Table of Contents
Advertisement
Quick Links
To learn more about EMAC's products and services and how they can help your project
http://ftp.emacinc.com/Tech_Info/About_EMAC_Products_and_Services.pdf
Authorized Distributor, Integrator, and Value-Added Reseller
Manual downloaded from
ftp.emacinc.com
For purchase information please contact
info@emacinc.com
For technical support please submit a ticket at
www.emacinc.com/support
Advertisement
Table of Contents

Related Manuals for Advantech RSB-4411


Summary of Contents for Advantech RSB-4411
- Page 1 To learn more about EMAC’s products and services and how they can help your project http://ftp.emacinc.com/Tech_Info/About_EMAC_Products_and_Services.pdf Authorized Distributor, Integrator, and Value-Added Reseller Manual downloaded from ftp.emacinc.com For purchase information please contact info@emacinc.com For technical support please submit a ticket at www.emacinc.com/support...
- Page 2 User Manual RSB-4411 3.5" SBC with NXP i.MX6 Processor ARM® Cortex™ A9 Architecture...
- Page 3 No part of this manual may be reproduced, copied, translated or transmitted in any form or by any means without the prior written permission of Advantech Co., Ltd. Information provided in this manual is intended to be accurate and reliable. How- ever, Advantech Co., Ltd.
- Page 4 This product has passed the CE test for environmental specifications when shielded cables are used for external wiring. We recommend the use of shielded cables. This kind of cable is available from Advantech. Please contact your local supplier for ordering information.
- Page 5 Technical Support and Assistance Visit the Advantech website at http://support.advantech.com where you can find the latest information about the product. Contact your distributor, sales representative, or Advantech's customer service center for technical support if you need additional assistance. Please have the following information ready before you call: –...
- Page 6 The sound pressure level at the operator's position according to IEC 704-1:1982 is no more than 70 dB (A). DISCLAIMER: This set of instructions is given according to IEC 704-1. Advantech disclaims all responsibility for the accuracy of any statements contained herein.
- Page 7 Don't touch any components on the CPU card or other cards while the PC is on. Disconnect power before making any configuration changes. The sudden rush of power as you connect a jumper or install a card may damage sensitive elec- tronic components. RSB-4411 User Manual...
-
Page 8: Table Of Contents
Board Dimensions............... 24 Figure 2.26Board Dimension Layout (Top Side) ......24 Figure 2.27Board Dimension Layout (Bottom Side) ....24 Figure 2.28Board Dimension Layout (Coastline)......25 Quick Start of RSB-4411................. 25 2.4.1 Debug Port Connection............... 25 2.4.2 Debug Port Setting..............25... - Page 9 3.4.12 Start building device tree blob ............ 55 3.4.13 To update kernel/modules/dtb to target device......55 System Recovery..................55 Debug Message..................55 Linux Software AP and Testing on RSB-4411 ........56 3.7.1 “Hello World!” Application and Execution ........56 3.7.2 Watchdog Timer Sample Code...........
- Page 10 Chapter Advantech Services ......65 RISC Design-in Services................. 66 Contact Information................. 69 Technical Support and Assistance............70 RSB-4411 User Manual...
- Page 11 RSB-4411 User Manual...
-
Page 12: Chapter 1 General Introduction
Chapter General Introduction... -
Page 13: Introduction
Introduction RSB-4411 is a RISC 3.5" single board computer (SBC) powered by a high-perfor- mance NXP ARM® Cortex®-A9 i.MX6 processor that supports full HD video encod- ing/decoding and Gigabit Ethernet networking. RSB-4411 also features mini PCIe, M.2, and SIM card slot for integrating Wi-Fi, Bluetooth, and 3G modules. Equipped with complete Linux and Android BSPs, this system enables customers to easily develop unique application software for specific OS. -
Page 14: Mechanical Specifications
Operating temperature: 0 ~ 60° C (32 ~ 140° F) Operating humidity: 40° C @ 95% RH Non-condensing Storage temperature: -40 ~ 85° C (-40 ~ 185° F) Storage humidity: 60° C @ 95% RH Non-condensing Block Diagram RSB-4411 User Manual... - Page 15 RSB-4411 User Manual...
-
Page 16: Chapter 2 H/W Installation
Chapter H/W Installation... -
Page 17: Jumpers
Generally, you simply need a standard cable to make most connections. 2.1.2 Jumper List Table 2.1: Jumper List LVDS_VDD_SLT LVDS Power LVDS_BKLT_SLT Backlight Power Boot device RS-232/422/485 selection RSB-4411 User Manual... -
Page 18: Jumper Settings
1 ON 2 OFF RS-485 Half Duplex 1 ON 2 ON RS-422 Full Duplex LVDS_VDD_SLT LVDS Power Part number 1653003101 Description PIN HEADER 3x1P 2.0mm 180D(M) DIP 2000-13 WS Setting Function (1-2) + V3.3 (2-3) + V5 RSB-4411 User Manual... -
Page 19: Connectors
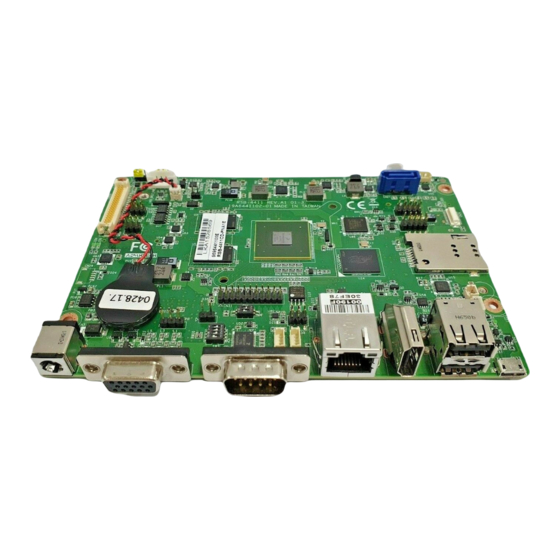
CN27 SATA CN25 SATA Power Debug Port CN12 USB port 3/4 CN29 USB port 5 CN23 MIC in CN14 Line Out CN21 RS-232 CN31 GPIO CN32 CN33 I2C_1 CN34 I2C_3 CN35 MiniPCIe SIM socket SD socket CN22 RSB-4411 User Manual... -
Page 20: Connector Settings
2.2.2 Connector Settings 2.2.2.1 RTC Battery connectors (CN1) RSB-4411 supports a lithium 3V/210mAH CR2032 battery with wire via battery con- nector. 2.2.2.2 DC power Jack (CN10) RSB-4411 comes with a DC-Jack header that carries 12V/19V/24V DC external power input. Description... - Page 21 Figure 2.3 COM Port 2.2.2.5 Ethernet Connector (CN8) RSB-4411 provides one RJ45 LAN interface connector; it is fully compliant with IEEE802.3u 10/100/1000 Base-T CSMA/CD standards. The Ethernet port provides standard RJ-45 jack connector with LED indicators on the front side to show Active/ Link status and Speed status.
- Page 22 2.2.2.6 HDMI (CN11) RSB-4411 provides one HDMI interface connector which provides all digital audio/ video interfaces to transmit the uncompressed audio/video signals and is HDCP and CEC compliant Connect the HDMI audio/video device to this port. HDMI technology can support a maximum resolution of 1920 x 1080p but the actual resolution sup- ported depends on the monitor being used.
- Page 23 2.2.2.7 USB Connector (CN11) RSB-4411 supports one standard USB2.0 Type A connector in the coastline. Description USB1_D- USB1_D+ USB2_D- USB2_D+ Figure 2.6 USB Type A Connector 2.2.2.8 USB OTG Connector (CN30) RSB-4411 supports one USB OTG port in the coastline.
- Page 24 LVDS0_TX0_P LVDS1_TX0_P LVDS0_TX1_N LVDS0_TX1_N LVDS0_TX1_P LVDS1_TX1_P LVDS0_TX2_N LVDS1_TX2_N LVDS0_TX2_P LVDS1_TX2_P LVDS0_CLK_N LVDS1_CLK_N LVDS0_CLK_P LVDS1_CLK_P I2C1_SCL_LVDS0 I2C1_SDA_LVDS0 LVDS0_TX3_N LVDS1_TX3_N LVDS0_TX3_P LVDS1_TX3_P +VDD_LVDS Figure 2.8 LVDS Connector RSB-4411 User Manual...
- Page 25 Please also refer to jumper setting in page before connecting LVDS panel. Description +VDD_BKLT_LVDS LCD_BKLT_EN LCD_BKLT_PWM Figure 2.9 LVDS Backlight Power Connector 2.2.2.11 SATA (CN27) RSB-4411 supports one SATA connector. Description SATA_TX+ SATA_TX- SATA_RX- SATA_RX+ Figure 2.10 SATA Connector RSB-4411 User Manual...
- Page 26 RSB-4411 supports one SATA P ower connector. Description +12V Figure 2.11 SATA Power Connector 2.2.2.13 Debug Port (CN5) RSB-4411 can communicate with a host server (Windows or Linux) by using serial cables. Description +3.3V Debug_TXD Debug_RXD Figure 2.12 Debug Port 2.2.2.14...
- Page 27 USB5_D- USB5_D+ Figure 2.14 USB Internal Pin Header 2.2.2.16 MIC in (CN23) RSB-4411 offers MIC in, microphone can be connected to the MIC in pin header. Description MIC IN Figure 2.15 MIC in Internal Pin Header 2.2.2.17 Line out (CN14) RSB-4411 offers Line-out stereo speakers;...
- Page 28 RSB-4411 provides 2x internal 2 wires RS-232 ports. Description COM 3_RXD COM 3_TXD COM 4_TXD COM 4_RXD Figure 2.17 UART Pin Header 2.2.2.19 GPIO (CN31) RSB-4411 provides internal GPIO interface by 2x11 pin headers. Description +3.3V GPIO_01 GPIO_02 GPIO_03 GPIO_04 GPIO_05 GPIO_06...
- Page 29 Figure 2.18 GPIO Internal Pin Header 2.2.2.20 GPIO (CN31) RSB-4411 provides 2 x CAN bus by 2x3 pin headers. Description CAN1_D+ CAN1_D- CAN2_D- CAN2_D+ Figure 2.19 CAN Pin Header 2.2.2.21 I2C (CN33/CN34) RSB-4411 provides 2 I2C pin headers. Pin (CN33)
- Page 30 SPI_MOSI Figure 2.21 SPI Pin Headers 2.2.2.23 MiniPCIe (CN3) RSB-4411 supports full size miniPCIe slot both USB and PCIe interface. If the WiFi card is only half-sized, please purchase extending bracket ( P/N: 1960047454N000) for WiFi card fixing. Description Description 3.3V...
- Page 31 Description Description UIM_PWR UIM_RESET UIM_CLK UIM_DATA Figure 2.23 SIM Socket 2.2.2.25 SD Socket (SD1) RSB-4411 supports SD/MMC card in Class2, 4, 6, 8, 10. Supported capacity is up to 32G(SDHC). Description Description DAT3 +3.3V DAT0 DAT1 DAT2 Figure 2.24 SD Slot...
- Page 32 2.2.2.26 M.2 (CN3) RSB-4411 supports M.2 2230 Key.E slot with SDIO,I2C and USB interface. Description Description +V3.3V USB5_D+ +V3.3V USB5_D- M.2_WLAN_LED# SD1_CLK SD1_CMD SD1_DATA0 SD1_DATA1 M.2_BT_LED# SD1_DATA2 SD1_DATA3 M2_SDIO_WAKE# SDIO_ RESET# Mechanical Key M.2_BT_X_OFF# M.2_WLAN_X_OFF# I2C1_SDA I2C1_SCL I2C1_ALERT# +3.3V +3.3V...
- Page 33 Figure 2.25 M.2 Connector RSB-4411 User Manual...
-
Page 34: Mechanical
Mechanical 2.3.1 Jumper and Connector Location RSB-4411 User Manual... -
Page 35: Board Dimensions
2.3.2 Board Dimensions 2.3.2.1 Board Drawing Figure 2.26 Board Dimension Layout (Top Side) Figure 2.27 Board Dimension Layout (Bottom Side) RSB-4411 User Manual... -
Page 36: Quick Start Of Rsb-4411
Figure 2.25. After the bootloader is programmed on SD card, insert power adapter connector to DC jack on RSB-4411 to power up the board. The bootloader prompt is dis- played on the terminal screen. Figure 2.29 Hyper Terminal Settings for Terminal Setup... - Page 37 RSB-4411 User Manual...
-
Page 38: Software Functionality
Chapter Software Functionality This chapter details the software programs on the RSB-4411 plat- form. -
Page 39: Test Tools
Test Tools All test tools must be verified on the RSB-4411 Evaluation kit. Please prepare the required test fixtures before verifying each specified I/O. If you have any problems with testing, please contact your Advantech contact window for help. 3.1.1... - Page 40 Multi Display - HDMI + LVDS1 + LVDS2 vi /usr/share/imx_6q_display_config original) [master] device = /dev/video17 ++++++++++++++++++++++++++++++++++ Modify: [hdmi] device = /dev/video17 fmt = RGBP width = 1920 height = 1080 [ldb] device = /dev/video19 fmt = RGBP width = 800 height = 480 alpha = 0 [ldb1] device = /dev/video20 fmt = RGBP width = 800 height = 480 alpha = 0 3. Multi display video: gst‐launch‐1.0 playbin uri=file:////unit_tests/akiyo.mp4 video‐ sink="overlaysink display‐ldb=true display‐ldb1=true" RSB-4411 User Manual...
-
Page 41: Audio Test
3.1.2 Audio Test audio codec module connected to I2S_CN1 # dmesg | grep sgtl # cat /proc/asound/cards # amixer get Mic # amixer set Mic 100 # arecord ‐t wav ‐c 1 ‐r 44100 ‐d 5 2.wav # aplay 2.wav RSB-4411 User Manual... -
Page 42: Camera Test
# gst‐launch‐1.0 imxv4l2src num‐buffers=1 ! jpegenc ! filesink location=test.jpeg Display # VSALPHA=1 gst‐launch‐1.0 filesrc location=test.jpeg ! jpegdec ! imagefreeze ! imxv4l2sink Record # gst‐launch‐1.0 imxv4l2src device=/dev/video0 num‐buffers=300 ! 'video/x‐raw,format=NV12,width=1920,height=1080,framerate=30/1' queue ! vpuenc_h264 ! matroskamux ! filesink location=output.avi Play Video # gst‐launch‐1.0 playbin uri=file:////home/root/output.avi 3.1.4 PCI-e Test Test it by a WiFi - PCI-e board (Advantech EWM-142) RSB-4411 User Manual... - Page 43 Check wlan0 existing or not # ifconfig wlan0 up # ifconfig # wpa_passphrase "ESSD Testing" adv27927818 > /tmp/wpa.conf #wpa_supplicant ‐BDwext ‐iwlan0 ‐c/tmp/wpa.conf # cat /tmp/wpa.conf # udhcpc ‐b ‐i wlan0 Check wlan0 working or not # ifconfig wlan0 # ping 8.8.8.8 RSB-4411 User Manual...
-
Page 44: Battery Test
3.1.5 Battery Test 3.1.5.1 AC power on, no battery connected # cat /sys/class/power_supply/battery/uevent 3.1.5.2 AC power on, battery connected # cat /sys/class/power_supply/battery/uevent 3.1.5.3 AC power off, battery connected # cat /sys/class/power_supply/battery/uevent 3.1.6 RS-232 Test #stty ‐F /dev/ttymxc1 115200 #stty ‐F /dev/ttymxc1 ‐echo #cat /dev/ttymxc1 & #echo test > /dev/ttymxc1 test RSB-4411 User Manual... -
Page 45: I2C Test
3.1.7 I2C Test # i2cdetect ‐l Test it by an audio codec module (ROM-ED51) # dmesg | grep sgtl # i2cdetect ‐y 4 # i2cset ‐f ‐y 4 0x0a 0 0xff00 w # i2cget ‐f ‐y 4 0x0a 0 w no module connected # dmesg | grep sgtl RSB-4411 User Manual... -
Page 46: Usb Test
# i2cdetect ‐y 4 3.1.8 USB Test Insert a USB disk usb 1‐1.2: new high‐speed USB device number 4 using ci_hdrc usb‐storage 1‐1.2:1.0: USB Mass Storage device detected scsi2 : usb‐storage 1‐1.2:1.0 scsi 2:0:0:0: Direct‐Access Generic‐ SD/MMC 1.00 PQ: 0 ANSI: 0 CCS sd 2:0:0:0: [sda] 3862528 512‐byte logical blocks: (1.97 GB/1.84 GiB) sd 2:0:0:0: [sda] Write Protect is off sd 2:0:0:0: [sda] No Caching mode page found sd 2:0:0:0: [sda] Assuming drive cache: write through sd 2:0:0:0: [sda] No Caching mode page found sd 2:0:0:0: [sda] Assuming drive cache: write through sda: sda1 sd 2:0:0:0: [sda] No Caching mode page found sd 2:0:0:0: [sda] Assuming drive cache: write through RSB-4411 User Manual... - Page 47 According to the above content, we can know sda is our usb disk Generate random file # dd if=/dev/urandom of=data bs=1 count=1024 Back up # dd if=/dev/sda of=backup bs=1 count=1024 skip=4096 Write to usb disk # dd if=data of=/dev/sda bs=1 seek=4096 Read and Verify # dd if=/dev/sda of=data1 bs=1 count=1024 skip=4096 # diff data data1 RSB-4411 User Manual...
-
Page 48: Rtc Test
# dd if=backup of=/dev/sda bs=1 seek=4096 3.1.9 RTC Test set system time to current, then write to RTC # date 021710452016 && hwclock ‐w && date set one incorrect time, then read time from RTC to verify # date 010100002000 && hwclock ‐r && date restore the RTC time to system time # hwclock ‐s && date RSB-4411 User Manual... -
Page 49: Mmc (Emmc/Sd) Test
3.1.10 MMC (eMMC/SD) Test booting from MB EMMC Message from U-Boot # cat /proc/cmdline Boot from eMMC and insert a bootable SD card. The mmcblk1p1 & mmcblk1p2 should be mounting automatically. RSB-4411 User Manual... - Page 50 Boot from SD card and mmcblk0p1 & mmcblk0p2 should be mounting automatically. Generate random file # dd if=/dev/urandom of=data bs=1 count=1024 Back up # dd if=/dev/mtdblock1 of=backup bs=1 count=1024 skip=$((0xD3000)) Write to mtdblock1 # dd if=data of=/dev/mtdblock1 bs=1 seek=$((0xD3000)) Read and Verify # dd if=/dev/mtdblock1 of=data1 bs=1 count=1024 skip=$((0xD3000)) # diff data data1 If fail, it shows as below: Binary files data1 and data differ Restore # dd if=backup of=/dev/mtdblock1 bs=1 seek=$((0xD3000)) RSB-4411 User Manual...
-
Page 51: Sata Test
Back up # dd if=/dev/sda of=backup bs=1 count=1024 skip=4096 Write to SATA disk # dd if=data of=/dev/sda bs=1 seek=4096 Read and Verify # dd if=/dev/sda of=data1 bs=1 count=1024 skip=4096 # diff data data1 If fail, it shows as below: Binary files data1 and data differ Restore # dd if=backup of=/dev/sda bs=1 seek=4096 booting from CB SATA Message from U-Boot # cat /proc/cmdline RSB-4411 User Manual... -
Page 52: Ethernet Test
3.1.12 Ethernet Test #ifconfig #ping 8.8.8.8 3.1.13 CAN Test Connect device with CAN0 (CN8A) # ip link set can0 up type can bitrate 125000 RSB-4411 User Manual... -
Page 53: Gpio Test
GPIO7 number = 56 [32*(2-1) + 24] GPIO8 number = 130 [32*(5-1) + 2] 3.1.14.3 GPIO Test method: 1) cd /sys/class/gpio 2) Before setting: root@imx6qprom7421:/sys/class/gpio# ls export gpiochip128 gpiochip192 gpiochip32 gpiochip96 gpiochip0 gpiochip160 gpiochip247 gpiochip64 unexport 3) export 8 gpio pins export GPIO1, command: echo 171 > ./export export GPIO2, command: echo 174 > ./export export GPIO3, command: echo 175 > ./export export GPIO4, command: echo 176 > ./export export GPIO5, command: echo 57 > ./export export GPIO6, command: RSB-4411 User Manual... - Page 54 6) Set gpio1 ~ gpio8 direction: a1) For example, Set gpio1 direction input(in) , command: echo in > gpio1/direction a2) get direction, command: cat gpio1/direction Console log: b1) For example, Set gpio1 direction output(out), command: echo out > gpio1/direction b2) get direction, command: cat gpio1/direction Console log: RSB-4411 User Manual...
-
Page 55: Watchdog Test
cat gpio1/value Console log: b1) For example, See gpio1 value 1(high active), command: echo 1 > gpio1/value b2) get value, command: cat gpio1/value Console log: <<<<<<<<<<<<<<<<<<<<<<<<<<<<<<<<<<<<<<<<<<<< Connect jumpers to DIO1 connector by follows jumper setting 3.1.15 Watchdog Test cd unit_tests ./wdt_driver_test.out 10 5 0 RSB-4411 User Manual... -
Page 56: Package Content
System will reboot after 10 seconds. Package Content We would offer you two different kinds of Linux package for RSB-4411. One is pre- built system image for system recovery another is source code package (BSP). 3.2.1 Source Code Package RSB-4411 source code package (BSP) contains cross compiler, Linux source code, Uboot source code, root file system and some scripts used in OS development. - Page 57 → Storage for all variable files and temporary files created by users, such as log files, the mail queue, the print spooler area, space for temporary storage of files downloaded from the Internet. – tools → just for sample test. RSB-4411 User Manual...
- Page 58 3.2.1.5 scripts Some scripts provided by Advantech will help you configure your system or build images more quickly: – setenv.sh → A script to setup the developing environment quickly. – cfg_uboot.sh → A script to configure the u-boot building setup quickly.
-
Page 59: Setting Up A Build Environment
$ sudo ln ‐s /usr/lib/i386‐linux‐gnu/mesa/libGL.so.1 /usr/lib/i386‐ linux‐gnu/libGL.so $ tar zcvf ~/usr_lib_i386‐linux‐gnu_for_Building_Android_KK.tar.gz \ /usr/lib/i386‐linux‐gnu/{libuuid.a,libuuid.so,liblzo2.so,liblzo2.a} $ sudo apt‐get install uuid‐dev liblzo2‐dev $ sudo tar zxvf ~/usr_lib_i386‐linux‐ gnu_for_Building_Android_KK.tar.gz ‐C / Please follow below instruction install JDK: Download "jdk-6u45-linux-x64.bin" manually from Oracle Official Website and put it to directory ~/FILES/ and perform following commands: $ cd /usr/lib $ sudo ~/FILES/jdk‐6u45‐linux‐x64.bin RSB-4411 User Manual... -
Page 60: Conventions
${PREBUILT_IMAGE} : compressed prebuilt image (*.img.gz) ${BSP_TARBALL} : BSP tarball (*.tgz) ${BSP_HOME} : home directory of the BSP ${BDIR} : build directory (e.g. build_x11) ${MX6PROC} : i.MX6 Processor: mx6q for iMX6 Quad Core / Dual Core; mx6dl for iMX6 Dual Lite / Solo ${IMX6PROC} : i.MX6 Processor: imx6q / imx6dl ${BOARD} : available target boards: rom5420 / ubc220 / rom7421/ rom3420 / rom7420 / rsb4410 / rsb4411 / rsb6410 / ubcds31 / wise3310 ${BOARD_REV} : board revision a1 / a2 / b1 ${MC} : machine code combined with ${IMX6PROC}${BOARD}${BOARD_REV} for example, imx6dlrom5420b1 for ROM‐5420‐Solo B1 imx6dlubc220a1 for UBC‐220‐Dual‐Light A1 imx6qprom7421a1 for ROM‐7421‐Dual/Quad‐Plus A1 imx6qrom3420a1 for ROM‐3420‐Dual/Quad A1 imx6qrom5420a1 for ROM‐5420‐Dual/Quad A1 RSB-4411 User Manual... -
Page 61: Introducing Bsp
3.3.2 Introducing BSP The BSP is based on Yocto Project with Freescale enhanced features for i.MX6, plus specific target board features from Advantech Inc.. 3.3.2.1 Naming Rule The tarball/prebuilt image name is consist of the model name followed by "LB" or "LI"... -
Page 62: Build Instructions
To build Linux kernel To create/continue a build environment, perform following commands in terminal con- sole and do menuconfig: $ bitbake linux‐imx ‐c menuconfig to start build $ bitbake linux‐imx ‐c compile ‐f $ bitbake linux‐imx ‐c compile_kernelmodules ‐f $ bitbake linux‐imx ‐c deploy The two files, zImage & zImage-${IMX6PROC}-${BOARD}-${BOARD_REV}.dtb, will be located in directory, ./tmp/deploy/images/${MC}. RSB-4411 User Manual... -
Page 63: Creating Boot-Up On-Board Flash From Pre-Built Image
First you need to boot up from SD card, then insert USB stick that contains ${SDCARD_IMAGE}, USB stick will be auto mounted to /run/media/sda1. Perform following commands in debug console: # umount /dev/mmcblk0p? # cd /run/media/sda1 # dd if=${SDCARD_IMAGE} of=/dev/mmcblk0 bs=4M conv=fsync # P2START=$(fdisk ‐lu | grep mmcblk0p2 | awk '{print $2}') # echo ‐e "d\n2\nn\np\n2\n${P2START}\n\nw\n" | fdisk ‐u /dev/mmcblk0 # umount /dev/mmcblk0p2 # e2fsck ‐f ‐y /dev/mmcblk0p2 # resize2fs /dev/mmcblk0p2 # poweroff RSB-4411 User Manual... -
Page 64: Customization
3.4.4 Building & updating u-boot manually To build u-boot, the cross compiling environment must have been set up. (ref. 3.4.3 Setting up cross compiling environment) Make one copy from Yocto working directory: $ mkdir ‐p ~/code $ pushd ${BSP_HOME}/${BDIR}/tmp/work/${MC}‐poky‐linux‐gnueabi/ $ rm ‐rf ~/code/u‐boot‐imx $ cp ‐a ./u‐boot‐imx/${UBOOT}‐r0/git ~/code/u‐boot‐imx $ popd RSB-4411 User Manual... -
Page 65: Configure U-Boot
$ cd ~/code/linux‐imx $ make distclean $ make imx_v7_adv_defconfig $ make menuconfig PKG_CONFIG_SYSROOT_DIR= PKG_CONFIG_PATH= 3.4.10 Start building linux kernel $ make ‐j4 zImage LOADADDR=0x10008000 LDFLAGS= The kernel image file, zImage, is located in the directory "./arch/arm/boot/". 3.4.11 Start building kernel modules $ make ‐j4 modules LDFLAGS= Copy all modules to a temporary rootfs directory, "~/temp/rootfs" $ make modules_install INSTALL_MOD_PATH=~/temp/rootfs RSB-4411 User Manual... -
Page 66: Start Building Device Tree Blob
Debug Message RSB-4411 can connect to a host PC (Linux or Windows) by using a console cable and debug port adapter. In order to communicate with a host PC, a serial communi- cation program such as HyperTerminal, Tera Term or PuTTY is required. Below are the detailed instructions for how to set up a serial console, a “HyperTerminal”... -
Page 67: Linux Software Ap And Testing On Rsb-4411
Insert the Linux system SD card to your developing computer. #cp helloworld /media/rootfs/tool (/media/rootfs is the mounted point of your Linux system SD card) Remove this SD card and insert it to RSB-4411, then open serial console. On RSB-4411 platform, type #root (Login) On RSB-4411 platform, type #cd /tool On RSB-4411 platform, type #./helloworld ... -
Page 68: Watchdog Timer Sample Code
test = atoi(argv[3]); printf("Starting wdt_driver (timeout: %d, sleep: %d, test: %s)\n", timeout, sleep_sec, (test == 0) ? "ioctl" : "write"); fd = open("/dev/watchdog", O_WRONLY); if (fd == ‐1) { perror("watchdog"); exit(1); printf("Trying to set timeout value=%d seconds\n", timeout); ioctl(fd, WDIOC_SETTIMEOUT, &timeout); printf("The actual timeout was set to %d seconds\n", timeout); ioctl(fd, WDIOC_GETTIMEOUT, &timeout); printf("Now reading back ‐‐ The timeout is %d seconds\n", timeout); while (1) { printf("WDT Time out counter:%d\n",count); if ((test !=0) && (test ==count)) { printf("Ping Watchdog (reset wdt)\n"); ioctl(fd, WDIOC_KEEPALIVE, 0); test=0; RSB-4411 User Manual... -
Page 69: Gpio Setting
GPIO variable. /* Enable GPIO */ gpio_request(SABRESD_GPIO0, "gpio‐0"); gpio_request(SABRESD_GPIO1, "gpio‐1"); gpio_request(SABRESD_GPIO2, "gpio‐2"); gpio_request(SABRESD_GPIO3, "gpio‐3"); gpio_request(SABRESD_GPIO4, "gpio‐4"); gpio_request(SABRESD_GPIO5, "gpio‐5"); gpio_request(SABRESD_GPIO6, "gpio‐6"); gpio_request(SABRESD_GPIO7, "gpio‐7"); 3.7.4 RS232 Initial Code The RS232 initial code as below. It shows you how to initial COM ports. int open_port(void) { int fd; fd=open("/dev/ttymxc1",O_RDWR|O_NOCTTY|O_NDELAY); if(fd == ‐1){ perror("open error"); } return(fd); } RSB-4411 User Manual... -
Page 70: Display Output Setting
806 horizontal lines. The DCLK frequency is 60 MHz. Therefore, we can get 10 (1344*806*60) = 15385. The margin values can be seen as front porch & back porch. The sync_len means pulse width. The sync value indicates the sync polarity (low or high). struct fb_videomode { const char *name; (optional) u32 refresh; (optional) u32 xres; u32 yres; u32 pixclock; RSB-4411 User Manual... - Page 71 u32 lower_margin; u32 hsync_len; u32 vsync_len; u32 sync; u32 vmode; u32 flag; }; 3.7.5.2 Single Display Settings # cat /sys/class//graphics/fb0/fsl_disp_dev_property hdmi # cat /sys/class//graphics/fb1/fsl_disp_dev_property overlay # cat /sys/class//graphics/fb2/fsl_disp_dev_property # cat /sys/class//graphics/fb3/fsl_disp_dev_property overlay # cat /sys/class//graphics/fb4/fsl_disp_dev_property 2. Modify file: vi /usr/share/imx_6q_display_config original) [master] device = /dev/video17 ++++++++++++++++++++++++++++++++++ Modify: [hdmi] device = /dev/video17 fmt = RGBP width = 1920 height = 1080 [ldb] device = /dev/video19 fmt = RGBP width = 800 height = 480 alpha = 0 RSB-4411 User Manual...
-
Page 72: Network Setup
3.7.5.3 Multi display video gst-launch-1.0 playbin uri=file:////tools/Advantech.avi video-sink="overlaysink dis- play-ldb=true display-ldb1=true" 3.7.6 Network Setup Default: IP get form DHCP. Manual: Set IP by below command: #ifconfig eth0 192.168.0.1 up ifconfig is to configure network interfaces, the manual page is as below. -
Page 73: Storage (Sata /Emmc/Sd Card)
If the address argument is given, set the protocol broadcast address for this interface. Otherwise, set (or clear) the IFF_BROADCAST flag for the interface. del addr/prefixlen Remove an IPv6 address from an interface. 3.7.7 Storage (SATA /eMMC/SD Card) The storages devices are named as follows: Device Name SATA /dev/sda eMMC /dev/mmcblk0 SD card /dev/mmcblk1 Onboard SD card /dev/mmcblk1 Carrier board SD card /dev/mmcblk2 RSB-4411 User Manual... -
Page 74: System Recovery
Chapter System Recovery This chapter introduces how to recover Linux operating system if it is damaged accidentally. -
Page 75: System Recovery
On RSB-4411 platform, type #root (Login) On RSB-4411 platform, type #cd /mk_inand On RSB-4411 platform, type #./mkinand‐linux.sh /dev/mmcblk0 On RSB-4411 platform, type “y “ (Start to copy files, wait until it shows [Done]) Power off and remove this SD card. RSB-4411 User Manual... -
Page 76: Chapter 5 Advantech Services
Chapter Advantech Services This chapter introduces Advantech design in serviceability, technical support and warranty policy for RSB-4411 evaluation kit. -
Page 77: Risc Design-In Services
Easy Development Advantech has support firmware, root file-system, BSP or other develop tools for cus- tomers. It helps customers to easy develop their carrier board and differentiate their embedded products and applications. - Page 78 Advantech has been involved in the industrial computer industry for many years and found that customers usually have the following questions when implementing modu- lar designs.
- Page 79 RISC COM. Design stage When a product moves into the design stage, Advantech will supply a design guide of the carrier board for reference. The carrier board design guide provides pin defini- tions of the COM connector with limitations and recommendations for carrier board design, so customers can have a clear guideline to follow during their carrier board development.
-
Page 80: Contact Information
RISC platforms usually have less support for ready-made drivers on the carrier board, therefore the customer has to learn from trial and error and finally get the best solution with the least effort. Advantech’s team has years of experience in customer support and HW/SW development knowledge. Consequently, we can support customers with professional advice and information as well as shortening development time and enabling more effective product integration. -
Page 81: Technical Support And Assistance
Technical Support and Assistance For more information about this and other Advantech products, please visit our web- site at: http://www.advantech.com/ http://www.advantech.com/ePlatform/ For technical support and service, please visit our support website at: <http://support.advantech.com.tw/support/> Visit the Advantech web site at www.advantech.com/support where you can find the latest information about the product. - Page 82 RSB-4411 User Manual...
- Page 83 No part of this publication may be reproduced in any form or by any means, electronic, photocopying, recording or otherwise, without prior written permis- sion of the publisher. All brand and product names are trademarks or registered trademarks of their respective companies. © Advantech Co., Ltd. 2017...
Need help?
Do you have a question about the RSB-4411 and is the answer not in the manual?
Questions and answers