Table of Contents
Advertisement
Quick Links
Advertisement
Table of Contents

Related Manuals for Snom M58


Summary of Contents for Snom M58
- Page 1 SIP DECT Deskset User Manual...
-
Page 2: Table Of Contents
User Manual SIP DECT Deskset Table of Contents Using the Deskset�������������������������������� 26 Idle screen ������������������������������������������� 26 Copyright, Trademarks, Legal Multiple pages of PFKs ������������������������� 26 Disclaimers ������������������������������������������ 4 Main Menu ������������������������������������������� 27 Important Safety Information ��������������� 5 Making calls ����������������������������������������� 28 Important Safety Instructions ����������������... - Page 3 WebUI �������������������������������������������������� 59 Locking the keypad ������������������������������ 49 Connecting a Bluetooth Headset ��������� 50 Using the WebUI ����������������������������������� 59 Opening the Bluetooth menu ���������������� 50 System Status �������������������������������������� 61 Adding a Bluetooth headset to the Device Cordless Registrations ������������������������� 62 list ��������������������������������������������������������...
-
Page 4: Disclaimers
Snom therefore disclaims all warranties and liability for the accurateness, completeness, and currentness of the information published, except in the case of intention or gross negligence on the part of Snom or where liability arises due to binding legal provisions�... -
Page 5: Important Safety Information
Important Safety Information This symbol is to alert you to important operating or servicing instructions that may appear on the product or in this user’s manual� Always follow basic safety precautions when using this product to reduce the risk of injury, fire, or electric shock�... - Page 6 A� When the power supply cord or plug is damaged or frayed� B� If liquid has been spilled onto the product� C� If the product has been exposed to rain or water� D� If the product does not operate normally by following the operating instructions�...
-
Page 7: For Cul Compliance Only
For cUL compliance only Mesures de sécurité importantes Ce symbole vous alertera d’informations importantes ou d’instructions d’entretien pouvant apparaître dans ce guide d’utilisation� Respectez toujours les mesures de sécurité et de sécurité de base lorsque vous utilisez ce produit, afin de réduire les risques de blessures, d’incendie, ou d’électrocution�... - Page 8 14� Débranchez cet appareil de la prise de courant et communiquez avec le département de service à la clientèle de Snom dans les cas suivants: A� Lorsque le cordon d’alimentation est endommagé ou écorché�...
- Page 9 CONSERVEZ CES INSTRUCTIONS Alimentation électrique Adaptateur électrique : VT05EUS05100 Entrée : 100~240V AC 50/60Hz 0�15A Sortie : 5�0 V DC @ 1A...
-
Page 10: Compliance
Compliance FCC part 15 This device complies with Part 15 of the FCC rules� Operation is subject to the following two conditions: (1) This device may not cause harmful interference, and (2) this device must accept any interference received, including interference that may cause undesired operation�... -
Page 11: Industry Canada
Should you experience trouble with this equipment, please contact Snom Technology GmbH 1 (339) 227-6160 (select option 2) for repair or warranty information� If the equipment is causing harm to the telephone network, the telephone company may request that you disconnect the equipment until the problem is resolved�... -
Page 12: Introduction
M58 SIP DECT Deskset� See “Viewing deskset status” on page 53 for instructions on how to check the software version of your M58 SIP DECT Deskset and/or M500 Multi-cell SIP DECT Base Station� Please read Important Safety Information on page 5 of this user manual�... -
Page 13: Product Overview
Product overview The M58 SIP DECT Deskset, combined with the M500 Multi-cell SIP DECT Base Station, is a full-featured SIP endpoint business phone system designed to work with popular hosted IP PBX services and on-premise SIP PBXs� Once you have ordered and configured your PBX service, the deskset enables you to make and receive calls as you would with any other business phone�... -
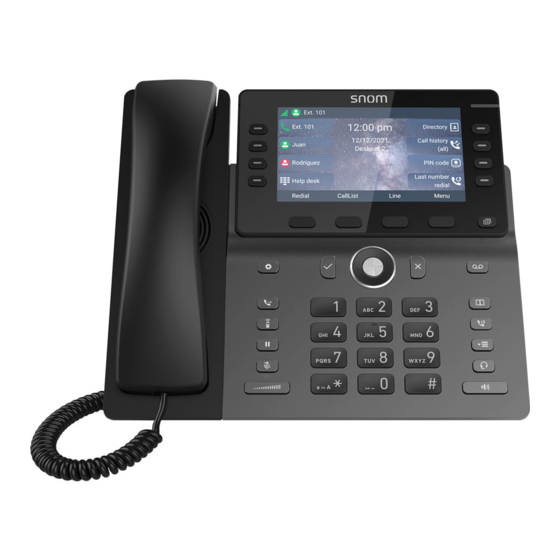
Page 14: Quick Reference Guide
Quick Reference Guide Programmable Feature 11 Color screen Keys (PFKs) 12 Alphanumeric keypad Soft keys 13 Message waiting ¡ MENU/Confirm key and indicator navigation keys 14 Next page key Settings key 15 Cancel key OK key 16 Message key Transfer key 17 Directory key Intercom key 18 Redial key... -
Page 15: Factory Default Line Key Settings
Factory Default Line Key Settings Your desksets have a factory default configuration where the first four PFKs are set up to handle calls on a shared line� All deskset users can use the shared line via the PFKs� The LEDs on the PFKs will be on or flashing to indicate calls in progress across all handsets/desksets�... -
Page 16: Deskset Installation
Deskset Installation This section assumes that your network infrastructure is established and that your IP PBX phone service has been ordered and configured for your location� Deskset installation involves both the deskset and the supplied power adapter� The deskset can be placed on a flat surface or mounted on a wall� Avoid placing the deskset too close to: •... -
Page 17: Attaching The Footstand
Attaching the footstand... -
Page 18: Connecting The Phone
Connecting the phone (1, 2) IMPORTANT INFORMATION 1� Use only the power adapter supplied with this product� To order a replacement www.snomamericas.com power adapter, visit our website at � 2� The power adapter is intended to be correctly oriented in a vertical or floor mount position�... -
Page 19: Deskset Registration
Deskset Registration The deskset must be registered to the base station in order to make and receive calls� When you power up the deskset for the first time, it will attempt to auto-register to the base station� Auto-registration will be successful only if you have set up the M500 configuration file with the deskset IPEI, or you have entered the IPEI on the Primary base station’s WebUI�... -
Page 20: On The Web Ui
Registering by entering the deskset’s IPEI on the Web UI To register the handset by entering the IPEI on the WebUI, you need to have at least one deskset registered in order to get the IP address of the base station; otherwise, you need to look up the IP address from your router that is connected to the M500�... -
Page 21: Base Station
Manually registering via the LINK key on base station 1� Make sure the base station is connected to power and the network� NOTE: If your phone system is a multi-cell environment, you can only register the deskset to the Primary base station (as indicated by a steady green or slowly flashing red SIP LED)�... -
Page 22: Manually Registering Via The Web Ui
Manually registering via the Web UI 1� Make sure the base station is connected to power and the network� 2� If the deskset is displaying the following screen: a� Press Cancel� The deskset displays “Registration failed”� b� Press OK� The deskset displays “Device not registered to base station�”... -
Page 23: Deregistering The Deskset
Deregistering the deskset Before using the deskset with a different base station, you must deregister the deskset from the base station to which it is currently registered� To deregister the deskset: Press the MENU/Confirm key� 1� (Settings), then press OK� 2�... -
Page 24: Screen Icons
Screen icons The following screen icons indicate your phone’s current status: Icon Status Indicates signal strength, from one bar (weak) to four bars (strong)� Flashes when out of range� The microphone is muted� The keypad is locked� The ringer is muted� Silent mode is enabled�... - Page 25 Icon Status Call History log entry - Missed call� Default outgoing line status - Registered� Default outgoing line status - Unregistered� Default outgoing line status - Disabled� Do Not Disturb is on� Index number assigned to shared calls� Applicable to shared calls only� This icon is displayed on the Call List and call screens�...
-
Page 26: Using The Deskset
Using the Deskset This section describes how to use the deskset to make calls and answer calls� This section also describes how to put calls on hold, transfer calls, and create conference calls� Idle screen The Idle screen appears after the phone is connected and configured for your SIP PBX service�... -
Page 27: Main Menu
Main Menu When your deskset is idle, press Menu or the Menu/Confirm key to display the Main Menu� to highlight a menu item, and press OK� Press the navigation keys Directory - see “Using the Directory” on page 46 Call history - see �”Using the Call History” on page 48 Message - see “Listening to messages”... -
Page 28: Making Calls
Making calls You can make calls to any phone number (an outside call), or you can call another deskset (an internal call)� To make an outside call: 1� Use the keypad to enter the desired number� Press DELETE if you enter an incorrect digit� •... - Page 29 To make an internal (intercom) call to another handset or deskset: 1� Press -OR- Press the MENU/Confirm key, press to select (Intercom Call), then press OK� 2� Press to select the handset or deskset you wish to call� Press Dial or pick up the handset from its cradle. 3�...
-
Page 30: Answering Calls
Answering calls When there is an incoming call, the deskset rings and displays the Incoming call screen� To answer a call: • Lift the handset from its cradle -OR- Press Answer or or the green flashing PFK (assigned as a shared line key): Press Answer, flashing... -
Page 31: Multiple Incoming Calls
Multiple Incoming Calls If you have multiple incoming calls (as indicated by • Press the green flashing PFK (assigned as a shared line key) for the call you want to answer -OR- Press to select the call you want to answer�... -
Page 32: Corded Headset
Corded Headset To turn the corded headset on/off during a call: • When the handset is lifted from its cradle, press to switch between the corded headset and handset� When the corded headset is active, the deskset displays the headset icon the top of the screen, and the key is illuminated�... -
Page 33: Putting A Call On Hold
You can put a shared call on “private hold” to prevent any non-system phones (not M55 n wook | 11.Oct.2022 | Revision 7.1 Hwang Jin or M58) from resuming the held call shared across many SIP devices� To put a shared call on private hold: Press and hold the Hold soft key�... -
Page 34: Switching Between Two Calls
Switching between two calls If you are managing two calls, you can switch between them by one of the following ways: • Press the red flashing PFK (assigned as a shared line key) of the call you want to pick up� Press flashing PFK 1... -
Page 35: Paging Another Handset/Desket
Paging another handset/desket You can page another handset/deskset, and send one-way audio� The receiving handset/deskset will play an alert tone, and your voice� The receiving handsets/ desksets will play the audio as defined in their Auto ans audio settings (see “Setting Auto ans audio”... -
Page 36: About Shared Calls
About Shared Calls A shared line is a line (SIP account) that is configured with account type “Key Line Emulation”� A shared line is assigned to more than one handset/deskset within the M500 system� A shared call is an incoming call on a shared line that can be seen and answered by any handset/deskset assigned with the shared line�... - Page 37 Example - picking up a held shared call: Alice’s deskset Bob’s deskset 1� Alice is on a call� 2� Alice presses Hold to put the call on hold� 3� Alice shouts across the room, “Bob, can you pick up call 2?” 4�...
-
Page 38: Displaying Calls On The Call List
Example - barging in a shared call: Alice’s deskset Bob’s deskset 1� Alice is on a call� 2� Alice shouts across the room, “Bob, can you join me on call 3?” 3� Bob presses Call List to display the Call List, and presses highlight call �... -
Page 39: Barging In
To view the Call List: 1� If your deskset is idle, press Call List� -OR- If your deskset is on an active call, press the MENU/Confirm key, then press to scroll down to Call List and press Select� 2� If there are multiple calls in the Call List, press to select a call�... -
Page 40: Call Privacy
Call Privacy During an active shared call, you can turn on Call privacy in order to prevent other handsets/desksets from barging in� If Call privacy is on and your put your call on hold, then your deskset resets Barge-in to “Allowed”�... -
Page 41: Using Shared Call Emulation
Using Shared Call Emulation Your phone is configured with Shared Call Emulation, where up to eight Programmable Feature Keys (PFKs) enable direct interaction with shared calls� The PFKs act like shortcuts to the calls in the Call List� Shared Call Emulation can be useful for small businesses where incoming calls are answered by a group of people�... - Page 42 Example - picking up a held shared call: Alice’s deskset Bob’s deskset 1� Alice is on a call� 2� Alice presses Hold to put the call on hold� 3� Alice shouts across the room, “Bob, can you pick up call 2?” 4�...
-
Page 43: Transferring A Call
Transferring a call You can transfer an external call to another party� While you are making the transfer, your call is automatically put on hold� There are three types of transfers: • Blind transfer (default) - Transfer the call immediately without talking to the transfer destination�... -
Page 44: Setting Up A Conference Call
Setting up a conference call You can hold a conference call between yourself and two other parties� To set up a conference call with an outside number: During a call, press Conference 1� -OR- Press the MENU/Confirm key, then press to scroll to Conference and press Select�... -
Page 45: Listening To Messages
Listening to messages When you have new messages, the message LED flashes on your deskset and the idle screen displays a new messages notification: To listen to your messages: 1� Press -OR- Press the MENU/Confirm key, then press to select (Message) and press OK�... -
Page 46: Using The Directory
Using the Directory The deskset has two lists of contacts� The Local directory is only available on your deskset� The Shared directory is usually maintained by your system administrator, and is available on all desksets� To view a directory: 1� Press when the phone is displaying the idle screen -OR-... - Page 47 NOTE: If the directory is sorted by first name, you will search by first name� If the directory is sorted by last name, you will search by last name� Enter a few letters of the name, and then press Search� 2�...
-
Page 48: Using The Call History
Using the Call History The Call History contains lists of your missed calls, received calls, and dialed calls� You can dial the number of a call saved in the list, or save the number to the Local directory� To view the Call History: 1�... -
Page 49: Locking The Keypad
To save a number to the Local directory: 1� When displaying the list of Missed calls, Received calls or Dialed calls, press to select a call� 2� Press the MENU/Confirm key, press to select Save, and then press Select� 3� OPTIONAL: To edit the details in the contact you are saving: •... -
Page 50: Connecting A Bluetooth Headset
Connecting a Bluetooth Headset You can connect a Bluetooth headset to your deskset� You can only connect one Bluetooth headset at at time� Opening the Bluetooth menu The Bluetooth menu enables you to select Bluetooth headset and connect it to your deskset�... -
Page 51: Using The Device List
If adding the device is successful: The handset displays “<device name> is added and connected to this phone”� Press to return to the idle screen� On the idle screen, the Bluetooth icon indicates the Bluetooth headset is connected� If adding the device fails: The deskset displays “<device name>... - Page 52 To disconnect a Bluetooth headset: • On the Device list, press Discon’t� The deskset displays “Disconnecting <device name> ���” The deskset displays “<device name> is disconnected”� To rename a connected Bluetooth headset: On the Device list, press Rename� 1� 2� Use the keypad to enter the new device name�...
-
Page 53: Configuring The Deskset
Configuring the Deskset You can configure the deskset using one of two methods: The Call Features and User settings menus on the deskset� 1� 2� The WebUI, which you access using your Internet browser� This section describes settings you can change using your deskset� For information about settings you can change on the WebUI, see “WebUI”... -
Page 54: Setting The Language
To view the IP address of your base station: 1� On the Status menu, with Network highlighted, press Enter� 2� Press to select IPv4 or IPv6, and press Enter� 3� Press to scroll down to view the IP address� To view the firmware version of your deskset / base station: On the Status menu, press to scroll to Product Info and press Enter�... -
Page 55: Setting The Display Options
Setting the display options You can configure the display options on the deskset screen – backlight, screensaver, power save timeout, wallpaper and display theme� To change the display options: 1� Press -OR- Press the MENU/Confirm key� Press (Settings), then press OK� to select to scroll to User settings, and press Enter�... -
Page 56: Setting The Ringer Tone And Volume
Setting the ringer tone and volume To set the ringer tone and volume: 1� Press -OR- Press the MENU/Confirm key� Press (Settings), then press OK� to select to scroll to User settings, and press Enter� Press to scroll to Audio, and press Enter� 2�... -
Page 57: Setting Auto Ans Audio
Setting Auto ans audio When your deskset auto answers a page, the audio will be played from the source defined by the Auto ans audio setting� To set auto answer audio: 1� Press -OR- Press the MENU/Confirm key� Press (Settings), then press OK� to select Press to scroll to User settings, and press Enter�... -
Page 58: Setting Speed Dial Entries
Setting Speed Dial entries The speed dial feature enables you to program up to ten numbers that you dial frequently� To dial a speed dial number, press and hold the keypad number key that matches the speed dial number� To program a Speed Dial number: 1�... -
Page 59: Webui
WebUI Using the WebUI Use an Internet web browser to access the Web User Interface (WebUI) that resides on your base station� After you log on to the WebUI, you can configure the following features: • Base Preferences • User Preferences •... - Page 60 Under User Name, enter user� 5� 6� Under Password, enter user, or your own password, if you have created one� You can create or change a password after you log on� 7� Click Log In / OK� The WebUI appears� Click topics from the navigation bar on the left side of the page, and then click the desired setting on the left side of the WebUI to see the page for that setting�...
-
Page 61: System Status
System Status The System Status page shows: • General information about your phone, including model, MAC address, and firmware version� • Account Status information about your SIP account registration� • IPv4 and IPv6 network information regarding your phone’s network address and network connection�... -
Page 62: Cordless Registrations
Cordless Registrations The Cordless Registrations page enables you to regisgter and deregister handsets/ desksets� It also displays a list of registration status, IPEI and firmware� Cordless Status The Cordless Status page shows the deskset name, IPEI and firmware for your desksets�... -
Page 63: Base Status
Base Status The Base Status page shows information about each M500 base in your system� Base Preferences The Base Preferences page enables configuration of the base mode� Do not make any changes on this page without first consulting with your system administrator� User Preferences On the User Preferences page, you can set the language that appears on the WebUI�... -
Page 64: Base Directory
Base Directory To view the base directory, click CONTACTS in the WebUI sidebar, and then click Base directory� On the Base directory page, you can manage your base directory entries� You can sort, edit, delete, and add contact information for up to 1,000 entries� The page also allows you to export your phone’s base directory or import a base directory file�... - Page 65 Click To... Sort the list by last name� Sort the list by first name� Edit information for an entry� View the first page of entries� View the next page of entries� View the last page of entries� Delete selected entries from the directory� Click Select All to select every entry on the page you are viewing�...
- Page 66 To edit a directory entry: 1� Click Edit for the entry you want to edit� The Edit Local Directory Entry page appears� 2� Edit or add the desired information� Click Save� 3� Import Base directory You can import an existing base directory file� Importing a directory file replaces all your previous base directory entries�...
-
Page 67: Blocked List
Blocked List To view the Blocked List, click CONTACTS in the WebUI sidebar, and then click Blocked List� The Blocked List directory is identical to the Base directory, except that you cannot configure an incoming ringer tone� Remote XML On the Remote XML page, you can configure up to three server-hosted Remote XML directories to appear on the Directory menu of your deskset�... -
Page 68: Security
Security On the Security page, you can change the User Password that you use to access the WebUI� After entering your old password and new password, click Save�... -
Page 69: Troubleshooting
Troubleshooting If you have difficulty with your deskset, please try the suggestions below� www.snomamericas.com For customer service, visit our website at � General issues Deskset does not work at all (LCD is black) • Ensure the adapter is securely plugged into an outlet not controlled by a wall switch�... -
Page 70: Technical Specifications
Poor audio quality. Speech is cutting out. • You may be close to being out of range of the base station� Try moving closer� • Other electronic products can cause interference with your deskset� Try installing the base station far away from devices such as TVs, microwaves, or other cordless devices, including other desksets�... -
Page 71: Special Characters
Special characters Entering special characters When entering text using the keypad, the following special characters are available� Press a key repeatedly to cycle through the characters� Characters ~ ^ ` % ! & - _ + = | 1 A B C 2 Ä Æ À Á Â Ã... -
Page 72: Maintenance
Maintenance Taking care of your telephone • Your base station and deskset contain sophisticated electronic parts, so you must treat them with care� • Avoid rough treatment� • Place the deskset down gently� • Save the original packing materials to protect your products if you ever need to ship them�... - Page 73 VTECH COMMUNICATIONS, INC� Tigard, Oregon 97223, USA� Copyright © 2022 Snom Technology GmbH� All Rights Reserved� v20220825 Version 1, 08/22...
Need help?
Do you have a question about the M58 and is the answer not in the manual?
Questions and answers