Table of Contents
Advertisement
Quick Links
Advertisement
Table of Contents

Subscribe to Our Youtube Channel
Related Manuals for SIIG MultiView CE-H26311-S1


Summary of Contents for SIIG MultiView CE-H26311-S1
- Page 1 Quad-View HDMI 2.0 4K 60Hz KVM MultiView Processor 04-1301A P/N: CE-H26311-S1...
- Page 2 1. Overview The Multiview KVM Processor is the excellent machine for monitoring and controlling host devices. It not only displays 4 host devices in 4K60 resolution through one HDMI output, but also provides real-time control of 4 host devices by one set of keyboard and mouse. Features ⚫...
- Page 3 3. Specifications MODEL NO. CE-H26311-S1 INPUT 4 x HDMI 2.0 with locking OUTPUT 1 x HDMI 2.0 with locking 4 x USB type B for host devices KEYBOARD/MOUSE 2 x USB type A for keyboard and mouse Front panel buttons IR remote control CONTROL RS232/TELNET...
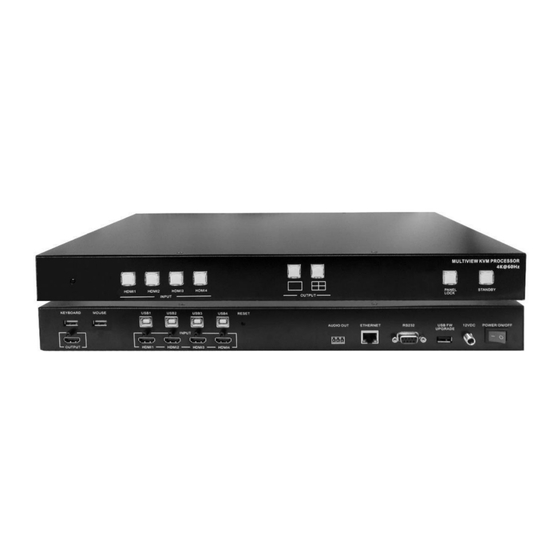
- Page 4 4. Hardware Descriptions 4.1 Product Appearance Feature Description Attach the bracket to the left side of the system Rack Mount Bracket * chassis for rack mount installation Front Panel Push buttons control Multiview KVM Processor Connect Video and Audio signal via rear panel Rear Panel input connectors System Chassis...
-
Page 5: Front Panel
4.2 Front Panel Feature Description Receives signals from the remote-control IR Receiver transmitter Press to select HDMI 1 input in full screen HDMI1 Press to select HDMI 1 audio in quad-view screen Press to select HDMI 2 input in full screen HDMI2 Press to select HDMI 2 audio in quad-view screen... - Page 6 4.3 Rear Panel Feature Description Connect to the HDMI display device, connector OUTPUT on rear panel with locking Connect to the HDMI source, connector on rear HDMI1 panel with locking Connect to the HDMI source, connector on rear HDMI2 panel with locking INPUT Connect to the HDMI source, connector on rear HDMI3...
-
Page 7: Ir Remote Control
IR Remote Control... - Page 8 Feature Description Put the system into standby mode or wake up Standby the system Mute Mute or unmute the audio output Lock Lock or unlock the front panel buttons Info. System information Auto Set output resolution to Auto Resolution Loop switching output resolution among the Loop* supported timings Layout...
- Page 9 5. Installation 5.1 Wiring Diagram Do the following steps for device connections. If the source is a computer, turn off the power and disconnect the keyboard and mouse. (optional) Connect a source/computer to HDMI 1 input connector via a HDMI cable and USB1 connector via a USB A-B cable. Connect a source/computer to HDMI 2 input connector via a HDMI cable and USB2 connector via a USB A-B cable.
-
Page 10: Rack Mount Installation
Connect the audio output connector to the audio amplifier, as required. Connect the keyboard and mouse to the corresponding USB connectors above the HDMI output connectors. Connect the 12V/2A adapter to 12V DC connector. 5.2 Rack Mount Installation Take the following steps to attach the two brackets to the system chassis and install into rack. - Page 11 6. Configurations 6.1 Front Panel Buttons Please see the section 4.2. 6.2 Front Panel Buttons Please see the section 4.4 6.3 KVM function The Multiview KVM Processor can be used with a mouse and keyboard with no configuration. A mouse with scroll wheel is recommended when using the KVM function.
- Page 12 6.4 Web UI You can connect the Ethernet directly from PC to Multiview KVM Processor. Please follow below steps to configure your PC Ethernet setting. 6.4.1 Directly Connect to PC via Ethernet Cable Click Start > Control Panel > Network and Sharing Center Click “Change Adapter Settings”...
- Page 13 After successfully operating steps a. to h., you can click into Web UI by typing the 192.168.1.202 IP address in IE or Chrome. 6.4.2 Ethernet Hub or Router At first, please follow section 6.4.1 and open web browser then follow 6.4.3 to set the Ethernet type to DHCP. You can connect the Ethernet port of the Multiview Video Process to the Ethernet port on a network hub or network router, via an Ethernet cable with RJ-45 connector.
- Page 14 6.4.3 System Setting Page in Web UI Settings System F/W version: 05.0D.07.7424 Multi View MAC addr.: FF:FF: FF:FF: Telnet CMD: Confirm Reboot Load Video Unit: Connect Network MANUAL ▼ Ethernet Type Mask Gateway Feature Description FW version System firmware version MAC address of Multiview KVM MAC addr.
- Page 15 6.4.4 Multiview Page in Web UI Settings Output Setting Color Setting Brightness AUTO Multi View HDMI3 Contrast Load Cancel Confirm Full Screen Setting Saturation Cancel Confirm Cancel Confirm Feature Description Select output resolution 1: Auto (default) 3840x2160@60Hz, 3840x2160@50Hz 3840x2160@30Hz 920x1080@60Hz, 1920x1200@60Hz Resolution 1600x1200@60Hz 1280x720@60Hz...
- Page 16 Flip video display in full screen mode 1: On Flip* 2: Off (default) Press “Confirm” after setting has finished or press “Cancel” to ignore the modification. Full Screen Rotate video display in full screen mode Setting 1: Off (default) 2: L90 Rotate* 3: R90 Press “Confirm”...
- Page 17 Feature Description Select display layout type on monitor 1: Layout A (full screen, default) 2: Layout B (quad view) Pre-defined* Press “Confirm” after setting has finished or press “Cancel” to ignore the modification. Main Screen: Window A Sub Screen: Window B, Window C, Window D Layout Window A input source: HDMI1...
-
Page 18: Serial Port Settings
6.4.5 Load Default in Web UI Settings Output Setting AUTO Multi View HDMI3 Load Cancel Confirm Full Screen Setting Cancel Confirm Press to load default setting in Web UI. 6.5 RS232/TELNET 6.5.1 Serial Port Settings Apply the following settings to set up the serial port communication. - Page 19 6.5.2 Commands Command Description Parameter LIST ALL AVAILABLE RS-232/TELNET ?/HELP COMMANDS SPOW 0/1 SET THE UNIT POWER ON/OFF 0=OFF,1=ON RPOW SHOW CURRENT POWER STATE 0:Auto 1:3840*2160@60 2:3840*2160@30 3:1920*1080@60 4:1280*720@60 5:640*480@60 SRES 0~13 SET OUTPUT RESOLUTOIN 6:3840*2160@50 7:3840*2160@25 9:1920*1200@60 10:1600*1200@60 13:2048*2048@57 RRES SHOW CURRENT OUTPUT RESOLUTION 0: OFF...
- Page 20 VIDEO N=1, 1: OUTPUT SIN2CH 1 M SET INPUT SOURCE INPUT SOURCE M=1~4, 1:HDMI1, 2:HDMI2, 3:HDMI3, 4:HDMI4 Command Description Parameter 1 = LAYOUT A, SRECALL 1~2 SET LAYOUT A or B. 2 = LAYOUT B 0=ROTATE OFF, 1 = L90, SET VIDEO ROTATION 2 = R90, SROTATE 0~4...
- Page 21 RAUDIO SHOW OUTPUT AUDIO SOURCE SHOW FIRMWARE VERSION REBOOT SYSTEM REBOOT READEDID READ EDID INFO FROM SINK DEVICE Command Description Parameter N=0~2 0: full (default) SASPECT N SET ASPECT MODE 1: aspect 2: 1by1 RASPECT SHOW ASPECT MODE AFTER COMMAND N=0~1 SBF N SET BORDER...
- Page 22 6.6 Hotkey 6.6.1 Layout A full screen : Switch to HDMI1 and K/M to scroll scroll USB1 (e.g. Double click scroll lock, then click 1) : Switch to HDMI2 and K/M scroll scroll to USB2 : Switch to HDMI3 and K/M scroll scroll USB3...
- Page 23 6.6.2 Layout B quad-view scroll scroll : Switch K/M to USB1 (e.g. Double click scroll lock, then click 1) : Switch K/M to USB2 scroll scroll scroll : Switch K/M to USB3 scroll scroll : Switch K/M to USB4 scroll backspace scroll scroll...
-
Page 24: Appendix 1: Function Na List
A. Appendix 1: Function NA list Input Output Layout A Layout B Layout A Layout B Resolution Resolution Rotate NA 4K60 Rotate NA 4K60 Flip NA Rotate NA 4K30 4K30 Rotate NA Flip NA Rotate NA 1080p 1080p Flip NA Rotate NA 720p 720p...
Need help?
Do you have a question about the MultiView CE-H26311-S1 and is the answer not in the manual?
Questions and answers