Advertisement
Quick Links
© 2022
Order #XXXXX
Item
Qty.
Description
1/2
1/1
46"w CEI110 Horizontal Extrusion
3/4
1/1
30.5"h CEI110 Vertical Extrusion
*
CEI-110 Corner Connection
A1
1) Insert TSRV2 and A1 Brackets
into milled groove of extrusion.
TSRV2
2) Slide connecting extrusion
Bracket
(2 pieces)
over exposed end of brackets.
3) Use Set screws to secure
extrusions.
*
1
TOP VIEW
CEI110
bolt &
Backer
wing nut
*
Lights
FRONT
Light to Light Attachment
Light to Transformer Attachment
Male
Lights
+
+
-
-
Maximum of 7 lights per chain / 7 lights per Transformer
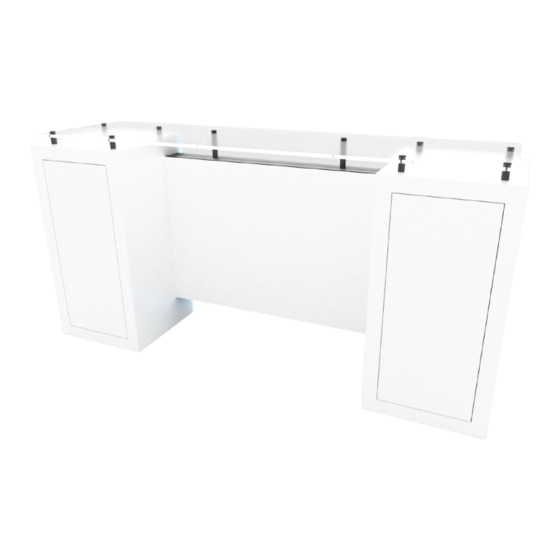
ECO-42C Backlit Counter
Steps:
1) Connect horizontals [3,4] between verticals [1,2],
sliding backer panel between verticals.
See
CEI-110 Corner Connection
2) Attach left & right cabinets to frame assembly [1/2/3/4]
using bolts & wing nuts.
3) Install
Counter Top
to assembly using standoff barrels.
See
Standoff Barrel Attachment
4) Connect power cords to Supernova lights as shown.
5) Apply SEG graphic to frame.
Refer to the SEG Installation general information page.
4
*
B a c k e r
P a n e l
2
*
3
+
-
Female
Power
Transformer
96W / 4 Amp / 24V
detail.
detail.
standoff
caps
1.5" standoff
barrels
*
Standoff Barrel Attachment
Turn to
tighten
Slide V20 Connector on
Standoff Barrel into groove
of horizontal extrusion.
Then turn barrel clockwise
to tighten in place.
SETUP INSTRUCTIONS
If you would like to tell us about your experience with your setup instructions please email us at info@classicexhibits.com
When assembled
standoff
caps
Counter Top
4.5" standoff
barrels
Note:
No standoff
*
cap for
middle
*
barrel.
*
hole for wire
management
Transformer
standoff
barrel
1.5" standoff
barrels
To
Power
Advertisement

Related Manuals for Eco-Systems ECO-42C


Summary of Contents for Eco-Systems ECO-42C
- Page 1 © 2022 Order #XXXXX ECO-42C Backlit Counter Item Qty. Description Steps: 46”w CEI110 Horizontal Extrusion 1) Connect horizontals [3,4] between verticals [1,2], 30.5”h CEI110 Vertical Extrusion sliding backer panel between verticals. CEI-110 Corner Connection detail. 2) Attach left & right cabinets to frame assembly [1/2/3/4] CEI-110 Corner Connection using bolts &...
- Page 2 © 2022 Order #XXXXX General Information General Setup Instructions - Read entire setup instruction manual prior to WARNING unpacking parts and pieces. - The setup instructions are created specifically for this configuration. - Setup instructions are laid out sequentially in steps, including exploded views with detailed explanation for assembly.
Need help?
Do you have a question about the ECO-42C and is the answer not in the manual?
Questions and answers