Advertisement
Quick Links
Advertisement

Related Manuals for Eco-Systems ECO-1067


Summary of Contents for Eco-Systems ECO-1067
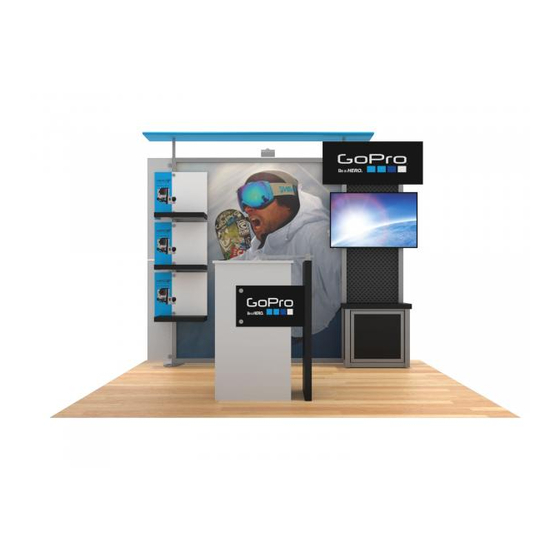
- Page 1 Order #XXXXX - ECO-1067 When assembled 866.463.2611 • www.ecosystemsdisplays.com...
-
Page 2: General Setup Instructions
General Setup Instructions •The setup instructions are created specifically for your configuration. •Setup instructions are laid out sequentially in levels, including exploded views and a logical series of steps for assembly. We encourage you to study the instructions before attempting to assemble your exhibit. Cleaning and Packing •Use non-abrasive cleaners when cleaning extrusions or ECO Glass inserts. - Page 3 ECO Panel Install Place ECO panel together with a vertical offset, slide down to lock connector in place. Panel Corner Connectors are installed just like ECO panels. Remove by off-setting top lock clips horizontally followed by separating vertically. SEG Graphic Install Graphic is installed corners first.
-
Page 4: Setup Instructions
SETUP INSTRUCTIONS 866.463.2611 • www.ecosystemsdisplays.com... - Page 5 Order #xxxxx - Setup file can be found online at www.ecosystemdisplays.com 866.463.2611 • www.ecosystemsdisplays.com...
- Page 6 Item Qty. Description Steps: Base Plate 1) Connect verticals to base plates with bolts. 2/2A 43”h Vertical Extrusion 2) Attach upper verticals to lower verticals as shown in S44 Connector detail. 3/3A 43”h Vertical Extrusion 3) Connect lower horizontals together as shown in S44 Connector detail.
- Page 7 Item Qty. Description Steps: 8/8A 24.5”h Vertical Extrusion 1) Attach graphic with stand off caps as shown in detail. 9/9A 24”w Horizontal Extrusion 2) Connect horizontals [9] & [9A] between verticals [8] & [8A]. 10/10A 12”w Horizontal Extrusion 3) Connect lower horizontals [10] between verticals. 4) Attach infills between verticals on top of lower horizontal [10].
- Page 8 Steps: 1) Attach wings to backwall using A10 Clamp Detail. 2) Connect door to counter assembly Door Attachment detail. 3) Place counter on top of assembly. 4) Attach monitor mount as shown in Monitor Mount Attachment detail. 5) Attach shelves to vertical where indicated. When assembled Monitor Mount A10 Clamp Detail...
- Page 9 Using Your Setup Instructions The Aero Overhead Sign Setup Instructions are created specifically for your configuration. They include an exploded view of the frame which is sequentially numbered. We encourage you to study the instructions When assembled before attempting to assemble your exhibit. Connections are kept very simple: no tools.
- Page 10 Steps: 1) Use canopy attachment to attach canopy to upper verticals. 2) Attach light as shown in detial. 3) Attach graphic to velcro where indicated. When assembled Velcro: Inside Edges 866.463.2611 • www.ecosystemsdisplays.com...
Need help?
Do you have a question about the ECO-1067 and is the answer not in the manual?
Questions and answers