Table of Contents
Advertisement
Quick Links
Download this manual
See also:
User Manual
Owner's Manual
Before using this unit, carefully read the sections entitled: "IMPORTANT
SAFETY INSTRUCTIONS" (Owner's Manual p. 2), "USING THE UNIT
SAFELY" (Owner's Manual p. 3), and "IMPORTANT NOTES" (Owner's
Manual p. 5). These sections provide important information concerning the
proper operation of the unit. Additionally, in order to feel assured that you
have gained a good grasp of every feature provided by your new unit, User
Guide, Owner's Manual, and Appendices should be read in its entirety.
These manuals should be saved and kept on hand as a convenient reference.
Copyright © 2001 ROLAND CORPORATION
All rights reserved. No part of this publication may be reproduced in any form
without the written permission of ROLAND CORPORATION.
Roland Web Site: http://www.roland.co.jp/
Advertisement
Table of Contents

Related Manuals for Roland VS-1824


Summary of Contents for Roland VS-1824
- Page 1 These manuals should be saved and kept on hand as a convenient reference. Copyright © 2001 ROLAND CORPORATION All rights reserved. No part of this publication may be reproduced in any form without the written permission of ROLAND CORPORATION. Roland Web Site: http://www.roland.co.jp/...
-
Page 2: Important Safety Instructions
CAUTION RISK OF ELECTRIC SHOCK DO NOT OPEN ATTENTION : RISQUE DE CHOC ELECTRIQUE NE PAS OUVRIR CAUTION: TO REDUCE THE RISK OF ELECTRIC SHOCK, DO NOT REMOVE COVER (OR BACK). NO USER-SERVICEABLE PARTS INSIDE. REFER SERVICING TO QUALIFIED SERVICE PERSONNEL. INSTRUCTIONS PERTAINING TO A RISK OF FIRE, ELECTRIC SHOCK, OR INJURY TO PERSONS. -
Page 3: Using The Unit Safely
• Do not attempt to repair the unit, or replace parts within it (except when this manual provides specific instructions directing you to do so). Refer all servicing to your retailer, the nearest Roland Service Center, or an authorized Roland distributor, as listed on the “Information” page. - Page 4 • Before using the unit in a foreign country, consult with your retailer, the nearest Roland Service Center, or an authorized Roland distributor, as listed on the “Information” page.
-
Page 5: Important Notes
However, in certain cases (such as when circuitry related to memory itself is out of order), we regret that it may not be possible to restore the data, and Roland assumes no liability concerning such loss of data. Memory Backup 501b •... -
Page 6: Disk Drive
Removable Disk Drive (See Appendices p. 13) • Do not turn off the power while the hard disk is operating. • While using the VS-1824, be careful not to subject the unit to vibration or shock, and avoid moving the unit while the power is turned on. -
Page 7: Table Of Contents
Recorder Section ... 20 Rear Panel ... 22 Front Panel ... 23 Chapter 1 Before You Start (VS-1824 Terminology) ...24 Saving and Managing Data ... 24 Managing Disk Contents (Partitioning)... 24 The Location Where a Performance is Recorded (Song) ... 25 Sources, Tracks, and Channels... - Page 8 Table of Contents Chapter 3 Playback Operations...38 The Display... 38 Display Regions... 38 Selecting a Playlist Display... 39 Function Buttons (While on the Playlist Display) ... 40 Mixer Channel Display ... 41 Changing Track Status... 42 Muting and Soloing ... 42 Muting Tracks...
- Page 9 Using the Metronome ... 67 Turn On the Metronome ... 67 Program the Tempo Map... 68 Using an External MIDI Sound Source to Play the Metronome ... 68 Chapter 5 Using the Digital Mixer...70 Fader/Mute Button ... 71 Method One: Switching the Fader Functions (FADER/MUTE Button) ... 71 Method Two: Input Mixer Screen...
- Page 10 Table of Contents Track Mixer... 90 [F1 (MIX)] MIX Bus Enable/Pan... 90 [F2 (Low)], [F3 (Mid)], and [F4 (High)] Equalizer... 90 [F5 (V.Trk)] V-Track Select... 91 [F6 (PRM.V)] Parameter View/ [F6 (CH.V)] Channel View... 91 [F1(FX1)] Effect 1 Send ... 91 [F2 (FX2)] Effect 2 Send ...
- Page 11 Connecting Loop Effects ... 107 Effects Return Section... 107 Two Examples of Using Loop Effects ... 108 Using Effects While Recording ... 109 Listening to an Insert Effect While Recording ... 109 Listening to a Loop Effect While Recording ... 110 Recording Insert Effects ...
- Page 12 Table of Contents Phrase Editing... 152 Phrase Delete ... 152 Dividing a Phrase (Phrase Divide/Split)... 153 Phrase Move... 155 Phrase Copy ... 157 Phrase Trim In ... 159 Phrase Trim Out ... 160 Phrase New ... 161 Phrase Name ... 162 Naming Takes...
- Page 13 Items Necessary for Synchronization... 197 Master and Slave ... 197 Using MTC ... 197 Synchronization Using the VS-1824 as the Master... 198 Synchronization Using the VS-1824 as the Slave... 199 Using MTC Offset ... 200 Using the Sync Track (Master) ... 200 Recording MIDI Clock Messages...
- Page 14 Input Peak Level... 255 Previous/Next Switch ... 255 Adjusting the Button Sensitivity... 256 Fan Control ... 256 Removing a Direct Current Offset from the MIX Bus ... 257 MIDI Model ID ... 257 ... 234 ... 234 VS-1824 ... 245 VS-1824 ... 245...
- Page 15 Scrolling the Waveform Display... 259 Alarm Clock... 260 Chapter 22 Specific Applications ...261 Syncing Two VS-1824s or a VS-1824 and a VS-1680 with MTC and MMC... 262 Settings for the Master VS... 262 Settings for the Slave VS... 263 Syncing a VS-1824 and VS-880/880EX or VSR-880 ... 263 Syncing the VS-880 to the VS-1824 Using MTC and MMC ...
-
Page 16: Preparations
Main Features The Latest in Compact Home Studio Environments The VS-1824 retains all of the features of Roland's VS-1880 Digital studio workstation, a revolution in the world of the home studio, with the disk recorder, digital mixer, and multi effects systematically integrated into a great sounding digital recorder. -
Page 17: Simple Operation
CD-R Drive (approved by Roland): A CD-R or CD-RW drive connected with a SCSI connector. Such a device allows you to create songs on the VS-1824 and burn them onto your own original audio CDs. Additionally, you can use a CD-R for backing up song data to inexpensive CD-R discs. -
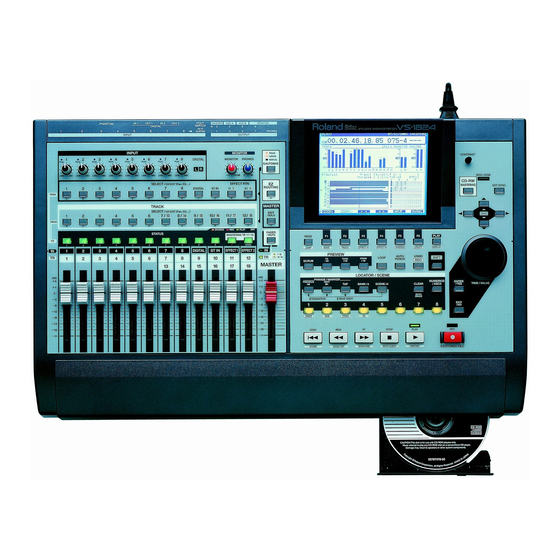
Page 18: Top And Rear Panels
Top and Rear Panels Mixer Section fig.00-03 1. PEAK Indicators Use these indicators to confirm the correct recording level as set with the INPUT knobs. The indicators are set at the factory to illuminate when the input audio reaches 0 dB. You can change the peak level indicator setting so the indicators illuminate when audio reaches -3 or -6 dB. -
Page 19: Status Buttons
REC (blinking red and orange): The track is ready to be recorded and the source will be heard. This occurs when the VS-1824 is in Record Ready and you press [PLAY], then press the blinking red status button. PLAY (green): The track assigned to the channel will play back. -
Page 20: Recorder Section
Recorder Section fig.00-04 1. Graphic Display This displays shows various data related to the current status of the VS-1824 during recording, playback, editing, changing its settings, and so on. 2. FUNCTION Button These buttons switch the display screen and execute operations. -
Page 21: Shift Button
If both occur, the indicator lights orange. 10. EXT SYNC (External Sync) Button Press this button to designate the VS-1824 or an external MIDI device as the master, or main, controlling synchronization device. With the VS-1824 selected as the master, the external MIDI device functions as the slave unit;... -
Page 22: Rear Panel
Top and Rear Panels Rear Panel fig.00-05 1. POWER Switch This switch turns the VS-1824’s power on and off. See Chapter 2. AC IN (AC Inlet) Connect the included power cable here. 3. Cooling Fan Exhaust The VS-1824 is equipped with a cooling fan, which prevents overheating of the VS-1824's electronics. -
Page 23: Front Panel
* Switching the phantom power on or off while the VS-1824 is turned on produces a loud noise that can damage amps and speakers. Turn the phantom power on or off only when the VS-1824 is turned off. -
Page 24: Chapter 1 Before You Start (Vs-1824 Terminology)
2000 MB. If you would like to change partition size, please refer to drive initializing on p. 229. The VS-1824 is able to manage 500 MB, 1000 MB or 2000 MB of disk space at once. If you use a disk drive with a capacity that is greater than this, you will need to divide it into two or more areas. -
Page 25: The Location Where A Performance Is Recorded (Song)
VS-1824 does not discard the earlier take. Phrases: A “phrase” is a set of pointers that tells the VS-1824 what portion of a take is to be played by a track. The length of a phrase may just be the entire length of a take, or may consist of only part of a take. -
Page 26: About Events
Chapter 1 Before You Start (VS-1824 Terminology) About Events The smallest unit of memory used by the VS-1824 to store recorded information on disk is called an “event.” A newly created song is provided approximately 18,000 events. For each track, one recording pass uses two events. -
Page 27: Mixer Section
If we think of the VS-1824 as the house, the water being supplied from the water company corresponds to inputs such as mic or guitar. Some of these inputs are sent to recording tracks and are recorded. -
Page 28: Input Mixer
RECORDING bus for overdubbing, or re-rerecording. The channel faders 1–18 correspond respectively to Tracks 1–18. Switching the Fader Functions On the VS-1824, it is possible to adjust Input Mixer or Track Mixer settings by switching the function of the channel faders on the top panel. -
Page 29: Master Block
This selects the jacks or connectors—which are connected to external equipment—to which the output of each mixer is sent. fig.01-13 Chapter 1 Before You Start (VS-1824 Terminology) Recorder Section Differences from a Tape-Type MTR Unlike DAT recorders, which use tape, digital disk recorders record performances (that is, sounds) on a disk, as do MD recorders. -
Page 30: Track Minutes And Recording Time
Auxiliary Tracks for Each Track The VS-1824 provides 18 playback tracks. Each track contains 16 of its own supplementary tracks that can be used for recording or playback. In other words, you can record performances containing up to 288 (18 tracks x 16) tracks. -
Page 31: Effects Section
About the Effect Expansion Board One VS8F-2 effect expansion board is pre-installed in the VS-1824. Up to two of these effect expansion boards can be installed in the VS-1824. With and additional VS8F-2 effect installed in the VS-1824, up to four high-quality stereo effects will be available for your use. -
Page 32: Chapter 2 Basic Operation
1. Turn on the power with the POWER switch on the rear panel of the VS-1824. * When you turn on the power of the VS-1824, the drive must be recognized and certain required data must be loaded. Thus, it takes a moment for the unit to finish booting up. -
Page 33: Restarting
Restarting You can restart the VS-1824 without turning off the rear panel POWER switch. This is convenient for switching disks when working off of a removable drive (such as a Zip drive) connected to the VS-1824’s SCSI port. 1. Perform the Shutdown procedure as described in “Turning Off the Power,”... -
Page 34: Setting The Internal Clock
This allows you to organize recordings by day, time, and order. Use the following procedure to set the time and date in your VS-1824. * The internal clock is battery-powered. Once you set this, the values are remembered each time you turn the VS-1824 off. -
Page 35: Operating The Vs-1824
Operating the VS-1824 The VS-1824 features a wide variety of features and settings. They are organized by type, function, operation, etc. Similar functions and operations are grouped together and are referred to as a “mode.” A list of the different modes is... -
Page 36: Function Buttons
The SHIFT button Press and hold [SHIFT] whenever you want to use a command indicated on the VS-1824 by a white outlined box with white lettering. For example, to locate to the end of your song using SONG END hold [SHIFT] and press [SONG END] simultaneously. -
Page 37: Mixer And System Initialize
Most value changes can be made while the VS-1824 is playing. However, you must first press [STOP] before changing V-Tracks and before changing mixer Scenes. [ENTER/YES] The [ENTER/YES] button is used to respond to an onscreen prompt. -
Page 38: Chapter 3 Playback Operations
Chapter 3 Playback Operations The Display Display Regions When you first turn on the VS-1824, the following display will appear. fig.02-01 This display is separated into three different areas. You can use [ ], [ ], [ ], and [ Time / Value dial to change settings in each area. -
Page 39: Selecting A Playlist Display
Lower Part of the Display This area displays the Playlist. fig.12-08 Phrase name at the cursor position/current location Cursor Track name at the cursor position Playlist Current track Tracks containing recorded data Tracks not containing recorded data You can use the CURSOR buttons to select the track you wish to view. -
Page 40: Function Buttons (While On The Playlist Display)
Chapter 3 Playback Operations Function Buttons (While on the Playlist Display) In the Playlist display, the function buttons perform as follows. * If “ZOOM+” does not appear above F1, press [PAGE] until it does. [F1 (ZOOM+)]: This enlarges, in three stages, the display of the tracks. When a waveform is displayed, this will make it appear taller. -
Page 41: Mixer Channel Display
Mixer Channel Display To view mixer settings, press any SELECT button for an input or track. The SELECT buttons are divided into two rows. The top row of buttons are referred to as the “Input SELECT buttons” (p. 18). This section also contains the Stereo In and Effects 1-4 Returns. -
Page 42: Changing Track Status
Blinking Red / Orange: Record Ready The track is ready to be recorded and the source will be heard. This occurs when the VS-1824 is in Record Ready and you press [PLAY], then press the blinking red status button. -
Page 43: Quick Soloing
One of the fastest ways to move around in your song is to use the locators. Time locators are stored for each song using the LOCATOR buttons ([1]-[8]). The VS-1824 provides 64 different locators per song. The locators are organized into eight banks, with eight locators per bank. -
Page 44: Changing The Locator Bank
Chapter 3 Playback Operations Changing the Locator Bank 1. Press [BANK]. The LOCATE buttons now act as buttons to change locator banks. A blinking locator button will now indicate which bank is active. The currently active bank will be blinking. 2. -
Page 45: Using Markers
Using Markers In addition to locators, you can store up to 1000 markers per song. Markers also provide a useful and convenient way to define sections of a song for loop recording, or to mark points for punch-in recording. Markers are also used to store Automix data and CD indexes. -
Page 46: Editing Marker Values
Chapter 3 Playback Operations Editing Marker Values 1. Move to the marker you want to change. Hold [SHIFT] and press [PREVIOUS] or [NEXT] to move to the marker. 2. Hold [SHIFT] and press [F6(UTILITY)]. The Utility menu icon appears in the display. If it is not displayed, press [F6(EXIT)]. -
Page 47: Other Ways To Move In A Song
Other Ways to Move In a Song Changing Playback Position Using JUMP Besides using markers and locators to move the current time of the song, you can also directly specify a location or measure and beat to move to. This is convenient when designating locations during track and phrase editing. -
Page 48: Protecting Songs (Song Protect)
Song Protect is off before you start. If you work in an environment where many different people use one VS-1824, you may want to use the following system: When you have finished all work for the day, turn Song Protect on immediately before shutting off the power to the VS-1824. -
Page 49: To Remove Song Protect
Selecting and Loading Songs (Song Select) Before you can play a song you have saved on the hard drive, you must select and load the song into the VS-1824’s memory. Use the following procedure to select and load the desired song. -
Page 50: Chapter 4 Recording Operations
Chapter 4 Recording Operations Preparing for a New Recording Items Necessary for Recording • VS-1824 • Audio equipment for the Master Out signal, or stereo headphones • Recording source (microphones, electric guitar, synthesizer, CD player, etc.) Create a New Song (Song New) Recording cannot take place when a demo song is selected. - Page 51 Chapter 4 Recording Operations With the VS-1824, you can select CDR as a recording mode (p. 51). If the recording mode of the song is CDR, the VS-1824 works as a recorder with four stereo tracks. Please always keep “Channel Link” (p. 77) of the track channel “On.” If it accidentally turns “Off,”...
- Page 52 (p. 222), and then creating a new song or reloading an existing song. Song Numbers On the VS-1824, every song is assigned a number. Newly created songs are given the lowest available number. For example, if there are five songs on the hard drive, the next song created will be assigned Song Number 6.
-
Page 53: The Recording And Mixing Process
The Recording and Mixing Process The recording procedure with the VS-1824 is similar to the process of recording with traditional multitrack recorders. The general process of recording a song is outlined below. 1. Connect instruments and microphones to the VS-1824. -
Page 54: Recording To The Tracks
In a newly created song, the inputs are assigned to tracks as shown below. This is the default mixer routing. When "VS-1824" is selected as the fader mode (p. 75) fig.03-05a When "VS-1880" is selected as the fader mode (p. 75) - Page 55 What to do About Low-Level Input Signals Occasionally, you may have a source which has a very low input level, such as when using a large diaphragm dynamic mic to record a soft-spoken vocalist. Use the steps below to provide extra gain to low-level inputs: 1.
-
Page 56: Recording On Other Tracks (Overdubbing)
Recording Using Different Virtual Tracks (V-Tracks) The VS-1824 features 16 recordable tracks per channel. These are called Virtual Tracks, or “V-Tracks.” By using V-Tracks, you can record up to 288 tracks per song. You can use Virtual Tracks to record over and over on the same track without erasing or losing the previous recording. -
Page 57: Manual Punch-In/Punch-Out
DP-2 or BOSS FS-5U) to do your punch-ins and -outs. fig.03-08 Start Punch-in Playback Connect the optional foot switch to the VS-1824’s FOOT SWITCH jack. fig.03-09 1. Hold [SHIFT] and press [F5 (SYSTEM)]. The System menu icon appears in the display. If the System menu does not appear, press [F6 (EXIT)]. -
Page 58: Auto Punch-In And Punch-Out
Chapter 4 Recording Operations 3. Using [ ], [ ], [ ], and [ Sw.” If “Foot Sw” does not appear in the display, press [F2 (Prm 2)]. fig.03-10 FootSw (Foot Switch) Set the function of the foot switch connected to the FOOT SWITCH jack. - Page 59 10. Press [PLAY] to begin playback of the song. 11. The VS-1824 will automatically go into Record mode where the punch-in point was set. 12. The VS-1824 will automatically go out of record where the punch-out point was set. Once you’ve passed the punch-out point, press [STOP].
-
Page 60: Loop Recording
Chapter 4 Recording Operations Loop Recording You can play back a specific section of a song over and over again, and use the Auto Punch In feature to record many quick takes. This is called “loop recording.” This can be convenient when you want to rehearse a section of the song, or record a number of takes of a solo, and compare the different takes. - Page 61 The VS-1824 will automatically go into Record mode where the punch-in point was set. 11. The VS-1824 will automatically go out of Record where the punch-out point was set. Playback continues until the end of the loop is reached, and the loop will begin from the start point again.
-
Page 62: Undo And Redo
Chapter 4 Recording Operations Undo and Redo If you decide a recording is unusable just after you’ve recorded it, you can use Undo to instantly delete the recording. When using Undo, you need to specify the number of levels to be undone. For example, suppose you use punch-in recording to create five consecutive recordings at the same location. -
Page 63: To Use The Undo Function
To use the Undo Function: 1. Press [UNDO]. “Level=1” appears in the display. 2. Use the TIME/VALUE dial to select the level of Undo. As you choose different levels of Undo, the date and time stamp for each recording or edit is displayed. fig.11-17 Undo Level Time Stamp... -
Page 64: Track Bouncing
Chapter 4 Recording Operations Track Bouncing You can merge the performance of two or more tracks and re-record them onto a different empty track. This operation is known as “track bouncing.” Track bouncing comes in handy when you have run out of free playback tracks. For this example, we’ll mix the audio recorded on Tracks 5-8, and bounce them onto the stereo Track 9/10. -
Page 65: Track Bouncing With Effects
Adjust the Pan for Each Track and Check the Volume Levels for Each Track 1. Press [PLAY (DISPLAY)] to return to the Playlist display. 2. Press [FADER/MUTE] so that “TR” is lit. 3. Press [PLAY] to begin song playback. 4. Adjust the volume and mix balance using Faders 5-8. The presently monitored sound—track volumes and panning—will be recorded to Track 9 and 10 just as you now hear them. -
Page 66: Recording A Digital Source
44.1 kHz. 4. Set the Master Clock In order to bring any digital signal into the VS-1824, you must synchronize the VS-1824’s internal clock with the digital signal from the your digital source. -
Page 67: Recording From A Cd
CD using the DIGITAL IN connection, use the following procedure. You will only need to perform this procedure one time to enable the VS-1824 to record digital signals from CD players. 1. Hold [SHIFT] and press [F5 (System)]. -
Page 68: Program The Tempo Map
Source to Play the Metronome A MIDI sound source can be used as a metronome in place of the VS-1824’s internal metronome. To do this, use the following procedure: 1. Connect the VS-1824 and the MIDI sound generator as shown below. fig.11-27 VOLUME... - Page 69 This switches the function of the MIDI OUT/THRU connector. The default setting is “OUT.” Out: Out put MIDI message of VS-1824 Select this in case you want to send out note message of metronome or settings of mixer parameters (message of control change or exclusive message).
-
Page 70: Chapter 5 Using The Digital Mixer
• You can automate your mix The VS-1824 features a 28-channel digital mixer. The mixer is divided into three main sections, the 10-channel Input Mixer, which in the signal path, is situated before the recorder, the 18-channel Track Mixer, which is placed after the recorder, and the Master Block, which is used for determining which signal appears at each of the output jacks and connectors. -
Page 71: Fader/Mute Button
Input and Track Mixers. Method One: Switching the Fader Functions (FADER/MUTE Button) The physical faders on the VS-1824 can be used to control either the 10-channel Input Mixer, or the 18-channel Track Mixer. Press [FADER/MUTE] to assign the physical faders to the mixer you want to control. -
Page 72: Determining Output
Chapter 5 Using the Digital Mixer Determining Output The VS-1824 has eight analog output jacks and two stereo digital outputs. Each of these outputs can have various signals assigned to them. Use the following procedure to determine the signal for each output jack or connector. -
Page 73: Aux Connectors
The signal at the EFFECT 2 bus. AUX1/FX3: The signal at the AUX1 bus, or EFFECT 3 when a second VS8F-2 effect card is installed in the VS-1824. AUX2/FX4: The signal at the AUX2 bus, or EFFECT 4 when a second VS8F-2 effect card is installed in the VS-1824. -
Page 74: Direct Out Connectors
Track 16: MONITOR jack (R) 4. Press [PLAY (DISPLAY)] to return to the Playlist display. Tracks 17 and 18 cannot be output directly from the VS-1824. Remember to turn the DIRECT OUT function off when you are finished transferring your tracks. -
Page 75: Changing Settings Of The Track Mixer Buttons And Faders (Fader Mode)
[F1 (Prm 1)]. Fader Mode Used for specifying the correspondence or assignment of panel buttons and faders to each of the Track Mixer channels. VS-1824: Assignments are as indicated on the panel. Assignments are according to the overlay VS-1880: sheet provided with the workstation. -
Page 76: Input Mixer Default Assignment
Mixer is automatically routed to the stereo master mix. This is the default setting when a new song is created. Any source connected to an INPUT jack in to the VS-1824 is routed to the main stereo output. To change this setting, follow the procedure below. -
Page 77: Channel Link
EQ, effects and other settings. With the VS-1824, it is possible to link adjacent pairs of mixer channels so you can make adjustments to both channels simultaneously. -
Page 78: Adjusting The Panning Of Channel Linked Channels
This adjusts the balance (L63-R63) of the even-numbered (right) channel. 5. Press [PLAY (DISPLAY)] to return to the Playlist display. When “VS-1824” is selected on fader mode (p. 75) When a new song is created, CHANNEL LINK for the DIGITAL input is ON. You can adjust parameters of each individual channel if you turn OFF the CHANNEL LINK. -
Page 79: Linking The Faders Of Two Or More Channels (Fader Group)
Linking the Faders of Two or More Channels (Fader Group) The faders of two or more channels (inputs/tracks) can be assigned to groups, so that when the fader of any channel is operated, the fader levels (volume levels) of all channels in that group will be adjusted as well. -
Page 80: Selecting V-Tracks
Chapter 5 Using the Digital Mixer Selecting V-Tracks The VS-1824 provides 16 recordable tracks per channel. These are called “V-Tracks,” short for “Virtual Tracks.” By using the V-Tracks, you can record up to 288 tracks per song. To change V-Tracks, use the procedure below. - Page 81 (Equalizer Select) This setting selects how many bands of EQ are available. 2 Band EQ: Low and High bands are available for 28 inputs and/ or tracks at once. 3 Band EQ: Low, Mid, and High bands are available for 16 Inputs and/or Tracks at once.
-
Page 82: Attenuation
4. Press [PLAY (DISPLAY)] to return to the Playlist display. Phase The VS-1824 features balanced (TRS) INPUT jacks. The pin assignment of each input is configured as follows: fig.11-41 Some audio devices employ the opposite HOT (TIP) and COLD (RING) wiring. -
Page 83: Copying Mixer Settings
When Phase Mismatch is a Problem Audio equipment connected as shown below will result in audio being out of phase. In such cases, select “INV” for any of the channels that use the third lead as “hot.” It is recommended that you check the HOT and COLD leads for all of your audio equipment. -
Page 84: Mixer Scenes
EZ Routing templates are not saved as part of a song. They can be saved within the VS-1824. EZ Routing is useful for storing settings for frequent activities, such as “Recording a Drum Kit,” or “Bouncing Rhythm Section Tracks.”... -
Page 85: Recalling A Mixer Scene
Recalling a Mixer Scene 1. If the song is playing, press [STOP]. 2. Press [SCENE]. The button indicator lights. 3. Whenever [SCENE] is blinking, the LOCATOR buttons are used to recall a Scene. Any LOCATOR which already has a Scene stored will be blinking. 4. -
Page 86: Chapter 6 Mixer Channel Strip Detail
Chapter 6 Mixer Channel Strip Detail This chapter explains in detail each of the settings available in the Mixer display for the Input Mixer, Track Mixer, and the Master Block. For general information about signal flow, busses, etc., see Chapter 5, “Using The Digital Mixer.” Input Mixer The following functions are found in the Input Mixer. -
Page 87: [F2 (Fx2)] Effect 2 Send
[F2 (FX2)] Effect 2 Send Channel settings for the EFFECT 2 Bus. Sets the Effect Send Switch, the Send Level (0-127) and panning. Sw (Effect Send Switch) Switches the channel to the EFFECT bus. Off: The channel is not sent to the EFFECT bus. Pre: The signal is sent to the EFFECT bus before it passes through the mixer fader. -
Page 88: [F1 (Fx1In)] Effect 1 Insert
Chapter 6 Mixer Channel Strip Detail [F1 (FX1In)] Effect 1 Insert After pressing [F1 (FX1In)], or moving the cursor to the FXIns area, press [ENTER] (see “Effect Types,” p. 99). FX1 (Effect Insert Switch) This sets how the effect is connected in the mixer. Off: The effect is not inserted in the channel. -
Page 89: [F3 (Fx3In)] Effect 3 Insert
[F3 (FX3In)] Effect 3 Insert After pressing [F3 (FX3In)], or moving the cursor to the FXIns area, press [ENTER]. FX3 (Effect Insert Switch) This sets how the effect is connected in the mixer. Off: The effect is not inserted in the channel. Ins: Both channels of the stereo effect are inserted into the channel. -
Page 90: [F3 (Phase)] Phase
Chapter 6 Mixer Channel Strip Detail [F3 (Phase)] PHASE This selects the Phase (NRM, INV) for each channel. If you are using two microphones to record one source, it is possible that you will experience “phase cancellation.” This is usually caused by a microphone that is wired in an inverted fashion and results in the lowering or muting of your signal when both channels are played. -
Page 91: [F5 (V.trk)] V-Track Select
Selects the V-Track (1-16) for playback or recording. The V-Track setting is only available in the Track Mixer. The VS-1824 must be stopped before this value can be changed. A small box indicates that a recording has been made on the V-Track. -
Page 92: [F4 (Fx4)] Effect 4 Send
Chapter 6 Mixer Channel Strip Detail [F4 (FX4)] Effect 4 Send Channel settings for the EFFECT 4 Bus. Sets the Effect Send Switch, the Send Level (0-127) and panning. Sw (Effect Send Switch) Switches the channel to the EFFECT bus. Off: The channel is not sent to the EFFECT bus. -
Page 93: [F2 (Fx2In)] Effect 2 Insert
[F2 (FX2In)] Effect 2 Insert After pressing [F2 (FX2In)], or moving the cursor to the FXIns area, press [ENTER]. FX2 (Effect Insert Switch) This sets how the effect is connected in the mixer. Off: The effect is not inserted in the channel. Ins: Both channels of the stereo effect are inserted into the channel. -
Page 94: [F4(Fx4In)] Effect 4 Insert
Chapter 6 Mixer Channel Strip Detail [F4(FX4In)] Effect 4 Insert After pressing [F4 (FX4In)], or moving the cursor to the FXIns area, press [ENTER]. FX4 (Effect Insert Switch) This sets how the effect is connected in the mixer. Off: The effect is not inserted in the channel. Ins: Both channels of the stereo effect are inserted into the channel. -
Page 95: [F3 (Solo)] Solo
The signal at the EFFECT 2 bus. AUX1/FX3: The signal at the AUX1 bus, or, when a second VS8F-2 Effect card is installed in the VS-1824, the EFFECT 3 bus. AUX2/FX4: The signal at the AUX2 bus, or, when a second VS8F-2 Effect card is installed in the VS-1824, the EFFECT 4 bus. -
Page 96: [F4 (Aux.b)] Aux B
The signal at the EFFECT 2 bus. AUX1/FX3: The signal at the AUX1 bus, or, when a second VS8F-2 Effect card is installed in the VS-1824, the EFFECT 3 bus. AUX2/FX4: The signal at the AUX2 bus, or, when a second VS8F-2 Effect card is installed in the VS-1824, the EFFECT 4 bus. -
Page 97: [F2 (Fx2In)] Effect 2 Insert
[F2 (FX2In)] Effect 2 Insert After pressing [F2 (FX2In)], or moving the cursor to the FXIns area, press [ENTER]. FX2 (Effect Insert Switch) This connects the effect in the Master Block section of the mixer. Off: The effect is not inserted. Ins: The stereo effect is inserted into the Master Block. -
Page 98: [F5 (Dir)] Direct Out
Chapter 6 Mixer Channel Strip Detail [F5 (DIR)] DIRECT OUT This selects tracks to be assigned as Direct Outputs. Off: Direct out is not used. 1-8: Tracks 1-8 are output from the analog output jacks 1-8. When DIRECT OUT is used, the MASTER, MONITOR and AUX jacks are used for the direct track outputs. -
Page 99: Chapter 7 Using Internal Effects (Vs8F-2)
A and EFFECT B. With two VS8F-2s installed, each of the effects in EFFECT A—FX1 and FX2—and the effects in EFFECT B—FX3 and FX4—may be used. You can apply up to four effects at a time to each channel of the VS-1824’s mixer. fig.05-01 EFFECTS... -
Page 100: Loop Effects
MIX bus or REC bus Procedure for Using Effects AUX bus To use an effect in the VS-1824, follow these three general steps: 1. Select the Effect Patch to use. 2. Determine whether the effect should be used as an insert effect or in a loop effect. -
Page 101: Selecting Effect Patches
Selecting Effect Patches An effect setting is referred to as a “patch.” The VS8F-2 provides over 240 preset patches and 200 user patches. Use the following procedure to select a preset patch. Selecting a Preset Patch 1. Press [PLAY (DISPLAY)]. 2. -
Page 102: Creating And Saving User Effect Patches
Chapter 7 Using Internal Effects (VS8F-2) Creating and Saving User Effect Patches A VS-1824 with one or two of the optional VS8F-2 effect boards installed will have 200 user patches, which are the same as the first 200 preset patches. It is possible to overwrite the user patches to store your own custom effects. -
Page 103: Save An Effect Patch As Part Of A Mixer Scene
[F2 (Clr)]: Clears all the characters in the window. [F3 (Del)]: Deletes the character where the cursor is positioned. [F4 (Ins)]: Inserts a space where the cursor is positioned. [F5 (Write)]: Stores the user patch and exits the screen. [F6 (EXIT)]: Exits the screen without storing the user patch. - Page 104 Chapter 7 Using Internal Effects (VS8F-2) fig.05-05 (2band, 3band) InsL (2band, 3band) InsR (2band, 3band) InsS (2band, 3band) * When Ins or InsS is selected, that effect cannot be used on any other channel. When InsL or InsR is selected, that effect can be inserted only on one other mixer channel.
-
Page 105: Connecting Insert Effects In The Master Block
Connecting Insert Effects in the Master Block It is possible to insert an effect into the MIX bus. For example, you might want to send the entire song mix through a compressor or limiter. Use the following steps to do so. 1. - Page 106 Chapter 7 Using Internal Effects (VS8F-2) Example 2: Use a Microphone Simulator on a Vocal Track to be Recorded. General Strategy: Insert the effect in the Input Mixer. Details for this Example: Select Patch P128 as FX3, insert on Input 2. Begin by Selecting The Effect: 1.
-
Page 107: Connecting Loop Effects
Connecting Loop Effects The following section explains in detail the steps to connect loop effects, and provides examples for each method. 1. Select the channel to which the effect is to be added. Press the SELECT button for either an input channel or a track channel. -
Page 108: Two Examples Of Using Loop Effects
Chapter 7 Using Internal Effects (VS8F-2) Two Examples of Using Loop Effects Example 1: Add a Delay to a Recorded Vocal Track. General Strategy: Connect the effect in the Track Mixer, post-fader. Details for this Example: Select Patch P024 as FX2, connect to Track 6. -
Page 109: Using Effects While Recording
VS-1824. General Strategy: Insert the effect in the Track Mixer. Details for this Example: Select Patch P088 as FX1, insert on Track Mixer Channel 8. -
Page 110: Listening To A Loop Effect While Recording
Chapter 7 Using Internal Effects (VS8F-2) Listening to a Loop Effect While Recording Example: A lead singer wants to hear reverb in the headphones while recording, but you want to record the track “dry.” General Strategy: Connect the effect loop in Track Mixer Details for this Example: Select Patch P024 as Effect 3, connect post-fader to Track Mixer on Channel 2, record from Input 2. -
Page 111: Recording A Loop Effect
Recording a loop effect This example explains how to use an effect loop while recording so the effect is recorded as a permanent part of the track. General Strategy: Connect an effect loop in the Input Mixer, assign the input to a stereo track and assign the effect return to the same stereo track. -
Page 112: Recording Stereo Effects
To do so, turn Link to “On” for both the input and the track. For example, use the following procedure to set up the VS-1824 to record a stereo effect on Input 8 to Tracks 7/8: 1. Press the SELECT button for Input 8. -
Page 113: Chapter 8 Ez Routing
Templates When you have set up the VS-1824 for a particular task—and would like the VS-1824 to remember your settings for re-use some time in the future—you can save the setup as an EZ Routing template. When you recall the template, the VS-1824’s parameters are instantly reset, and your setup is once more in place. -
Page 114: Using Ez Routing Step Editing
[F2 (STEP)] to proceed to the next set of parameters until the entire setup is complete. Step Editing can help you learn how the VS-1824 works and is therefore a great tool for beginners. When you have finished your setup, you can save it as an EZ Routing template. - Page 115 8. Make the settings for the effects. Use [ ], [ ], [ ], and [ cursor and the TIME/VALUE dial to adjust each of the values. Press [F3 (FX A)] to make settings to EFFECT A (FX1/2); press [F4 (FX B)] to make settings to EFFECT B (FX3/4).
-
Page 116: Setting Up For Mixing Using Step Editing
Select this to use the Input Mixer during mixdown to mix external sources along with your 18 tracks to the VS-1824’s stereo MASTER mix outputs. If you want to cancel the settings procedure before completing it, press [F6 (EXIT)] at any time. -
Page 117: Setting Up For Bouncing Using Step Editing
10. Select mixer channels to be output to the AUX bus. The AUX bus is useful for creating a separate headphone mix for the performer you are recording, or for sending tracks to an external effects processor. Use [ ], [ ], and [ ] to move the cursor and the TIME/VALUE dial to adjust each of the values. - Page 118 Chapter 8 EZ Routing 5. Press [F2 (STEP 6. Only the source tracks you specified during Step 4 will be shown. Use [ ], [ ], [ move the cursor and the TIME/VALUE dial to adjust each of the values. fig.02-32 Cursor Track Channel...
-
Page 119: Setting Up For Mastering Using Step Editing
14. Select the Master Section settings. Use [ ], [ ], [ ], and [ cursor and the TIME/VALUE dial to adjust each of the values. fig.02-36 Monitor Select Equalizer Mode Direct Out Effect Insert 15. Press [F4 (Exec)]. “EZ ROUTING Step Edit is finished!!” appears in the display. - Page 120 Chapter 8 EZ Routing 6. Only the sources—Input Mixer Channels and Track Mixer Channels—you specified during Step 5 will be shown. Use [ ], [ ], [ the cursor and the TIME/VALUE dial to adjust each of the values. fig.02-26 Cursor Track Channel 7.
-
Page 121: Using Ez Routing Quick Editing
Quick Editing lets you quickly get to VS-1824’s Input Mixer, Track Mixer, effect and mastering parameters so that you can change their values in a hurry. Once you become familiar with the many things you can do on the VS-1824, you may find Quick Editing to be the fastest way to create a new setup. - Page 122 Chapter 8 EZ Routing fig.02-14 Track Mixer Settings Cursor Output destination (MIX bus or track) Track to be recorded (up to two tracks) Track Status Effect Send Switch AUX Send Switch Stereo Link V-track Pop-up Window Mix Send Level Mix Send Pan fig.02-15 Effect Settings Cursor...
-
Page 123: Using Ez Routing Templates
Using EZ Routing Templates Saving an EZ Routing Template 1. When you have pressed the SAVE button after creating a new setup, the Routing Save screen appears in the display. Turn the TIME/VALUE dial to select the number of the desired memory location for your EZ Routing template. -
Page 124: Chapter 9 Automix
Chapter 9 Automix Mixer Automation With the VS-1824, you can record the present status or condition of the mixer as a Scene. However, you cannot change a Scene while the song is playing. If you want to store mixer settings that change as the song plays, use Automix. -
Page 125: Using Automix
Automix. 2. Press [AUTOMIX]. The AUTOMIX indicator lights, indicating that the VS-1824 is in Automix mode. 3. Decide which track fader’s movement you want to record using Automix. While pressing [AUTOMIX], press the Track SELECT button for the tracks you want to automate so that their indicators are blinking. -
Page 126: Realtime Automix Of Input Faders
Automix. 2. Press [AUTOMIX]. The AUTOMIX indicator lights, indicating that the VS-1824 is in Automix mode. 3. Decide which input fader’s movement you want to record using Automix. While pressing [AUTOMIX], press the Input SELECT button for the inputs you want to automate so that they begin blinking. -
Page 127: Snapshot Automation
Snapshot, follow the procedure below. 1. Press [AUTOMIX]. The AUTOMIX indicator lights, indicating that the VS-1824 is in Automix mode. 2. Play or locate to the point in the song where you want the Snapshot to occur. 3. Press [STOP]. -
Page 128: Snap Mode
Then, using Automix, you can create a Snapshot at the beginning of your song with the “no delay” version of the effect selected. Next, advance the VS-1824 to the beginning of the guitar solo. Select the “delay” version of your effect and create a second Snapshot. -
Page 129: Gradation
Gradation After creating two Snapshots, you can have the VS-1824 automatically create a smooth crossfade between these Snapshots using “gradation.” Gradation can be used to create fade-ins and fade-outs, as well as dynamic panning sweeps. The following is a quick overview of the gradation procedure: 1. - Page 130 Chapter 9 Automix Two Gradation Examples Example 1: Crossfade Between Stereo Tracks When creating your own original CD, you may decide you want one song to fade out and the next to fade in simultaneously. You can dictate the length of the crossfade by determining the time between two Snapshots.
-
Page 131: Updating Automix
1. Press [ZERO] to rewind to the beginning of the song. 2. Press [AUTOMIX]. The AUTOMIX indicator lights, indicating that the VS-1824 is in Automix mode. 3. Hold [AUTOMIX], and press the Track SELECT button for the Tracks whose Automix data you are satisfied with, so they are lit, but not blinking. -
Page 132: Editing Automix Data
Chapter 9 Automix Editing Automix Data Editing Automix Data (Micro Edit) You can check and change the values for settings pertaining to all Automix data. The general method is as follows. 1. Hold [SHIFT] and press [F6 (UTIL)]. The Utility menu icon appears. 2. -
Page 133: Copying Data To Another Location (Copy)
8. Use [ ] and [ ] to move to the last marker of the area from which you wish to erase Automix value, and press [F1 (Out)]. Checkmarks will be added to the area specified for erasure. fig.4-04.e Check marks Even if you wish to erase the Automix data for only one marker, press [F1 (In)] and then [F1 (Out)] for the desired marker. - Page 134 Chapter 9 Automix 8. Use [ ] and [ ] to move the cursor to the last marker of the area from which you wish to copy Automix data, and press [F1 (Out)]. A checkmark will be added to the copy area. fig.4-04.e Check marks Even if there is only one marker for the Automix data that...
-
Page 135: Smooth Data Transitions (Gradation)
Smooth Data Transitions (Gradation) This operation creates Automix data that smoothly connects the first Automix marker in the specified area with the last marker. fig.4-12.e Gradation area Time Editing of the Automix data cannot be cancelled by the Undo function. 1. -
Page 136: Increasing Or Decreasing All Data Values (Shift/Expand)
Chapter 9 Automix Gradation Curve Select the curve by which the gradation will be created. Linear: Linear. Convex above (exponential curve). Exp+: Exp-: Convex below (exponential curve). fig.4-17 Linear Exp+ Marker Add If this is turned on, markers will automatically be added to the area specified for gradation in the optimal locations for the curve that you selected in “Gradation Curve.”... - Page 137 6. Make sure that the cursor is located at “Edit Target,” and use the TIME/VALUE dial to select the Automix data that will be increased or decreased. 7. Use [ ] and [ ] to move the cursor to the first marker of the Automix data you wish to increase or decrease, and press [F1 (In)].
-
Page 138: Erasing Automix Data
To Quickly Erase all Automix Data, Including Snapshots This procedure will erase ALL markers in the VS-1824! 1. Hold [SHIFT] and [CLEAR], and press [TAP]. “Clear All Tap Markers?” appears in the display. -
Page 139: Chapter 10 Track And Phrase Editing
Delete, Split, Move, Copy, Trim In, and Trim Out allow you to define and edit entire sections of your song at once. Best of all, because the VS-1824’s Undo function (p. 62) works during editing in the same way that it does when recording, you can experiment without fear of losing your original version. -
Page 140: Track Cut
Chapter 10 Track and Phrase Editing 5. Press [ ], [ ], [ ], and [ cursor. Set the START and END values. You can enter the START and END times in a number of different ways such as using LOCATOR buttons, markers, the TIME/VALUE dial, Transport controls, or by Measure/ Beat. - Page 141 Alternate method: Press [F1 (SelTr)]. Press [ ], [ ], [ ], and [ cursor to the track you want to cut. Press [F3 (MARK)]. d. If [F2 (All)] is pressed, all tracks are selected to be cut. fig.04-22 Press [F1 (Back)]. 5.
-
Page 142: Track Move
Chapter 10 Track and Phrase Editing Track Move This operation moves audio to a new location on the timeline, and simultaneously, to another playback track, if desired. This is useful for correcting timing mistakes that can occur during recording. fig.04-08 Example 1: Moving within the same track Start Example 2: Moving to a different track... - Page 143 fig.04-10 START (Start Point) Specifies the start time of the segment to be moved. END (End Point) Specifies the end time of the segment to be moved. FROM (From Point) Specifies the reference position of the segment to be moved, in relation to the TO point. Normally, this is set as the same as the START point.
-
Page 144: Track Copy
Chapter 10 Track and Phrase Editing Track Copy This operation copies audio to another location on the timeline, and simultaneously, to another playback track, if desired. This is convenient when you want the same chorus to occur at several different points of the song, but you don’t want to re-record it each time. - Page 145 fig.04-04 START (Start Point) Specifies the start time of the segment to be copied. END (End Point) Specifies the end time of the segment to be copied. FROM (From Point) Specifies the reference position of the segment to be copied, in relation to the TO point. Normally, this is set as the same as the START point.
-
Page 146: Track Insert
Chapter 10 Track and Phrase Editing Track Insert This operation inserts blank space at the specified location. * Do not leave sound shorter than 0.5 seconds before or after there area to be inserted. Any sound within 0.5 seconds will be copied but may not be played. -
Page 147: Track Exchange
Track Exchange This operation swaps the audio data on two tracks. fig.04-14 Example: Exchanging tracks 1 and 2 Track1 Track2 Track1 Track2 1. Select the V-Track containing the source playback audio to be exchanged. 2. Hold [SHIFT] and press [F2 (TRACK)]. 3. -
Page 148: Track Time Compression/Expansion
Chapter 10 Track and Phrase Editing Track Time Compression/ Expansion This operation allows you to expand or compress the playback time of a track or a group of tracks by a specified time. You can specify the amount of time compression or time expansion in a range of 75-125%, but the more extreme the setting, the more the sound quality may be affected. - Page 149 fig.04-31 START (Start Point) Specifies where the time compression or expansion will start. END (End Point) Specifies where the time compression or expansion will end. Pitch Mode Variable: The pitch of the audio will change Fixed: The pitch will remain at the original level. Type This selects which algorithm is used to complete the Time Compression/Expansion.
-
Page 150: Track Name
Chapter 10 Track and Phrase Editing Track Name Normally, each track is given a name as shown below. fig.04-33 Track V-Track Track Name (up to 16 characters) You can change the name for each track. This helps you to remember what performance is recorded on each track. Give your tracks names such as “Lead Vocal”... -
Page 151: Track Import
Track Import This allows you to copy recordings from other songs into the current song. fig.04-35 Current Drive Other Song Performance Data Performance Data * You can only import a standard track from a song that has the same sample rate and recording mode as the current song. * You can import a pair of tracks containing a stereo CD image file (p. -
Page 152: Phrase Editing
Chapter 10 Track and Phrase Editing Phrase Editing In Play mode, you can select the phrase that you wish to edit, and quickly jump to the desired editing window using the following shortcut method. 1. Press [PLAY (DISPLAY)]. 2. Move the current time so that it falls within the phrase that you wish to edit. -
Page 153: Dividing A Phrase (Phrase Divide/Split)
IN Threshold Specify the volume (-84 - 6 dB) that will be used when searching for the point at which the phrase begins to sound. The VS-1824 will search for a point that exceeds this level. ], [ ], and... - Page 154 Specify the volume (-84-6 dB) that will be used when searching for the point at which the phrase stops sounding. The VS-1824 will search for a point that falls below this level. OUT Margin Specify the length of time (0.1–9.9 sec.) that will be preserved after reaching the “OUT Threshold.”...
-
Page 155: Phrase Move
7. Press [F1 (Back)]. 8. Use [ ], [ ], [ ], and [ cursor, and use the TIME/VALUE dial to set the parameters. Type Select how the phrase will be divided. In this case, select “Split.” Divide: Automatically divide the phrase into two or more phrases. - Page 156 Chapter 10 Track and Phrase Editing 7. Press the Track STATUS button for the desired destination track. The STATUS button turns red. * If you want to select TR 1-12, press [FADER/MUTE] several times until the “TR” indicator lights. If you want to select TR 13-18, press [FADER/MUTE] several times until the “TR”...
-
Page 157: Phrase Copy
Phrase Copy This operation copies the audio of a specified phrase to another location. This is convenient when you want, for example, a four-measure rhythm pattern to loop seamlessly. * Each phrases needs to be longer than 0.5 seconds. Otherwise, short phrases will not be played. - Page 158 Chapter 10 Track and Phrase Editing EX1 : Phrase is shorter than interval of FROM and TO FROM Copy Times="2," Overlap="Off" FROM Copy Times="2," Overlap="On" FROM EX2 : Phrase is longer than interval of FROM and TO FROM Copy Times="2," Overlap="Off" FROM Copy Times="2,"...
-
Page 159: Phrase Trim In
Phrase Trim In This adjusts the point at which the phrase begins without changing the phrase’s position on the timeline. This is convenient for trimming the edges of a phrase to be looped. fig.04-52 Time 1. Press [PLAY (DISPLAY)]. 2. Hold down [SHIFT] and press [F2 (TRACK)]. 3. -
Page 160: Phrase Trim Out
Chapter 10 Track and Phrase Editing Phrase Trim Out This adjusts the point at which the phrase ends without changing the phrase’s position on the timeline. This is convenient for trimming the edges of a phrase to be looped. fig.04-56 Time 1. -
Page 161: Phrase New
Phrase New You can create a new phrase any time you wish from any recorded take in the song. Creating a New Phrase 1. Press [PLAY (DISPLAY)]. 2. Hold down [SHIFT] and press [F2 (TRACK)]. 3. Press [F1 (Tr/Ph)] so that the Phrase Edit Menu appears. 4. -
Page 162: Phrase Name
Chapter 10 Track and Phrase Editing You cannot mix on one V track regularly recorded audio with audio that has been recorded with the CDR Recording Mode ON. In Songs that use a Recording Mode other than “CDR” follow these rules: •... -
Page 163: Deleting A Take
9. After assigning the name, press [F5 (Write)]. A message will ask whether you also want to change the names of the phrases used by that take. 10. If you also want to change the name of any phrase that plays the take, press [ENTER/YES]. -
Page 164: Chapter 11 Editing Tips & Tools
Non-destructive track and phrase editing are some of the most powerful tools available in the VS-1824. Since the VS-1824 also has 999 levels of UNDO, you can edit your audio without risk. Steps for Track Editing There are two basic editing steps on the VS-1824: Set the edit points. -
Page 165: Step 1: Set The Edit Points
Step 1: Set the Edit Points The first step to editing audio on the VS-1824 is finding the START and END edit points. These edit points indicate where on the track you want to start the edit, and where on the track you want to end the edit. - Page 166 [PLAY (DISPLAY)] or [EXIT] to return to the Playlist display. Setting Edit Points Using Scrub Another part of the Preview section of the VS-1824 is the Scrub function. Scrub provides an exact method to find edit points. With analog tape recorders, edit points were determined by slowly rocking the tape back and forth across the playback head of the tape machine.
- Page 167 TIME/VALUE slowly and smoothly for the best results. Setting Scrub Direction When using the Scrub function in the VS-1824, it is possible to scrub both forward and backward. That is, you can turn the TIME/VALUE dial either clockwise or counter-clockwise to find an edit point.
-
Page 168: Waveform Display
Scrub. 5. Press [SCRUB]. Waveform Display The pop-up waveform display in the VS-1824 is very useful for precision editing. The waveform shows audio amplitudes of the recorded track. You can use the function buttons to manipulate the resolution of this waveform for very precise location of edit points. -
Page 169: Step 2: Perform The Button-Pushes To Complete The Edit
Step 2: Perform the Button- Pushes to Complete the Edit Entering Editing Time Values Once you’ve entered a track editing screen, you must then place the time locations you’ve established for the edit points (START, END, etc.) into the appropriate fields in the display. There are several ways to do this. -
Page 170: Track Editing Vs. Phrase Editing
The VS-1824 offers two different types of editing. These are called “track editing” and “phrase editing.” Every time you start and stop recording, the VS-1824 creates a block of audio in the display. These blocks are called “phrases,” and they include the instructions that tell the VS-1824 which portion of your recordings should be played. -
Page 171: An Editing Note Of Caution
An Editing Note of Caution The VS-1824 is not able to play individual pieces of audio that are 0.5 seconds in length or smaller. If you have a phrase that is five seconds long, and you erase from the beginning up to 4.5 seconds, you will be left with a phrase 0.5 seconds... - Page 172 “Copy Time.” Use the TIME/VALUE dial to select the number of loops you want. 8. Use [ TIME/VALUE dial to select “On.” The VS-1824 will now automatically insert the amount of blank space necessary for the copy. This ensures that any existing audio on the selected track(s) will not be copied over.
-
Page 173: Chapter 12 Song Editing
Chapter 12 Song Editing This chapter explains editing that can be done across an entire song, rather than on a track-by-track basis. Song Arrange Song Arrange allows you to easily rearrange song structure. To use Song Arrange, place markers at the beginning of major sections of your song. -
Page 174: Song Split
Chapter 12 Song Editing [F4 (Arng)]: Moves the cursor back to “Arrange.” [F5 (Exec)]: Executes Song Arrange. [F6 (EXIT)]: Exits the Song Arrange screen. * If the time for the new playlist to begin is set at a point earlier than the previous song end, the original playlist is overwritten. -
Page 175: Song Combine
Combine, make a backup of both the source and destination songs using a CD-R, CD-RW or DAT recorder. You can perform Song Combine with any two VS-1824 songs that have the same sample rate and Record mode. The information copied to the current song includes performance data (audio) and the information that designates the track numbers the performance data is recorded on. - Page 176 Chapter 12 Song Editing 4. Use the TIME/VALUE dial to move the cursor to the source song and press [F3 (MARK)]. The song with the mark will be combined with the current song. 5. Press [F1 (SelSg)], and a directory of song names will appear.
-
Page 177: Chapter 13 Cd-Rw And Mastering
In some countries—such as the United States—the VS-1824 is shipped with a hard drive already installed. If you need to purchase an internal hard drive for your VS-1824, be sure to purchase an appropriate drive. The successful playing back of 16 tracks while you mix down to the mastering tracks is significantly affected by the speed of the hard disk. - Page 178 When CDRRecMode is on, a CD disk image is created during the recording of the mastering tracks using the VS-1824’s CDR recording mode. Off: When CDRRecMode is off, no CD disk image is created during the recording of the mastering tracks.
-
Page 179: Mastering Tracks Status Shortcut
6. Press [FADER] so that the TR (track) indicator blinks. fig.2-07.e Dark Blink 7. Hold down [STOP], and press the STATUS button for all tracks (13–16) that you wish to mix down. The STATUS indicators will light green. 8. Press [PLAY]. The song will play back. 9. -
Page 180: Playing Back The Mastering Tracks
Chapter 13 CD-RW and Mastering Playing Back the Mastering Tracks Here’s how you can verify the audio that was mixed down to the mastering tracks. You will listen to the mastering tracks. Tracks 1-16 themselves will not be played. 1. Press [PLAY (DISPLAY)]. 2. -
Page 181: To Prohibit Digital Copying
To Prohibit Digital Copying When mixing down from the VS-1824 to a DAT recorder or similar recorder via a digital connection, you can prevent digital copying of the tape on which the mixdown has been recorded. Many DAT recorders implement “SCMS”—the Serial Copy Management System. - Page 182 Chapter 13 CD-RW and Mastering 4. Use [ ], [ ], [ ], and [ cursor to “FXIns.” fig.2-19 5. Press [ENTER (YES)]. 6. Use [ ], [ ], [ ], and [ cursor. Use the TIME/VALUE dial to make your settings.
-
Page 183: Creating An Audio Cd
Creating an Audio CD You can create your own audio CD by choosing audio from two individual tracks in the VS-1824 and writing those to a CD-R disc. A CD can contain as many as 99 tracks—typically, each song on a CD is a track—up to a total length of 74 minutes. -
Page 184: Before Using The Cd-Rw Drive
(while the MIDI/ DISK indicator of VS-1824 or busy indicator of external CD-RW drive is lit). • Do not attempt to carry a VS-1824 equipped with a CD-RW drive (VS-1824 CD) while a disc is loaded in the CD-RW drive. -
Page 185: Creating A Master Stereo Mix
Write Method to “Track at Once” and Finalize to “OnlyFin.” When you are writing the entire contents of a CD at once: - set Write Method to “Disk at Once.” The VS-1824 will automatically finalize the CD regardless of the Finalize setting. -
Page 186: Assembling Multiple Songs For Cd Recording
If you use a part or an entire CD in your compositions with the VS-1824 and write the song onto a CD-R, obey the copyright notice on the original CD. The VS-1824 and its CD recording... - Page 187 Make sure your CD markers are at least four seconds apart. The placement of a CD track marker in a VS-1824 song sends a command to the CD-R to increment the track number on the CD-R disc by one. It is not possible to create a CD-R with non-sequential track numbers, or to skip track numbers.
-
Page 188: Writing Songs To Cd-R Discs
7. Wait a moment for the CD-R Writer display to appear. Press [F1 (SelTr)]. fig.07-05 8. Select the left and right tracks from the VS-1824 that you want written to the CD-R. Use [ and [ ] and the TIME/VALUE dial to move the cursor to the V-Track you want written as the left channel of the CD-R, and press [F3 (Sel L)]. - Page 189 Free Disc Space on CD-R/CD-RW The amount of drive space source tracks occupy on the VS-1824 may not be the same amount of disc space it occupies on a CD-R/CD-RW disc. The track size on the VS-1824 varies depending on the number of tracks and recording mode used.
-
Page 190: Adding A Song To A Partially Recorded Disc
Chapter 13 CD-RW and Mastering 13. Press [F5 (Exec)]. A message will ask you to confirm. When you are using CD-RW discs: “Track at Once” cannot be selected as the writing mode for “Writing Method.” The following message appears on the LCD and it will be unable to carry out the operation if you try to write CD-RW discs using the Track at Once method. -
Page 191: Cd Player Function
CD-R discs, use the CD Player function. * You can listen to the contents of the disc only through the VS-1824’s MASTER output, MONITOR output, or from the PHONES jack. You cannot output the audio from the CD-R/ CD-RW headphone jack or AUDIO OUT jacks. -
Page 192: Capture Audio Data From Audio Cd (Capture Function)
Capture Audio data from Audio CD (Capture function) VS-1824 have function to capture Audio data from Audio CDs. This can capture audio from CD only in case the sampling rate setting of current song is 44.1kHz. If you are using a VS-1824 that is not equipped with an internal CD-RW drive, you will need to purchase a separately available CD-RW drive. - Page 193 3. Press [F6 (CDCap]. CD Capture screen will appear. 4. Press [ ]to move curser and set each of following parameters using TIME/VALUE dial. If following cases, the tracks to capture audio must be set as Stereo Pair. In case it is not set as Stereo Pair, a message of “Illegal Track Pair!”...
-
Page 194: Connecting An External Cd-R/Cd-Rw Drive
Connect the CD-R/CD-RW drive to the VS-1824 as shown below. If the CD-R is the only SCSI device connected to the VS-1824, or if it is the last device in the chain, make sure that the terminator plug is connected to the remaining SCSI port on the CD-R. -
Page 195: Chapter 14 Other Useful Functions
Chapter 14 Other Useful Functions Vari Pitch Vari Pitch allows the VS-1824 to match the pitch of previously recorded tracks to the instrument currently being recorded, or to produce certain special effects. When recording an ensemble performance, all the instruments normally tune to an instrument such as an acoustic piano whose tuning cannot easily be changed. -
Page 196: Stereo Input
Input Mixer or Track Mixer. This is referred to as the STEREO IN bus. This can be used to bring an additional stereo input source into the VS-1824. Use the following procedure to route a signal to the STEREO IN bus. -
Page 197: Chapter 15 Using External Midi Devices
“slave.” When using MTC, you can choose whether to have the MIDI sequencer be the master that controls the VS-1824, or to have the VS-1824 be the master that controls the MIDI sequencer. When you use... -
Page 198: Synchronization Using The Vs-1824 As The Master
Chapter 15 Using External MIDI Devices Synchronization Using the VS-1824 as the Master When you want the VS-1824 to control the MIDI sequencer, use the following procedure: 1. Connect the VS-1824 and the MIDI sequencer as shown in the following illustration. -
Page 199: Synchronization Using The Vs-1824 As The Slave
MTC signal sent to the VS-1824 may be unstable. If the synchronization is erratic, try using the VS-1824 as the master device, or try raising the VS-1824 Sync Error Level as described above. ] to move the... -
Page 200: Using Mtc Offset
= (24h00m00s00f00 + 00h00m50s00f00) - 00h01m00s00f00 = 23h59m50s00f00 If the VS-1824 is slaved to a MIDI device using a negative offset, song playback across 00h00m00s00f00 will momentarily stop at 23h59m59s29f99 before resuming playback. Be careful not to record any audio until after this point in time. -
Page 201: Recording Midi Clock Messages
Recording MIDI Clock Messages 1. Connect the VS-1824 and the MIDI sequencer as shown below: fig.08-06 MIDI OUT MIDI Sequencer 2. Hold [SHIFT] and press [EXT SYNC]. The Sync/Tempo screen appears in the display. 3. Press [F1 (STRec)]. 4. If you wish to cancel the MIDI clock data recording, press [EXIT]. -
Page 202: Using The Tempo Map
MIDI Clock: one is to use the sync track, and the other is to use the tempo map. This section provides an explanation of how to control the MIDI sequencer from the VS-1824 using a tempo map. What is a Tempo Map? A tempo map is a song’s measure, beat, and tempo... -
Page 203: Synchronized Operation
(EXIT)]. The Sync/Tempo screen appears in the display. 4. Press [PLAY (DISPLAY)] to return to the Playlist display. Chapter 15 Using External MIDI Devices Synchronized Operation 1. Connect the VS-1824 and the MIDI sequencer as shown below: fig.08-11 ] to move the 2. -
Page 204: Other Methods To Generate A Sync Track Or Tempo Map
VS-1824. If you create a sync track or tempo map which matches the live drum track, the MIDI sequence will be in sync. -
Page 205: Creating A Sync Track Automatically
Chapter 15 Using External MIDI Devices Create a Tempo Map from a Sync Track If you have already recorded a VS-1824 sync track from an external MIDI source, you can convert it into a tempo map. 1. Hold [SHIFT] and press [EXT SYNC]. -
Page 206: Using Midi Controller Messages
4. Press [PLAY (DISPLAY)] to return to the Playlist display. Using MIDI Controller Messages The VS-1824 can transmit its mixer settings and functions as MIDI messages, and MIDI messages from an external MIDI controller can be used to control the VS-1824’s track status and mixer settings. -
Page 207: Switching Scenes
Scenes cannot be switched during song playback without pausing playback as the settings are changed. The VS-1824 will stop momentarily if it receives a Program Change message during playback instructing it to change Scenes. While it is stopped, the Scene is switched, and then playback resumes. -
Page 208: Adjusting Effects
The VS-1824 supports MIDI Machine Control (MMC). This means that when two VS-1824s are synchronized, or when a VS-1824 is synchronized with a MIDI sequencer that also implements MMC, operations such as Play, Stop, Fast Forward, etc., can be accomplished by operating only the Master device. -
Page 209: Chapter 16 Using Software Sequencers
28-channel digital mixer, you can mix and process up to 10 live signals from a MIDI-based sequencing system along with the recorded tracks in the VS-1824. This can reserve the VS-1824’s tracks for recording vocals, guitar, etc. This chapter explains how to synchronize the VS-1824 with some common software sequencing programs. -
Page 210: Specific Software Applications
Connections 1. Connect the MIDI OUT port of your MIDI interface to the MIDI IN port of the VS-1824. 2. Connect the MIDI OUT port of the VS-1824 to the MIDI IN port of your MIDI interface. Cakewalk Settings 1. Click on “Project Options…” in the Tools menu. -
Page 211: Cubase Vst
The next example also uses MTC, with the VS-1824 controlling the playback of Cubase. Connections 1. Connect the MIDI OUT port of the VS-1824 to the MIDI IN port of your MIDI interface. Cubase Settings 1. Click on “Synchronization” in the Options menu. -
Page 212: Logic Audio
Press [PLAY] on the VS-1824 and Logic will play in sync with the VS-1824. Logic will automatically recognize the frame rate that the VS-1824 is using. If it is different than the frame rate set in Logic, a pop-up window will appear allowing you... -
Page 213: Digital Performer
MIDI studio. When connecting a VS-1824 to Performer, the first thing you need to do is create a VS-1824 device in your FreeMIDI setup. You should only have to do this once. FreeMIDI Configuration 1. -
Page 214: Vision Dsp
OMS is a software program used by Vision to coordinate the various devices in your MIDI studio. When using a VS-1824 with Vision, the first thing you need to do is create a VS-1824 device in your OMS setup. You should only have to do this once. - Page 215 The next example uses MTC, with the VS-1824 controlling the playback of Vision. Connections 1. Connect the MIDI OUT port of the VS-1824 to the MIDI IN port of your MIDI interface. Vision Settings 1. Click on “Sync Options...” in the Options menu.
-
Page 216: Chapter 17 Using Hard Drives
2000 MB. If you would like to change partition size, please refer to drive initializing on p. 229. The VS-1824 is able to manage 500 MB, 1000 MB or 2000 MB of disk space at once. If you use a disk drive with a capacity that is greater than this, you will need to divide it into two or more areas. -
Page 217: Recording Times Vs. Sample Rate/Recording Modes
Recording Times vs. Sample Rate/Recording Modes The available recording time for a hard drive depends on a number of factors, including the size of the drive, the sample rate, the recording mode and the total number of tracks recorded. Both the recording mode and sample rate can be selected on a song-by-song basis. -
Page 218: Recovering Drive Space
This storage of this material can be a great advantage because it enables the VS-1824 to have an Undo function (p. 62) that can, for example, recover data that was recorded-over by accident. -
Page 219: Song Erase
Song Erase Eventually you will probably need to remove songs from the hard drive. This may be done to increase the amount of recording time available on the drive or because you no longer need to keep a particular song. The Song Erase function is used to delete song data from the current drive. -
Page 220: Using External Hard Drives
Selecting an External Hard Drive Most SCSI hard drives that adhere to AV specifications will work with the VS-1824. Bear in mind that drives that do not meet AV specs, though not recommended for recording and playback, are often still reliable for data storage. The VS-1824 can format a compatible drive in either 1 GB or 2 GB partitions and can also access up to eight partitions. -
Page 221: Connecting A Removable External Hard Drive
Connecting a Removable External Hard Drive It is possible to connect a removable external hard drive, such as a Zip® drive, to the SCSI connector on the VS-1824. Use the following procedure to connect an external removable drive to the VS-1824. -
Page 222: Initializing (Formatting) The Drive
A new drive, or a drive that was used by another device, cannot be used on the VS-1824 as is. You must initialize the drive so it can be used by the VS-1824. When a drive is initialized, all existing data on that drive is erased—all of its contents are irretrievably lost. -
Page 223: Saving A Song To An External Drive (Song Copy)
Saving a Song to an External Drive (Song Copy) You can save a song created on the VS-1824 to an external drive, such as a Zip drive. This is a good way to have the song backed up in the event of possible drive problems, or to get back drive space when little space on the internal IDE remains. -
Page 224: Song Copy Playable
To play back song data copied using the Song Copy Archives format, it must first be copied back onto the VS-1824’s hard drive using the Song Copy Extract procedure. If song data is copied onto disks that already have data on them, the older data will be erased. -
Page 225: Song Copy Archives
7. Press [ ] to move the cursor to “Destination Drive.” 8. Use the TIME/VALUE dial to select the destination drive and partition. Press [F5 (SelDr)] to view a directory of drives. Then use [ ], [ ], [ select the destination drive, and use the TIME/VALUE dial to select the partition. -
Page 226: Loading A Song From An External Drive
Song 2 Song 3 Song 4 Song 1 1. Confirm that the power on both the VS-1824 and the external drive are turned on. 2. If you are using a removable-type drive, insert a disk into the drive. 3. Press [PLAY (DISPLAY)]. -
Page 227: Loading A Song From External Disks Using Song Archive Extract
[PAGE] until “AcExt” appears, and then press [F3 (AcExt)]. fig.06-11 6. If several external drives are connected to the VS-1824, press [F5 (SelDr)] to view a list of drives. Use CURSORS to select the drive that contains the Song Archive disk, and press [F1 (Back)]. -
Page 228: Drive Select
Chapter 17 Using Hard Drives 7. Use [ ] and [ ] to move the cursor to “Source Song.” 8. Use the TIME/VALUE dial to move the cursor to the song you want to extract and press [F3 (MARK)]. By pressing [F2 (ALL)], you can place and remove Marks from all songs. -
Page 229: Hard Drive Maintenance
To initialize a drive using Physical Format: 1. Confirm that the power of the drive and the VS-1824 is turned on. 2. Insert a disk into the drive if you are using a removable type drive. -
Page 230: Drive Check
9. Press [ENTER/YES]. “STORE Current ?” appears in the display. Press [ENTER/YES] to store the current song; otherwise press [EXIT/NO]. 10. After the initialization is completed, the VS-1824 restarts automatically, and returns to the Playlist display. Drive Check You can check the drive you are using to make sure it can be read correctly. -
Page 231: Check Drive Reliability Using Surface Scan
1. Press [EXIT/NO]. “Cancel ?” appears in the display. 2. Press [ENTER/YES]. Surface Scan is now canceled. Note that any unusable memory found up to that point is not registered by the VS-1824. 3. The VS-1824 restarts automatically. 2. When Surface Scan is completed, one of the following messages appears in the display. -
Page 232: Backup Options
Backup Options There are several methods you can use to backup song data from the VS-1824. It is important to remember that simply backing up a song does not automatically remove it from the current drive. If you wish to free up drive space, backup the song using one of the methods described below, and then use Song Erase to remove it from the current drive. -
Page 233: Chapter 18 Cd-R Backup
CD-R/CD-RW drive. If you wish to play the backup data, it must be recovered onto a VS-1824 hard drive first. A song that will not fit on a single disc will be copied across multiple discs based on the available free space on the discs. -
Page 234: Items Necessary For Cd-R Backup
4. Press the CD downward. The CD will be locked by 3 clips of the stopper. 5. Press disc tray until it is locked in the VS-1824. If a disc tray does not open If the power is turned off with the disc still in the drive (such as due to a power failure), the disc tray cannot be opened by pressing the eject button. -
Page 235: Cd-R Backup
The song will be written at quadruple speed (706 kilobytes per second). The song will be written at double speed (353 kilobytes per second). The available speeds will depend on the Roland- approved CD drive connected to the VS-1824. Chapter 18 CD-R Backup... -
Page 236: Cd-R Recover
Chapter 18 CD-R Backup 6. If several CD-R/CD-RW drives are connected to the VS-1824, you can press [F5 (SelDr)] to display a directory of drives. From this screen, use [ and [ ] to select the CD-R/CD-RW backup destination drive, then press [F1 (Back)]. - Page 237 The song will be recovered at fourhold speed (706 kilobytes per second). The available speeds will depend on the Roland- approved CD drive connected to the VS-1824. Even if the “CD SPEED” is set to “x24” or “x14” the time it takes for recovery is onto always 1/24 or 1/14 of the base.
-
Page 238: Chapter 19 Using A Dat Recorder (Dat Backup)
During DAT backups, no audio is output from the VS-1824’s analog output jacks. The song data sent to the DAT recorder from the VS-1824 is a particular signal recorded on the drive. Monitoring this with the DAT recorder’s volume raised may result in damage to... -
Page 239: Saving Song Data To Dat (Dat Backup)
Saving Song Data to DAT (DAT Backup) Use the following procedure to back up song data on the current drive. 1. Connect the VS-1824 and the DAT recorder as shown below. fig.09-02a Optical Digtal In DAT recorder fig.09-02b Coaxial Digital In... - Page 240 ] to move the backup at any time during the procedure. Song data recorded to a DAT up to that point cannot be loaded into the VS-1824. * To check whether or not a backup has been performed correctly, we recommend you carry out the Verify procedure (p. 243).
-
Page 241: Recovering Data From A Dat
VS-1824 while it is still in a VS-880/ 880EX/1680 format. If you wish to edit VS-880/880EX/1680 song data with the VS-1824, you will need to convert it to VS- 1824 format using the Song Import procedure (p. 246). -
Page 242: Canceling The Recover Operation
* Loud noises may damage your amplifier and speakers. Turn down the headphones and master volume of the VS-1824 when you check for errors in the song data. Canceling a DAT Recovery Operation in Progress 1. -
Page 243: Dat Backup Verification
DAT tape. * After performing DAT backups, in order to confirm the data has indeed been properly backed up, we strongly recommend you carry out the Verify procedure. 1. Connect the VS-1824 and the DAT recorder as shown below. fig.09-06c Optical... - Page 244 Chapter 19 Using a DAT Recorder (DAT Backup) 2. Insert the tape that contains the song data into the DAT recorder. If the song data is backed up on two or more tapes, insert the first tape. 3. Rewind the tape to begin playback from the beginning of song data.
-
Page 245: Chapter 20 Compatibility With Other Vs Recorders
Chapter 20 Compatibility with Other VS Recorders Drives used with Roland’s VS-890, 1680, VS-880/880EX or VSR-880 can also be used by the VS-1824. Song data recorded on such drives can be loaded by the VS-1824. Because of differences in the structure of drive space and song data... -
Page 246: Song Import
Chapter 20 Compatibility with Other VS Recorders Song Import You can convert songs created on a VS-1680/880/880EX/ 840/840EX/890 or VSR-880 for use in the VS-1824 and copy them as new songs to the current drive. This is called “Song Import.”... -
Page 247: Song Export
VS-1680/880/880EX/890 or VSR-880 and copy it as a new song to an external drive (such as a Zip drive) connected to the VS-1824’s SCSI port. This is referred to as “Song Export.” All song data, including mixer settings such as EQ (where... - Page 248 Chapter 20 Compatibility with Other VS Recorders 1. Make your connections as shown in the diagram below. fig.10-04 2. Select the song you want to export as the current song. 3. Insert a disk into the Zip drive. 4. Press [PLAY (DISPLAY)]. 5.
-
Page 249: Chapter 21 System And Global Settings
Chapter 21 System and Global Settings System Settings for Each Song These are overall system settings that can be saved with each song. These settings are lost if the power is turned off without the song being saved, or if the system settings are reset to their original conditions. -
Page 250: Peak Hold
Chapter 21 System and Global Settings Peak Hold You can set the display to hold the maximum values (peaks) while the level meter is shown in the graphic display. fig.12-16 1. Hold [SHIFT] and press [F5 (SYSTEM)]. The System Menu icon is displayed. If the System Menu icon does not appear, press [F6 (EXIT)]. -
Page 251: Foot Switch Settings
Foot Switch Settings You can choose how the foot switch functions when an optional foot switch—such as the Roland DP-2 or BOSS FS- 5U—is connected to the FOOT SWITCH jack. 1. Hold [SHIFT] and press [F5 (SYSTEM)]. The System Menu icon is displayed. If the System Menu icon does not appear, press [F6 (EXIT)]. -
Page 252: Numerics Type
Chapter 21 System and Global Settings Shift Lock Shortcut You can quickly toggle the Shift Lock feature on and off by holding down [SHIFT] and pressing [ENTER/YES]. To Display the Song Menu Icon 1. Press [SHIFT] and immediately release the button. The button indicator lights. -
Page 253: Measure Display
Chapter 21 System and Global Settings Measure Display VS-1824 can show measure and beat while it is sending MIDI clock. About MIDI clock, see “Sync Gen.” on p. 198. VS-1824 can send MIDI clock in case “Sync Gen.” setting is “MIDIClk”... -
Page 254: Scsi Id Number
ID number. The VS-1824’s ID number is set to “7” at the factory. When connecting SCSI devices (such as a Zip drive or a CD-R drive) to the VS-1824, be sure to set the SCSI ID number for these devices to a number other than “7.”... -
Page 255: Input Peak Level
Input Peak Level You can designate the level at which the peak indicator lights based on signal input via the INPUT jacks (1-8). 1. Hold [SHIFT] and press [F5 (SYSTEM)]. The System Menu icon is displayed. If the System Menu icon does not appear, press [F6 (EXIT)]. -
Page 256: Adjusting The Button Sensitivity
4. Press [PLAY (DISPLAY)] to return to the Playlist display. Fan Control You may find the noise from the VS-1824’s cooling fan to be a concern when recording with a mic nearby. If this is the case, you can program the VS-1824 to turn off the fan during certain operations. -
Page 257: Removing A Direct Current Offset From The Mix Bus
When MIDI Model ID is set to “VS-1680,” you cannot control the VS-1824’s Tracks 17 and 18 via MIDI. If you are using a VS-1824 and a VS-1680 in the same MIDI system, and you set the VS-1824’s MIDI Model ID parameter to “VS-1680,”... -
Page 258: Play And Record Settings
During playback, you can press STATUS to switch between monitoring the recorded track and monitoring the input source. It is also possible to set the VS-1824 so the input source is always monitored. 1. Hold [SHIFT] and press [F5 (SYSTEM)]. -
Page 259: Fade Length
Fade Length During track editing, or punch-in and punch-out recording, it is possible that a tiny audio click may occur. The VS-1824 can fade in and fade out these edges so no noise is heard. Adjust the Fade Length if an objectionable noise occurs as a result of editing or recording. -
Page 260: Alarm Clock
Chapter 21 System and Global Settings Alarm Clock The VS-1824 has a built-in clock with an alarm function. With the alarm function, you can have a text message of your choice appear in the display at a certain time of day, day of week, month or year. -
Page 261: Chapter 22 Specific Applications
The VS-1824 is controlled by synchronization signals (MTC) from the external MIDI device. With this setting, the VS-1824 will not go into Play or Record unless it is receiving MTC signals. Use this setting when you want to use the MTC from an external MIDI device to control the VS-1824. -
Page 262: Syncing Two Vs-1824S Or A Vs-1824 And A Vs-1680 With Mtc And Mmc
VS-1824 and a VS-1680 with MTC and MMC The VS-1824 has the ability to generate and slave to MIDI Time Code (MTC). It also has the ability to varispeed its sample rate to account for fluctuations in the source clock signal. -
Page 263: Settings For The Slave Vs
VS-1824 and VS-880/880EX to operate in sync with the VS-1824 as the master device: 1. Connect the MIDI OUT jack of the VS-1824 to the MIDI IN jack of the VS-880/880EX. 2. Connect the left MASTER OUT jack of the VS-880/880EX to INPUT 3 on the VS-1824. - Page 264 TYPE” is displayed and use the TIME/VALUE dial to select “30.” 8. Press [PLAY (DISPLAY)] to return to the main screen. When you press PLAY on the VS-1824, both units will start playing. The VS-1824’s stereo mix output will now contain ] to move the audio from both units.
-
Page 265: Using An External Midi Device To Control The Mixer (Compu Mix)
The VS-1824 can send and receive mixer settings and fader movements as MIDI messages. You can use an external MIDI controller to control the VS-1824’s faders. You can also use an external MIDI sequencer to record mixer settings and movements during playback as MIDI song data, and the mixer can be controlled automatically by the MIDI sequencer when the song is played back later. -
Page 266: Preparations For Compu Mix
MIDI Sequencers” (“Synchronizing with MIDI Sequencers,” p. 197) to make the necessary settings in both the VS-1824 and the MIDI sequencer to synchronize the two machines. Make sure to set the MIDI sequencer so MIDI messages received at the MIDI In connector are not output from the MIDI Out connector. -
Page 267: Recording With Compu Mix
2. Put the MIDI sequencer into Record mode, and press [PLAY] on the VS-1824. 3. As soon as playback of the VS-1824 starts, immediately hold [SHIFT] and press [SCENE]. The mixer’s initial settings are transmitted from the MIDI OUT connector. -
Page 268: Using External Effects Units
3. Press [F5 (AUX)]. If “AUX” does not appear in the display above [F5], press [PAGE] until you see “AUX,” and then press [F5 (AUX)]. * If EFFECT B is not installed in the VS-1824, then [F4] displays “AUX3.” 4. Move the cursor to “AUX Sw.” Use the TIME/VALUE dial to select “Pst.”... -
Page 269: Chapter 23 Frequently Asked Questions
17/18 are set with Channel Link ON and act as stereo pairs. Tracks 7-18 on the VS-1824 are configured as stereo tracks but they can be controlled independently. To do this, the Channel Link function must be turned off. Tracks 7, 9, 11, 13, 15 and 17 can then be controlled from the front panel just as Tracks 1-6 are. -
Page 270: What Is The Fader/Mute Button Used For
How Do I Burn Audio CDs? The VS-1824 allows you to take a project from its beginning stages all the way to a finished CD. What steps need to be taken to produce a finished CD? A general description of the recording process might be as follows: •... - Page 271 You will need to create CD markers for any additional songs. Use the following procedure to create CD markers: 1. Locate the VS-1824 to the point where the audio for your second song begins. 2. Hold [PLAY (DISPLAY)] and press [TAP].
-
Page 272: How Do I Create A Tempo Map
Chapter 23 Frequently Asked Questions How Do I Create a Tempo Map? The VS-1824 allows you to create a tempo map that controls tempo and meter changes throughout your song. This is very useful when you are integrating the VS-1824 with a MIDI sequencer. -
Page 273: How Do I Create A User Template In Ez Routing
5. Advance the VS-1824 to the point in time where you want these settings to change and adjust them as desired. Then, hold [SCENE] and press [TAP]. 6. Repeat Step 4 to create additional Snapshots as desired. 7. Reset your song to the beginning and press [PLAY] to hear the results. -
Page 274: How Do I Bounce Tracks
New material can then be recorded to the original tracks if necessary. On the VS-1824, you can record new tracks without recording over the original material by recording on different V-Tracks. -
Page 275: How Do I Bounce Tracks With Effects
How Do I Bounce Tracks with Effects? If you are using effects, it can be beneficial to include the output of the effects processor when you bounce tracks. This is sometimes referred to as “printing” the effects. By printing the effects, you make them a permanent part of the audio. This also frees up the effect processor to be used on a different track, or to add a different effect on the same track. -
Page 276: How Do I Use The Scrub And Waveform Display Features
Setting the Scrub Length There are two factors that can affect the precision with which you can scrub audio in the VS-1824: the Scrub Length and the position of the cursor in the time display. Scrub Length controls the size (in milliseconds) of the section of audio that is looped, and can set as low as 25ms or as high as 100ms. -
Page 277: How Do I Record A Stereo Signal
How Do I Restore the Mixer Parameters to the Factory Settings? The VS-1824 gives you the ability to return all of your mixer and system parameters back to their original factory settings. This is convenient if you want to reset the mixer and system settings to their original values without having to adjust each parameter manually. -
Page 278: How Do I Import Vs-1680, Vs-880/880Ex, Vs-890/Vsr-880 And Vs-840/840Ex Songs
If you have songs created on a VS-1680, VS-880/880EX, VS-890/VSR-880 or VS-840/840EX that you would like to edit on the VS-1824, you will need to convert them to the VS-1824’s format using the Song Import function. If your VS-1680, VS-880/880EX, VS-890/VSR-880 or VS-840/840EX backup is not in a playable form (e.g. -
Page 279: Index
Index Numerics 1–8 (Scene) button ... 21 1–8 button ... 18 2 Band EQ ... 81 24 fps ... 197 25 fps ... 197 29 fps (drop) ... 197 29 fps (non-drop) ... 197 3 Band EQ ... 81 30 fps (non-drop) ... - Page 280 Index connecting a CD-R/CD-RW drive ... 194 creating an audio CD ... 183 adding songs ... 190 all songs at once ... 190 CD-RW ... 188 disk at once ... 185 necessary items ... 184, 234 rules ... 185 Table of Contents ... 185 track at once ...
- Page 281 Display ... 38 Automix ... 125 regions ... 38 understanding ... 38 DP-2 ... 251 DR20 ... 106 Drive Busy! ... 52 Drive Check ... 230 Drive Initialize ... 229 Drive Select ... 228 Drop frames described ... 197 Drum reverb ...
-
Page 282: Importing Tracks
... See Attenuation How big is my song? ... 277 How can I store my connections? How do I automate the VS-1824? How do I bounce tracks? ... 274 How do I bounce with effects? How do I burn audio CDs? - Page 283 IN MIDI jack ... 22 Initialize System/Mixer ... 37 Initializing a hard drive ... 222 the VS-1824 ... 277 INPUT jacks ... 23 INPUT Knobs ... 18 Input Mixer channel parameters ... 86 default routing ... 76 diagram ... 28 faders ...
- Page 284 Index Master fader ... 19 MASTER OUT jacks ... 22 level & balance adjustment ... 95 Mastering Room ... 177 creating mastering tracks ... 177 Mastering Tool Kit ... 181 Mastering tracks defined ... 177 playing back ... 180 recording ... 177 with effects ...
- Page 285 Muting channels ... 42 Input Mixer ... 90 Track Mixer ... 95 Naming by typing ... 195 NEXT button ... 20, 45 No Effect Board ... 101 Non-drop ... 197 Not 44.1kHz Song ! ... 190 NTSC ... 197 Numbers, typing ...
- Page 286 Index Program Changes..See MIDI Program numbers..See Track numbers on a CD Protecting songs ... 48 Punch-in defined ... 57 ...See also Punching Punching and phrases ... 170 Auto Punch ... 58 setting during playback ... 59 using locators ... 58 using markers ...
- Page 287 ... 197 sync track ... 200–202, 204–206 tempo map ... 202, 204–206 unstable ... 199 Synchronization with video equipment Synchronization with VS recorders another VS-1824 ... 262 VS-1680 ... 262 VS-880/880EX ... 263 System initialization ... 37 System mode ...
- Page 288 ... 42 recording to ... 54 soloing ... 42 Track mode ... 35 Transitions. Transport controls Turning off the VS-1824 Turning on the VS-1824 Typing numbers and letters Undo defined ... 62 ...See also Undo and Redo UNDO (REDO) button Undo and Redo explained ...
- Page 289 VS-1680 compatibility ... 245 syncing with ... 262 VS-840/840EX compatibility ... 245 VS-880/880EX compatibility ... 245 syncing with ... 263 VS8F-1 ... 17 VS8F-2 ... 17 VSR-880 compatibility ... 245 V-Tracks explained ... 30 recording ... 56 selecting ... 56, 80, 91 Wake-up call ...
- Page 290 Information When you need repair service, call your nearest Roland Service Center or authorized Roland distributor in your country as shown below. SINGAPORE AFRICA AFRICA Swee Lee Company 150 Sims Drive, EGYPT SINGAPORE 387381 TEL: 846-3676 Al Fanny Trading Office...
- Page 291 Apparatus containing Lithium batteries ADVARSEL! Lithiumbatteri - Eksplosionsfare ved fejlagtig håndtering. Udskiftning må kun ske med batteri af samme fabrikat og type. Levér det brugte batteri tilbage til leverandøren. ADVARSEL Eksplosjonsfare ved feilaktig skifte av batteri. Benytt samme batteritype eller en tilsvarende type anbefalt av apparatfabrikanten.
- Page 292 Roland will take no responsibility for any “direct damages,” “consequential damages,” or “any other damages” which may result from your use of the VS-1824. These damages may include but are not limited to the following events which can occur when using the VS-1824.
- Page 293 Capture Audio data from Audio CD (Capture function) VS-1824 have function to capture Audio data from Audio CDs. This can capture audio from CD only in case the sampling rate setting of current song is 44.1kHz. If you are using a VS-1824 that is not equipped with an internal CD-RW drive, you will need to purchase a separately available CD-RW drive.
- Page 294 Capture Audio data from Audio CD (Capture function) 6. Press [F5 (Exec)] after completion all the settings. A message concerning copyright appears in the display. After reading this message, press [ENTER/YES]. The same message appears in the back cover of Owner’s Manual.
- Page 295 VS-1824 A demo song is pre-installed! A demo song is pre-installed in internal hard disk of VS-1824. Therefore, it is not necessary to execute process of “How To Load a Demo Song (CD-R Recover)” (p. 21–23) in the User Guide.
Need help?
Do you have a question about the VS-1824 and is the answer not in the manual?
Questions and answers