
Related Manuals for ETC Irideon WLZ


Summary of Contents for ETC Irideon WLZ
- Page 1 Irideon WLZ User Manual Version 1.0.1 Part Number: 7192M1200-1.0.1 Rev G Released: 2021-10...
- Page 2 To view a list of ETC trademarks and patents, go to etcconnect.com/ip. All other trademarks, both marked and not marked, are the property of their respective owners. ETC intends this document, whether printed or electronic, to be provided in its entirety.
-
Page 3: Table Of Contents
Install Portable Fixture on Unistrut Track Connect Cables to Portable Fixture Configuration Set the DMX Address at the Fixture Adjust the Local Intensity Initial Power Up Status LED RDM Values Focus and Setup Adjust the Tilt Irideon WLZ User Manual... - Page 4 Adjust the Field Use the Barn Door Accessory Use the Integrated Media Holder Cleaning Irideon WLZ User Manual...
-
Page 5: Introduction
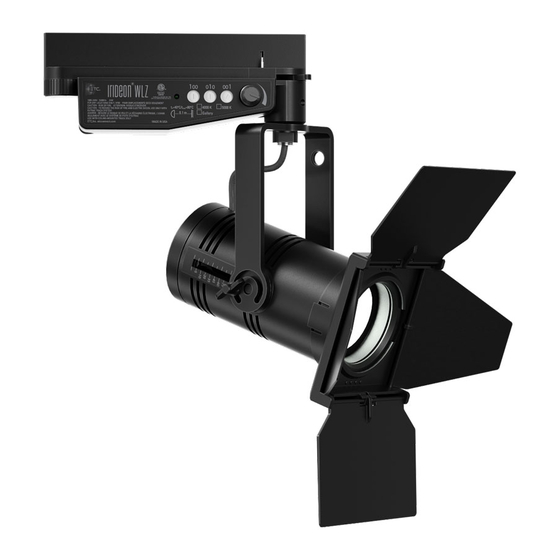
Introduction The Irideon WLZ is a compact but powerful LED wash light. It incorporates many of the great features of its companion fixture, the Irideon FPZ, including local and DMX control, adjustable zoom, and sleek design. The Irideon WLZ has three available mounting options: Track-mount: For use with the DataTrack track system. -
Page 6: Safety
N’utilisez pas le projecteur sans que la lentille soit • installée. N’utilisez pas ce projecteur si la lentille présente des • rayures ou des fissures profondes. Il faut remplacer la lentille si elle est abîmée. Irideon WLZ User Manual... - Page 7 AVERTISSEMENT : Pour éviter le risque d'incendie ou de choc électrique avec le modèle adaptateur pour rail, utiliser uniquement avec une alimentation par rail DataTrack (EUTRAC). WARNING: Use the track-mount fixture with ceiling- mounted track only. Irideon WLZ User Manual...
-
Page 8: Installation
Dialing into a dimmable circuit may cause fixture damage that will void the ETC warranty. 3. Use the circuit selection lock to select the circuit. The desired circuit number should point toward the center of the adapter. Irideon WLZ User Manual... -
Page 9: Install Canopy Fixture (Dmx Variant)
Separate the line voltage from the data side in the back box. Install the voltage barrier provided by ETC. Install the voltage barrier in the back box with the provided bolt (see images at right, showing a 4 in back... - Page 10 (the mounting surface is smaller than the canopy enclosure). 3. Terminate DMX/RDM input from the control source to the back box. Irideon WLZ User Manual...
- Page 11 See the specific termination setup guide for the type of cable used (either Belden 9729 or Category 5) in the installation. Termination kits are ordered separately. b. Install the connector with wires terminated to the DMX/RDM Thru receptacle on the termination board. Irideon WLZ User Manual...
- Page 12 Mounting and data side are separated by plate bolts the voltage barrier in the back box. See Install the Voltage Barrier (DMX Variant) on Canopy page 5 bolts Irideon WLZ User Manual...
- Page 13 All other devices in the data run should retain the default setting for the termination switch (OFF). 6. Following the label on the mounting plate, attach the power wires to the power block. Mounting plate DMX connector Termination switch Power block Irideon WLZ User Manual...
- Page 14 Canopy before you secure the bolts fixture. Insert the oval-shaped covers into the canopy enclosure to cover the canopy bolt openings. 9. Restore power at the disconnect device. Oval-shaped covers Irideon WLZ User Manual...
-
Page 15: Install Canopy Fixture (0-10 V And Dali Variants)
Cover plate Remove the adhesive tape or (if needed fasteners securing the for surface- mounting plate to the fixture mounting) to free the mounting plate Mounting from the canopy enclosure. plate Mounting plate bolts Canopy bolts Irideon WLZ User Manual... - Page 16 WAGO connectors. For 120 V fixtures: Connect the black wire to line and the white • wire to neutral. For 230 V fixtures: Connect the brown wire to line and the blue • wire to neutral. Irideon WLZ User Manual...
-
Page 17: Install Portable Fixture With C-Clamp
3/4 in to 2 in pipe. Two different length pipe bolts are provided to accommodate different pipe sizes. Note: The miniature C-clamp for the portable fixture is available only in non-EU markets. Within the EU, use an M12 bolt to secure a clamp (provided separately) to the fixture. Irideon WLZ User Manual... - Page 18 4. Loosen the C-clamp yoke bolt and rotate the yoke to the desired position. CAUTION: Tighten the C-clamp pipe bolt to about 18 in/lb (approximately finger-tight plus up to one-quarter turn). Do not use excessive force. 5. Tighten the bolt to lock the fixture position. Irideon WLZ User Manual...
-
Page 19: Install Portable Fixture On Unistrut Track
To order RJ45-to-plug XLR adapter, use part number W6539. • 2. Connect the fixture to the power source. Note: The Irideon WLZ is not self-terminating. You must terminate • the last fixture in line with a 120 Ohm resistor. Please contact your ETC customer service representative to purchase part number N4086. -
Page 20: Configuration
DMX addresses must be set between 1 and 512. Each fixture must be considered a separate DMX device for the purpose of DMX line-loading calculations. The Irideon WLZ only has an intensity channel. Note: When using RDM with track-mounted fixtures, ETC recommends connecting no more than 20 fixtures on a single run. - Page 21 Local intensity control knob Status LED and Track-mount Portable DMX addressing dials In these addressing examples, the fixture is addressed to 503. 10'S 100'S 10'S 100'S Canopy (mounting plate removed) Irideon WLZ User Manual...
-
Page 22: Adjust The Local Intensity
When DMX is lost and the local intensity is set to Off, the light will • go dark. When DMX is lost and the local intensity is set to a level greater • than 0, the light goes to the level of the local intensity setting. Irideon WLZ User Manual... -
Page 23: Initial Power Up
When the local intensity is set to Off, the status LED will flash when there is a loss of DMX. With the local intensity set to any other position, the status LED will flash for 10 seconds when there is a loss of DMX. Then the LED will turn off. Irideon WLZ User Manual... -
Page 24: Rdm Values
Rotate the back of the fixture body to adjust the field between wide and narrow (see image at left). The field angle markers on the side of the fixture indicate the field angle as you adjust within the range of 16–91 degrees. Field angle markers Irideon WLZ User Manual... - Page 25 DataTrack adaptor, C-clamp, or canopy. Use the Integrated Media Holder The Irideon WLZ comes equipped with an integrated media holder, which is a metal frame used to hold color media (often referred to as gel) or diffusion in front of the lens. The media holder is equipped with a magnetic retaining clip that prevents the media from falling out.
- Page 26 Magnets 2. Place the dichroic glass into the groove. 3. Replace the media holder by aligning the tab at the top of the media holder with the inset on the front casting. Irideon WLZ User Manual...
- Page 27 6. Replace the lens, rubber ring, and glass lens (CE version only). Ensure that the ridged side of the lens is facing out. 7. Replace the front casting and secure it with the bolts. 8. Replace the integrated media holder. Irideon WLZ User Manual...
- Page 28 | © 2021 Electronic Theatre Controls, Inc. Trademark and patent info: etcconnect.com/ip | Product information and specifications subject to change. ETC intends this document to be provided in its entirety. 7 1 9 2 M 1 2 0 0 -1 .0 .1 Rev G Released 2021-10...
Need help?
Do you have a question about the Irideon WLZ and is the answer not in the manual?
Questions and answers