
Related Manuals for ETC Irideon WLZ


Summary of Contents for ETC Irideon WLZ
- Page 1 Irideon WLZ User Manual Version 1.0 Part Number: 7192M1200-1.0.1 Rev: D Released: 2019-06...
- Page 2 To view a list of ETC trademarks and patents, go to etcconnect.com/ip. All other trademarks, both marked and not marked, are the property of their respective owners. ETC intends this document, whether printed or electronic, to be provided in its entirety.
-
Page 3: Table Of Contents
Table of Contents Introduction ..... . . 1 Specifications..... . . 3 Basic Assembly. - Page 4 Adjustments..... . . 19 Set the Angle with the Yoke ... . . 19 Adjust the Field .
-
Page 5: Introduction
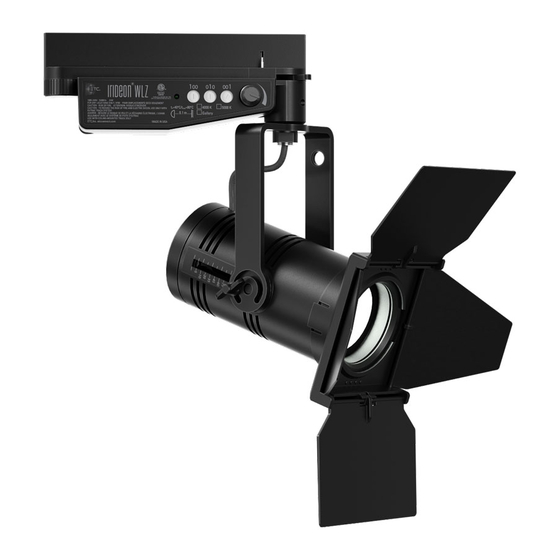
Introduction The Irideon WLZ (Wash Light Zoom) is a compact but powerful LED wash light. It incorporates many of the great features of its companion fixture, the Irideon FPZ, including local and DMX control, adjustable zoom, and sleek design. The Irideon WLZ has three available mounting options: •... - Page 6 WARNING - To reduce the risk of FIRE, ELECTRIC SHOCK, OR INJURY TO PERSONS: 1) Keep lamp away from materials that may burn. 2) External temperature after 5 minutes of full-brightness operation: 27°C (81°F). 3) External temperature when steady state is achieved: 50°C (122°F). SAVE THESE INSTRUCTIONS Irideon WLZ...
-
Page 7: Specifications
LEDs • Cree LED source • Long-life LED: 70,000 hours L70 lumen - Irideon WLZ 2700 K Gallery: 90+ CRI maintenance - Irideon WLZ 3000 K: 80+ CRI - Irideon WLZ 3000 K Gallery: 90+ CRI - Irideon WLZ 4000 K: 80+ CRI... -
Page 8: Basic Assembly
The desired circuit number should point toward the center of the adapter. WARNING: When using the circuit selection lock, ensure that the selected circuit is a constant power circuit. Dialing into a dimmable circuit may cause fixture damage that will void the ETC warranty. Irideon WLZ... -
Page 9: Install Canopy Fixture (Dmx Variant)
• Separate the line voltage from the data side in the backbox. Install the voltage barrier provided by ETC. Install the voltage barrier in the backbox with the provided screw, separating the power side from the data side (see image at right). -
Page 10: Connect Canopy Wiring (Dmx Variant)
Belden 9729 for DMX input cable to the screw terminal connector. b: Install the screw terminal connector with wires terminated to the DMX/RDM Input receptacle on the termination board. Belden 9729 (or equivalent) wire termination to screw connector Irideon WLZ... - Page 11 If using Category 5: Cat5 Cable Preparation for a: See the IDC Termination Setup Guide instructions to prepare and terminate Category 5 for DMX/RDM input cable to the insulation displacement connector. b: Install the IDC connector with wires terminated to the DMX/RDM Input receptacle on the termination board.
-
Page 12: Install The Mounting Plate And Complete The Wiring (Dmx Variant)
Mounting plate screws Canopy screws (DMX variant shown) Mounting plate (DMX variant) Canopy screw hole For this structure..secure mounting plate using: 4-11/16” backbox Large oval slots (see 1 above) 4” backbox Small oval slots (see 2 above) Irideon WLZ... - Page 13 Use the hook in the canopy enclosure to hang the fixture from the mounting plate while you complete the fixture wiring. Hook If desired, manually set the DMX address on the fixture using the three addressing dials in the canopy. Set the DMX Address on the Fixture page 15 Connect the pre-wired DMX connector on the fixture...
-
Page 14: Install Canopy Fixture (0-10 V And Dali Variants)
The cover plate is (DALI required when the interior of the variant canopy enclosure could be exposed shown) after installation with only the mounting plate (the mounting surface is smaller than the canopy enclosure). Irideon WLZ... - Page 15 Mounting plate (0–10 V and DALI variants) Canopy screw hole For this structure..secure mounting plate using: 4-11/16” backbox Large oval slots (see 1 above) 4” backbox Small oval slots (see 2 above) Mud ring and round box Circular slots (see 3 above) Use the hook in the canopy enclosure to hang the fixture from the mounting plate while you complete...
- Page 16 Use the canopy screws to secure the fixture to the mounting plate. Insert the oval-shaped covers into the canopy enclosure to cover the canopy screw openings. Canopy screws Oval-shaped covers Restore power at the disconnect device. Irideon WLZ...
-
Page 17: Install Portable Fixture With C-Clamp
Install Portable Fixture with C-clamp The C-clamp attaches the fixture to the mounting pipe and allows you to adjust the position of the fixture once it is mounted. The C-clamp will fit a 3/4” to 2” pipe. Two different length pipe bolts are provided to accommodate different pipe sizes. -
Page 18: Install Portable Fixture On Unistrut Track
• To order RJ45-to-male XLR adapter, use part number W6539. Connect the fixture to the power source. Note: • The Irideon WLZ is not self-terminating. You must terminate the last fixture in line with a 120 Ohm resistor. Please contact your ETC customer service representative to purchase part number N4086. -
Page 19: Portable Fixture Dmx Pinout
Portable Fixture DMX Pinout Wire Color Description White/orange DMX1 + Orange DMX1 - White/green DMX2 + Blue Not Connected White/blue Not Connected Green DMX2 - White/brown Iso Common Brown Iso Common 2 Set the DMX Address on the Fixture You can set the DMX address using RDM, but you can also set the DMX address on the fixture itself, if necessary. - Page 20 DMX addresses must be set between 1 and 512. Each fixture must be considered a separate DMX device for the purpose of DMX line-loading calculations. The Irideon WLZ only has an intensity channel. Local intensity control knob Status LED and...
-
Page 21: Alternative Dmx Addressing Functions
Alternative DMX Addressing Functions Certain DMX addresses are reserved for special functions. Addresses 700 and above can be used for setting the intensity level of the fixture. The second and third address numbers set the intensity level. The intensity knob is ignored when using these DMX addresses. -
Page 22: Initial Power Up
When the local intensity is set to Off, the status LED will flash when there is a loss of DMX. With the local intensity set to any other position, the status LED will flash for 10 seconds when there is a loss of DMX. Then the LED will turn off. Irideon WLZ... -
Page 23: Adjustments
Adjustments Set the Angle with the Yoke Yoke locking knob Loosen the yoke locking knob. Do not remove the knob. Tilt the fixture to the desired position. Tighten the yoke locking knob to secure the position. Adjust the Field Rotate the back of the fixture body to adjust the field between wide and narrow (see image at right). -
Page 24: Use The Barn Door Accessory
DataTrack adaptor, C-clamp, or canopy. Use the Integrated Media Holder The Irideon WLZ comes equipped with an integrated media holder, which is a metal frame used to hold color media (often referred to as gel) or diffusion in front of the lens. The media holder is equipped with a magnetic retaining clip that prevents the media from falling out. -
Page 25: Install Color Media Or Diffusion
Install Color Media or Diffusion Release the magnetic retaining clip by gently pushing it up. Insert the media. Replace the media holder by aligning the tab at the top of the media holder with the inset on the front casting. Integrated media holder Install Dichroic Glass... -
Page 26: Clean The Lens
Remove dust with a blast of oil-free air or wipe with a clean, lint-free cloth. Replace the lens. Ensure that the ridged side of the lens is facing out. Replace the front casting and secure it with the screws. Replace the integrated media holder. Irideon WLZ... -
Page 27: Rdm Values
RDM Values Manufacturer ID: 0x6574 (Electronic Theatre Controls) Model ID: 0x901 (Irideon WLZ) Parameter RDM PID Value DMX Start 0x00F0 Range = 1–512 Address 1 = DMX Personality ID 0x00E0 2 = Local Output 0 = Standard (1.2 kHz) 0x8123... - Page 28 Rome, IT +39 (06) 32 111 683 Hong Kong +852 2799 1220 Paris, FR +33 1 4243 3535 etcconnect.com Support support.etcconnect.com Contact etcconnect.com/contactETC © 2019 Electronic Theatre Controls, Inc. Product information and specifications subject to change. ETC intends this document to be provided in its entirety. Trademark and patent info: etcconnect.com/ip 7192M1200-1.0.1 Rev D Released 2019-06...
Need help?
Do you have a question about the Irideon WLZ and is the answer not in the manual?
Questions and answers