
Related Manuals for ETC SolaPix Fan 8


Summary of Contents for ETC SolaPix Fan 8
- Page 1 High End Systems SolaPix Fan 8 Automated Luminaire User Manual Version 1.2.1 Part Number: 2594M1210-1.2.1 Rev: A Released: 2024-10...
- Page 2 To view a list of ETC trademarks and patents, go to etcconnect.com/ip. All other trademarks, both marked and not marked, are the property of their respective owners. You can find complete High End Systems terms and conditions and warranty information at etcconnect.com/Support/Warranty.aspx.
-
Page 3: Table Of Contents
Table of Contents Introduction Document Conventions Help from Technical Services Safety Considerations General Operation and Use Guidelines Fixture Overview Modular Control Tilt Lock Operation Specifications Environment Power Electrical Input and Power Factor Fixtures per Circuit Connector Specifications Install the Fixture DMX Control DMX Connector Pinout Connect DMX Cables to Fixture... - Page 4 Set the Control Source and Universe Configure the Fixture Navigate the User Interface Set Fixture Parameters Control Options Info Menu Set Menu Test Menu Preset Menu Error Codes Maintenance Clean the Fixture Replace the Fuse Compliance FCC Compliance SolaPix Fan 8 User Manual...
-
Page 5: Introduction
Introduction This manual provides important information for the safe installation, configuration, and maintenance of your High End Systems SolaPix Fan 8 fixture. For your safety, read this entire manual prior to installing, operating, or servicing the fixture. ETC recommends that you update your fixture with the latest version of software before you use the fixture. -
Page 6: Help From Technical Services
Help from Technical Services If you have questions that are not answered by this document, try the ETC support website at support.etcconnect.com or the ETC LED Automated Lighting product website at etcconnect.com/Products/Automated-Fixtures. If none of these resources are sufficient, contact ETC Technical Services directly at one of the offices identified below. Emergency service is available from all offices outside of normal business hours. -
Page 7: Safety Considerations
• This fixture is intended for professional use only. Not for residential use. Read the entire manual before using this equipment. • Contact your authorized ETC dealer or Technical Services before performing any service in order to maintain warranty coverage. - Page 8 Note: The light source in this luminaire is not user-replaceable, and must be replaced only by a qualified technician. Contact ETC Customer Support for assistance. Symbols used on the product label are defined below: The luminaire must be installed at least 1.0 m (3 ft Le luminaire doit être installé...
-
Page 9: General Operation And Use Guidelines
• Please use the original packaging if the fixture is to be transported. ETC will not be responsible for the fixture if packaging other than manufacturer provided packaging is used. -
Page 10: Fixture Overview
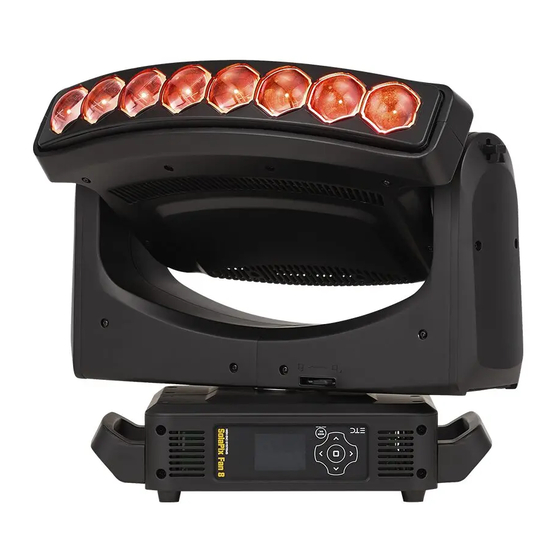
Tilt Lock Operation on page 8 2: Lens (x8) 3: Display 4: Navigation controls 5 Pan lock 6: Handle 7: Power In 8: USB 9: Power Out 10: DMX Thru 11: DMX In 12: Ethernet ports (x2) SolaPix Fan 8 User Manual... -
Page 11: Modular Control
‐ In Independent mode, you address the Pixel module to any source (DMX or Ethernet), Address, or Universe that your control setup requires. There are seven library layouts available on the SolaPix Fan 8 fixture depending on the protocol you use and the settings of the Pixel module: •... -
Page 12: Tilt Lock Operation
Tilt Lock Operation The SolaPix Fan 8 tilt lock is locked when the lock is in the vertical position and is unlocked when it is in the horizontal position. To lock or unlock the tilt lock: 1. Pull the tilt lock away from the yoke arm. -
Page 13: Specifications
Fixtures per Circuit • 4 fixtures via the 15 A power thru connectors • 4 fixtures via an ETC R20 or similar breaker module Consult the upstream breaker trip curves when using something other than an ETC R20 or similar breaker module. Specifications... -
Page 14: Connector Specifications
See the following wire color code chart: Wire Color Code (EU) Wire Color Code (US Standard) Connection type Terminal Green/Yellow Green Earth/Ground Blue White Neutral Brown Black Line (Live) SolaPix Fan 8 User Manual... -
Page 15: Install The Fixture
Install the Fixture Overhead rigging must be performed by qualified personnel. Follow all local and national codes and recommended practices. WARNING: • The installation location must support a minimum point load of 10 times the weight of the fixture. Fixture weight is 17.3 kg (38.0 lb). •... - Page 16 Follow local codes and recommended safety standards for securing the fixture to the installation location. 8. Unlock the pan and tilt locks. 9. Apply power to the fixture. 10. Inspect the installation prior to lifting the fixture overhead. SolaPix Fan 8 User Manual...
-
Page 17: Dmx Control
DMX Control The SolaPix Fan 8 fixture operates on standard DMX-512 control bus, controlled by a DMX console. The fixture requires a maximum of 74 channels of DMX-512. Attach the fixture to the control bus using a two-core, shielded cable with a 5-pin XLR connector (Belden 9729 is preferred). -
Page 18: Terminate Dmx
DMX Control and Ethernet Output While many of the High End Systems fixtures automatically convert DMX signals to network data, the SolaPix Fan 8 does not include that feature due to its multiple data source processing capabilities. Set the DMX Start Address Give each fixture a unique DMX starting address so that the correct fixture responds to the control signals. -
Page 19: Ethernet Control
Ethernet Control The SolaPix Fan 8 fixture includes two Ethernet ports that allow sending and receiving of control signals using the Art-Net protocol or sACN. Use a Cat5e (or better) cable and terminate to RJ45 connectors following the TIA/EIA 568B wiring standard. -
Page 20: Ethernet Control And Dmx Thru
Ethernet Control and DMX Thru While many of the High End Systems fixtures automatically convert network data signals to DMX, the SolaPix Fan 8 does not include that feature due to its multiple data source processing capabilities. Set the DMX Start Address Give each fixture a unique DMX starting address so that the correct fixture responds to the control signals. -
Page 21: Configure The Fixture
Configure the Fixture You can configure SolaPix Fan 8 fixtures through the onboard user interface. Navigate the User Interface Mode 1. Press the [MODE/ESC] button to access the main menu. (The display is powered by Esc. Mode battery when the fixture has no power; press and hold the [MODE/ESC] button Esc. -
Page 22: Set Fixture Parameters
Set Fixture Parameters This section provides instructions to configure and set up the SolaPix Fan 8 fixture. See Navigate the User Interface on page 17 for information about the navigation buttons. Provide power to the fixture before configuring it. If you do not provide power, the fixture will use battery power to power the user interface. - Page 23 Configure the Pixel Module Navigate: Main Menu → Address → Pixel Module The Pixel module is an optional feature and is turned off by default. Parameter Value Description Mode • Compound Select how the Pixel module is implemented: • Independent • Compound - the module inherits its Source, Address, and Universe settings from the overall •...
- Page 24 • Recommended console library: Base + Flex The result: All fixtures have control for the 42 channels of functions and animations via DMX and 32 channels of control for the Pixel module via Ethernet from a video server. SolaPix Fan 8 User Manual...
-
Page 25: Info Menu
Info Menu View Software Version Navigate: Main Menu → Info → Software Ver Displays the software version installed on the fixture. View Fixture Head Temperature Navigate: Main Menu → Info → Head Temp Displays the current fixture temperature as read from the fixture head (near the CMY filter). View Power Temperature Navigate: Main Menu →... - Page 26 View the DMX value of one of the fixture's channels. Scroll to the channel that you want to view (Pan Coarse, Pan Fine, etc.) and press the Enter button. The DMX value of the channel you chose is shown in the main window of the UI.
-
Page 27: Set Menu
Set Menu Set the Status Options Navigate: Main Menu → Set → Status Parameter Value Description No DMX Mode • Close Shutter Control mode when DMX is absent. The default value is Hold. • Hold • Auto Program Pan Reverse • ON Reverse the pan movement of the fixture. - Page 28 You • OFF must enter the Service PIN to access this menu item. Set this parameter to ON in order to clear the error messages. The default setting is OFF. SolaPix Fan 8 User Manual...
- Page 29 Note: Fan Speed DMX control overrides the Fans Mode setting in the fixture user interface when the DMX control is set to Auto or Studio. See the SolaPix Fan 8 DMX channel map for more details: etcconnect.com/SolaPix/Documentation. Set Display Settings Navigate: Main Menu →...
-
Page 30: Test Menu
Test Menu Reset (Home) the Mechanical Positions on the Fixture Navigate: Main Menu → Test → Home Reset ("home") all features on the fixture, including, pan, tilt, colors, gobos, etc. Test the Fixture Navigate: Main Menu → Test → Self Test Run a self-test program on the fixture. When you run the test, the display indicates "Running"... -
Page 31: Preset Menu
Presets are built by combining scenes into programs and then assigning the programs to Program Partitions for playback. For information about the Preset menu, access the High End Systems Preset Menu Guide from the ETC support website: support.etcconnect.com. Configure the Fixture... -
Page 32: Error Codes
• the magnetic-indexing circuit malfunctions (optical or magnetic sensor failure) • the stepper motor is defective or the related IC driver on the main PCB has failed • the Zoom wheel is not located in the default position after the reset SolaPix Fan 8 User Manual... -
Page 33: Maintenance
• Moving parts must not show any signs of wear and must move smoothly without issue. • The power supply cables must not show any damage, material fatigue, or sediment. • If spare parts are required, order only genuine parts from ETC or your authorized ETC dealer. -
Page 34: Compliance
Controls, Inc. could void the user’s authority to operate the product. Operation of this equipment in a residential area is likely to cause harmful interference, in which case the user will be required to correct the interference at their own expense. SolaPix Fan 8 User Manual... - Page 35 Compliance...
- Page 36 New York, NY | Orlando, FL | Los Angeles, CA | Austin, TX | © 2024 Electronic Theatre Controls, Inc. etcconnect.com | Support support.etcconnect.com | Contact etcconnect.com/contactETC Trademark and patent info: etcconnect.com/ip | Third-party license agreement info: etcconnect.com/licenses Product information and specifications subject to change. ETC intends this document to be provided in its entirety. 2594M1210-1.2.1 Rev A Released 2024-10...
Need help?
Do you have a question about the SolaPix Fan 8 and is the answer not in the manual?
Questions and answers