ETC Irideon FPZ User Manual
Hide thumbs
Also See for Irideon FPZ:
- User manual (16 pages) ,
- User manual (28 pages) ,
- User manual (28 pages)
Table of Contents
Advertisement
Quick Links
Advertisement
Table of Contents

Related Manuals for ETC Irideon FPZ


Summary of Contents for ETC Irideon FPZ
-
Page 1: User Manual
® Irideon User Manual Part Number: 7191M1200-1.0.0 Rev: C Released: 2017-08... - Page 2 All other trademarks, both marked and not marked, are the property of their respective owners. ETC intends this document, whether printe d or electronic, to be provided in its entirety. This product is intended for professional use only. Read this entire document before using...
- Page 3 Table of Contents Introduction ..... . . 1 Specifications..... . . 3 Basic Assembly.
-
Page 5: Introduction
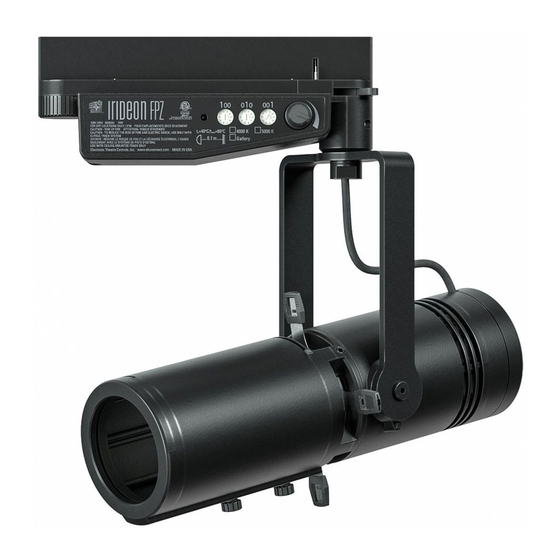
Introduction ™ The Irideon FPZ takes the beauty and punch of the Source Four Mini beam and puts it into a fixture designed to work in any architectural environment. The Irideon FPZ has three available mounting options: • Track-mount • Portable (includes a miniature C-clamp) •... - Page 6 WARNING: Please note the following safety warnings before use: • Do not mount the fixture on or near combustible surfaces. • Do not operate the fixture without a lens installed, or with a scratch or cracked lens. Damaged lenses must be replaced.
-
Page 7: Specifications
• Cree LED source • Long-life LED: 35,000 hours L70 lumen - Irideon FPZ 3000K: 80+ CRI maintenance - Irideon FPZ 3000K Gallery: 90+ CRI - Irideon FPZ 4000K: 80+ CRI - Irideon FPZ 5000K: 80+ CRI Optical • Built-in zoom optics •... -
Page 8: Basic Assembly
WARNING: When using the circuit selection lock, ensure that the selected circuit is a constant power circuit. Dialing into a dimmable circuit may cause fixture damage that will void the ETC warranty. -
Page 9: Install Canopy Fixture (Dmx Variant)
• Separate the line voltage from the data side in the backbox. Install the voltage barrier provided by ETC. Install the voltage barrier in the backbox with the provided screw, separating the power side from the data side (see image at right). - Page 10 Connect Canopy Wiring (DMX variant) Cable preparation instructions for DMX termination are included in the termination kits, and are also available for free download at etcconnect.com. Remove the adhesive tape securing the mounting plate to the fixture to free the mounting plate from the canopy enclosure. WARNING: RISK OF ELECTRIC SHOCK! Install the cover plate as directed below for installations where the interior of the...
- Page 11 If using Category 5: Cat5 Cable Preparation for a: See the IDC Termination Setup Guide instructions to prepare and terminate Category 5 for DMX/RDM input cable to the insulation displacement connector. b: Install the IDC connector with wires terminated to the DMX/RDM Input receptacle on the termination board.
- Page 12 Install the Mounting Plate and Complete the Wiring (DMX variant) Cover plate Secure the mounting plate (or (if needed for the combination of mounting surface-mounting) plate and cover plate for surface-mounting) to the Mounting plate installed backbox, positioning the plate so that the power side and data side are separated by the voltage Mounting plate...
- Page 13 Use the hook in the canopy enclosure to hang the fixture from the mounting plate while you complete the fixture wiring. Hook If desired, manually set the DMX address on the fixture using the three addressing dials in the canopy. Set the DMX Address on the Fixture page 15 Connect the pre-wired DMX connector on the fixture...
- Page 14 Install Canopy Fixture (0–10V and DALI variants) Note: The 0–10V driver conforms to IEC 60929 Annex E. Of the 0–10V range, use 0–1V to set the minimum level, and use 1–10V for continuous dimming. Note: The canopy fixture can be installed directly on 4” and 4-11/16”...
- Page 15 Mounting plate (0–10V and DALI variants) Canopy screw hole For this structure..secure mounting plate using: 4-11/16” backbox Large oval slots (see 1 above) 4” backbox Small oval slots (see 2 above) Mud ring and round box Circular slots (see 3 above) Use the hook in the canopy enclosure to hang the fixture from the mounting plate while you complete...
- Page 16 Use the canopy screws to secure the fixture to the mounting plate. Insert the oval-shaped covers into the canopy enclosure to cover the canopy screw openings. Canopy screws Restore power at the disconnect device.
-
Page 17: Install Portable Fixture With C-Clamp
Install Portable Fixture with C-clamp The C-clamp attaches the fixture to the mounting pipe and allows you to adjust the position of the fixture once it is mounted. The C-clamp will fit a 3/4” to 2” pipe. Two different length pipe bolts are provided to accommodate different pipe sizes. -
Page 18: Install Portable Fixture On Unistrut Track
• To order RJ45-to-male XLR adapter, use part number W6539. Connect the fixture to the power source. Note: • The Irideon FPZ fixture is not self-terminating. You must terminate the last fixture in line with a 120 Ohm resistor. Please contact your ETC customer service representative to purchase part number N4086. -
Page 19: Set The Dmx Address On The Fixture
Portable Fixture DMX Pinout Description Description DMX + Not Connected DMX - DMX2 - DMX2 + Iso Common Not Connected Iso Common 2 Set the DMX Address on the Fixture You can set the DMX address using RDM, but you can also set the DMX address on the fixture itself, if necessary. - Page 20 DMX addresses must be set between 1 and 512. Each Irideon FPZ fixture must be considered a separate DMX device for the purpose of DMX line-loading calculations. The Irideon FPZ only has an intensity channel. Local intensity control knob Status LED and...
- Page 21 Alternative DMX Addressing Functions Certain DMX addresses are reserved for special functions. Addresses 700 and above can be used for setting the intensity level of the fixture. The second and third address numbers set the intensity level. The intensity knob is ignored when using these DMX addresses.
-
Page 22: Initial Power Up
Initial Power Up Track-Mount, Portable, and Canopy (DMX) Fixtures Control and configure the fixture over a DMX/RDM control network or directly from a connected computer running appropriate software. When controlling the fixture directly from a PC, a Gadget II interface or DMX/RDM gateway is required. -
Page 23: Adjustments
Adjustments Set the Angle with the Yoke Yoke locking knob Loosen the yoke locking knob. Do not remove the knob. Tilt the fixture to the desired position. Tighten the yoke locking knob to secure the position. Zoom and Focus the Beam Loosen the beam focus or zoom knob located under the barrel. -
Page 24: Shape The Beam
You can shape the beam using the four shutters or with a pattern. Shape the Beam with Shutters The Irideon FPZ has four shutters: left, right, top, and bottom. Each shutter can be pulled out or pushed in to create the desired beam shape. -
Page 25: Rotate The Lens Barrel
Use the Integrated Media Holder The Irideon FPZ comes equipped with an integrated media holder, which is a metal frame used to hold color media (often referred to as gel) or diffusion in front of the lens. The media holder is equipped with a magnetic retaining clip that prevents the media from falling out. -
Page 26: Clean The Glass Lens
Clean the Glass Lens WARNING: Do not use ammonia-based or other harsh commercial cleaners. Clean lens only as directed. Commercially available glass cleaning agents should be avoided as they may contain ammonia, other harsh chemical detergents, or abrasive agents. These cleaners may damage the glass surface and the Anti-Reflective coatings. - Page 27 Note: You may find it easier to insert the metal shaft into its pocket of each lens before replacing the lens. Replace the lens adjustment knobs. Replace the light block bracket. Make sure that it fits into its pocket of each lens.
- Page 28 Web: etcconnect.com Copyright © 2017 Electronic Theatre Controls, Inc. All Rights Reserved. Product information and specifications subject to change. ETC intends this document to be provided in its entirety. 7191M1200-1.0.0 Rev C Released 2017-08 ...
Need help?
Do you have a question about the Irideon FPZ and is the answer not in the manual?
Questions and answers