Table of Contents
Advertisement
Quick Links
2 POST HOIST
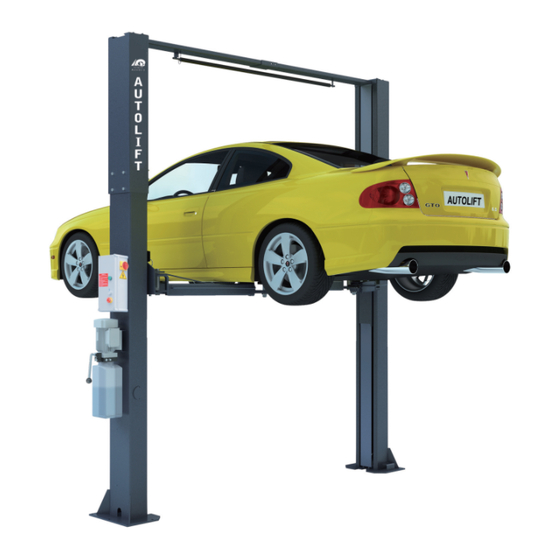
AutoLift AL-6214A
Asymmetric 2 Post Clearfloor Vehicle Hoist
3800Kg Maximum Lifting Capacity
Design Registration Approval Number: WAH19927
Design Code: AS1418.9-1996
Note: While all due care and attention has been taken in the preparation of this document, Advance AutoQuip shall not be liable for any inaccuracies or omissions
Ph: 08 9279 1663 | Fax: 08 9279 1667 | E: sales@aaq.net.au | W: www.aaq.net.au
INSTALLATION MANUAL & OPERATION
INSTRUCTIONS
- READ THE ENTIRE CONTENTS OF THIS MANUAL BEFORE
INSTALLATION AND OPERATION. BY PROCEEDING YOU AGREE THAT
YOU FULLY UNDERSTAND AND COMPREHEND THE FULL CONTENTS
OF THIS MANUAL. FORWARD THIS MANUAL TO ALL OPERATORS.
FAILURE TO OPERATE THIS EQUIPMENT AS DIRECTED MAY CAUSE
Specifications subject to change without notice.
which may occur therein
Advance AutoQuip
2 McDonald Crescent | Bassendean WA 6054
INJURY OR DEATH.
READ FIRST
DO NOT use the
machine until you read
and understand all the
dangers, warnings and
cautions in this manual.
Advertisement
Table of Contents

Related Manuals for AAQ AL-6214A


Summary of Contents for AAQ AL-6214A
- Page 1 Note: While all due care and attention has been taken in the preparation of this document, Advance AutoQuip shall not be liable for any inaccuracies or omissions which may occur therein Advance AutoQuip 2 McDonald Crescent | Bassendean WA 6054 Ph: 08 9279 1663 | Fax: 08 9279 1667 | E: sales@aaq.net.au | W: www.aaq.net.au...
- Page 2 Installation, Operation and Parts Manual AutoLift AL-6214 INDEX 1. Important safety instructions… ................2-3 1.1 Important notices 1.2 Qualified personnel 1.3 Danger notices 1.4 Training 1.5 Warning signs 2. Overview of the hoist ....................4 2.1 General descriptions 2.2 Technical data 2.3 Construction of the hoist 3.
-
Page 3: Important Safety Instructions
Installation, Operation and Parts Manual AutoLift AL-6214 IMPORTANT SAFETY INSTRUCTIONS 1.1 Important notices Advance AutoQuip will offer one-year's quality warranty for the whole machine,during which any quality problem will be properly solved to the user's satisfaction. However, we will not take any responsibility for whatever bad consequence resulted from improper installation and operation, overload running or unqualified ground condition. -
Page 4: Warning Signs
Installation, Operation and Parts Manual AutoLift AL-6214 Attention: For environment protection, please dispose the disused oil in a proper way. 1.5 Warning signs All safety warning signs attached on the machine are for the purpose of drawing the user’s attention to safety operation. The labels must be kept clean and need to be replaced when they are worn-out or have dropped. -
Page 5: General Descriptions
Installation, Operation and Parts Manual AutoLift AL-6214 OVERVIEW OF THE HOIST 2.1 General descriptions This two- post hoist is composed of posts, carriages, lifting arms, cylinders and motor unit, etc. The hoist is driven by an electro-hydraulic system. The gear pump delivers hydraulic oil to oil cylinders and pushes upwards its piston. -
Page 6: Preparations Before Installation
Installation, Operation and Parts Manual AutoLift AL-6214 3.1 Preparations before installation 3.1.1 Tools and equipments needed Appropriate lifting equipment Anti-abrasion 32 grade hydraulic oil. Rotary Hammer Drill with 18mm masonary drill bit. Chalk and tape measure, magnetic level. ... - Page 7 Installation, Operation and Parts Manual AutoLift AL-6214 1. Secure the extension post column firmly to the top of the post. This is only necessary when your hoist is ordered with extension posts. 2. Unfold the package and decide on which post the power unit will be mounted. 3.
- Page 8 Installation, Operation and Parts Manual AutoLift AL-6214 Step 9. Connect oil hoses NOTE: make sure the connectors and hose are clean. Step 10: Connect wires. Attention: Only licensed electricians are allowed to carry out electrical connection. Mount the control box on to the power side post. top limit switches motor cable connect to the control box...
- Page 9 Installation, Operation and Parts Manual AutoLift AL-6214 POWER SIDE POST OTHER POST Step 11: Install lifting arms. Install the lifting arms on the carriage by 38mm pins. NOTE: Long arms are to the rear of the vehicle. Step 12: Fill oil tank. Oil tank volumn is 10L.
- Page 10 Installation, Operation and Parts Manual AutoLift AL-6214 OPERATION INSTRUCTIONS 4.1 Precautions 4.1.1 Check all the joints of oil hose. Only when there is no leakage, the hoist can be operated. 4.1.2 DO NOT use the hoist if the safety device malfunctions. 4.1.3 Make sure the vehicle is evenly balanced on the hoist.
-
Page 11: Troubleshooting
Installation, Operation and Parts Manual AutoLift AL-6214 TROUBLE SHOOTING ATTENTION: If the trouble could not be fixed by the troubleshooting guide, please do not hesitate to contact us for help .We will offer our support and service at the earliest possible time. Please email supporting and detailed or pictures to us. TROUBLES CAUSE SOLUTION... -
Page 12: Maintenance
Installation, Operation and Parts Manual AutoLift AL-6214 The hydraulic oil is too hot ( above 45°). Change the oil. The seal of the cylinder is abraded. Replace the seal. Inside surface of the posts is not well greased. Add grease. The throttle valve jammed. - Page 13 Installation, Operation and Parts Manual AutoLift AL-6214 ∙Check arm locks for correct engagment. 6.2 Weekly checking items ∙Check all moving parts. ∙Check the working conditions of safety parts. ∙Check the amount of oil left in the oil tank when at full height. Otherwise the oil is too low and will need to be topped up. ∙Check whether expansion bolts are firmly screwed.
- Page 14 Installation, Operation and Parts Manual AutoLift AL-6214 Name Drawing#/Spec. Property M8*12 Hex socket button head screw Standard M8*16 Cross socket flat head screw Standard M6*8 Cross socket cap head screw Standard Flat washer Standard Flat washer Standard Spring washer Standard Standard Standard Φ38...
- Page 15 Installation, Operation and Parts Manual AutoLift AL-6214 Annex2, Overall diagram...
- Page 16 Installation, Operation and Parts Manual AutoLift AL-6214 Annex3, Floor plan...
- Page 17 Installation, Operation and Parts Manual AutoLift AL-6214 Annex4, Wiring diagram Single phase Here below is the motor connections to the contactor, 1ph...
- Page 19 Installation, Operation and Parts Manual AutoLift AL-6214 Three phase...
- Page 20 Installation, Operation and Parts Manual AutoLift AL-6214...
- Page 21 Installation, Operation and Parts Manual AutoLift AL-6214 Annex5, Hydraulic working system Description Motor Hydraulic block Overflow valve Fitting Cushion valve Absorbing oil pipe Oil filter Throttle valve Oil hose tie-in Manual unloading valve One way valve Gear pump Oil tank Oil tank cover Oil back pipe...
- Page 22 Installation, Operation and Parts Manual AutoLift AL-6214 Annex 6,Separate diagrams for the hoist Annex6, Separated drawings for the hoist Name Drawing#/Spec. Property Note Steel cable L=10460mm FL-8213Z-A6 Assembly Hex nut M16 GB/T610-2000 Standard Expansion bolt M18*180 Standard...
- Page 23 Installation, Operation and Parts Manual AutoLift AL-6214 Name Drawing#/Spec. Property Note L=9300(mm) rubber oil hose Assembly rubber oil hose L=500 Q235A Composite Connector Standard FL-8224-A4-B2 Assistant Cylinder Q235A FL-8224-A4-B9 Composite Chain Wheel Part Assembly GB/T894.2-1986 Spring Washer B type 25 Assembly FL-8224-A4-B11 Chain Shaft...
- Page 24 Installation, Operation and Parts Manual AutoLift AL-6214 Name Drawing#/Spec. Property Note Cover plate FL-8224-A1-B5 Q235A GB/T95-1985 Flat washer M6 Standard GB/T818-2000 Cross socket cap head screw M6*10 Standard GB/T894.2-1986 Circlip 25 Standard SF-1 Bearing 2512 Standard Down pulley FL-8224-A1-B2 Q235A Cotter pin 3*45 Standard Slider...
- Page 25 Installation, Operation and Parts Manual AutoLift AL-6214 Name Drawing#/Spec. Property Note Guide wheel FL-8214D-A1-B6 Assembly GB/T70.1-2000 Inner hexagon screwM6*10 FL-8214D-A1-B3 Guide wheel frame welding part FL-8214D-A1-B7 Safety shaft FL-8214D-A1-B9 Torsion spring 1 FL-8214D-A1-B4 Safey hook welding part GB/T70.1-2000 Inner hexagon screw M8*35 GB/T6170-2000 Screw M8 FL-8214D-A1-B10...
- Page 26 Installation, Operation and Parts Manual AutoLift AL-6214 Annex7, Spare parts list Spare parts list -for the electrical system Item Spec. Note Power switch LW26GS-20/04 Button Y090-11BN Power indicator AD17-22G-AC24 Same look as item 7 Transformer JBK-40VA220V-24V Transformer Same look as item 7 JBK-40VA230V-24V Transformer Same look as item 7...
- Page 27 Installation, Operation and Parts Manual AutoLift AL-6214 Spare parts list – for the mechanical system Name Drawing#/Spec. Property Note Slider FL-8224-A3-B6 Nylon 1010 Rubber lifting pad FL-8224-A7-B3-C4 Rubber O-seal ring (Inside)23.6*3.55 Y- seal ring KD 63*48*10 Anti–dust ring DHS 40*48*5/6.5...
- Page 28 SAFETY OPERATING PROCEDURES Vehicle Hoist DO NOT use this machine unless the operator has been thoroughly instructed in its safe use and operation. Safety glasses must be worn at all Long and loose hair must be times in work areas. contained.
- Page 29 3.8 TONNE 2 Post Clearfloor Hoist OPERATING INSTRUCTIONS The hoist should only be operated by personnel that have been thoroughly trained in operation and maintenance of the hoist. Position the vehicle between the columns, turn off the engine and apply the park brake. Adjust the lifting arms until they reach the supporting position of the vehicle.
- Page 30 THIS WARRANTY SUPERSEDES ALL OTHER WARRANTY POLICIES PREVIOUSLY STATED AND IN ALL OTHER ADVANCE AUTOQUIP’s PRODUCT SPECIFIC LITERATURE. Advance AutoQuip 2 McDonald Crescent | Bas endean WA 6054 Ph: 08 9279 1663 | Fax: 08 9279 1667 | E: sales@aaq.net.au | W: www.aaq.net.au...
- Page 31 2. Hoist Details Model No: 2 McDonald Crescent Hoist Type: Bassendean WA 6054 Installation Date: P: 08 9279 1663 | E: sales@aaq.net.au 3. Commissioning Report Comments Safety Devices Safety devices incorporated into the design of the vehicle to AS/NZS 1418.9 Welds...
- Page 32 Installation, Operation and Parts Manual AutoLift AL-6214 Location of Vehicle Hoist & Vehicle Clearances Vehicle hoist or any part of the load is positioned no less than 600mm away from any fixed structure Provisions have been made for effective clearances above the vehicle when the hoist is in its fully raised position.
Need help?
Do you have a question about the AL-6214A and is the answer not in the manual?
Questions and answers