Advertisement
For Models
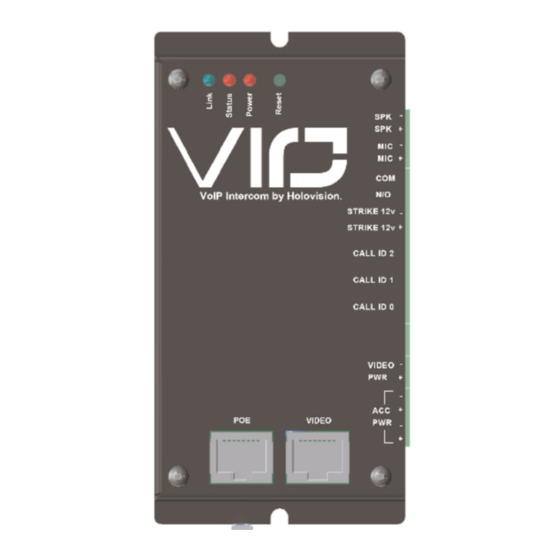
Communication
Holovision VIO is a SIP enabled intercom module
developed specifically with the custom integrator in
mind. It works with Crestron RAVA/SIP and most SIP
enabled VoIP phone systems and servers.
Not Used
Not Used
Not Used
Normal Serial
Inverted Serial
Ground
Bit Parity Mode
Connect tamper switch to alarm (optional)
Manual Type 6.5.0.9-RF
xxx
with Essex "ASCII" Keypad
400-A-VIO
403-A-VIO
410-A-VIO
Specifications
Access Control
Essex K1-26I Keypad field configurable to ASCII,
Wiegand and others.
400 Series ''A'' Junction Board
401-A-VIO
404-A-VIO
411-A-VIO
INSTALLATION
INSTRUCTIONS
501 E. Goetz Ave.
Santa Ana, Ca 92707
www.eholovision.com
Ph. 714-434-6904
Fax 800-362-0002
HOLOVISION
Advertisement
Table of Contents

Related Manuals for HOLOVISION 400-A-VIO


Summary of Contents for HOLOVISION 400-A-VIO
- Page 1 410-A-VIO 411-A-VIO Specifications Communication Access Control Holovision VIO is a SIP enabled intercom module Essex K1-26I Keypad field configurable to ASCII, developed specifically with the custom integrator in Wiegand and others. mind. It works with Crestron RAVA/SIP and most SIP enabled VoIP phone systems and servers.
- Page 2 ASCII Connection to Crestron or HAI 400 The red LED is normally on all of the Automation System Relays time. When a valid code is entered, the relay controlling the LEDs would close, (Typical of Crestron or HAI) and the green light would go on Gate Control Red Green LED control (momentarily).
- Page 3 VIO Wiring Diagram TO GATE CONTROLLER OR “REMOTE TERMINALS” ON ASCII CONTROLLER To Automation System Relay NO & COM To Automation System Page 3 TYPE 6.5.0.9-RF...
- Page 4 VIO RAVA Quick Start 1. Plug the device into the network. Device will speak it’s IP address. 2. Navigate to device IP on a web browser. 3. Under “Configuration” please enter SIP ID for the name to be displayed, and enter the extension of the Main RAVA Touchscreenunder “Input Call ID 0 Default is CALL:CRESTRON”...
- Page 5 5. Configure the relay setting under “Inbound Calls”. Configure the powered relay and the dry contact closure. Choose any 2 to 4 digit combination Note; By configuring the request to exit feature you can configure for either relay. 6. Once the device has been configured you can initiate the call by pressing the button Page 5 TYPE 6.5.0.9-RF...
- Page 6 VIO(sip) QUICK START & " " " Page 6 TYPE 6.5.0.9-RF...
- Page 7 Page 7 TYPE 6.5.0.9-RF...
- Page 8 501 E. Goetz Ave. Santa Ana, Ca 92707 Ph. 714-434-6904 Fax 800-362-0002 www.eholovision.com...
Need help?
Do you have a question about the 400-A-VIO and is the answer not in the manual?
Questions and answers