Advertisement
Quick Links
For Models
Communication
Holovision VIO is a SIP enabled intercom module devel-
oped specifically with the custom integrator in mind. It
works with Crestron RAVA/SIP and most SIP enabled
VoIP phone systems and servers.
Not Used
Not Used
12 VDC input (for keypad)
NO, COM, NC relay connections
Keypad case ground
Remote bypass terminals (activate relay)
Connect tamper switch to alarm (optional)
Manual Type 6.2.0.10-RF
VIO Intercom with Essex
"S-12 Stand - Alone" Keypad
400-S12-VIO2
Specifications
Access Control
Essex "stand-alone" 12 button keypad
1 relay plus 2 grounding outputs
(external relays required)
500 users
12 VDC power supply included
Cut for NO Contact Closure
410-S12-VIO2
AC Loop for Strike
INSTALLATION
INSTRUCTIONS
501 E. Goetz Ave.
Santa Ana, Ca 92707
www.eholovision.com
Ph. 714-434-6904
Fax 800-362-0002
HOLOVISION
Advertisement

Related Manuals for HOLOVISION 400-S12-VIO2


Summary of Contents for HOLOVISION 400-S12-VIO2
- Page 1 410-S12-VIO2 Specifications Communication Access Control Holovision VIO is a SIP enabled intercom module devel- Essex “stand-alone” 12 button keypad oped specifically with the custom integrator in mind. It 1 relay plus 2 grounding outputs works with Crestron RAVA/SIP and most SIP enabled (external relays required) VoIP phone systems and servers.
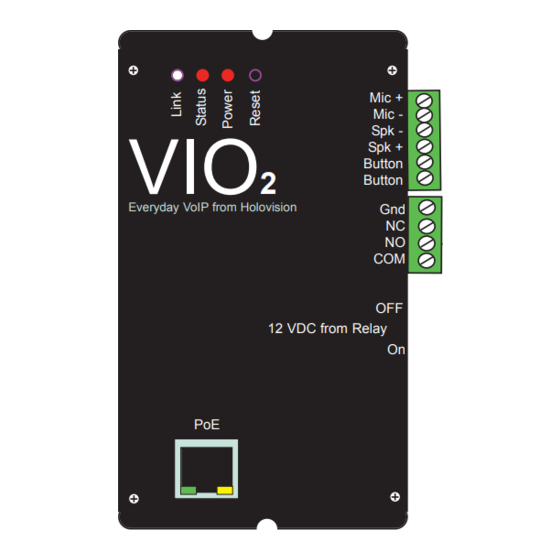
- Page 2 Essex Keypad Wiring DC Out for Gate Strike Mic + Mic - Spk - Spk + Button Button Everyday VoIP from Holovision 12 VDC from Relay 12v + 12v - PoE+ 12vDC Switch or 1.5 A Injector Loop Required for Strike DC**...
- Page 3 Essex Keypad Wiring Contact Closure for Gate Operation Mic + Mic - Spk - Spk + Button Button Everyday VoIP from Holovision 12 VDC from Relay 12v + 12v - 12vDC 1.5 A Cut Loop for Dry Contact NO Output...
- Page 4 VIO RAVA Quick Start 1. Plug the device into the network. Device will speak it’s IP address. 2. Navigate to device IP on a web browser. 3. Under “Configuration” please enter SIP ID for the name to be displayed, and enter the extension of the Main RAVA Touchscreenunder “Input Call ID 0 Default is CALL:CRESTRON”...
- Page 5 5. Configure the relay setting under “Inbound Calls”. Configure the powered relay and the dry contact closure. Choose any 2 to 4 digit combination Note; By configuring the request to exit feature you can configure for either relay. 6. Once the device has been configured you can initiate the call by pressing the button Page 5 Type 6.2.0.10-RF...
- Page 6 VIO(sip) QUICK START Page 6 Type 6.2.0.10-RF...
- Page 7 Page 7 Type 6.2.0.10-RF...
-
Page 8: Green Led
Programming the Essex Keypad Set Keypad Illumination to ON ALL OF THE TIME STEP ACTION BEEP Red LED Green LED Remove power Jumper the “CONFIG” pins on the rear of the keypad . V = 12 Apply 12 VDC power to red and black wires Quadruple Beep Flash Solid... - Page 9 Programming the Essex Keypad Set User Codes STEP ACTION BEEP Red LED Green LED The Master Code is necessary to do this step. Master Code “123” is used as an example. Enter 1 1 2 3 Double Beep Slow Flash Solid Enter Double Beep...
- Page 10 Programming the Essex Keypad Deleting User Codes - using User Code/PIN STEP ACTION BEEP Red LED Green LED The Master Code is necessary to do this step. In this example, the Master Code is 123 1 1 2 3 Enter Double Beep Slow Flash Solid...
- Page 11 Programming the Essex Keypad Reset Keypad to Factory Defaults--- This is not normally necessary, but can be done as follows STEP ACTION BEEP Red LED Green LED Remove power Jumper the “CONFIG” pins on the rear of the keypad Apply 12 VDC power to red and black wires ONLY Quadruple Beep Flash Solid...
- Page 12 501 E. Goetz Ave. Santa Ana, Ca 92707 Ph. 714-434-6904 Fax 800-362-0002 www.eholovision.com...
Need help?
Do you have a question about the 400-S12-VIO2 and is the answer not in the manual?
Questions and answers