Table of Contents
Advertisement
Quick Links
TC-1425-IP-PA
Rev. B, March 2021
http://www.commscope.com
About this manual
This installation instructions document describes the installation steps of the patch application of the Compact
Closure 100 series. Installation steps in this document are limited to: splicing input of the connectors to the feeder
fibers, patching SC cables and patching LC cables.
Installation steps of the feeder and branch cables are explained in manual TC-1425-IP: CC 100 Basic Instructions.
The document starts with providing an overview of the tools required to perform the installation. Also warnings and
cautions are indicated, which should be observed before starting the product installation.
Images in this manual are for reference only and are subject to change.
General product information
SC/APC or SC/UPC
LC/APC or LC/UPC
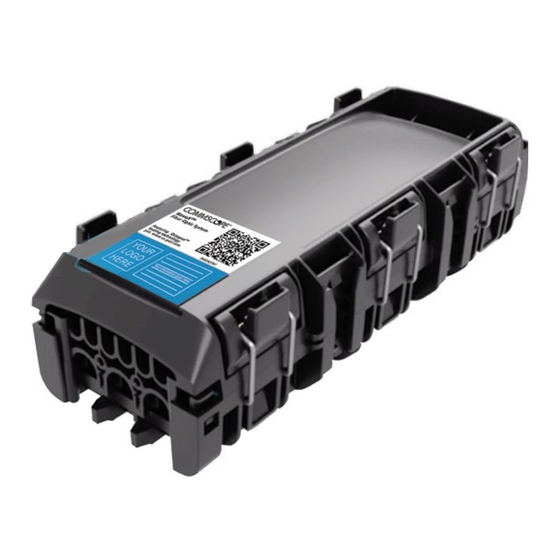
Overview organizer
4
1
2
1
Drop cable strain relief T-shapes
2
Locking features
3
Octopus
gel seal
™
4
SC adapters
5
LC adapters
6
SC Xpress drop
860XXXXXX
NOVUX™ Fiber Optic System
CC 100 Patch Application
Quantity drops
up to 6
Pre-connectorized with and without transition, FIC, Xpress drop
up to 12
Pre-connectorized with and without transition, FIC
3
2
© 2021 CommScope, Inc. All Rights Reserved
Installation Instructions
installation method drops
5
1
3
page 1 / 13
6
1
3
2
Advertisement
Table of Contents

Related Manuals for CommScope NOVUX Compact Closure 100 Series


Summary of Contents for CommScope NOVUX Compact Closure 100 Series
- Page 1 12 Pre-connectorized with and without transition, FIC Overview organizer Drop cable strain relief T-shapes Locking features Octopus gel seal ™ SC adapters LC adapters SC Xpress drop 860XXXXXX page 1 / 13 © 2021 CommScope, Inc. All Rights Reserved...
-
Page 2: Table Of Contents
4.2 Splice feeder to factory installed splitter..........5 6.2 Install LC-connectorized cable with transition and FIC....11 4.3 Splice feeder and input connectors to field installable Trade-marks..................13 splitter......................... 5 Contact information................ 13 page 2 / 13 © 2021 CommScope, Inc. All Rights Reserved... -
Page 3: Abbreviations
• Fiber optic cables may be damaged if bent or curved to a radius that is less than the recommended minimum bend radius. Always observe the recommended bend radius limit when installing fiber optic cables, subunits and patch cords. page 3 / 13 © 2021 CommScope, Inc. All Rights Reserved... -
Page 4: Splice Feeder To Input Connector
Make sure all fibers are properly positioned under the lips and avoid bulging of the fiber. Note: The fiber guidance pen (situated on top of the loop storage basket) can be used to position all the fibers under the lips. page 4 / 13 © 2021 CommScope, Inc. All Rights Reserved... -
Page 5: Splice Feeder To Factory Installed Splitter
Slide the field installable splitter in one of the dove tails. Make sure the output of the splitter is oriented to the top. Splitter installed in position 6. page 5 / 13 © 2021 CommScope, Inc. All Rights Reserved... -
Page 6: Pre-Connectorized Cable
Remove dust caps of the adapter port. Clean per standard practice. Remove dust caps of the connector. Clean the connector per standard practice. Position the connector in the correct orientation (rib facing forward as shown in figure above). page 6 / 13 © 2021 CommScope, Inc. All Rights Reserved... -
Page 7: Install Sc Xpres Drop
Adapter ports are designated with the numbers 1-6. A clicking sound is observed when the connector is properly seated. Swing the adapter port with cable back in its original position. page 7 / 13 © 2021 CommScope, Inc. All Rights Reserved... -
Page 8: Install Lc-Connectorized Cable
The locking lip returns into original position and the carrier is correctly seated. A clicking sound is observed Remove dust caps of both connector and adapter of the selected port. Clean the connector and adapter per page 8 / 13 © 2021 CommScope, Inc. All Rights Reserved... -
Page 9: Pre-Connectorized Cable With Transition And Fic
In case of a Field Installable Con- nector (FIC) CommScope does not warrant the performance or compatibility of any third party or non-CommScope products or components. Please verify all compatibility and performance requirements with the FIC supplier prior to use a third party FIC. - Page 10 (rib facing forward as shown in figure above). Connect the SC-connectorized cable to its assigned port. Adapter ports are designated with the numbers 1-6. A clicking sound is observed when the connector is properly seated. page 10 / 13 © 2021 CommScope, Inc. All Rights Reserved...
-
Page 11: Install Lc-Connectorized Cable With Transition And Fic
Remove dust caps of both connector and adapter of the selected port. Clean the connector and adapter per standard practice. Position the connector in the correct orientation (clip facing forward as shown in figure above). page 11 / 13 © 2021 CommScope, Inc. All Rights Reserved... - Page 12 The fiber guidance pen (situated on top of the loop storage basket) can be used to position all the transition lengths under the lips. Transition length stored of cables installed in position 1-3. Transition length stored of cables installed in position 1-6. page 12 / 13 © 2021 CommScope, Inc. All Rights Reserved...
-
Page 13: Trade-Marks
This document is for planning purposes only and is not intended to modify or supplement any specifications or warranties relating to CommScope products or services. CommScope is committed to the highest standards of business integrity and environmental sustainability, with a number of CommScope’s facilities across the globe certified in accordance with international standards, including ISO 9001, TL 9000, and ISO 14001.
Need help?
Do you have a question about the NOVUX Compact Closure 100 Series and is the answer not in the manual?
Questions and answers