Table of Contents
Advertisement
Quick Links
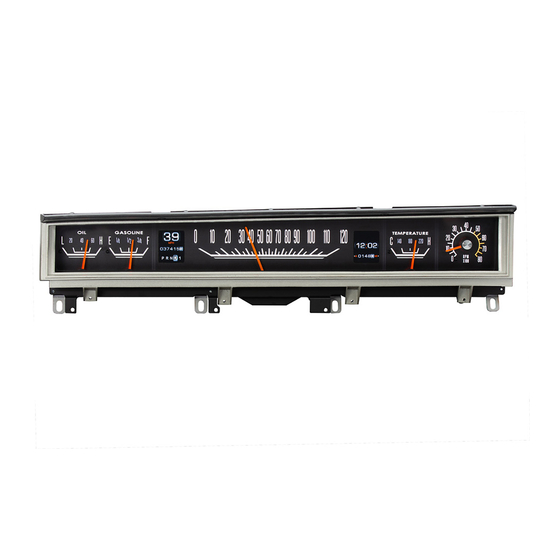
RTX-68D-STD
Dakota Digital RTX Instrument Installation
For 1968-70 Dodge/Plymouth B-Body Non-Rallye
Your new RTX-68D-STD kit includes:
RTX Display
Switch Assembly
Buzzer
Installation Manuals
Universal Sender
Pack
36" Main Harness
Control Box
4x 0.5" Oval Head Screws
3x 0.5" Pan Head Screws
Manual # 650770
Advertisement
Table of Contents

Related Manuals for Dakota Digital Retrotech RTX-68D-STD


Summary of Contents for Dakota Digital Retrotech RTX-68D-STD
- Page 1 RTX-68D-STD Dakota Digital RTX Instrument Installation For 1968-70 Dodge/Plymouth B-Body Non-Rallye Your new RTX-68D-STD kit includes: RTX Display Switch Assembly Buzzer Installation Manuals Universal Sender Pack 36” Main Harness Control Box 4x 0.5” Oval Head Screws 3x 0.5” Pan Head Screws...
- Page 2 Installation 1. Remove the lower dash pad and switch panel, retaining the hardware recovered for reassembly. 2. Remove the two upper and four lower screws securing the gauge cluster to the dash. The factory gauge cluster can now be taken out of the dash. 3.
- Page 3 4. Mount the factory gauge bezel to the RTX system by reusing the nine screws that held it to the factory gauge cluster. 5. Connect the provided 36” main harness and buzzer cable (optional for audio feedback) to the back of the RTX system.
- Page 4 7. Re-install the lower dash pad using the three provided pan-head screws. Then mount the switch panel to the dash using the factory hardware from disassembly. 8. Refer to the main manual for wiring instructions to complete the RTX installation. WARNING: This product can expose you to chemicals including lead, which is known to the State of California to cause cancer and birth defects or other reproductive harm.
Need help?
Do you have a question about the Retrotech RTX-68D-STD and is the answer not in the manual?
Questions and answers