Table of Contents
Advertisement
Quick Links
Advertisement
Table of Contents

Related Manuals for SMC Networks E-MY2B Series


Summary of Contents for SMC Networks E-MY2B Series
- Page 1 Actuator Operation Manual E-MY2B Series URL http://www.smcworld.com...
-
Page 2: Table Of Contents
CONTENTS Thank you for purchasing the SMC E-MY2B Series e-Rodless Actuator. Please read this manual carefully before operating the e-Rodless Actuator and make sure you understand the e-Rodless Actuator, SAFETY its capabilities and limitations. Please keep this manual handy for future reference. -
Page 3: Safety
SAFETY The e-Rodless Actuator and this manual contain essential information for the protection of users and others from possible injury and property damage and to ensure correct handling. Please check that you fully understand the definition of the following messages (signs) before Do not use the product in the environment with possible presence of flammable, going on to read the text, and always follow the instructions. -
Page 4: Model Indication Method
SAFETY (continue) Model Indication Method NOTE E-MY2B 16 Follow the instructions given below when handling your actuator. Otherwise, the switch may be damaged or may fail, thereby resulting in malfunction. Nominal size Number of •Do not use at voltage over specified voltage. auto switches •Do not apply the load over max. -
Page 5: Names And Functions Of Individual Parts
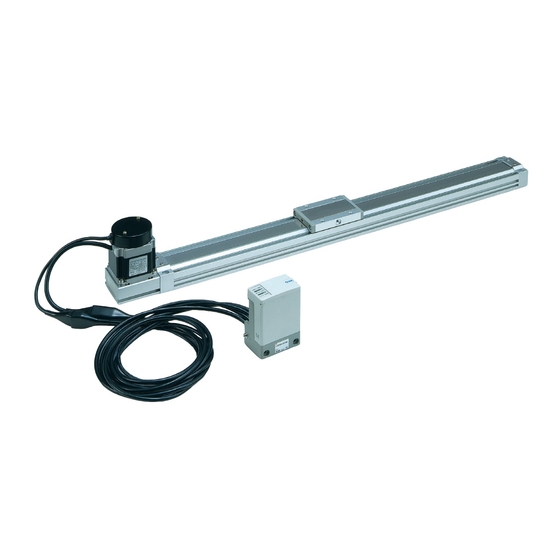
Names and Functions of Individual Parts Installation Controller integrated type Read "Precautions for Handling" of safety Instruction and "How to install" of this chapter with care to provide safe and exact measurement for installation of the actuator. Motor Controller Installation of body I/O cable Use 4 mounting holes on the top of the body or nuts inside 2 T slots on the bottom of the body for installation. - Page 6 When setting to DIN rail, place A of fig. 3 into DIN rail. While pushing it, fix it by the clamp of screw in fig. Guide Guide Inadequate pushing may cause falling of parts. E-MY2B Series E-MY2B Series Clamp screw(M4) Tightening torgue DIN rail 0.4 to 0.6N •...
-
Page 7: Positions
Names and Functions of Controller (3 positions) 3 positions Controller detail E-MY2B 16 Nominal size Number of State of auto switches indicator light light Auto switch goes out Speed type blink Low speed Cable length lighting Middle speed Standard speed Load type Heavy load Positioning stop number... - Page 8 Example of Internal Circuit and Wiring Electric Specification •Corresponding to NPN I/O Item Specification install power supply Power supply DC24V Power supply voltage switch cable Power supply Brown DC1 (+) for drive install power supply Current consumption Max.5A(within 2s) normally 2.5A at DC24V Blue DC1 (-) DC24V Power supply voltage...
-
Page 9: Setting
Setting Example of Internal Circuit and Wiring (continue) Signal through I/O cable Setting Procedures Input signal Confirm the product is installed and connected properly and perform setting in the following procedure. Symbol Command Command to operate motor side 1. troke adjustment Command to operate end side Command to operate intermediate stop means ON,... - Page 10 Setting (continue) 1.Stroke adjustment 3.Stroke learning Adjust the stroke of actuating part. 3-1 By push of over 3s at least, the product comes into learning mode and starts stroke learning. Adjusting bolt 3-2 Confirm 2 indicator lamps MOTOR and END are blinking.
- Page 11 Setting (continue) Precautions on intermediate position 6.Setting of speed and acceleration Intermediate position is set relative to the motor side. 6-1 Setting of speed Therefore, if the stroke adjusting unit at the motor side is moved, the intermediate position is By adjustment of switch , the speed of changed.
-
Page 12: Operation Characteristics
Operation Characteristics Specifications Standard specifications Application of power supply Install power supply Item Specification When power supply is applied, the controller is initialized READY output Low speed 10 to 1000 mm/s 2s or less and then READY output is performed. Transfer speed set range Middle speed 50 to 1000 mm/s... -
Page 13: Positions
Names and Functions of Controller (5 positions) 5 positions Controller detail E-MY2B 16 State of Nominal size Number of indicator light auto switches light goes out blink Auto switch Speed type lighting Low speed Cable length Middle speed Standard speed Load type Heavy load Positioning stop number... - Page 14 Example of Internal Circuit and Wiring Electric Specification •Corresponding to NPN I/O Item Specification install power supply Power supply DC24V Power supply voltage switch cable Power supply Brown DC1 (+) for drive install power supply Current consumption Max.5A(within 2s) normally 2.5A at DC24V Blue DC1 (-) DC24V Power supply voltage...
-
Page 15: Setting
Setting Example of Internal Circuit and Wiring (continue) Signal through I/O cable Setting Procedures Input signal Confirm the product is installed and connected properly and perform setting in the following procedure. Symbol Command Command to operate motor side 1. troke adjustment Command to operate end side Command to operate intermediate stop 1 Command to operate intermediate stop 2... - Page 16 Setting (continue) 1.Stroke adjustment 3.Stroke learning Adjust the stroke of actuating part. 3-1 By push of over 3s at least, the product comes into learning mode and starts stroke learning. Adjusting bolt 3-2 Confirm 2 indicator lamps MOTOR and END are blinking.
- Page 17 Setting (continue) Precautions on intermediate position 6.Setting of speed and acceleration Intermediate position is set relative to the motor side. 6-1 Setting of speed Therefore, if the stroke adjusting unit at the motor side is moved, the intermediate position is By adjustment of switch , the speed of changed.
-
Page 18: Operation Characteristics
Operation Characteristics Application of power supply Intermediate operation READY output The input transmit drive command 1 When power supply is applied, the controller is initialized and then READY output is performed. Ex.)Movement from motor side to intermediate 1 The input transmit drive command 2 If first transit of used power supply is 1s or more, the alarm output is performed in prior The input transmit drive command 3 Do not turn off input of drive command until... -
Page 19: Specifications
Specifications Common Functions Standard specifications Lock function Item Specification If the set value of speed and acceleration need to be fixed, they can be locked. Set value of Low speed 10 to 1000 mm/s intermediate position is not locked. Transfer speed set range Middle speed 50 to 1000 mm/s Standard speed... -
Page 20: Alarm Indication And Remedy
Common Functions (continue) Alarm indication and remedy Perform the following remedy when an alarm comes out. Tuming off blink Ligting Point Display Content Disposition Point Display Content Disposition I f f o r e i g n m a t e r i a l i s Confirm the power supply f o u n d , r e m o v e i t a n d for signal is energized and... -
Page 21: Alarm Reset
Common Functions (continue) Alarm reset Alarm reset is available by manual alarm reset using and external alarm reset by external signal. (See page 36, 37 and after for ALM display in case of alarm.) Manual alarm reset When alarm occur, press for recovery from alarm condition.
Need help?
Do you have a question about the E-MY2B Series and is the answer not in the manual?
Questions and answers