
Subscribe to Our Youtube Channel
Related Manuals for Extron electronics AXI 02 AT


Summary of Contents for Extron electronics AXI 02 AT
- Page 1 User Guide Audio Products Mixers and Processors AXI 02 AT Audio Expansion Interface 68-3070-01 Rev. C 06 21...
- Page 3 Copyright © 20xx-2021 Extron. All rights reserved. www.extron.com Trademarks All trademarks mentioned in this guide are the properties of their respective owners. The following registered trademarks ( ® ), registered service marks ( ), and trademarks ( ) are the property of RGB Systems, Inc. or Extron (see the current list of trademarks on the Terms of Use page at www.extron.com):...
- Page 4 FCC Class A Notice This equipment has been tested and found to comply with the limits for a Class A digital device, pursuant to part 15 of the FCC rules. The Class A limits provide reasonable protection against harmful interference when the equipment is operated in a commercial environment.
- Page 5 Class 1 Laser Product Any service to this product must be carried out by Extron and its qualified service personnel. CAUTION: Using controls, making adjustments, or performing procedures in a manner other than what is specified herein may result in hazardous radiation exposure. NOTE: For more information on safety guidelines, regulatory compliances, EMI/EMF compatibility, accessibility, and related topics, see the “Extron Safety and...
- Page 6 Conventions Used in this Guide Notifications The following notifications are used in this guide: DANGER: • Will result in serious injury or death. • Entraînera des blessures graves ou la mort. WARNING: Potential risk of severe injury or death. AVERTISSEMENT : Risque potentiel de blessure grave ou de mort. Risk of minor personal injury.
-
Page 7: Table Of Contents
Device Name ..........17 Receiver and Transmitter Names ....17 Dante Controller Naming Conventions ... 17 Renaming the AXI 02 AT in Dante Controller .. 18 Renaming a Receiver or Transmitter....20 Finding a Dante Device IP Address ....22... - Page 8 Technical Publications Standards and Styles • Contents viii...
- Page 9 Technical Publications Standards and Styles • Contents...
- Page 10 Technical Publications Standards and Styles • Contents...
-
Page 11: Introduction
Introduction This section provides an overview of this guide and the features of the Extron AXI 02 AT Audio Expansion Interface. This section covers the following topics: • About this Guide • About the AXI 02 AT Features • •... -
Page 12: Applications Diagrams
SIS commands via USB or DSP Configurator. • Dante audio networking provides a wide range of expansion capabilities — Dante-equipped audio products, including the AXI 02 AT, provide scalability for creating larger audio systems over a local area network using standard network protocols and hardware. -
Page 13: Installation And Operation
Free-standing — Set the AXI 02 AT on furniture as desired. • NOTE: To mount the AXI 02 AT using an Extron ZipClip 100 mounting kit, see the instructions provided with the kit. AXI 02 AT • Installation and Operation... -
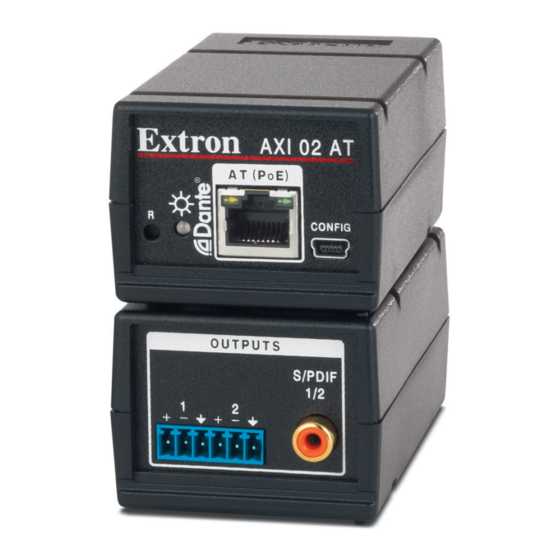
Page 14: Rear Panel Connections
6-pole output. S/PDIF Audio Output — Two S/PDIF output channels mirror the analog outputs on a coaxial RCA connector. Attenuation applied to the analog outputs does not affect the S/PDIF output. AXI 02 AT • Installation and Operation... -
Page 15: Front Panel Features
USB Config Port — Connect a computer to this USB Mini-B port for device configuration and firmware updates. AT (PoE) Port — This RJ-45 port is used to connect the AXI 02 AT to a Dante network. The AT (PoE) port supports digital audio transport (AT), communication with the Dante network, communication with DSP Configurator for device configuration, and power over Ethernet (PoE). -
Page 16: Reset Modes
Following this reset, the Dante module will proceed to its normal boot sequence. This reset will: • Set the IP configuration to default settings Clear all audio channel routing • • Set the Dante device name and channel names to default AXI 02 AT • Installation and Operation... -
Page 17: Dsp Configurator Software
DSP Configurator Software In addition to front panel hardware controls, the AXI 02 AT can be configured with Extron DSP Configurator Software and a PC running Microsoft Windows 7 or newer. This section ® ® describes Extron DSP Configurator Software and covers the following topics: •... -
Page 18: Accessing The Dsp Configurator Help File
DSP Configurator Software features. DSP Configurator Software Workspace The DSP Configurator Software workspace for the AXI 02 AT contains a menu bar for accessing configuration tools and the main audio workspace for audio configuration (see figure 7). - Page 19 Re-enable All Dialogs — This option re-enables all dialog boxes that no longer appear based on user selection (certain dialog boxes that appear are user-defeatable by selecting a checkbox that reads Do Not Show This Dialog Again). AXI 02 AT • DSP Configurator Software...
- Page 20 List of Open Windows — Below the dividing line in the menu is a list of all open windows. Select a window from the list to bring it into focus and to the forefront of the workspace. Windows appear in the order they were opened. AXI 02 AT • DSP Configurator Software...
- Page 21 “offline” state. Changes made to the configuration file are not applied to a device. Creating configuration files in Emulate mode saves time by not requiring a device to be connected or present in order for the bulk of configuration to be completed. AXI 02 AT • DSP Configurator Software...
- Page 22 When a connection with the device is established, the Synchronize with Device dialog box opens. From the dialog box, one of two options can be selected: Figure 12. Synchronize with Device Dialog Box AXI 02 AT • DSP Configurator Software...
- Page 23 Click the Emulate button in the DSP Configurator Software menu bar (see figure 13, ). Alternatively, select Tools > Disconnect from Device or press <F6> on the keyboard. Figure 13. Emulate Button Click OK to confirm (see figure 14, Figure 14. Confirm Disconnect Dialog Box AXI 02 AT • DSP Configurator Software...
-
Page 24: Analog Outputs
Analog Outputs The AXI 02 AT has two AT Inputs and two analog outputs. The AXI analog outputs receive signal from the Dante network and are listed on the Dante network as Receiver channels. Renaming AT Input Channels AT Input channel names are read from the AXI Dante interface Receiver channel labels but can be changed from the DSP Configurator workspace while connected in Live mode. -
Page 25: Dante Controller
The Dante Controller page opens (see figure 16 on page 16). Figure 15. Accessing the Dante Controller Download Page On the Dante Controller page, click Download (see figure 16, on page 16). The Download Center page opens (see figure 17 on page 16). AXI 02 AT • Dante Controller... - Page 26 Figure 17. Download Center, Dante Controller File If you choose to run the file, follow all prompts. If you saved the file, double-click the saved file to begin installation when ready. AXI 02 AT • Dante Controller...
-
Page 27: Axi Network Configuration In Dante Controller
AXI Network Configuration in Dante Controller Use a standard Ethernet cable to connect the AXI 02 AT to a network via the front panel AT (PoE) port (see figure 4, on page 5) and power the device. Launch the Dante Controller software. Dante Controller auto-discovers all Dante devices on the network and advertises itself to allow communication over the network. -
Page 28: Renaming The Axi 02 At In Dante Controller
Renaming the AXI 02 AT in Dante Controller NOTE: Dante device naming can also be done via DSP Configurator (see under Tools on page 10). Ensure that the host PC and the AXI are connected to the same network. From the control computer start menu select: All Programs>Audinate>Dante Controller>Dante Controller. - Page 29 Configuration dialog box. The new name is written to the AXI. Repeat as necessary for all devices. NOTE: The device name assigned in Dante Controller also applies to the device name recognized in DSP Configurator Software. Figure 22. Rename Device Confirmation Dialog Box AXI 02 AT • Dante Controller...
-
Page 30: Renaming A Receiver Or Transmitter
To view the Receiver or Transmitter channels in Dante Controller, click the + sign next to the Receiver or Transmitter device name to expand it. The + sign becomes a - sign when the device is expanded (see figure 23, NOTE: The AXI 02 AT does not have any Transmitter channels. Figure 23. Expanded Receivers and Transmitters... - Page 31 Press <Enter> on the keyboard or click another channel name to confirm the new name. Repeat steps 4 through 6 to rename additional Receiver channels. When finished renaming Receivers, close the Device View dialog box. Figure 24. Renaming a Receiver AXI 02 AT • Dante Controller...
-
Page 32: Finding A Dante Device Ip Address
). The IP address is located in the Primary Address column ( column ( ). In the example below, the IP address for the connected AXI 02 AT is 192.168.11.181. Figure 25. Device Info Page Identifying a Physical Dante Device... -
Page 33: Physical Dante Network Setup
A physical network is required to share Dante audio channels among Dante-enabled devices like the AXI 02 AT. Other devices capable of sending and receiving audio over a Dante network must be on the same physical network in order to communicate via Dante (see figure 26 for an example of a physical Dante network). -
Page 34: Routing Device Channels
• intersection. Once a subscription has been made, the corresponding subscription icon will appear. NOTE: AXI 02 AT supports up to two receive flows (unicast or multicast). Refer to the Dante Controller User Guide for more information on flows. •... -
Page 35: Disconnecting Inputs From Outputs
Ethernet cable connecting the host PC to the Dante network and restart Dante Controller. This can be enough for the software to reacquire the Dante network. If the problem persists, perform the following troubleshooting procedures in the order presented. AXI 02 AT • Dante Controller... -
Page 36: Simplifying The Network For Troubleshooting
1). Turn off all anti-virus and firewall software on the computer. Enable DHCP on the remaining network connection. This forces the computer to acquire an IP address from the Dante network. AXI 02 AT • Dante Controller... -
Page 37: Restarting Dante Controller
Click the Help icon in the upper-right corner of the Dante screen (see figure 30, • Select Contents from the Help menu ( • ) on the Dante screen. • Press the <Shift+F1> keys on the computer keyboard. Figure 30. Accessing the Dante Help File AXI 02 AT • Dante Controller... -
Page 38: Remote Control
Remote Control This section discusses the Simple Instruction Set (SIS ) commands that can be issued to ™ the AXI 02 AT via the front panel USB Config port. The following topics are discussed: • SIS Commands • Command and Response Table for SIS Commands DSP Configurator Software Workspace •... -
Page 39: Verbose Mode
Verbose Mode A USB connection is used to monitor changes that occur on the AXI 02 AT. For a session to receive change notices, the device must be set to verbose mode 1 or 3. In verbose mode 1 or 3, the device reports changes in messages that resemble tagged SIS command responses. -
Page 40: Command And Response Table For Sis Commands
POWERDOWN = Device is powering down READY = Device is ready BUSY = Device is busy COMM_ERROR = Communication error FIRMWARE_UPGRADING = Firmware is upgrading REBOOT_REQUIRED = Dante device reboot is required REBOOTING = Dante device is rebooting AXI 02 AT • Remote Control... - Page 41 ). Names must begin with a letter and cannot begin or end with a hyphen ( Preset number Channel number Dante channel name Channel name may not contain (hyphen), (period), or DHCP status = enabled (default), = disabled AXI 02 AT • Remote Control...
-
Page 42: Dsp Sis Commands
• Attenuation values should be entered as negative integers. Attenuation values must be in 1 dB steps. • Output Attenuation Value Range Output 1 0 to -100 60000 0 to -100 Output 2 60001 AXI 02 AT • Remote Control... - Page 43 Extron Warranty Extron warrants this product against defects in materials and workmanship for a period of three years from the date of purchase. In the event of malfunction during the warranty period attributable directly to faulty workmanship and/ or materials, Extron will, at its option, repair or replace said products or components, to whatever extent it shall deem necessary to restore said product to proper operating condition, provided that it is returned within the warranty period, with proof of purchase and description of malfunction to: USA, Canada, South America,...
Need help?
Do you have a question about the AXI 02 AT and is the answer not in the manual?
Questions and answers