Table of Contents
Advertisement
Quick Links
Advertisement
Table of Contents

Summary of Contents for International Datacasting P56 Series
- Page 1 P56x Manual 14032011...
- Page 2 Manual for P56x P56x Manual 14032011...
-
Page 3: P56X Contact Information
P56x Contact Information International Datacasting Corporation Europe Address : Marga Klompélaan 18 6836 BH ARNHEM The Netherlands Telephone : +31 26 323 6969 : +31 26 323 3952 Web site : http://www.datacast.com E-Mail EMEA_info@datacast.com P56x Manual 14032011... -
Page 4: Table Of Contents
P56x Contact Information ......................3 Safety Information ........................8 Conformity ..........................9 Introduction ........................10 1.1. General functionality ....................10 1.2. Scope of Delivery ...................... 10 First Start ......................... 11 2.1. Before Start ....................... 11 2.2. Back Panel Views ...................... 11 2.2.1. - Page 5 3.3.3.2. ISDN Status ....................24 3.3.4. SNMP ........................ 24 3.3.4.1. SNMP Settings .................... 25 3.3.4.2. SNMP Traps ....................25 3.3.5. Security ......................25 3.3.6. Alarms........................ 26 3.3.7. Date & Time ....................... 26 3.3.8. Profiles ....................... 26 3.4. Firmware Upload menu ..................... 27 3.5.
- Page 6 4.4.6.2. Output buffer[msec] ..................36 4.4.6.3. Analog level offset[dB] ................36 4.4.7. Ancillary Data ....................36 4.4.7.1. Transport mode ................... 36 4.4.7.2. RS232 baud rate ..................36 4.5. P561 Encoder Configuration ..................36 4.5.1. Sample Rate ....................... 37 4.5.2. Encoder Channels ....................37 4.5.2.1.
- Page 7 4.6.3.2. RS232 baud rate ..................41 4.7. P56x Configuration using SNMP ................41 System Update ......................... 42 Reset to Factory Defaults ....................43 6.1. Via front panel keyboard .................... 43 6.2. Via web interface ....................... 43 Error handling ........................44 Technical specifications ....................
-
Page 8: Safety Information
Safety Information Electrical Safety Electrical Safety To prevent electric shock or hazard, do not attempt to disassemble To prevent electric shock or hazard, do not attempt to disassemble To prevent electric shock or hazard, do not attempt to disassemble the unit. Operation Safety Operation Safety Avoid dust, humidity and temperature extremes. -
Page 9: Conformity
Conformity The product complies with all the relevant safety requirements of the The product complies with all the relevant safety requirements of the The product complies with all the relevant safety requirements of the appropriated directives. appropriated directives. The product complies with the The product complies with the Conformity as defined by the guideline Conformity as defined by the guideline RoHS:... -
Page 10: Introduction
Introduction 1.1. General functionality The P56x series is an Audio Encoder/Decoder/Codec for up to 8 stereo channels (encoder channels, decoder channels or mixed). It is delivered in a 19'' 1U housing. The connection depends on the configuration of the ordered device. 1.2. -
Page 11: First Start
First Start 2.1. Before Start Check if scope of delivery (see section Check if scope of delivery (see section Scope of Delivery) is complete with ) is complete with help of the included packing list. Installation in rack When installing the When installing the P56x Series in a rack or another assembly you Series in a rack or another assembly you should make sure that the housing has the necessary air exchange... -
Page 12: Decoder P562
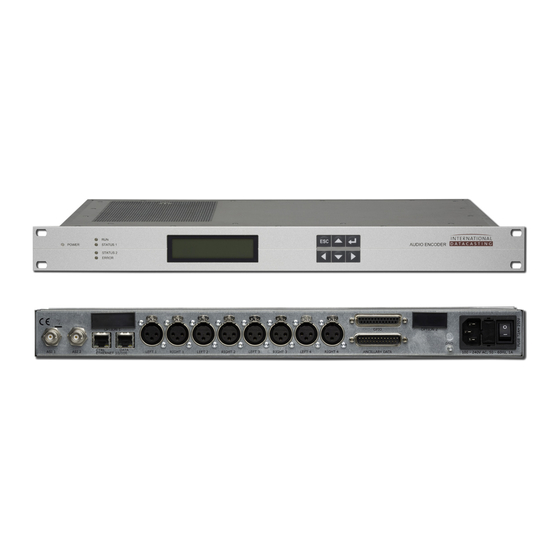
2.2.2. Decoder P562 2.2.3. Codec P560 2.3. Installation for P56x models models Mount the rack-mount 19” 1U unit and connect the mount 19” 1U unit and connect the following connectors: 1. Audio Connectors LEFT 1- -4/ RIGHT 1-4, AES/EBU Please connect an analog stereo input signal to any two of the Please connect an analog stereo input signal to any two of the LEFT and RIGHT LEFT and RIGHT connectors. - Page 13 Encoder: up to 4 analog inputs or up to 8 digital AES/EBU inputs or mixed • Decoder: up to 4 analog outputs or up to 8 digital AES/EBU outputs or mixed • Codec: up to 2 analog inputs or 4 digital AES/EBU inputs or mixed and up to 2 •...
-
Page 14: Leds
2.4. LEDs Status LEDs 1. Power The unit has AC power. 2. RUN The unit has successfully completed its boot cycle and is running. The unit has successfully completed its boot cycle and is running. 3. STATUS 1 The unit is running and streaming data. The unit is running and streaming data. -
Page 15: Front Panel Keyboard
2.5. Front panel keyboard With the front panel keyboard you can configure and display the status of the With the front panel keyboard you can configure and display the status of the With the front panel keyboard you can configure and display the status of the P56x. Buttons Generally there are three kinds of buttons: Generally there are three kinds of buttons:... -
Page 16: Front Panel Display
2.6. Front Panel Display After switching-on the unit, the Qbit logo appears for a short time before the status on the unit, the Qbit logo appears for a short time before the status on the unit, the Qbit logo appears for a short time before the status screen is shown on the display. - Page 17 discards any changes made. Pressing ESC several times eventually leads back to discards any changes made. Pressing ESC several times eventually leads back to discards any changes made. Pressing ESC several times eventually leads back to the status screen. To confirm any changes made, the ENTER button has to be the status screen.
-
Page 18: Default Ip Settings
2.7. Default IP settings By default the unit has got the following IP settings: Address: 192.168.093.151 Netmask: 255.255.255.000 Gateway: 000.000.000.000... -
Page 19: On System Http/Web-Server
On System HTTP/Web On System HTTP/Web-server It is not recommended to use the web interface for the configuration of the It is not recommended to use the web interface for the configuration of the It is not recommended to use the web interface for the configuration of the unit´s IP addresses. -
Page 20: Navigation Menu
Note: Default username: q56xadmin Default password: qbit Username and password are case sensitive Shut down the browser to log off the P56x web-server. 3.1. Navigation menu The navigation menu supports the following: Display the system status • Configuration of the network and P56x •... -
Page 21: Status Menu
3.2. Status menu The link Status opens a menu bar with the options: The link Status opens a menu bar with the options: Codec • Network • Revisions • System Health • 3.2.1. Codec Here the current encoding/decoding parameters Here the current encoding/decoding parameters are displayed. -
Page 22: Network
3.2.2. Network Displays the Hostname and the IP addresses of the CTRL and DATA interface. For ISDN models only the IP address of the CTRL interface will be displayed. 3.2.3. Revisions Displays the revision number of the firmware and integrated modules. 3.2.4. -
Page 23: Codec
3.3.1. Codec Here the settings for each channel can be done. ings for each channel can be done. 3.3.2. Network Allows you to set the Hostname and the Allows you to set the Hostname and the TCP/IP-configuration of the P56x-web interface web interface IP address, netmask, default gateway and Ethernet mode. -
Page 24: Isdn (Isdn Models Only)
3.3.3. ISDN (ISDN models only) The ISDN menu supports the following: configuration of the ISDN interface. • displays the ISDN status • 3.3.3.1. ISDN Settings a) Local Phone No. #1 Allows you to set the ISDN number for the P56x. b) Origination Phone No. -
Page 25: Snmp Settings
3.3.4.1. SNMP Settings Allows you to set the required UDP Port number and the password for the read and write community. 3.3.4.2. SNMP Traps Trap Version Trap Version options: [SNMPv1][SNMPv2c] Enable/Disable Traps: a) Alarm Reports whether the audio level threshold selected under 3.3.6 Alarms is out of tolerance range. -
Page 26: Alarms
3.3.6. Alarms Allows you to set the audio level threshold (overload and silence detection) for each channel. Select audio level and alarm in SNMP menu to generate the appropriate Trap. 3.3.7. Date & Time Allows you to set the Time zone and Clock-Reference and to synchronize date and time of the device with your PC time. -
Page 27: Firmware Upload Menu
3.4. Firmware Upload menu Firmware Upload menu Allows you to update your P56x. Refer to section 5 System Update System Update for information on the Firmware Upload menu for information on the Firmware Upload menu screen and how to manage it. 3.5. -
Page 28: Hard Reboot
3.5.2. Hard Reboot For a defined state of your P56x P56x you have the possibility to power cycle the device. you have the possibility to power cycle the device. All parameters will be set to default values. All parameters will be set to default values. Don't use this button after a firmware update. -
Page 29: System Configuration
System Configuration System Configuration This chapter describes how you can change the configuration of the This chapter describes how you can change the configuration of the P56x from from factory settings to your desired settings. Therefore you have to configure the network factory settings to your desired settings. - Page 30 Press the “ENTER” key to confirm the changes or “ESC” to discard the changes. Press the “ENTER” key to confirm the changes or “ESC” to discard the changes. Press the “ENTER” key to confirm the changes or “ESC” to discard the changes. •...
-
Page 31: Network Configuration Using The Web Interface
4.2. Network configuration using the Web Interface Network configuration using the Web Interface It is not recommended to use the web interface for the configuration It is not recommended to use the web interface for the configuration It is not recommended to use the web interface for the configuration the unit´s IP addresses. -
Page 32: P56X Configuration Using The Web Interface
Confirm your settings with save and press the “Restart system” button. The P56x will reboot and the changed configuration will be used. Shut down the browser to log off the P56x web-server. Note For a relogin you now need to enter the new network settings into your web browsers address field. -
Page 33: Sample Rate
Sample Rate • Encoder Channels • Encoder MPEG-TS (DVB) • Encoder Data Output • Decoder Data Source • Decoder Channels • Ancillary Data • 4.4.1. Sample Rate This menu item is optional and sets the sample rate [kHz]. Configuration options:[32000] [48000] 4.4.2. -
Page 34: Channel Mode (Layer Ii)
[Linear PCM] [E-APTX] [OFF] This means the channel will be cut off. All configurations still remain. 4.4.2.4. Channel mode (Layer II) Sets the Layer II channel mode. Configuration options:[joint stereo] [stereo] [dual channel] [mono (left)] [mono (right)] [mono (mix down)] 4.4.2.5. -
Page 35: Linear Pcm Format
4.4.2.9. Linear PCM format Sets the Linear PCM format. Configuration options: [16 bit] [20 bit] [24 bit] [16 bit/ 16 kHz sample rate]] 4.4.2.10. Bitrate Sets the transport stream bit rate at the ASI output connectors. Note that the user has to make sure that the bit rate is supported by the chosen encoder type, otherwise the P561 might stop with an error condition (ERROR LED permanently on), after “Save”... -
Page 36: Decoder Channels
[MPEG-2 TS via RTP/UDP] [MPEG-2 TS via ASI] [MPEG-2 TS via *plain* UDP] 4.4.6. Decoder Channels Here the settings for each channel can be done as described in the following sections. 4.4.6.1. Audio output Allows selection of the audio output. Configuration options:[analog] [AES/EBU] 4.4.6.2. -
Page 37: Sample Rate
Sample Rate • Encoder Channels • Encoder MPEG-TS (DVB) • Encoder Data Output • Ancillary Data • 4.5.1. Sample Rate This menu item is optional and sets the sample rate [kHz]. Configuration options:[32000] [48000] 4.5.2. Encoder Channels Here the settings for each channel can be done as described in the following sections. -
Page 38: Channel Mode (Layer Ii)
[OFF] This means the channel will be cut off. All configurations still remain. 4.5.2.4. Channel mode (Layer II) Sets the Layer II channel mode. Configuration options:[joint stereo] [stereo] [dual channel] [mono (left)] [mono (right)] [mono (mix down)] 4.5.2.5. Channel mode (AAC LC) Sets the AAC LC channel mode. -
Page 39: Encoder Mpeg-Ts (Dvb)
4.5.3. Encoder MPEG-TS (DVB) Here the parameters for the transport stream can be set. 4.5.3.1. DVB table selection Sets the utilized DVB tables; either no tables at all (off) or a minimum set of tables (PAT and PMT) or a standard set of tables (DVB). Configuration options:[no tables] [PAT and PMT] [all DVB tables] These menu items are just available for devices with transport stream. -
Page 40: Udp Destination Ip
4.5.4.2. UDP destination IP Sets the destination IP address for the RTP/UDP stream. Note: If data output is set to “via ASI”, these parameter have no effect. 4.5.4.3. UDP destination port Sets the destination port number for the RTP/UDP stream. Note: If data output is set to “via ASI”, these parameter have no effect. -
Page 41: Decoder Channels
Configuration option:[ Element. Stream from ISDN 4.6.2. Decoder Channels Here the settings for each channel can be done as described in the following sections. 4.6.2.1. Audio output Allows selection of the audio output (analog or digital). Configuration options:[analog] [AES/EBU] 4.6.2.2. Output buffer[msec] The P56x will be streaming with the defined delay. -
Page 42: System Update
System Update The firmware update is provided by Qbit as a single file with the file name provided by Qbit as a single file with the file name "qbit_q56x_fw_xxx.gz" . This file must be get ready on your computer before update. _fw_xxx.gz"... -
Page 43: Reset To Factory Defaults
Reset to Factory Defaults Reset to Factory Defaults All settings and parameters will be reset to All settings and parameters will be reset to factory settings factory settings and have to be readjusted to the desired values. and have to be readjusted to the desired values. You have two options to reset the You have two options to reset the P56x to factory default: via web interface or front to factory default: via web interface or front... -
Page 44: Error Handling
Error handling In case of an error, there are three possible states: a) The LED STATUS 1 is permanently off. b) The LED ERROR is permanently on. c) The LED STATUS 1 is permanently off and the LED ERROR is permanently on. The first measure could be a re-start of the unit by either switching the AC power off and ( after a few seconds ) on again, or by triggering a re-start through the web-interface, or the front panel keyboard ( refer to section 6.1 Via front panel... -
Page 45: Technical Specifications
Technical specifications 8.1. Models Mode Encoder Decoder Display/ Interfaces Codec Keyboard Ethernet, P560 ● ● Ethernet, ● P561 ● Ethernet, P562 ● ● Advanced ISDN models Ethernet, P560 ● ● ISDN Ethernet, ● P561 ● ISDN Ethernet, P562 ● ● ISDN •... -
Page 46: General Technical Data
8.2. General Technical Data Audio input digital: AES/EBU, electrical, XLR (IEC958) Audio input analog: XLR, electronically balanced, level range 0 to +18 dBu 24bit A/D converters Frequency range 20 Hz to 20 kHz +- 0.3 dB Audio encoding: ISO/IEC 11172-3, 13813-3 MPEG-1/2 Layer II ISO/IEC 13813-7 MPEG-2 AAC ISO/IEC 14496-3 MPEG-4 AAC LC Encoding bit rate:... -
Page 47: Supported Bit Rates Aac
8.3.2. Supported bit rates AAC Sample AAC LC AAC LC AAC LC HE-AAC v1 HE-AAC v1 HE-AAC v2 rates MONO STEREO dual MONO STEREO STEREO channel 32000 Hz 16000- 32000- 2*(16000- 14000- 28000- 14000- 160000 320000 160000) 64000 128000 64000 48000 Hz 16000- 32000-... -
Page 48: Audio Analog In (Left / Right)
8.4.1. Audio Analog In (LEFT / RIGHT) Audio Analog In (LEFT / RIGHT) Assignment IN + IN - 8.4.2. Audio Analog Out (LEFT / RIGHT) Audio Analog Out (LEFT / RIGHT) Assignment OUT + OUT - 8.4.3. Audio Digital (AES / EBU) Assignment IN / OUT a IN / OUT b... -
Page 49: Ethernet 10 / 100 Ctrl / Data
8.4.4. Ethernet 10 / 100 CTRL / DATA Assignment 8.4.5. Layout ANCILLARY DATA connector Description Description TRANSMIT CH 1 RECEIVE CH 1 TRANSMIT CH 2 RECEIVE CH 2 TRANSMIT CH 3 RECEIVE CH 3 TRANSMIT CH 4 RECEIVE CH 4 TRANSMIT CH 5 RECEIVE CH 5 TRANSMIT CH 6... -
Page 50: Layout Gpio Connector
8.4.6. Layout GPIO connector Description Description OPTO IN COMMON OPTO IN 1 OPTO IN 2 OPTO IN 3 OPTO IN 4 OPTO IN 5 OPTO IN 6 OPTO IN 7 OPTO IN 8 REL 1 COMMON REL 1 BREAK REL 1 MAKE REL 2 COMMON REL 2 BREAK REL 2 MAKE...
Need help?
Do you have a question about the P56 Series and is the answer not in the manual?
Questions and answers