
Related Manuals for promotal Elansa 1161 01 Series


Summary of Contents for promotal Elansa 1161 01 Series
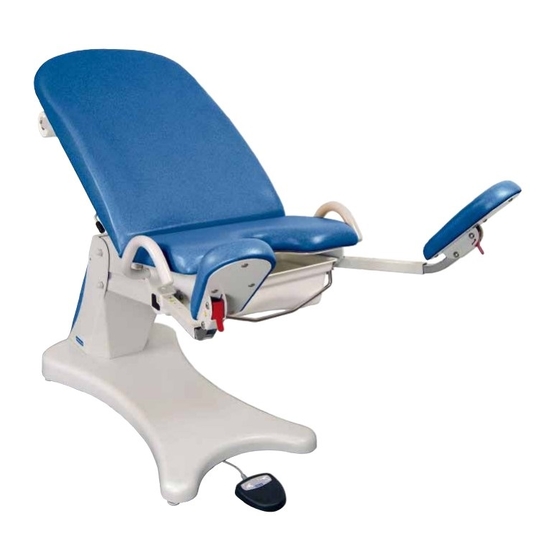
- Page 1 User’s Guide Elansa Model Shown : 11615-01 Electric Gynecological Table 11610-01 / 11614-01 / 11615-01...
- Page 2 Operating Manual are deemed correct at the time of 22, rue de Saint-Denis de Gastines printing. B.P. 26 - 53500 ERNÉE Cedex Promotal , however, reserves the right to modify its models FRANCE and its procedures or render them obsolete without notice. Tél. :...
-
Page 3: Table Of Contents
Summary Important Information Safety symbols Power supply Electromagnetic interfere Precautions when unpacking Material delivered in cardboard packaging Products delivered on wooden palettes Storage condition Conditions of use Unpacking / Installation Verification Cleaning protocol Warning General maintenance Disinfection Maintenance Instructions Painted surfaces (epoxy polyester fi nish) Imitation leather coverings Stainless steel products Chrome fi nished products... - Page 4 Summary Safety Using the pedal control Using the Table Adjusting the height Postioning the incline of the backrest Plastic pan Installation of the plastic pan Paper roll Installing the paper roll The levellers Adjusting the levellers The footrests Installing the footrests Width adjustment of the footrests Length adjustment of the footrests Tilt adjustment of the footrests The pair of stirrups Installing the stirrups The pair of Goeppels Installing the Goeppels...
- Page 5 Summary Options The programmable pedal control Using the 3 pre-programmed positions Selection the 3 pre-programmed positions Castors with brakes Using the castors Electrical receptacles Using the electrical receptacles Restarting the table Lifespan of the Medical Device Fuse replacement Obligatory/specific maintenance End of the device’s useful life Maintenance notebook Note Warranty Information Warranty Obligations Exclusions Exclusive Remedy No Authorization Declaration of Conformity...
-
Page 6: Important Information
Important Information Safety symbols Warning sign Information marked with this symbol must be read and strictly complied with! Remark Draws your attention to a procedure, practice or situation. Maximum number of Correct orientation for Humidity limitation stacked pallets transportation Atmospheric pressure Temperature limitation Fragile limitation... -
Page 7: Power Supply
Electromagnetic interfere This Promotal examination equipment was designed and built in order to minimize electromagnetic interferences with other devices. If interferences are noted, it is necessary to withdraw the parts causing the interference and/or to connect the equipment on isolated circuits. -
Page 8: Precautions When Unpacking
Precautions when unpacking Material delivered in cardboard packaging ○ Small, lightweight, easy ○ Heavy or cumbersome material requiring the use to handle materiel of lifting gear In this case, the products can be easily handled In this case, it is possible to use a fork lift truck, without any lifting gear, taking care to position the provided it is used correctly. - Page 9 Note : Authorized CE representative Countries in the EEC should direct all questions, incidents, and complaints to Promotal’s Authorized CE representative listed below : Promotal 22, rue de Saint-Denis de Gastines 53500 Ernée, FRANCE Téléphone : + 33 (0)2 430 517 76 Fax : + 33 (0)2 430 572 00 User’s Guide...
-
Page 10: Cleaning Protocol
Any modification of the DM without the manufacturer’s written authorisation is prohibited. Caution Only those accessories allowed and provided by Promotal for this DM may be used. General maintenance Apart from regular cleaning, our products do not The variable height tables, chairs and trolleys are require regular maintenance. -
Page 11: Imitation Leather Coverings
Imitation leather coverings Use a damp cloth and soapy water (eg. household Flame retardort classifi cation : All our coverings soap). For stubborn stains, dab, but do not rub, class are M2 or M1. We can provide you with a using a cloth soaked in white spirits or in a solution manufacturers certifi cate on request. -
Page 12: User's Guide - Gynecological Table
User’s Guide – Gynecological Table Intended use This appliance is designed for use in professional premises only : ● Medical practices ● Care establishments This appliance must not be installed in domestic premises. This table is designed to be used only by healthcare staff. This examining table is used to perform gynaecological interventions under the best possible safety conditions. -
Page 13: Electrical Connections
Electrical connections This table must be connected to the main electricity supply. ● Connection to the supply : 120 V or 230 V (depending on country) ● Frequency : 50/60 Hz ● Protection Classification / Degree of electric shock protection : Class 1 / B ●... -
Page 14: Safety
Safety The switch situated at the base of the table allows the table to be switched on or off. If the table is not to be used for a prolonged period of time, it should be switched off. Caution The power cable of this medical device may act as an obstacle and cause you to trip over it. -
Page 15: Using The Table
Using the Table Adjusting the height Press on the pedal control for the desired position. Down Caution Make sure that there is no object present under the device before lowering it. Postioning the incline of the backrest Use one hand to guide the backrest (to the desired position) and the other to activate the gas-spring (L1). -
Page 16: Plastic Pan
Using the Table Plastic pan Installation of the plastic pan The plastic pan is removable to ensure easy cleaning, it can be moved towards the front and also be placed under the seat. ● Pull the handle underneath the seat, to move the pan forward. -
Page 17: The Footrests
The footrests (only for the model 11615-01) Installing the footrests see image oposite. Width adjustment of the footrests (3 positions) A : Take the footrest by the end and lift slighty. B : The footrest can be opened out or closed in. Caution Hold the footrest correctly when adjusting. -
Page 18: Tilt Adjustment Of The Footrests
Using the Table Tilt adjustment of the footrests From position C to D : Take the footrest by the end and lift slighty. It will move into position D. From position D to C : Holding the footrest, unlock the mechanism, the footrest returns to a straight position. -
Page 19: The Upholstery
The upholstery Removing the upholstery Place the backrest in a horizontal position. 1 : Lift the seat by removing it from the studs (P). 2 : Slide the whole upholstery towards the top. User’s Guide... -
Page 20: Accessories
Accessories Fill-in cushion (reference 11372-01) (only for the model 11615-01) Installing the cushion Align the footrests with the seat. Insert the fill-in cushion. Press slightly to ensure it is correctly in place. Caution Make sure that the cushion of feet is well to insert. This is designed for a charge of 25 kg maxi. -
Page 21: Leg Cushion
Leg cushion (reference 11272-01) (only for models 11610-01 and 11614-01) Installing the leg cushion Caution Make sure that the cushion of feet is well to insert. This is designed for a charge of 25 kg maxi. Installing the wall-mounted support for the foot cushion - The support is fixed to the wall by 3 holes Ø... -
Page 22: Lamp Holder
Accessories Lamp holder (reference 11910-01) Installing the lamp holder (Insert right or left) - Remove the tip (E) 40x40 on the tube (tc), and - Insert the lamp support in the tube (TC) and unscrew the screw (VA). tighten the screw (VA). Lamp (reference LEDXX) (Insert right or left) Caution Clamps are necessary to install... -
Page 23: Auto-Blocking I.v. Pole
Auto-blocking I.V. pole N°4 Allen key (reference 2985-01) Installing the IV pole Caution Clamps are necessary to install these accessories. (réf. : 11910-01). Tighten screws before use. Adjusting the height of the IV pole The IV pole has 1 sliding stem. Use the screw to adjust the height of the lower stem and the bolt to adjust the upper stem. -
Page 24: Leisegang Colposcope Holder
Accessories Leisegang Colposcope holder (reference 11810-01) Installing the colposcope holder (Insert right or left) - Remove the tip (E) 40x40 on the tube (tc), and - Insert the colp support in the tube (TC) and unscrew the screw (VA). tighten the screw (VA). Colposcope LEISEGANG Tighten the 2 screws to the maximum (VB) User’s Guide... -
Page 25: Support Colposcope Zeiss / Colposcope Kaps
Support Colposcope Zeiss / Colposcope KAPS (reference 11840-01 and 11830-01) Installing the colposcope holder (Insert right or left) - Remove the tip (E) 40x40 on the tube (tc), and - Insert the colp support in the tube (TC) and unscrew the screw (VA). tighten the screw (VA). Colposcope ZEISS Tighten the 2 screws to the maximum (VB) -
Page 26: Headrest
Accessories Headrest (reference 11679-01) Installing Insert the grip of the headrest in the frame of the backrest. Adjustments Adjustments are made by pushing on the headrest to lower it and pulling on the grip to heighten it. Splash guard cover (reference 12677-01) User’s Guide... -
Page 27: Options
Options The programmable pedal control (reference 1739) To achieve the desired position, simply apply and and low positions. The height position of the table maintain pressure on the pedal. As soon as this may be adjusted while the patient is on the table. pressure is released, the movement will stop. -
Page 28: Castors With Brakes
Options Restarting the table The table will have to be re-started after any one of the following interventions : programming, general service, changing the electrical box, disconnection of the electric motors. Method : Place the table in the lowest possible position (End of downward run). ● Unplug the electric cable from the mains (Wait for a few seconds). Then reconnect the table to the mains. ●... -
Page 29: Lifespan Of The Medical Device
• The upholstery • The knobs and screws Promotal recommends replacing the wear parts after a maximum of 5 years of use. For any intervention, please contact your local authorized dealer, indicating the serial number of the device. Fuse replacement Remove all power to unit by unplugging unit’s power cord. -
Page 30: Obligatory/Specific Maintenance
Your dealer is responsible for reclaiming and processing this device at the end of its service life. Do not hesitate to contact Promotal, if necessary. We will suggest to you a solution to process this equipment in the best conditions. -
Page 31: Maintenance Notebook
Maintenance notebook User’s Guide... -
Page 32: Note
Note User’s Guide... - Page 33 User’s Guide...
-
Page 34: Warranty Information
No Authorization No person or fi rm is authorized to create for Promotal any other obligation or liability in connection with the products. THIS WARRANTY IS PROMOTAL’S ONLY WARRANTY AND IS IN LIEU OF ALL OTHER WARRANTIES, EXPRESS OR IMPLIED. -
Page 35: Declaration Of Conformity
22, rue de Saint-Denis de Gastines, 53500 Ernée - FRANCE Tél. : +33 (0)2 43 05 17 76, Fax : + 33 (0)2 43 05 72 00, www.promotal.com S.A.S. au capital de 4 290 660 € - R.C.S. LAVAL Siret 421 156 720 00011 - TVA FR 67 421 156 720 - APE 3250A... - Page 36 PROMOTAL - FRANCE www.promotal.com DIC11610-01_4615EN...
Need help?
Do you have a question about the Elansa 1161 01 Series and is the answer not in the manual?
Questions and answers