
Related Manuals for promotal 156 01 Series


Summary of Contents for promotal 156 01 Series
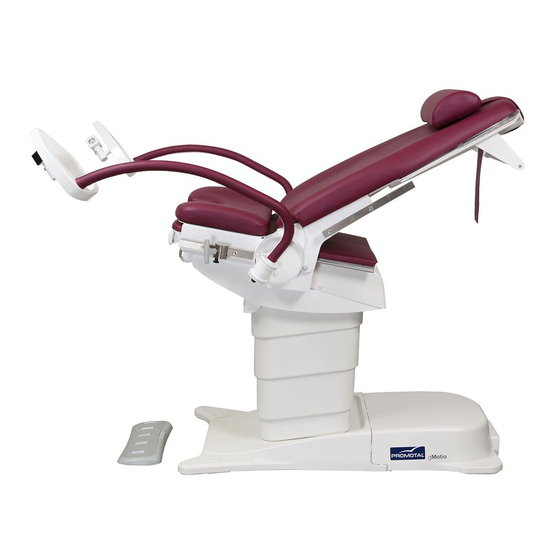
- Page 1 User’s Guide Model Shown : 15640-01 Model Shown : 15620-01 Electric Gynecological Table 15620-01 / 15624-01 / 15626-01 15630-01 / 15640-01...
- Page 2 Operating Manual are deemed correct at the time of 22, rue de Saint-Denis de Gastines printing. B.P. 26 - 53500 ERNÉE Cedex Promotal , however, reserves the right to modify its models FRANCE and its procedures or render them obsolete without notice. Tél. :...
-
Page 3: Table Of Contents
Summary Important information Safety symbols Applied parts Electromagnetic interference Unpacking precautions Medical device delivered on a wooden pallet Storage conditions Conditions of use Unpacking and Installation Step by step Check Remark: Authorised EC Representative Cleaning protocol Warning Cleaning/Disinfecting User manual – gMotio Intended purpose Patient weight capacity Protection against penetration of liquids... - Page 4 Summary Placing on castors Position QE1, QE2, QE3 Seat inclination control pedals Using the pedals Using the gMotio Paper roll Installation of the paper roll holder Removing the upholstery The levellers Adjustment of the levellers Plastic pan Protection at the output of the tray Accessories Sliding clamp for 25 x 10 rail Installing the clamp...
- Page 5 Removal of the screws present Assembly of the pair of rails Lamp holder Fixing of the lamp on the support Leisegang Colposcope holder Installing the colposcope holder Zeiss Colposcope holder Installing the colposcope holder Olympus Colposcope holder Installing the colposcope holder Pair of covers for legrests Roll bar protection Foot Protection...
-
Page 6: Important Information
Important information Safety symbols Warning sign Information marked with this symbol must be read and strictly complied with! Remark Draws your attention to a procedure, practice or situation. Maximum number of Correct orientation for Humidity limitation stacked pallets transportation Atmospheric pressure Temperature Fragile limitation... -
Page 7: Applied Parts
Electromagnetic interference This Promotal medical device was designed and built to minimize electromagnetic interference with other equipment. If interference is, however, observed, you must remove the apparatus causing the interference from the room and/or plug it into an isolated circuit. -
Page 8: Unpacking Precautions
Unpacking precautions Medical device delivered on a wooden pallet The medical device positioned on a wooden pallet ensure that the forklift truck is correctly positioned may be easily moved using a forklift truck, as long in relation to the pallet, and that the unit is stable. as this is used correctly. -
Page 9: Check
2) Check the external components for any Remark: Authorised EC Representative Within the European Union, all problems, complaints or questions should be addressed to the Authorised EC Representative of Promotal indicated below: Promotal 22, rue de Saint-Denis de Gastines 53500 Ernée,... -
Page 10: Cleaning Protocol
• The use of abrasive powders or any other abrasive product should be avoided. • High-pressure cleaning is forbidden. Under no circumstances shall Promotal be held liable under warranty for any damage caused by non-compliance with the use instructions for a detergent- disinfectant. -
Page 11: User Manual - Gmotio
User manual – gMotio Intended purpose This medical device is designed for use in professional premises only: • Medical office • Health establishment This medical device must not be installed in domestic premises. This medical device is intended for use by health professionals for examinations or gynaecological procedures, in the safest possible conditions. -
Page 12: Electrical Connection
User manual – iQuest Electrical connection This medical device must be connected to the mains supply. • Connection to the mains supply : 120 V or 230 V (depending on the country) • Frequency : 50/60 Hz • Protection classification : Class 1/ type B device •... -
Page 13: Safety
Safety Caution To avoid malfunctions and for safety reasons, no objects must be left under the DM’s seat or between its moving frames. Caution the supply cable for this medical device may represent an obstacle and cause falls. Do not forget its presence when moving around the device once connected to the mains supply. - Page 14 Safety note Before using the medical device lowering control, ensure that no objects or obstacles are between the moving parts and the ground. Safety note When using the position memory function, movements can be interrupted by pushing on one of the command buttons for the DM or, as a last resort, by disconnecting the power supply cord.
-
Page 15: Options
Options Accumulator (reference 3092-01) (Built in to the device’s power supply system) (Note: the DM can functions the same in «Battery mode» or in «Mains mode». Charging the accumulator Before using the DM for the 1st time, it is recommended to leave it plugged into the mains for 24 hours to enable the accumulator to charge fully. -
Page 16: Using The Individual Control
Using the individual control Manual command Presentation Safety note When using the pre-programmed positions, (welcome, QE1, QE2, QE3, DM position, DM position), do not leave the patient on the DM without supervision. Adjusting the height (up) Adjusting the height by holding the button down Default position Standard position for getting into... -
Page 17: Technical Information
Foot pedal Technical information : Type of EI: Radio Frequency (Frequency 2.4G) IEEE802.15.4 standard Mob.: between 5 and 6 metres Presentation Safety note When using pre-programmed positions (reception, QE1, QE2, QE3), do not leave the patient on the DM unattended. Adjustment of electric Adjustment of electric footrests... -
Page 18: Adjusting The Height
Using the individual control Adjusting the height The position below is obtained by holding down the hand control or foot control Down Down Adjusting the trendelenburg position The position below is obtained by holding down the hand control or foot control Down User’s Guide... -
Page 19: Adjusting The Backrest Tilt
Adjusting the backrest tilt The position below is obtained by holding down the hand control or foot control Down Down Adjustment of electric footrests (only on models 15630-01 and 15640-01) The position below is obtained by holding down the hand control or foot control Down Down User’s Guide... -
Page 20: Adjustment Of The Distance Between The Electric Footrests
Using the individual control Adjustment of the distance between the electric footrests (only on models 15630-01 and 15640-01) The distance between the footrests can be adjusted manually. Protection at the electric footrests (only on models 15630-01 and 15640-01) In order to avoid any risk of pinching between the footrests and the floor, the footrests are equipped with sensors that detect any objects that might be crushed. -
Page 21: Use Of Integrated Lamps
Using the individual control Use of integrated lamps (only on model 15640-01) 1. Automatic switch-on of the diagnostic lamps 2. Angular adjustment of diagnostic lamps User’s Guide... -
Page 22: Welcome Position
Using the individual control Welcome position The position can be recalled by pressing once on the button NB: This position cannot be modified. Welcome position Welcome position Placing on castors This position can be recalled by pressing and holding the button Safety note Unplug the power supply cable Return to a standard position by pressing once on... -
Page 23: Position Qe1, Qe2, Qe3
Using the individual control Position QE1, QE2, QE3 The keys QE1, QE2 and QE3 are factory-set. These are modifiable. To register a new position on the QE1 or QE2 button, it will move the DM to the desired position, then press the QE1 (or QE2 or QE3) for 6 seconds. -
Page 24: Seat Inclination Control Pedals
Using the individual control Seat inclination control pedals Using the pedals The inclination is adjusted using the controls The return to the horizontal position is done using located on the edge of the housing. the opposite pedal. Press on the pedal to obtain an inclination. -
Page 25: Using The Gmotio
Using the gMotio Paper roll Installation of the paper roll holder The paper roll is positioned on an axis with spring Caution follow the indications clips at each end. Press these springs to remove the provided well obtain a greater paper roll. -
Page 26: Plastic Pan
Using the gMotio Plastic pan (6 liters) The plastic pan is removable to ensure easy cleaning, it can be moved towards the front and also be placed under the seat. • Pull the handle underneath the seat, to move the pan forward. -
Page 27: Accessories
Accessories Only accessories designed and provided by Promotal for this medical device are authorised for use. Sliding clamp for 25 x 10 rail (reference 878-12) Installing the clamp 878-12 Using the clamp Check that the parts are secure before use. -
Page 28: Pair Of Stirrups
Accessories Only accessories designed and provided by Promotal for this medical device are authorised for use. Pair of stirrups (For model 15620-01) (reference 850) Installing the stirrups Ensures good clamping with each Caution Clamps are necessary to install these accessories. -
Page 29: (For Model 15620-01) Rotating Clamp For 25 X 10 Rail
Rotating clamp for 25 x 10 rail (reference 879-10) Installing the clamps Insert the clamp on the rail. Tighten the screws before use. User’s Guide... -
Page 30: Auto-Blocking I.v. Pole
Accessories Only accessories designed and provided by Promotal for this medical device are authorised for use. 2 hook IV pole (reference 985-01) Caution Clamps are necessary to Installing the IV pole install these accessories. (réf. : 878-12) Ensures good clamping with each Auto-blocking I.V. -
Page 31: Manual Control / 9 Programmable Positions
Manual control / 9 programmable positions (reference 15031-10) Safety note When using the position memory function, movements can be interrupted by pushing on one of the command buttons for the DM or, as a last resort, by disconnecting the power supply cord. Conection User’s Guide... -
Page 32: Use
Accessories Only accessories designed and provided by Promotal for this medical device are authorised for use. Adjusting the backrest angle (up) LED (Choice of medium) Adjusting the height by holding Adjusting the seat angle the button down (up) Adjusting the height by holding... -
Page 33: Head Rest
Head rest (reference 30679-01) ENT0803 (x2) Mounting the flange F1P263-01(x1) VXM17614(x2) Positioning Push the head rest's band insert into the plate fixed to the back rest. Adjustment Just press on the head rest to lower it (D), or pull on the band insert to raise it (R). -
Page 34: Pair Of 25X10 Stainless Steel Rails (Backrest)
Accessories Only accessories designed and provided by Promotal for this medical device are authorised for use. Pair of 25x10 stainless steel rails (Backrest) Box spanner of 13 (reference 15879-01) Removal of the screws present N°5 Allen key Assembly of the pair of rails... -
Page 35: Lamp Holder
Lamp holder (reference 2056-02) Ensures good clamping with each Ensures good clamping with each Fixing of the lamp on the support 4 screw TFC M4x16 User’s Guide... -
Page 36: Leisegang Colposcope Holder
Accessoires Only accessories designed and provided by Promotal for this medical device are authorised for use. Leisegang Colposcope holder (reference 15810-01) Installing the colposcope holder (Insert right or left) Colposcope LEISEGANG Incidence due to the adaptation of the colposcope support. -
Page 37: Zeiss Colposcope Holder
Zeiss Colposcope holder (reference 15840-01) Installing the colposcope holder (Insert right or left) Colposcope ZEISS Incidence due to the adaptation of the colposcope support. In order to avoid any risk of pinching between the colposcope and the DM, the impulse buttons QE1, QE2, QE3 and HOME will switch to maintained contact. -
Page 38: Olympus Colposcope Holder
Accessoires Only accessories designed and provided by Promotal for this medical device are authorised for use. Olympus Colposcope holder (reference 15850-01 right) Installing the colposcope holder (15851-01 left) Supply «OLYMPUS» Incidence due to the adaptation of the colposcope support. In order to avoid any risk of... -
Page 39: Pair Of Covers For Legrests
Pair of covers for legrests (reference 861) for models 15626-01 Roll bar protection (For models 15830-01 and 15840-01) (reference 15861-01) Protection reference Foot Protection (For models 15830-01 and 15840-01) (référence 15905-01) Protection reference User’s Guide... -
Page 40: Seat Protection
Accessoires Only accessories designed and provided by Promotal for this medical device are authorised for use. Seat protection (reference 15906-01) Protection reference Leg rest extension protection (reference 15907-01) Protection reference User’s Guide... -
Page 41: Leg Rest Extension
Options Leg rest extension (reference 15672-01) Using the leg rest extension Caution Maximum permissible load : 25kg BIP.. BIP To avoid any risk of pinching between the leg rest and the floor, the retracted position of the leg rest is controlled by a CRposition sensor, if you press the keys that allow you to obtain the pre-programmed positions QE1, QE2, QE3 and HOME by implusion, then the leg rest is not fully retracted, the movements will only be carried out with maintained contact, preceded by two audible beeps. -
Page 42: Plastic Bowl With Drainage Tube
Options Plastic bowl with drainage tube (reference 2061-30) Sliding plastic removable bowl (6 liters) with drainage tube (150 cm). The plastic pan is removable to ensure easy cleaning, it can be moved towards the front and also be placed under the seat. •... -
Page 43: Stainless Steel Tray
Stainless steel tray (reference 15966-01) Stainless steel tray (300 x 210 x 50) on rail The tray is removable for easy cleaning, it can be moved forwards and folded under the seat. • Grasp the handle underneath the seat to move the tray forward. •... -
Page 44: Additional Mains Plug And Equipotential Terminal
Options Additional mains plug and equipotential terminal (reference 40400-1 (EU, UK, US) 40400-2 (DK,IT,AUS,CH)) Safety note By connecting a medical device to the additional mains plug, the unit becomes an Electro-medical system according to the standard EN 60601-1. The user must ensure that the EM system is in conformity with the standard EN 60601-1 (article 16). -
Page 45: Notes
Notes User’s Guide... - Page 46 Notes User’s Guide...
- Page 47 User’s Guide...
-
Page 48: Lifespan Of The Medical Device
Medical device end of service life Your dealer is responsible for the recovery and end of life treatment of this device. If necessary, do not hesitate to contact Promotal. We can propose solutions to treat this equipment in the best conditions. -
Page 49: Fuse Replacement
6. Insert fuse drawer (1) into fuse housing (2) until fuse drawer snaps into place (both side of use drawer are locked into fuse housing). 7. Plug in power cord to equipment. If fuse blows again, call your Promotal distributor. User’s Guide... -
Page 50: Replacing Used Batteries In The Foot Pedal
Replacing used batteries in the foot pedal (battery reference (x2): LR03 - AAA Alkaline 1.5V) To replace the batteries in this wireless foot pedal: Turn the pedal over Loosen the screw and remove the battery compartment cover Remove the two used batteries and replace them with the two new batteries. (make sure to place them with their polarities correctly positioned.) Replace the cover and tighten the screw. -
Page 51: Maintenance Notebook
Maintenance notebook User’s Guide... -
Page 52: Warranty Information
No Authorization No person or fi rm is authorized to create for Promotal any other obligation or liability in connection with the products. THIS WARRANTY IS PROMOTAL’S ONLY WARRANTY AND IS IN LIEU OF ALL OTHER WARRANTIES, EXPRESS OR IMPLIED. - Page 53 gMotio 15620-01 / 15624-01 / 15926-01 15630-01 / 15640-01 Electric Gynecological Table 2020 on 2 March, 2020...
- Page 54 PROMOTAL - FRANCE www.promotal.com DIC15620-01_1020EN...
Need help?
Do you have a question about the 156 01 Series and is the answer not in the manual?
Questions and answers