Advertisement
Quick Links
Advertisement

Subscribe to Our Youtube Channel
Related Manuals for Kogan KA38CICEMKA


Summary of Contents for Kogan KA38CICEMKA
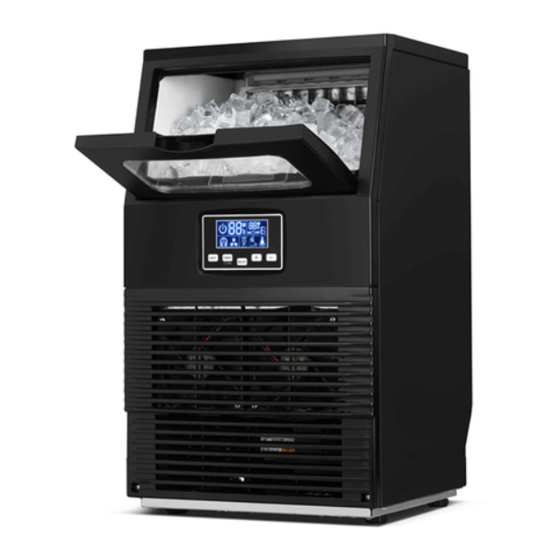
- Page 1 38KG COMMERCIAL ICE CUBE MAKER KA38CICEMKA...
- Page 3 The use of an extension cord is not recommended as it may overheat and cause a risk of fire. • If the supply cord is damaged, it must be replaced by Kogan.com or its service agent to avoid a hazard. •...
- Page 4 • Do not use mechanical devices or other means to accelerate the defrosting process or ice harvesting process, other than those recommended by Kogan.com • Do not use other electrical appliances inside the icemaker.
- Page 5 OVERVIEW Main unit Top cover Ice-making and its water tank assembly, including ice-making evaporator, water tank, water charging tank, water pump and detection circuits. Access door for ice removal Operation panel Air outlet: must be unobstructed to allow air to circulate smoothly, as hot air will blow out when the unit is running.
- Page 6 Water dividing pipe: water will flow out from the drainage holes, and it can be disassembled and cleaned as required. Evaporator (ice-making module) C. Ice level sensor board: detects if the inner cabinet is full of ice and the status of the ice-harvesting process.
- Page 7 Operation panel LCD display window Power state: when the unit is turned off (standby mode), this symbol flashes. When the unit is operating, the symbol will remain lit. Ambient temperature and ice-making countdown time display. Ice-making setting and Timer setting display. Error code: E1 signifies an ambient temperature sensor fault.
- Page 8 LED Light button Turns the internal LED light on or off. Note: Pressing and holding the LED Light button for 5 seconds or more will change the ambient temperature unit between degrees Fahrenheit and degrees Centigrade. C. Timer/Clean button Press this button once to enter the Timer setting program. Press and hold for 5 seconds or more to enter the Self-Cleaning program.
- Page 9 Exploded diagram Part list Top cover DC fan support frame...
- Page 10 Insulation sponge DC fan Water dividing pipe cap Water tank drainpipe Water dividing pipe Bottom feet Water circulation pump Air inlet front panel Ice level detection plate Water drainage cap Evaporator and frame Water drainage port Back plate Ice compartment door Circuit box Ice compartment door window Circuit box cover...
- Page 11 INSTALLATION This unit is not for outdoor use. Keep to the proper room temperature and inlet water temperature according under “Specifications” below, or the ice making performance will be affected. This unit should not be located near heat sources such as ovens or radiators. The unit should be located on a firm and level foundation at normal countertop height.
- Page 12 ¼” to ½” quick connector and the water draining pipe, etc., are included. If any parts are missing, contact Kogan.com. Remove all tape keeping accessories and components in place, and wipe over the inner cabinet and ice scoop with a wet cloth.
- Page 13 Electrical requirement and connection WARNING: THIS UNIT MUST BE EARTHED. • Plug into a grounded wall outlet. • Never remove the ground prong. • Use a separate power supply or receptacle. • Never use an adapter. • Never use an extension cord. •...
- Page 14 OPERATION Water connection Important: Be sure to use the new hose-sets supplied with the appliance to connect to water mains. Old hose-sets should not be reused. Connect the water drainage pipe Pull out the black water drainage cap (indicated as “A” in the diagram below), then connect the included white drainage pipe.
- Page 15 Connect the water hose to the water supply Install the supplied quick-connector (from ¼” to ½” with a black sealing ring) to the water tap by screw thread. Remove the clipper from the quick-connector and insert the free end of the water hose into the quick-connector port completely. Reinstall the clipper to lock the water supply hose into place.
- Page 16 The ice-making process Step 3: Start to Step 2: The arrow Press make ice and ice- Step 1: Standby state flashes to show ON/OFF cube symbol rotates water flow button to turn on the unit Step 6: During ice- Step 5: Ice-harvest starts Step 4: Display the harvest, the water- and ice-cube symbol...
- Page 17 “+” or “-” button and the right digit will flash; the default setting is zero, 1 minute will be added to or decreased from the ice-making process for each pressing of the “+” or “-” button. After 5 seconds, the new setting will be remembered by the system. Low water quality will cause low quality ice cubes and reduce the transparency of the ice cube.
- Page 18 When the unit is plugged in, press the “Light” button on the operation panel once to turn on the LED light inside the ice bin, and the light symbol on the LCD display window will illuminate. Press this button once again, the LED light and the light symbol will both turn off. Note: Press and hold the “Light”...
- Page 19 Water drainage Make sure the water drainage pipe is correctly connected at the unit back before use. Water can be drained from the ice storage bin through the white drainage pipe connected on the back-drainage port. Make sure not to set the white drainage pipe too high.
- Page 20 CLEANING & CARE WARNING: Before carrying out any cleaning or maintenance operations, unplug the ice maker from the main power supply (with the only exception being the self-cleaning program). Do not use alcohol or solvents for cleaning or sanitisation of the ice maker, as this may cause cracks on the plastic parts.
- Page 21 Interior cleaning The ice storage bin should be sanitised occasionally. Clean the bin before the ice maker is used for the first time and after being unused for an extended period. It is usually convenient to sanitise the bin after the ice-making system has been cleaned and the storage bin is empty.
- Page 22 Ice-making parts cleaning During use, periodically clean these main systems of your icemaker. Repeat above steps to clean the water tank and other inner parts of the unit. Pay special attention to the water dividing pipe on the evaporator. If there is no water flowing out from the water dividing pipe or the water flow is very weak, remove this water dividing pipe to clean carefully.
- Page 23 Water tank and ice-full detecting plate: Cleaning the water tank and the ice-full detecting plate is very important to keep ice cubes hygienic. Put a mixture of neutral cleaner and water into a clean water jet and spray all inner surfaces of the tank and the ice detecting plate.
- Page 24 Ice making assembly system: Minerals that are removed from water during the freezing cycle will eventually form a hard, scaly deposit in the water system. Cleaning the system regularly helps remove the mineral scale build-up. How often the system requires cleaning depends upon how hard the water used is.
- Page 25 this process, the self-cleaning symbol will be illuminated, and the display window will indicate the remaining time. After 20 minutes of one self-cleaning program completing, pull out the drainpipe of the water tank and drain the cleaning solution down to the lower ice storage bin. Shake the unit slightly to drain out all the cleaning solutions completely.
- Page 26 General cleaning Daily cleaning The ice shovel, door and the water dividing pipe should be cleaned each day. At the end of every day, rinse the ice shovel and wipe both sides of the door with a clean cloth. Semi-monthly cleaning The ice shovel, ice bin, water tank, the ice-full detecting plate and the surface of the evaporator should be cleaned semi-monthly according to interior cleaning program.
- Page 27 SPECIFICATIONS Dimensions/Connections Rating Power supply voltage 1 Phase, 220-240/50Hz Climate class SN/N/ST/T Electrical protection class Ice making rating (amps) 1.3 Amp Ice harvest rating (amps) 1.8 Amp Ice making capacity (kg/24h) 38 kg/24Hour Refrigerant charge R290, 52g Vesicant C5H10 Unit dimensions (W x D x H) 345 x 339 x 602mm Net weight/gross weight (kg) 16.5kg...
- Page 28 TROUBLESHOOTING Problem Possible Cause Solution The main water pressure is too low, or the water supply hose is No water in the unit. blocked. Check them and increase the water pressure and/or clean the supply hose. Floating ball of the water level Clean the water tank and the The entire water flowing detecting switch is blocked,...
- Page 29 Ice making cycle appears normal, but no Refrigerant leakage; E2 error ice cubes are produced Contact Kogan.com. code display. Cooling system tube is Contact Kogan.com. clogged. Disposal This marking indicates that this appliance should not be disposed with other household wastes.
- Page 30 NOTES...
- Page 32 Need more information? We hope that this user guide has given you the assistance needed for a simple set-up. For the most up-to-date guide for your product, as well as any additional assistance you may require, head online to help.kogan.com...
Need help?
Do you have a question about the KA38CICEMKA and is the answer not in the manual?
Questions and answers