
Related Manuals for Emerson Rosemount FCL


Summary of Contents for Emerson Rosemount FCL
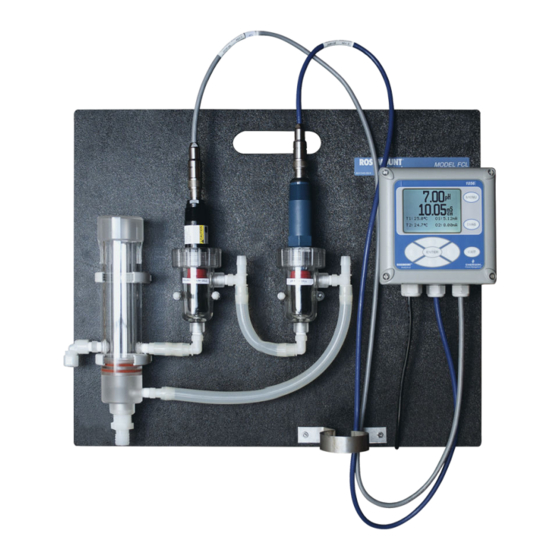
- Page 1 Reference Manual 00809-0200-3412, Rev AA May 2019 ™ Rosemount Free Chlorine System with Rosemount 56 Transmitter...
- Page 2 Essential instructions Read this page before proceeding! Your instrument purchase from Emerson is one of the finest available for your particular application. Emerson designs, manufactures, and tests its products to meet many national and international standards. Experience indicates that its performance is directly related to the quailty of the installation and knowledge of the user in operating and maintaining the instrument.
- Page 3 WARNING Physical access Unauthorized personnel may potentially cause significant damage to and/or misconfiguration of end users’ equipment. This could be intentional or unintentional and needs to be protected against. Physical security is an important part of any security program and fundamental to protecting your system. Restrict physical access by unauthorized personnel to protect end users’...
-
Page 5: Table Of Contents
6.1 Data and event logging overview....................35 6.2 Configure data and event logging and retrieval................35 6.3 Downloading data and events......................36 6.4 Viewing events..........................36 6.5 Date and time..........................37 Chapter 7 Graphical display......................39 7.1 Graphical display overview......................39 7.2 Configuration..........................39 Rosemount FCL 56... - Page 6 9.4 Troubleshooting calibration problems....................50 9.5 Other troubleshooting - chlorine....................51 9.6 Other troubleshooting - pH......................53 9.7 Other troubleshooting - general..................... 55 9.8 Simulate inputs - chlorine....................... 56 9.9 Simulating inputs - pH........................57 9.10 Simulating inputs - temperature....................58 Emerson.com/Rosemount...
-
Page 7: Description And Specifications
< 80 sec to 95% of final reading for inlet sample flow of 3 gph (11 L/hr) Weight/shipping weight Rosemount FCL-01: 10 lb./13 lb. (4.5 kg/6.0 kg) Rosemount FCL-02: 11 lb./14 lb. (5.0 kg/6.5 kg) Rounded to the nearest 1 lb. (0.5 kg) - Page 8 (pass or fail), power on/off cycles, and hold on/off. Can also store alarm relay activation and deactivation. Older events are automatically removed to make room for new events. Data event downloading Through USB port on front panel. Emerson.com/Rosemount...
-
Page 9: Ordering Information
Free chlorine sensor with Variopol connector 3900VP-02-10 pH sensor with Variopol connector Table 1-7: Cable Sensor cable Description 23747-04 Interconnecting cable, Variopol for Rosemount 499ACL sensor, 4 ft. (1.2 24281-05 Interconnecting cable, Variopol for Rosemount 3900VP sensor, 4 ft. (1.2 Rosemount FCL 56... - Page 10 Description and specifications Reference Manual May 2019 00809-0200-3412 Accessories Table 1-8: Tag Part number Description 9240048-00 Tag, stainless steel (specify marking) Emerson.com/Rosemount...
-
Page 11: Display And Operation
The following abbreviations are used in the lower two lines of the display. The number following the display refers to the sensor, alarm relay, or output. Output Temperature (live) Temperature (manual) Measurement Alarm relay Sensor current (chlorine) mV input (pH) slope (pH) R.Z. reference impedance (pH) Gl.Z. glass impedance (pH) Rosemount FCL 56... -
Page 12: Keypad
D. Four navigation keys move the cursor up, down, left, and right. E. Press EXIT to return the display to the first screen in a series of related screens. Changes that have not been stored will not be saved. Emerson.com/Rosemount... -
Page 13: Operation
5. To enter the Outputs submenu, press Down. The cursor moves to the first control box, Output. The Rosemount 56 has four analog outputs, and this control lets you select which output to configure. The default is output 1. Rosemount FCL 56... - Page 14 8. Move the cursor to Dampening at the bottom of the screen. The default Dampening value is 0 seconds. 9. To change the value, press ENTER/MENU. The dark blue back-lighting disappears, indicating that a number can be entered. Emerson.com/Rosemount...
- Page 15 The next screen in the Outputs submenu appears. The cursor is on the Outputs tab. 14. To enter the screen, press Down. 15. To return to the previous screen, move the cursor to BACK and press ENTER/MENU. 16. To return to the main menu, press EXIT. Rosemount FCL 56...
-
Page 16: Hold
The selected sensor outputs and alarm relays remain on hold until taken out of hold. However, if power is lost and then restored, hold will automatically be turned off. The screen describes how to take the transmitter out of hold. Emerson.com/Rosemount... -
Page 17: Main Display
1. With the main display showing, press ENTER/MENU. The main menu appears. 2. Choose Display Setup. The screen below appears. 3. Move the cursor to Display setup and press ENTER/MENU. The screen below appears. 4. Choose Configure main display. Rosemount FCL 56... -
Page 18: Security
2. A user has access to the Calibration and Hold menus only. 3. A user has access to all menus. Procedure 1. If a security code has been programmed, pressing a submenu button (see Operation) causes the security screen shown below to appear. Emerson.com/Rosemount... - Page 19 If the entry is correct, the requested submenu appears, and you have access to all the submenus the code entitles you to. If the entry is wrong, the Invalid code screen appears. 2.6.2 Assigning security codes Section. 2.6.3 Bypassing security codes Call the factory. Rosemount FCL 56...
- Page 20 Display and operation Reference Manual May 2019 00809-0200-3412 Emerson.com/Rosemount...
-
Page 21: Programming The Transmitter
2. Move the cursor to Program and press ENTER/MENU. 3. Move the cursor to the tab showing the desired submenu and press ENTER/MENU. A fifth tab, not shown, labeled pH diagnostics setup, will be present if one of the sensors is a pH sensor. Rosemount FCL 56... -
Page 22: Outputs
Move the cursor to the appropriate control box and press the desired setting. For more information about the control box the cursor is on, press INFO. To close the information screen, press any key. Relays 3.3.1 Menu tree is the Relays menu tree. Figure 3-2 Emerson.com/Rosemount... - Page 23 Figure 3-2: Menu tree for the Relays submenu 3.3.2 Configure relay settings A large number of relay actions are available in the Rosemount 56. Procedure 1. For more information about a relay action, move the cursor to Explanation of relay actions and press ENTER/MENU. Rosemount FCL 56...
-
Page 24: Measurement
6. Move the cursor to the appropriate control box and make the desired setting. 7. For more information about the control the cursor is on, press INFO. 8. To close the information screen, press any key. Measurement 3.4.1 Menu tree Figure 3-3 is the Measurement menu tree. Emerson.com/Rosemount... -
Page 25: Temperature
1. Move the cursor to the appropriate control box and make the desired setting. 2. For more information about the control the cursor is on, press INFO. 3. To close the information screen, press any key. Temperature 3.5.1 Menu tree Figure 3-4 is the Temperature menu tree. Rosemount FCL 56... -
Page 26: Ph Diagnostic Setup
1. Move the cursor to the appropriate control box and make the desired setting. 2. For more information about the control the cursor is on, press INFO. 3. To close the information screen, press any key. pH diagnostic setup 3.6.1 Menu tree Figure 3-5 is the pH diagnostic setup menu tree. Emerson.com/Rosemount... -
Page 27: Security
1. Move the cursor to the appropriate control box and make the desired setting. 2. For more information about the control the cursor is on, press INFO. 3. To close the information screen, press any key. Security 3.7.1 Menu tree Figure 3-6 is the Security menu tree. Rosemount FCL 56... - Page 28 1. Move the cursor to the appropriate control box and make the desired setting. 2. For more information about the control the cursor is on, press INFO. 3. To close the information screen, press any key. 3.7.3 Restoring default settings See Reset. Emerson.com/Rosemount...
-
Page 29: Chapter 4 Calibrate
Complete the following steps to enter the Calibration submenus on your 56 Transmitter. Procedure 1. With the main display showing, press ENTER/MENU to display the main Menu. The cursor is on Calibrate. 2. Press ENTER/MENU. 3. Choose the sensor (measurement or temperature) or output to be calibrated. Rosemount FCL 56... -
Page 30: Calibrating Temperature
You are asked to accept the zero current. Press INFO for an information screen to aid with troubleshooting if the results are not acceptable. If the zero current is badly in error, the transmitter displays the Zero failed screen. Press INFO for troubleshooting. Emerson.com/Rosemount... -
Page 31: Calibrate The Ph Sensor
Press INFO for an information screen to aid with troubleshooting and repeat the calibration. Calibrate the analog outputs Procedure 1. Choose the appropriate output in Entering the Calibration menus and follow the prompts to trim the selected output. If you want more information about a calibration step, press INFO. Rosemount FCL 56... -
Page 32: Reset
Procedure 1. With the main display showing, press ENTER/MENU to display the main menu. 2. Move the cursor to Reset and press ENTER/MENU. 3. Check the desired boxes and press APPLY. Emerson.com/Rosemount... -
Page 33: Chapter 5 Digital Communications
Reference Manual Digital communications 00809-0200-3412 May 2019 Digital communications The Rosemount 56 Transmitter supplied with the FCL has HART communications as a standard feature. For more information, refer to the Rosemount 56 HART Addendum Manual. Rosemount FCL 56... - Page 34 Digital communications Reference Manual May 2019 00809-0200-3412 Emerson.com/Rosemount...
-
Page 35: Data And Event Logging And Retrieval
30 seconds. Configure data and event logging and retrieval Procedure 1. With the main display showing, press ENTER/MENU. Choose Data storage and retrieval. The screen below appears. The data logger is currently disabled (default). Rosemount FCL 56... -
Page 36: Downloading Data And Events
2. Move the cursor to the View Events button and press ENTER/MENU. 3. To scroll through the list of events, move the cursor to the DOWN or UP key at the bottom of the screen and press and hold ENTER/MENU. Emerson.com/Rosemount... -
Page 37: Date And Time
To reset the date and time from the main Menu, press the Time and Date button. Note Setting the date and time to an earlier value than the one showing will cause data to be lost from the data/event logger. See Downloading data and events. Rosemount FCL 56... - Page 38 Data and event logging and retrieval Reference Manual May 2019 00809-0200-3412 Emerson.com/Rosemount...
-
Page 39: Chapter 7 Graphical Display
Complete the following steps to configure the graphical display on your 56 Transmitter. Procedure 1. With the main display showing, press ENTER/MENU. Choose Display setup. The screen shown below appears. 2. Configure the displayed variable, the maximum and minimum values for the Y-axis, and the time scale. Rosemount FCL 56... - Page 40 The time axis can be expanded or shrunk. 4. To expand the time scale, use Left or Right to move the pair of dotted green lines to the area of interest. Press Up to expand the graph. To shrink the time axis, press Down. Emerson.com/Rosemount...
-
Page 41: Chapter 8 Maintenance
7. Carefully pull the sensor cable through the gland fitting as you push the sensor board back into the enclosure. 8. Tighten the cable glands. 9. Close the front panel. 10. Turn on power. Rosemount FCL 56... -
Page 42: Chlorine Sensor
O-rings 9109536 #4 free chlorine sensor fill solution, 4 oz. (120 mL) Procedure 1. Unscrew the membrane retainer. 2. Remove the membrane assembly and O-ring. 3. Hold the sensor over a container with the cathode pointing down. Emerson.com/Rosemount... - Page 43 Keep pressing the bladder until no air bubbles can be seen leaving the holes. Be sure the holes remain covered with electrolyte solution. 19. Place a drop of electrolyte solution on the cathode; then place the membrane assembly over the cathode. Rosemount FCL 56...
-
Page 44: Ph Sensor
3. Rinse the sensor thoroughly with water and soak in pH 4 buffer for several hours. 4. Recalibrate the sensor in buffers before returning it to service. 8.3.3 Other maintenance The 3900VP-02-10 sensor supplied with the Rosemount FCL-02 is disposable. It has no replaceable parts. Constant head flow controller 8.4.1... - Page 45 Rosemount FCL-01. Table 8-3 Figure 8-2 show replacement parts for the flow controller assembly used in the Rosemount FCL-02. Table 8-2: Rosemount FCL-01 Constant Head Flow Controller Assembly Replacement Parts Location in Description Figure 8-1 24039-00 Flow cell for chlorine sensor with bubble shedding nozzle...
- Page 46 Reference Manual May 2019 00809-0200-3412 Figure 8-1: Rosemount FCL-01 Constant Head Flow Controller Assembly Replacement Parts Table 8-3: Rosemount FCL-02 Constant Head Flow Controller Assembly Replacement Parts Location in Description Figure 8-2 24039-00 Flow cell for chlorine sensor with bubble shedding nozzle...
- Page 47 Reference Manual Maintenance 00809-0200-3412 May 2019 Figure 8-2: Rosemount FCL-02 Constant Head Flow Controller Assembly Replacement Parts Rosemount FCL 56...
- Page 48 Maintenance Reference Manual May 2019 00809-0200-3412 Emerson.com/Rosemount...
-
Page 49: Chapter 9 Troubleshoot
Outputs. Fault messages cannot be turned off. Reading and troubleshooting Fault and Warning messages Complete the following steps to access Fault and Warning messages and determine what they mean. Procedure 1. With the main display showing, press INFO. The screen below appears. Rosemount FCL 56... -
Page 50: Sensor Diagnostics
3. For more information about a specific diagnostic measurement, move the cursor to the diagnostic of interest and press INFO. Troubleshooting calibration problems If a calibration attempt results in an error or a likely error, the transmitter displays the appropriate warning screen. For troubleshooting suggestions, press INFO. Emerson.com/Rosemount... -
Page 51: Other Troubleshooting - Chlorine
Membrane permeability is a function of temperature. The transmitter automatically corrects for changes in sensor current caused by temperature changes. The time ™ constant for the Rosemount 499ACL-02 sensor is about five minutes. Therefore, the reading may drift for a while after a sudden temperature change. Rosemount FCL 56... - Page 52 1. Is the grab sample test accurate? Is the grab sample representative of the sample flowing to the sensor? 2. Is sample flowing past the sensor? Be sure the liquid level in the constant head sampler is level with the central overflow tube and that excess sample is flowing Emerson.com/Rosemount...
-
Page 53: Other Troubleshooting - Ph
3. Make sure sample is flowing past the sensor. Be sure the liquid level in the constant head sampler is level with the central overflow tube and that excess sample is flowing down the tube. If necessary, disassemble and clean the overflow sampler. Cleaning the sensor. Rosemount FCL 56... - Page 54 A floating system can pick up stray voltages from other electrical equipment. a) Ground the piping or tank to a local earth ground. If noise still persists, simple grounding is not the problem. Noise is probably being carried into the instrument through the sensor wiring. Emerson.com/Rosemount...
-
Page 55: Other Troubleshooting - General
Alarm relays don't work. 9.7.1 Current output is too low. Load resistance is too high. Maximum load is 550 Ω. 9.7.2 Alarm relays don't work. 1. Verify the relays are properly wired. 2. Verify the relays are properly configured. Rosemount FCL 56... -
Page 56: Simulate Inputs - Chlorine
The input current is the second line in the display. 4. Change the decade box resistance and verify that the correct current is shown. Calculate current from the equation: The voltage of a fresh 1.5 volt battery is about 1.6 volt (1600 mV). Emerson.com/Rosemount... -
Page 57: Simulating Inputs - Ph
6. To check linearity, set the voltage source to the value shown in the table and verify that the pH and millivolt readings match the values in the table. Voltage (mV) pH (at 25 °C) 295.8 2.00 177.5 4.00 59.2 6.00 -59.2 8.00 -177.5 10.00 Rosemount FCL 56... -
Page 58: Simulating Inputs - Temperature
B. Resistance temperature device sense C. Resistance temperature device in D. Resistance temperature device shield To check the accuracy of the temperature measurement, set the resistor simulating the resistance temperature device to the values indicated in the table and note the Emerson.com/Rosemount... - Page 59 (10.0 °C) is the same as the difference between the simulated temperatures, the transmitter is working correctly. Temp. (°C) Pt 100 (Ω) 100.0 103.9 107.8 109.7 111.7 115.5 119.4 123.2 127.1 130.9 132.8 134.7 138.5 Rosemount FCL 56...
- Page 60 2019 Emerson. All rights reserved. twitter.com/rosemount_news The Emerson logo is a trademark and service mark of Emerson Electric Co. Rosemount is a Facebook.com/Rosemount mark of one of the Emerson family of companies. All other marks are the property of their youtube.com/RosemountMeasurement respective owners.
Need help?
Do you have a question about the Rosemount FCL and is the answer not in the manual?
Questions and answers