
Related Manuals for emmeti CTTS RF


Summary of Contents for emmeti CTTS RF
- Page 1 E70007420 Cronotermostato Digitale a radiofrequenza CTTS RF Manuale d’Uso User Manual RADIOFREQUENCY DIGITAL PROGRAMMABLE THERMOSTAT...
-
Page 3: Table Of Contents
Pagina 26 Reset strumento Pagina 27 Sostituzione batteria Pagina 28 Norme di riferimento Pagina 28 Valori di fabbrica Pagina 29 Programmi predefiniti inverno Pagina 30 Programmi predefiniti estate Pagina 31 - 1 - Manuale d’Uso Cronotermostato Digitale a radiofrequenza CTTS RF... - Page 4 • Display touch screen di tipo capacitivo (sensibile al tocco delle dita) • Installazione a parete o a copertura della scatola 503 • Programmazione settimanale con 3 livelli di temperatura impostabili - 2 - Manuale d’Uso Cronotermostato Digitale a radiofrequenza CTTS RF Manuale d’Uso Cronoter...
-
Page 5: Dimensioni
CTTS RF Per il dettaglio di configurazione degli strumenti si veda il capitolo “Installazione” pag. 7 e “Menu Radiofrequenza” a pag 19. - 3 - Manuale d’Uso Cronotermostato Digitale a radiofrequenza CTTS RF... -
Page 6: Avvertenze Di Sicurezza
Alimentato con due batterie di tipo AAA, il CTTS RF non necessita di alcun cablaggio. Questo consente di installare il cronotermostato in qualsiasi posizione all’interno della stanza, senza alcun intervento di muratura. -
Page 7: Caratteristiche Tecniche
• Isolamento: rinforzato tra parti accessibili (frontale) e tutti gli altri morsetti • Classificazione secondo il punto 6 della Comunicazione 2014/C 207/02 della Commissione Europea: classe IV. Contributo all’efficienza energetica stagionale: 2% - 5 - Manuale d’Uso Cronotermostato Digitale a radiofrequenza CTTS RF... -
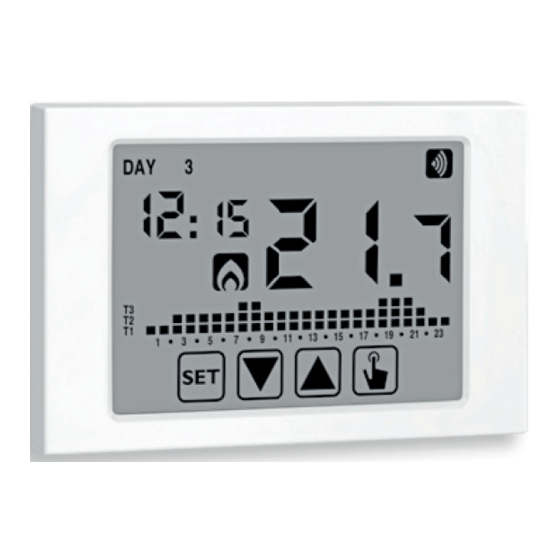
Page 8: Display E Tastiera
⑧ Grafico del programma attivo per il giorno corrente (in funzionamento automatico) ⑨ Funzionamento spento ⑩ Indicazione batteria scarica ⑪ Tastiera (attiva solo se lo strumento è agganciato alla base a muro) - 6 - Manuale d’Uso Cronotermostato Digitale a radiofrequenza CTTS RF... -
Page 9: Installazione
L’attuatore rimarrà in modalità configurazione per un tempo prefissato, entro il quale deve ricevere la stringa di configurazione dal CTTS RF. 2. Inserire le batterie nel CTTS RF, rispettando la polarità riportata sullo strumento (per accedere al vano batterie è necessario sganciare il cronotermostato dalla base premendo la linguetta sul lato inferiore dello strumento). - Page 10 • Indicazioni per il posizionamento Il CTTS RF è progettato per l’installazione a parete o a copertura della scatola 503. Fissare la base a muro utilizzando Agganciare il cronotermostato alla le viti in dotazione.
- Page 11 Impostazione delle ore Impostazione dell’anno Impostazione del mese Impostazione del giorno Una volta impostati tutti i valori, premere a lungo (3 secondi) il tasto per uscire dal menù di sincronizzazione dell’orologio. - 9 - Manuale d’Uso Cronotermostato Digitale a radiofrequenza CTTS RF...
- Page 12 (6°C). In questa condizione, la pressione di un tasto qualsiasi riattiva il menù di inserimento data/ora per altri 30 secondi circa. - 10 - Manuale d’Uso Cronotermostato Digitale a radiofrequenza CTTS RF...
-
Page 13: Menù Di Programmazione
“Cambio ora legale” a pag. 22. Modifica programmi Questo menù consente di modificare i programmi del funzionamento automatico. Lo strumento è configurato per eseguire il programma P1 dal lunedì al venerdì e P2 il - 11 - Manuale d’Uso Cronotermostato Digitale a radiofrequenza CTTS RF... - Page 14 Sul campo (3) compare mentre sul campo (7) lampeggia il livello di temperatura (T1, T2 o T3) - 12 - Manuale d’Uso Cronotermostato Digitale a radiofrequenza CTTS RF...
-
Page 15: Modifica Temperature
finchè comincia a lampeggiare il simbolo sul campo (2) 2. Premere brevemente il tasto fino a quando lampeggia il simbolo . Premere il tasto per accedere alla modifica dei parametri. - 13 - Manuale d’Uso Cronotermostato Digitale a radiofrequenza CTTS RF... - Page 16 (circa 30 secondi). Attenzione: i valori di temperatura impostati devono rispettare la condizione: T1 ≤ T2 ≤ T3. In condizionamento T1 non è impostabile e corrisponde a condizionatore spento. - 14 - Manuale d’Uso Cronotermostato Digitale a radiofrequenza CTTS RF...
-
Page 17: Impostazione Di Una Temporizzazione
(ore o giorni). 4. Inizia a lampeggiare l’unità di misura ( ). Usare i tasti per scegliere se si tratta di una temporizzazione in ore ) o giorni ( - 15 - Manuale d’Uso Cronotermostato Digitale a radiofrequenza CTTS RF... -
Page 18: Menù Funzioni Avanzate
3. A questo punto comincia a lampeggiare il primo parametro del menù: usare i tasti per modificare il parametro e il tasto per confermare e passare al parametro successivo. Per uscire dalla modifica dei parametri premere il tasto - 16 - Manuale d’Uso Cronotermostato Digitale a radiofrequenza CTTS RF... - Page 19 ) oppure programmazione proporzionale da utilizzare se l’attuatore remoto è una valvola per radiatori ACTVR RF ( Per maggiori informazioni sul tipo di regolazione vedere il capitolo “Tipo di regolazione” a pag. 25. - 17 - Manuale d’Uso Cronotermostato Digitale a radiofrequenza CTTS RF...
- Page 20 Il menù “Fin” consente di abilitare ( ) o disabilitare ) la funzione “finestra aperta”. Se la funzione è attiva, è necessario impostare la sensibilità di intervento e la durata dello spegnimento. - 18 - Manuale d’Uso Cronotermostato Digitale a radiofrequenza CTTS RF...
- Page 21 Per impostare una password, inserire nel campo un valore compreso tra 001 e 999. Per disattivare la password tenere premuto il tasto finchè compare “__ _”. - 19 - Manuale d’Uso Cronotermostato Digitale a radiofrequenza CTTS RF...
-
Page 22: Menù Radiofrequenza
Menu radiofrequenza Il menù radiofrequenza RF consente di effettuare un test di comunicazione. Test - Il test serve per verificare la corretta comunicazione tra CTTS RF e attuatore e può durare al massimo 10 minuti. Per attivarlo, scegliere e tenere premuto il tasto per almeno 3 secondi. -
Page 23: Funzionamento Manuale
2 e 3. Per tornare al funzionamento automatico tenere premuto a lungo il tasto (circa 3 secondi). Funzionamento automatico Impostazione Setpoint manuale (Tm) Funzionamento manuale - 21 - Manuale d’Uso Cronotermostato Digitale a radiofrequenza CTTS RF... -
Page 24: Funzionamento Spento
Nota: la funzione è disponibile solo per il funzionamento riscaldamento. Nota: la funzione “finestra aperta” non si attiva se è in corso una delle temporizzazioni descritte a pag 27. - 22 - Manuale d’Uso Cronotermostato Digitale a radiofrequenza CTTS RF... -
Page 25: Valori Minimo E Massimo
2. premere il tasto per accedere alla modifica di ora e data. A questo punto, durante la modifica di uno qualsiasi dei parametri (secondi, minuti, ora, anno, mese o giorno) - 23 - Manuale d’Uso Cronotermostato Digitale a radiofrequenza CTTS RF... - Page 26 Per uscire e tornare al funzionamento normale premere a lungo il tasto o attendere lo scadere del time-out (circa 30 secondi). - 24 - Manuale d’Uso Cronotermostato Digitale a radiofrequenza CTTS RF...
-
Page 27: Tipo Di Regolazione
TIPO DI REGOLAZIONE Il CTTS RF dispone di due tipi di regolazione: Regolazione on/off Nella regolazione on/off il cronotermostato misura una volta al minuto la temperatura ambiente ed esegue la regolazione secondo la logica seguente: modalità riscaldamento modalità raffreddamento relè ON relè... - Page 28 Lo strumento effettua una regolazione di emergenza qualora si presenti un errore durante la lettura della sonda o in caso di perdita dell’ora. Nel caso di errore sonda, se la funzione antigelo non è esclusa, lo strumento attiva il - 26 - Manuale d’Uso Cronotermostato Digitale a radiofrequenza CTTS RF...
-
Page 29: Temporizzazioni: Cosa Sono
fino al termine della temporizzazione, poi si passa al funzionamento spento. Manuale temporizzato Se nello stato manuale si imposta una temporizzazione, tale stato manuale viene mantenuto fino al termine della temporizzazione, poi si passa al funzionamento automatico. - 27 - Manuale d’Uso Cronotermostato Digitale a radiofrequenza CTTS RF... -
Page 30: Reset Strumento
1. scollegare il cronotermostato dalla base a muro e ricollegarlo 2. durante il lampeggio dei tasti tenere premuto il tasto finché a display compare la scritta I valori di fabbrica sono riportati a pagina 30 di questo manuale. - 28 - Manuale d’Uso Cronotermostato Digitale a radiofrequenza CTTS RF... -
Page 31: Sostituzione Batteria
SOSTITUZIONE BATTERIA CTTS RF segnala la condizione di batterie scariche accendendo il simbolo (campo (10)) e facendo lampeggiare il display. In questa condizione la regolazione è comunque garantita, tuttavia si consiglia di sostituire le batterie appena possibile! (*) Nel caso il livello di carica delle batterie scenda ulteriormente, il cronotermostato entra in modalità... -
Page 32: Valori Di Fabbrica
Estate: LAST DAY7 marzo 02:00 cambio ora solare/legale Inverno: LAST DAY7 ottobre 03:00 ritardo di attivazione 0’ 45’ 15’ 0’ funzionamenti temporizzati - 30 - Manuale d’Uso Cronotermostato Digitale a radiofrequenza CTTS RF... -
Page 33: Programmi Predefiniti Inverno
0 1 2 3 4 5 6 7 8 9 10 11 12 13 14 15 16 17 18 19 20 21 22 23 0 1 2 3 4 5 6 7 8 9 10 11 12 13 14 15 16 17 18 19 20 21 22 23 - 31 - Manuale d’Uso Cronotermostato Digitale a radiofrequenza CTTS RF... -
Page 34: Programmi Predefiniti Estate
0 1 2 3 4 5 6 7 8 9 10 11 12 13 14 15 16 17 18 19 20 21 22 23 0 1 2 3 4 5 6 7 8 9 10 11 12 13 14 15 16 17 18 19 20 21 22 23 - 32 - Manuale d’Uso Cronotermostato Digitale a radiofrequenza CTTS RF... - Page 35 Page Regulation type Page Timings: what they are Page Instrument reset Page Battery replacement Page Reference standards Page Default values Page Winter preset programs Page Summer preset programs Page - 1 - CTTS RF Radiofrequency digital programmable thermostat User Manual...
- Page 36 • Touch screen display of capacitive type (sensible to the fingers’ touch) • Wall-mounting or to coverage of box 503 • Weekly programming with 3 different settable temperatures - 2 - CTTS RF Radiofrequency digital programmable thermostat User Manual CTTS RF Radiofrequency d...
- Page 37 CTTS RF For more detailed information about the instruments configuration see chapter “Installation” page. 7 and “Radiofrequency menu” on page 19. - 3 - CTTS RF Radiofrequency digital programmable thermostat User Manual...
- Page 38 Powered by two batteries of AAA type, CTTS RF doesn’t need any wiring. This allows to install the thermostat anywhere inside your room, without any intervention of masonry.
- Page 39 • Insulation: reinforced among accessible parts (frontal) and all other terminals • Class of the temperature control according to European Commission communication 2014/C 207/02: class IV. Contribution to seasonal energy efficiency: 2% - 5 - CTTS RF Radiofrequency digital programmable thermostat User Manual...
- Page 40 ⑧ Program on graphic for the current date (in automatic operation) ⑨ Off operation ⑩ Depleted battery indication ⑪ Keyboard (the keys are active only if the instrument is correctly installed on wall-mounted base) - 6 - CTTS RF Radiofrequency digital programmable thermostat User Manual...
- Page 41 The actuator remains in configuration mode for a pre-set time, within which it must receive the configuration string from CTTS RF. 2. Insert the batteries in the CTTS RF, respecting the polarity indicated on the instrument (to access the batteries compartment it’s necessary to unhook the thermostat from the base by pressing the tab at the bottom of the instrument).
- Page 42 • Indications for placement The CTTS RF is designed for wall-mounting installation or to cover the 503 box Fix the base on the wall using the screws Attach the programmable thermostat to supplied.
- Page 43 Time setting Year setting Month setting Day setting Once all values are set, press for a long time (3 seconds) the key to exit the menu of the clock synchronisation. - 9 - CTTS RF Radiofrequency digital programmable thermostat User Manual...
- Page 44 (see page 33) displaying the day of the week, the time, the environment temperature and the graphic of the program on. When CTTS RF sends an on or off PROGRAM command to the remote actuator, GRAPHIC icon (field 2) lights for a...
- Page 45 “Summer time change” on page 22. Programs modification This menu allows to modify the programmings of the automatic operation. In default status the instrument is configured to perform the program P1 from Monday - 11 - CTTS RF Radiofrequency digital programmable thermostat User Manual...
- Page 46 On field (3) appears while on field (7) flashes the temperature level (T1, T2 o T3) set for that specific time (00:00). - 12 - CTTS RF Radiofrequency digital programmable thermostat User Manual...
- Page 47 1. From the normal operation display, press for a long time the key until the symbol starts flashing on field (2) 2. Press for a short time the key until the symbol flashes. Press the key access the parameters modification. - 13 - CTTS RF Radiofrequency digital programmable thermostat User Manual...
- Page 48 (30 seconds about). Attention: the values of set temperatures must respect the condition: T1 ≤ T2 ≤ T3. In cooling mode T1 is not settable and equals off system. - 14 - CTTS RF Radiofrequency digital programmable thermostat User Manual...
- Page 49 (hours and days). 4. The measurement unit starts flahing ( ). Press the keys choose a timing in hours ( ) or days - 15 - CTTS RF Radiofrequency digital programmable thermostat User Manual...
- Page 50 3. At this point the first parameter of the menu starts flashing: press the keys to modify the parameter and the key to confirm and to move to the next parameter. To exit the parameters modification press the key - 16 - CTTS RF Radiofrequency digital programmable thermostat User Manual...
- Page 51 ) or proportional programming ( ) to use if the remote actuator is a valve for ACTVR RF radiators. For further information about regulation type see the chapter “Regulation types” on page 25. - 17 - CTTS RF Radiofrequency digital programmable thermostat User Manual...
- Page 52 The “Fin” menu allows to enable ( ) or disable ) the “open window” function. If the function is active, it is necessary to set the intervention sensitivity and the duration of the switching off. - 18 - CTTS RF Radiofrequency digital programmable thermostat User Manual...
- Page 53 If the key lock is active and one key is pressed, the display shows for a few seconds the writing with flashing dashes: enter the password to unlock the keyboard, which will be locked for 30 seconds from the last pressure. - 19 - CTTS RF Radiofrequency digital programmable thermostat User Manual...
- Page 54 Radiofrequency menu The radiofrequency menu RF allows you to make a communication test. Test - The test is used to verify the correct communication between CTTS RF and actuator and can last 10 minutes at max. To activate it, choose key and press the key for at least 3 seconds.
- Page 55 2 and 3. To go back to the automatic operation press for a long time the key (about 3 seconds). Automatic operation Manual setpoint (Tm) setting Manual operation - 21 - CTTS RF Radiofrequency digital programmable thermostat User Manual...
- Page 56 Note: the function is only available for heating operation. Note: the “open window” function does not work if one of the timings described on page 27 is in progress. - 22 - CTTS RF Radiofrequency digital programmable thermostat User Manual...
- Page 57 2. press the key to access the time and date modification. At this point, during the modification of any parameter (seconds, minutes, hour, year, month or day) press for a - 23 - CTTS RF Radiofrequency digital programmable thermostat User Manual...
- Page 58 To exit and to go back to the normal operation press for a long time the key or wait for the time-out expiration (30 seconds about). - 24 - CTTS RF Radiofrequency digital programmable thermostat User Manual...
- Page 59 REGULATION TYPE The CTTS RF has got two types of regulation: On/off regulation During on/off regulation the programmable thermostat measures once a minute the environment temperature and it carries out the regulation on the basis of the following logic: heating mode...
- Page 60 Emergency regulation (for heating mode only) The instrument performs a regulation of emergency if an error occurs during the - 26 - CTTS RF Radiofrequency digital programmable thermostat User Manual...
- Page 61 Timed manual If in manual status you set a timing, such off status will be maintained until the end of the timing; operation will then switched to automatic mode. - 27 - CTTS RF Radiofrequency digital programmable thermostat User Manual...
- Page 62 1. to disconnect the time thermostat from the wall-mounted base and reconnect it. 2. during the flashing of the keys press the key until the display shows the writing Default values are indicated on page 30 of this manual. - 28 - CTTS RF Radiofrequency digital programmable thermostat User Manual...
- Page 63 BATTERY REPLACEMENT The CTTS RF signals the status of depleted batteries switching on the symbol (field (10)) and making the display to flash. In this status the regulation is always guaranteed, but it’s advisable to replace the batteries as soon as possible! (*) If the charge level of batteries further decreases, the programmable thermostat enters into less consumption mode, it switches off the display and it doesn’t perform any...
- Page 64 Summer: LAST DAY7 march 02:00 winter/summer time change Winter: LAST DAY7 october 03:00 activation delay 0’ 45’ 15’ 0’ timed operations - 30 - CTTS RF Radiofrequency digital programmable thermostat User Manual...
- Page 65 0 1 2 3 4 5 6 7 8 9 10 11 12 13 14 15 16 17 18 19 20 21 22 23 0 1 2 3 4 5 6 7 8 9 10 11 12 13 14 15 16 17 18 19 20 21 22 23 - 31 - CTTS RF Radiofrequency digital programmable thermostat User Manual...
- Page 66 0 1 2 3 4 5 6 7 8 9 10 11 12 13 14 15 16 17 18 19 20 21 22 23 0 1 2 3 4 5 6 7 8 9 10 11 12 13 14 15 16 17 18 19 20 21 22 23 - 32 - CTTS RF Radiofrequency digital programmable thermostat User Manual...
- Page 68 EMMETI Spa Via Brigata Osoppo, 166 I-33074 VIGONOVO DI F.DDA (PN) Tel: +39 0434 567911 e-mail: info@emmeti.com http://www.emmeti.com...
Need help?
Do you have a question about the CTTS RF and is the answer not in the manual?
Questions and answers