
Related Manuals for emmeti CTUP


Summary of Contents for emmeti CTUP
- Page 1 E7000156A Cronoumidostato Digitale Manuale d’Uso Digital Chronothermostat with Humidistat User Manual...
- Page 3 Indice ■ Montaggio Pagina ■ Dimensioni Pagina ■ Schema di collegamento Pagina ■ Avvertenze di sicurezza Pagina ■ Caratteristiche tecniche Pagina ■ Elementi di controllo / Indicazioni a display Pagina ■ Avviamento iniziale / Reset Pagina ■ Impostazione orologio Pagina ■...
- Page 4 Cronoumidostato digitale • Cronotermostato con umidostato integrato. Un unico strumento per regolare temperatura e umidità • Programmazione settimanale con 3 livelli di temperatura e modalità di funzionamento estate/inverno selezionabile (funzione cronotermostato) • Modalità umidificatore/ deumidificatore selezionabile (funzione umidostato) • Alimentazione: 1 batteria 1,5V tipo AA •...
- Page 5 MONTAGGIO • È consigliabile scegliere per il cronoumidostato una collocazione in una zona che rispecchi il più possibile le condizioni di temperatura e umidità medie di tutto l’ambiente. Va evitata l’installazione nell’immediata vicinanza di porte, finestre, fonti di calore, irraggiamento solare diretto, e posizioni con eccesso o totale mancanza di aerazione.
- Page 6 DIMENSIONI SCHEMA DI COLLEGAMENTO cronotermostato relè in scambio umidostato relè N.A. - 4 - Manuale d’Uso Cronoumidostato...
- Page 7 2 e categoria di sovratensione III (EN 60730-1). Codice Modello Descrizione 02018090 CTUP Cronotermostato settimanale con umidostato bianco AVVERTENZE DI SICUREZZA ■ Durante l’installazione ed il funzionamento del prodotto è necessario rispettare le seguenti indicazioni: 1) Lo strumento deve essere installato da persona qualificata rispettando scrupolosamente gli schemi di collegamento.
- Page 8 • Regolazione della temperatura: – ON/OFF con differenziale impostabile tra 0,1°C e 1°C – PROPORZIONALE con banda proporzionale e periodo di regolazione impostabili • Programmazione settimanale • Risoluzione giornaliera: 1h • Ritardo di accensione impostabile tra 15, 30 o 45 minuti (indipendente per ogni ora) •...
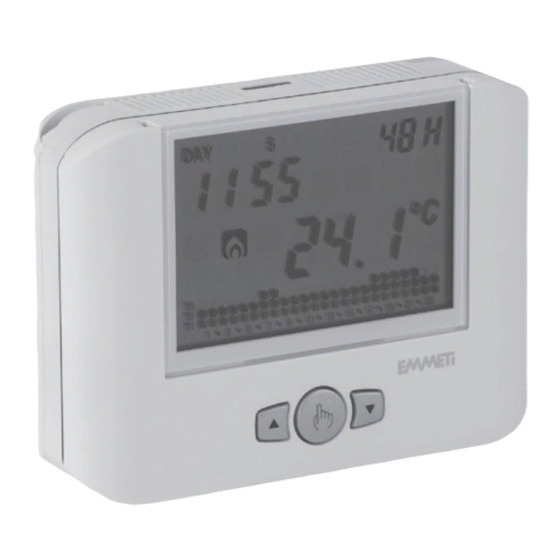
- Page 9 ELEMENTI DI CONTROLLO / INDICAZIONI A DISPLAY Elementi di controllo ■ 1) Tasto “ ”: funzionamento manuale per la regolazione della temperatura 2) Tasto “ ”: incrementa il campo selezionato o visualizzazione temperatura e umidità massime giornaliere 3) Tasto “ ”: decrementa il campo selezionato o visualizzazione temperatura e umidità...
- Page 10 Indicazioni a display ■ 14) Campo “Giorno” 15) Campo “Umidità misurata” Nota: il punto decimale indica lo stato del relè relativo all’umidostato (punto acceso = carico collegato, punto spento = carico scollegato) 16) Campo “Temperatura ambiente” 17) Campo “Programma impostato” 18) Campo “Attivazione funzionamento manuale”...
- Page 11 AVVIAMENTO INIZIALE / RESET • Inserire la batteria e premere con una punta il tasto “R”. Vengono accesi tutti i segmenti del display e attivato il relè per un tempo di 3 secondi, dopodichè il campo orologio (22) riparte da 12:00 e rimane lampeggiante fino all’impostazione dell’orologio.
- Page 12 A questo punto comincia a lampeggiare la cifra dei minuti. Agire sui tasti “ ” e “ ” per incrementare o decrementare il campo e premere “ ” per confermare. Ripetere la procedura per impostare le ore. Una volta impostato il valore delle ore, sul campo (22) compare lampeggiante il valore dell’anno, sul campo (15) il valore del mese e sul campo (16) il valore del giorno.
- Page 13 I capitoli “Impostazione programmi”, “Impostazione temperature”, “Funzionamento manuale”, “Funzionamento estate/inverno”, “Comando ON/OFF da tastiera”e “Temporizzazioni” sono relativi alla sola parte cronotermostato. Per l’impostazione dei parametri dell’umidostato vedere la programmazione avanzata. IMPOSTAZIONE PROGRAMMI • Premendo il tasto “PRG” sul campo (14) compare l’indicazione relativa a lunedì, sul campo (16) compare il programma selezionato lampeggiante (nell’esempio P1),...
- Page 14 Con i tasti T1 , T2 e T3 è possibile modificare la temperatura selezionata per quell’ora e, allo stesso tempo, passare all’ora successiva. Utilizzando i tasti “ ” e “ ” è possibile spostarsi di ora in ora senza modificare la temperatura impostata.
- Page 15 IMPOSTAZIONE TEMPERATURE • In uno qualsiasi dei modi di funzionamento, alla pressione dei tasti T1, T2 e T3 sul campo (22) compare la scritta relativa alla temperatura che si sta modificando, sul campo (16) lampeggia il valore della suddetta temperatura. Con i tasti “...
- Page 16 FUNZIONAMENTO MANUALE • In funzionamento automatico alla pressione del tasto “ ” il cronotermostato si comporta come un normale termostato con temperatura di funzionamento Tm. Sul campo (22) rimane l’ora corrente. Sul campo (14) rimane il giorno corrente. Sul campo (15) compare la scritta “SEt”. Il simbolo (18) compare.
- Page 17 FUNZIONAMENTO ESTATE / INVERNO Per passare dal funzionamento invernale a funzionamento estivo (o viceversa), premere con una punta il tasto “ ”(12). Sul campo (22) compare la scritta “rISC” (o “Cond”) lampeggiante e il simbolo “ ” (o “ ”). Con i tasti “...
- Page 18 COMANDO ON-OFF DA TASTIERA • Per disattivare il cronotermostato premere il tasto “ ”. Sul display compare il simbolo “ ” Una volta spento, in funzionamento invernale il cronotermostato abilita la funzione di antigelo per far si che la temperatura non scenda sotto una certa soglia.
- Page 19 Spegnimento temporizzato Se nello stato spento si imposta una temporizzazione, tale stato spento viene mantenuto fino al termine della temporizzazione, poi si passa al funzionamento che si aveva prima dello spegnimento. Se durante la temporizzazione si accende l’impianto, la temporizzazione termina. In tutti i casi, la condizione di temporizzazione è...
- Page 20 PROGRAMMAZIONE AVANZATA • In programmazione avanzata è possibile accedere ai seguenti parametri di funzionamento: – tipo di regolazione temperatura – parametri per il tipo di regolazione temperatura – temperatura di antigelo – unità di misura della temperatura – funzionamento umidostato –...
- Page 21 Parametri per il tipo di regolazione scelta (solo per funzionamento invernale) • Nel caso di regolazione di tipo “ON/OFF” l’unico parametro da impostare è il differenziale. Sul campo (22) compare la scritta “dIF=” e sul campo (16) il valore lampeggiante attualmente impostato. Premere i tasti “...
- Page 22 Temperatura di antigelo (solo per funzionamento invernale) • E’ possibile impostare un valore di temperatura di sicurezza (temperatura di antigelo) da mantenere anche nel caso in cui il cronotermostato venga spento. Sul campo (22) compare la scritta “OFF=” e sul campo (16) lampeggia il valore di temperatura di antigelo attualmente impostato.
- Page 23 Sul campo (22) compare la scritta “dEG=” e sul campo (25) lampeggia l’unità di misura attualmente impostata. Premere indifferentemente il tasto “ ” e “ ” per cambiare unità e “ ” per confermare. Funzionamento umidostato E’ possibile scegliere la logica di funzionamento per quanto riguarda il relè...
- Page 24 Password per blocco tastiera E’ possibile scegliere un valore di tre cifre da utilizzare per sbloccare la tastiera. Sul campo (22) compare la scritta “PAS=” e sul campo (16) lampeggia il valore della password attualmente impostata (il valore impostato di default è “123”).
- Page 25 Stato di carica batteria E’ possibile visualizzare il livello di carica della batteria. Sul campo (22) compare la scritta “BAT=” e sul (16) il valore in percentuale del livello di carica. Dato che questo è l’ultimo parametro della sequenza, con la pressione del tasto “...
- Page 26 Per modificare i valori impostati, premere il tasto “PRG”. Il parametro interessato dalla modifica inizierà a lampeggiare. Premere i tasti “ ” e “ ” per modificare il parametro e “ ” per confermare. Le impostazioni da eseguire per entrambi i menù...
- Page 27 Per sbloccare la tastiera, premere nuovamente i tasti T1, T2 e T3 per 3 secondi e immettere tramite i tasti “ ” e “ ” la password di protezione. Visualizzazione valori massimo e minimo giornalieri Lo strumento memorizza automaticamente i valori minimi e massimi di temperatura e umidità...
- Page 28 TIPO DI REGOLAZIONE La regolazione impostata di default è di tipo ON/OFF con spegnimento in corrispondenza del setpoint e con differenziale impostato a 0,3°C. In modalità di funzionamento on/off, il relè di uscita segue la seguente logica: modalità riscaldamento / umidificazione modalità...
- Page 29 Scegliere il valore di banda di regolazione come segue: • banda larga (5°C) per impianti con elevato gradiente termico • banda stretta (0,5°C) per impianti con basso gradiente termico SOSTITUZIONE BATTERIA • Quando la batteria è prossima alla scarica, lampeggia tutto il display pur continuando ad eseguire tutte le funzioni.
- Page 30 NORME DI RIFERIMENTO La conformità alle Direttive Comunitarie 2014/35/UE (LVD) 2014/30/UE (EMCD) è dichiarata in riferimento alle seguenti norme armonizzate: CEI EN 60730-2-7, CEI EN 60730-2-9, CEI EN 60730-2-13 ai sensi dell’art. 26 del Decreto Legislativo 14 marzo 2014, n. 49 “Attuazione della direttiva 2012/19/UE sui rifiuti di apparecchiature elettriche ed elettroniche (RAEE)”...
- Page 31 PROGRAMMI INVERNALI ■ ■ ■ ■ ■ ■ ■ T2 ■ ■ ■ ■ ■ ■ ■ ■ ■ ■ ■ ■ ■ ■ ■ ■ ■ ■ ■ ■ ■ ■ ■ ■ T1 ■ ■ ■ ■ ■ ■ ■ ■ ■ ■ ■ ■ ■ ■ ■ ■ ■ ■ ■ ■ ■ ■ ■ ■ 0 1 2 3 4 5 6 7 8 9 10 11 12 13 14 15 16 17 18 19 20 21 22 23 ■...
- Page 32 PROGRAMMI ESTIVI T3 ■ ■ ■ ■ ■ ■ ■ ■ ■ ■ ■ ■ ■ ■ ■ ■ ■ T2 ■ ■ ■ ■ ■ ■ ■ ■ ■ ■ ■ ■ ■ ■ ■ ■ ■ ■ ■ ■ ■ ■ ■ ■ T1 ■...
- Page 33 Index ■ Assembly Page ■ Dimensions Page ■ Connection diagram Page ■ Safety warning Page ■ Technical characteristics Page ■ Control elements / display indications Page ■ Initial start-up / Reset Page ■ Clock setting Page ■ Programs setting Page ■...
- Page 34 Chronothermostat with humidistat • Chronothermostat with integrated humidistat. One instrument to regulate temperature and humidity • Weekly programming with 3 levels of temperature and selectable summer/winter operating mode (for the chronothermostat) • Selectable humidifier/dehumidifier mode (for humidistat) • Power supply: 1 battery 1, 5V type AA •...
- Page 35 ASSEMBLY • It is advisable to place the chronothermostat in an area that mirrors, as much as possible, the conditions of average temperature and humidity of the entire environment. Avoid installing too close to doors, windows, heat sources, direct sunlight radiation, and positions with excess or total lack of air inlet.
- Page 36 DIMENSIONS CONNECTION DIAGRAM Chronothermostat change-over relay Humidistat relay N.O. - 34 - Chronothermostat with Humidistat User Manual...
- Page 37 III (EN 60730-1). Code Model Description 02018090 CTUP Weekly chronothermostat with humidistat white SAFETY WARNINGS ■ During installation and operation of the product, it is necessary to comply with the following instructions: 1) The instrument must be installed by a skilled person, in strict compliance with the connection diagrams.
- Page 38 • Temperature regulation: - ON/OFF with differential setting between 0.1°C and 1°C - PROPORTIONAL with proportional band and regulation period setting • Weekly programming • Daily resolution: 1h • Activation delay setting between 15, 30 and 45 minutes (independent for every hour) •...
- Page 39 CONTROL ELEMENTS / DISPLAY INDICATIONS Control elements ■ " " Key: manual operation for temperture regulation " " Key: increases the selected field or displays the daily maximum temperature and humidity 3) " " Key: decreases the selected field or displays the daily minimum temperature and humidity 4) "...
- Page 40 display indications ■ 14) "Day" Field 15) "Measured humidity" Field Note: the decimal point indicates the status of humidistat relay (point ON = connected load, point OFF = disconnected load) 16) "Environment temperature" Field 17) "Set program" Field 18) "Manual operation activation" Field 19) "Timer"...
- Page 41 INITIAL START-UP / RESET • Insert the battery and press the "R" key using a point. All the display segments will turn on and the relay will be activated for 3 seconds; after this, the clock field (22) will start at 12:00 and will flash until the clock is set.
- Page 42 At this point, the minutes digit will start flashing. Use the " " and " " keys to increase or decrease the field and press " " to confirm. Repeat the procedure to set the hours. Once the value for the hours is set, field (22) will display a flashing value of the year, field (15) the value of the month and field (16) the value of the day.
- Page 43 The chapters “Programs setting”, Temperature settings”, “Manual operation”, “Summer / winter operation”, “Keypad on-off command”, and “Timings” are related only to the part of the chronothermostat. For the setting of humidistat parameters see advanced programming. PROGRAMS SETTING • Pressing the "PRG" key on field (14) will display the indication regarding Monday, field (16) will display the selected program flashing (in the example: P1), field (15) will...
- Page 44 With the T1, T2 and T3 keys, it is possible to modify the temperature selected for that hour and, at the same time, move on to the next one. Using the " " and " " keys, it is possible to move from one hour to the next without modifying the set temperature.
- Page 45 TEMPERATURES SETTING • In any of the operation modes, pressing the T1, T2 and T3 keys will bring field (22) to display the writing corresponding to the temperature that is being modified; on field (16) the value of the aforementioned temperature will flash.
- Page 46 MANUAL OPERATION • During automatic operation, when pressing the " " key, the chronothermostat will act as a normal thermostat with operating temperature Tm. Field (22) will show the current time. Field (14) will show the current date. Field (15) will display the writing "SEt". The symbol (18) will appear.
- Page 47 SUMMER / WINTER OPERATION To move from winter to summer operation (or vice versa), press the " " key with a point (12). On field (22) the writing "rISC" (or "Cond") will flash and the symbol " " (or " ") will appear. With the "...
- Page 48 KEYPAD ON-OFF COMMAND • To deactivate the programmable thermostat press the " " key. The display will show the " " symbol. Once deactivated, during winter operation the programmable thermostat will activate the antifreeze function to ensure that the temperature does not decrease below a certain threshold.
- Page 49 Timed deactivation If in off status you set a timing, such off status will be maintained until the end of the timing; operation will then switch to the one active before deactivation. If, during timing, the system is activated, the timing ends. In all cases, the timing condition is signalled by the symbol "...
- Page 50 ADVANCED PROGRAMMING • In advanced programming it is possible to access the following operation parameters: - regulation temperature type - parameters for regulation temperature type - antifreeze temperature - temperature measurement unit - humidistat operation - humidistat set point - humidistat differential - keypad lock password - system operation hours - battery charge status...
- Page 51 • Using the " " and " " keys, choose the desired regulation mode and press " " to confirm and move to the setting of the next parameter. Parameters for the chosen regulation type (only for winter operation) • In case of "ON/OFF" regulation type, the only parameter to be set is the differential.
- Page 52 Antifreeze temperature (only for winter operation) • It is possible to set a safety temperature value (antifreeze temperature) to be maintained in case the programmable thermostat is deactivated. Field (22) will display the writing "OFF=" and on field (16) the antifreeze temperature value currently set will flash.
- Page 53 Field (22) displays the writing "dEG=" and on field (25) the measurement unit currently set will flash. Press the " " or " " keys indifferently to change the unit and " " to confirm. Humidistat operation It is possible to set the intervention differential about the humidistat relay.
- Page 54 Keypad lock password It is possible to choose a three digits value to be used to unlock the keypad. Field (22) will display the writing "PAS=" and on field (16) the password value currently set will flash (the default set value is "123").
- Page 55 Battery charge status It is possible to view the battery charge status. Field (22) will display the writing "BAT=" and field (16) will show the percentage value of the charge level. Since this is the last parameter of the sequence, pressing the " " key will exit the menu and return to automatic operation.
- Page 56 To modify the set values, press the "PRG" key. The parameter corresponding to the modification will start flashing. Press the “ ” and “ ” keys to modify the values and “ ” to confirm. The settings for both menus are, in order: - week of the month (1ST first, 2ND second, 3RD third, 4TH fourth, LST last)
- Page 57 To unlock the keypad, press the T1, T2 and T3 keys again for 3 seconds and input, using the " " and " " keys, the protection password. Display of max/min daily values The instrument memorizes the minimum and maximum temperature values measured and humidity during the day.
- Page 58 REGULATION TYPE The default regulation type is ON/OFF with deactivation in correspondence with the setpoint and with differential set to 0.3°C. During on/off operation mode, the output relay follows the following logic: heating mode / humidification cooling mode / dehumidification relay ON relay ON relay OFF...
- Page 59 Choose the regulation band value as follows: • broad band (5°C) for systems with high thermal gradient • narrow band (0.5°C) for systems with low thermal gradient BATTERY REPLACEMENT • When the battery is almost flat, the whole display flashes, although it will continue to carry out all functions.
- Page 60 REFERENCE STANDARDS Compliance with Community Directives 2014/35/EU (LVD) 2014/30/EU (EMCD) is declared with reference to the following harmonized standards: EN 60730-2-7, EN 60730-2-9, EN 60730-2-13 INFORMATION TO USERS pursuant to art. 14 of the DIRECTIVE 2012/19 / EU OF THE EUROPEAN PARLIAMENT AND OF THE COUNCIL of 4 July 2012 on waste electrical and electronic equipment (WEEE) The crossed bin symbol on the appliance or on its packaging indicates that the product at the end of its useful life must be collected separately and not disposed...
- Page 61 WINTER PROGRAMS ■ ■ ■ ■ ■ ■ ■ T2 ■ ■ ■ ■ ■ ■ ■ ■ ■ ■ ■ ■ ■ ■ ■ ■ ■ ■ ■ ■ ■ ■ ■ ■ T1 ■ ■ ■ ■ ■ ■ ■ ■ ■ ■ ■ ■ ■ ■ ■ ■ ■ ■ ■ ■ ■ ■ ■ ■ 0 1 2 3 4 5 6 7 8 9 10 11 12 13 14 15 16 17 18 19 20 21 22 23 ■...
- Page 62 SUMMER PROGRAMS T3 ■ ■ ■ ■ ■ ■ ■ ■ ■ ■ ■ ■ ■ ■ ■ ■ ■ T2 ■ ■ ■ ■ ■ ■ ■ ■ ■ ■ ■ ■ ■ ■ ■ ■ ■ ■ ■ ■ ■ ■ ■ ■ T1 ■...
- Page 64 Via Brigata Osoppo, 166 Frazione Vigonovo 33074 Fontanafredda (Pn) – Italy Tel.+39 0434567911 Fax +39 0434567901 info@emmeti.com www.emmeti.com...
Need help?
Do you have a question about the CTUP and is the answer not in the manual?
Questions and answers