Table of Contents
Advertisement
Advertisement
Table of Contents

Related Manuals for Magic Mobility R-NET CJSM2


Summary of Contents for Magic Mobility R-NET CJSM2
- Page 1 r-net user guide...
-
Page 2: Table Of Contents
r-net user guide Contents About this manual ..................................6 Chapter 1 – Operation .................................. 7 INTRODUCTION ................................7 GENERAL ..................................7 Handling ..................................7 Operating conditions ..............................7 Cleaning ..................................7 MATING CONNNECTORS ............................8 CONTROLS ..................................9 Joystick ..................................9 Buttons .................................. - Page 3 r-net user guide IR Setup ..................................24 Exit ....................................24 TIPS FOR USING YOUR CONTROL SYSTEM ...................... 24 Driving - General ..............................24 Driving Technique ..............................24 Slow or sluggish movement ........................... 25 PRECAUTIONS FOR USE ............................25 10.1 Hazards ..................................25 SAFETY CHECKS ..............................
- Page 4 r-net user guide Please note: If the programmable parameter, Motor Swap has been enabled, then left and right hand references in this table will need transposing........................ 34 Slow or sluggish movement ..........................34 Maximum speed / Profile indicator is steady ....................34 3.10.1 Speed indication ..............................
- Page 5 Orientation error ..............................43 3.28 ASM disconnected ..............................43 3.29 Switch short ................................43 SERVICING OF DEFECTIVE UNITS......................... 44 Chapter 4 - Specifications ............................... 45 Contact Magic Mobility if you require further information ..................45 5940A R-net User Guide DCR1266 magicmobility.com.au...
-
Page 6: About This Manual
WARNING: A point of safety which if ignored could cause injury to the individual. Magic Mobility accepts no liability for any losses of any kind if the cautions and warnings are not followed. 5940A R-net User Guide DCR1266 magicmobility.com.au... -
Page 7: Chapter 1 - Operation
r-net user guide Chapter 1 – Operation INTRODUCTION The operation of the R-net wheelchair control system is simple and easy to understand. The control system incorporates state-of-the-art electronics, the result of many years of research, to provide you with ease of use and a very high level of safety. -
Page 8: Mating Connnectors
r-net user guide MATING CONNNECTORS To connect the Communication Cables: Holding the connector housing, firmly push the connector into its mate until you can no longer see the yellow plastic. The connectors are secured using a friction system. To disconnect the Communication Cables: Holding the connector housing firmly, pull the connectors apart. -
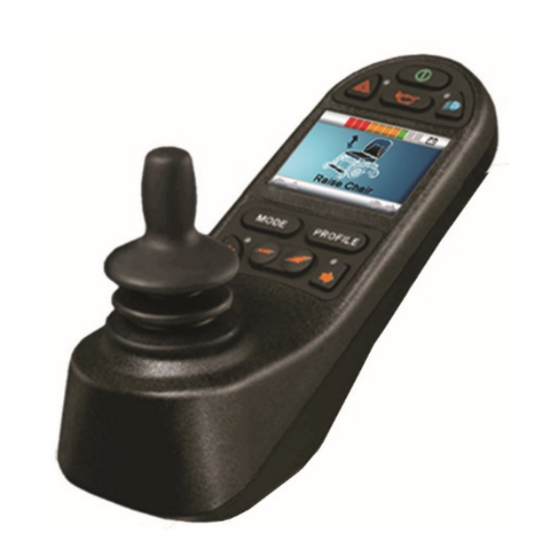
Page 9: Controls
r-net user guide CONTROLS The R-net control system has two versions of Joystick Module – with and without lighting control. Most of the controls are common to both however, the lighting buttons are only included on the Joystick Module with lighting control. -
Page 10: Buttons
r-net user guide Buttons 4.2.1 ON/OFF BUTTON The On/Off button applies power to the control system electronics, which in turn supply power to the wheelchair’s motors. Do not use the On/Off button to stop the wheelchair unless there is an emergency. (If you do, you may shorten the life of the wheelchair drive components). - Page 11 r-net user guide 4.2.7 HAZARD WARNING BUTTON AND LED This button activates and de-activates the wheelchair’s hazard lights. Depress the button to turn the hazards on and depress the button again to turn them off. When activated the hazard LED and the indicator LEDs will flash in sync with the wheelchair’s indicators.
-
Page 12: Lcd Screen
r-net user guide LCD Screen The status of the control system can be understood by observing the LCD screen. The control system is on when the screen is backlit. Refer to section 5 for details on screen symbols. Charger socket This socket should only be used for charging or locking the wheelchair. - Page 13 r-net user guide 5.1.2 SPEED INDICATOR This displays the current speed setting. The speed setting is adjusted using the Speed Buttons. 5.1.3 CURRENT PROFILE The Profile Number describes which Profile the control system is currently operating in. The Profile Text is the name or description of the Profile the control system is currently operating in.
-
Page 14: Momentary Screens
r-net user guide 5.1.10 CONTROL SYSTEM TEMPERATURE This symbol is displayed when the control system has intentionally reduced its own power, in order to protect itself against heat damage. 5.1.11 TIMER This symbol is displayed when the control system is changing between different states. -
Page 15: Locking The Control System
r-net user guide 5.3.1 IDENTIFIED MODULE This identifies which module of the control system has registered the problem, such as: Power Module Joystick Module Intelligent Seating/lighting Module 5.3.2 TRIP TEXT The Trip Text gives a brief description of the trip type. 5.3.3 TRIP CODE The 4-digit code displayed gives the exact trip that has been recorded. - Page 16 r-net user guide 5.4.1 KEYPAD LOCKING To lock the wheelchair using the keypad: While the control system is switched on, depress and hold the On/Off button. After 1 second the control system will beep. Now release the On/Off button Deflect the joystick forwards until the control system beeps. Deflect the joystick in reverse until the control system beeps.
-
Page 17: Actuator Selection Screen
r-net user guide Actuator selection screen To adjust the seat position, the actuator screen must be visible. Depress the Mode Button to scroll through the Mode screens until you reach the actuator screen, displayed below. Actuator adjustment is achieved as follows. Move the Joystick sideways to select the desired axis. -
Page 18: Top Bar
r-net user guide Top bar 6.1.1 BATTERY INDICATOR This displays the charge available in the battery and can be used to alert the user to the status of the battery. Steady: This indicates that all is well. Flashing Slowly: The control system is functioning correctly, but you should charge the battery as soon as possible. - Page 19 r-net user guide 6.3.2 CLOCK This displays the current time in a numeric format. The clock is user adjustable. Adjustable options are: Visibility, whether the clock is displayed on screen. The display format, 12 or 24 hour. The time, the user can adjust the time. These adjustments are made within the Settings Menu.
-
Page 20: Message Window
r-net user guide 6.3.8 ACTUATOR MODE Displays the sections of the chair currently selected for movement, the name given to the selection and a direction arrow showing what sort of movement is available. 6.3.9 BLUETOOTH MODE When Bluetooth Mode is entered the following screen will be displayed. - Page 21 r-net user guide 6.4.4 CROSS & TICK These symbols will be displayed during configuration procedures. Process completed correctly. Process not completed correctly. 6.4.5 E-STOP If the External Profile Switch is activated during drive, or actuator operation, this symbol will be displayed. 6.4.6 JOYSTICK DISPLACED If you operate the Joystick before or just after you switch the control system on, the screen will flash the joystick displaced screen.
-
Page 22: Getting Ready To Drive
r-net user guide This indicates a system trip, i.e. the R-net has detected a problem somewhere in the wheelchair’s electrical system. Refer to section 5 for a detailed description of Diagnostic screen and procedure. Refer to Chapter 3 Diagnostics for a complete description of the Trip Texts. GETTING READY TO DRIVE Operate the On/Off switch. -
Page 23: Settings Menu
r-net user guide SETTINGS MENU The Settings Menu allows the user to adjust the CJSM display in terms of clock adjustment and display format, the brightness of the backlight, the background colour and the behaviour of the odometer. The menu is accessed by depressing the Speed Down and Speed Up buttons simultaneously. -
Page 24: Backlight
r-net user guide Clear Trip Distance: A right joystick deflection will clear the Trip Distance value. Exit: A right joystick deflection will return to the Settings Menu. Backlight This sets the intensity of the LCD backlight. The adjustable range is 0% to 100% in steps of 10%. Adjustments are made with left and right joystick deflections. -
Page 25: Slow Or Sluggish Movement
r-net user guide Slow or sluggish movement If the wheelchair does not travel at full speed or does not respond quickly enough, and the battery condition is good, check the maximum speed setting. If adjusting the speed setting does not remedy the problem then there may be a non-hazardous fault. -
Page 26: Daily Checks
r-net user guide 11.1 Daily checks Joystick: With the control system switched off, check that the joystick is not bent or damaged and that it returns to the centre when you push and release it. If there is a problem, do not continue with the safety checks and contact your service agent. -
Page 27: How To Read A Battery Gauge
r-net user guide the distance you can travel in your wheelchair. All wheelchair batteries will gradually lose their capacity as they age. The most important factor that reduces the life of your batteries is the amount of charge you take from the batteries before you recharge them. -
Page 28: Programming
(On-board Programming) feature or the specialist R-net software and Dongle or the Diagnostic Test Tool (DTT). WARNING: Programming should only be conducted by your Magic Mobility Representative with in-depth knowledge of R-Net electronic control systems. Incorrect programming could result in an unsafe set-up of a wheelchair for a user. -
Page 29: Joystick Knobs
r-net user guide JOYSTICK KNOBS The knob fitted to your joystick is suitable for most applications. If you would prefer another type, there is a range of alternatives available. Please contact your wheelchair distributor or manufacturer for advice. Do not replace the joystick knob with any unauthorized item - it may cause hazardous operation. -
Page 30: Chapter 2 - Elpm 90, Jsm-Led & Sm
r-net user guide Chapter 2 – ELPM 90, JSM-LED & SM INTRODUCTION JSM-LED: LED Joystick Module JSM-LED-L: LED Joystick Module with lighting control buttons EL PM90: EL 90A Power Module Seating Module NOTE: The EL PM90 can be used with any R-net JSM, including LCD based versions, as well as an Omni or any other Input Device. -
Page 31: Buttons
r-net user guide Buttons 2.1.1 BATTERY GAUGE The battery gauge shows you that the wheelchair is switched on. It also indicates the operating status of the wheelchair. Details are given in section 3. If the battery gauge shows red, yellow and green, the batteries are charged. (LEDs 1 – 10) If the battery gauge shows just red and yellow, then you should charge the batteries as soon as you can. -
Page 32: Actuator Indicator
r-net user guide 2.1.2 PROFILE INDICATOR This is an indicator that shows the selected drive profile. There may be up to 5 drive profiles available, this depends on the programming of the control system. 2.1.3 SPEED / PROFILE DECREASE BUTTON This button decreases the maximum speed setting or, if the control system is programmed for drive profile operation, selects a lower drive profile. -
Page 33: Speed Indicator Ripples Outwards
r-net user guide This indicates a system trip, i.e. the R-net has detected a problem somewhere in the wheelchair’s electrical system. Please follow this procedure: Switch off the control system. Make sure that all connectors on the wheelchair and the control system are mated securely. Check the condition of the battery. -
Page 34: Please Note: If The Programmable Parameter, Motor Swap Has Been Enabled, Then Left And Right Hand References In This Table Will Need Transposing
If adjusting the speed setting does not remedy the problem, then there may be a non-hazardous fault. Contact your local Magic Mobility service agent. Maximum speed / Profile indicator is steady The display will vary slightly depending on whether the control system is programmed to operate with drive profiles. -
Page 35: Maximum Speed / Profile Indicator Ripples Up And Down
r-net user guide 3.11 Maximum speed / Profile indicator ripples up and down This indicates the control system is locked, refer to Chapter 1 section 5.4 for details of how to unlock the control system. 3.12 Maximum speed / Profile indicator flashes This indicates the speed of the wheelchair is being limited for safety reasons. -
Page 36: Chapter 3 - Diagnostics
r-net user guide Chapter 3 - Diagnostics INTRODUCTION The primary objective of this chapter is to assist service personnel in finding the likely area of a detected trip within the whole wheelchair electrical system. It is important to realize that even though the control system is signalling a trip, it may not be the control system itself that is defective. -
Page 37: Diagnostic Text Definitions
r-net user guide 2.1.1 IDENTIFIED MODULE This identifies which module of the control system has registered the problem, such: Power Module JSM: Joystick Module ISM: Intelligent Seating/lighting Module 2.1.2 TRIP TEXT The Trip Text gives a brief description of the trip type. 2.1.3 TRIP CODE The 4 digit code displayed gives the exact trip that has been recorded. -
Page 38: High Battery Voltage
r-net user guide If the trip is still present after the batteries and connections have been checked, then the Power Module may be defective. Refer to section 5. High battery voltage This occurs when the control system detects that the battery voltage has risen above 35V. The most common reasons for this are overcharging of the battery or bad connections between the control system and the batteries. -
Page 39: Brake Lamp Short
r-net user guide Brake lamp short This occurs when the control system detects a short in the Brake Lamp Circuit. Check the brake lamps, cables and connections to the control system. If the trip is still present after the above checks have been made, then the ISM may be defective. Refer to Section 5. -
Page 40: Overtemp (Acts)
r-net user guide 3.13 Overtemp (acts) This occurs when the control system detects that the SM or ISM’s actuator circuitry has become too hot. The control system will cease drive to the actuator motor in question. Allow the SM or ISM to cool. If the SM or ISM is frequently overheating check the condition of the actuator motors and the connections to them. -
Page 41: Pm Memory Error
r-net user guide 3.17 PM Memory error This is a specific Power Module based trip. Check all cables and connections. Using the R-net PC Programmer, re-program the control system. This should be done with either the most current specific program file for the wheelchair or the manufacturer’s original programming file. -
Page 42: System Error
If the trip is still present after the above checks have been made, then the switch or the CJSM2 may be defective. Refer to Section 5. WARNING: Because a disconnected User Switch means there is no emergency stop function, Magic Mobility recommend that Switch Detect for this option is always set to On. 3.24 Gone to sleep This occurs when the control system has been left inactive for a time greater than the parameter Sleep Timer. -
Page 43: 3.25 Charging
r-net user guide An entry is made in the system log each time this occurs. 3.25 Charging This occurs when the control system detects that a charger is connected to either Inhibit 1 or Inhibit 3. The Battery charging screen will be displayed during charger connection. An entry is made in the system log each time this occurs. -
Page 44: Servicing Of Defective Units
r-net user guide If the trip is still present after the above checks have been made, then the switch or the CJSM2 may be defective. Refer to Section 5. SERVICING OF DEFECTIVE UNITS Excluding specific OEM approved replacement parts (for details of these contact the wheelchair manufacturer), there are no serviceable parts in the R-net control system. -
Page 45: Chapter 4 - Specifications
Tested at 30V/m to EN12184 and ANSI/ RESNA requirements Emissions: To EN55022 Class B ESD: IEC801 part 2 Contact Magic Mobility if you require further information 3 International Court, Scoresby Vic 3179 Tel +61 3 8791 5600 Email sales@magicmobility.com.au http://www.magicmobility.com.au 5940A R-net User Guide DCR1266...
Need help?
Do you have a question about the R-NET CJSM2 and is the answer not in the manual?
Questions and answers
Come posso cambiare la lingua dal tedesco all’italiano?