Table of Contents
Advertisement
Available languages
Available languages
Quick Links
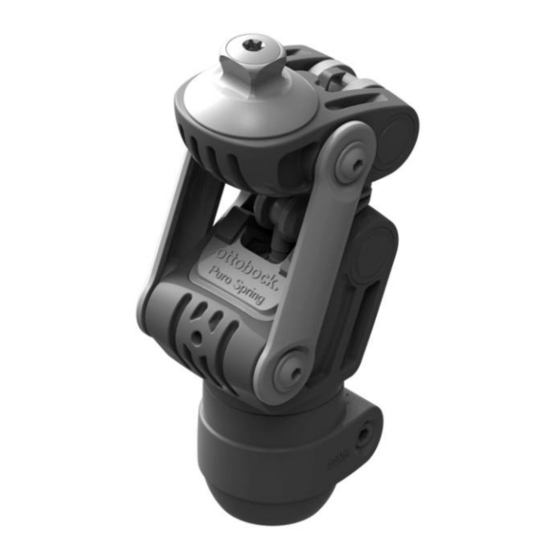
Puro Spring 3R120, 3R120=KD, 3R120=HD
Gebrauchsanweisung .....................................................................................................
Instructions for use .........................................................................................................
For Field Testing only
27
39
Advertisement
Chapters
Table of Contents

Related Manuals for Otto Bock 3R120


Summary of Contents for Otto Bock 3R120
- Page 1 ALPHA Puro Spring 3R120, 3R120=KD, 3R120=HD Gebrauchsanweisung ..................... Instructions for use ......................For Field Testing only...
- Page 2 2 | Ottobock...
- Page 3 Ottobock | 3...
- Page 4 4 | Ottobock...
- Page 5 Ottobock | 5...
- Page 6 6 | Ottobock...
- Page 7 Ottobock | 7...
- Page 8 8 | Ottobock...
- Page 9 Ottobock | 9...
- Page 10 10 | Ottobock...
- Page 11 Ottobock | 11...
- Page 12 12 | Ottobock...
- Page 13 Ottobock | 13...
- Page 14 14 | Ottobock...
- Page 15 Ottobock | 15...
- Page 16 16 | Ottobock...
- Page 17 Ottobock | 17...
- Page 18 18 | Ottobock...
- Page 19 Ottobock | 19...
- Page 20 20 | Ottobock...
- Page 21 Ottobock | 21...
- Page 22 22 | Ottobock...
- Page 23 Ottobock | 23...
- Page 24 24 | Ottobock...
- Page 25 Ottobock | 25...
- Page 26 26 | Ottobock...
-
Page 27: Table Of Contents
Inhaltsverzeichnis Hinweise zum Dokument .................... Bedeutung der Warnsymbolik ................Bedeutung der Piktogramme ................Produktbeschreibung ....................Verwendung ........................Verwendungszweck .................... Einsatzgebiet ..................... Kombinationsmöglichkeiten ................. Umgebungsbedingungen ..................Wiederverwendung und Nutzungsdauer ..............Allgemeine Sicherheitshinweise ................Lieferumfang ......................... Herstellung der Gebrauchsfähigkeit ................Hinweise zur Herstellung einer Prothese ............... - Page 28 Wartung ......................... Entsorgung ........................Rechtliche Hinweise ....................11.1 Haftung ......................11.2 CE-Konformität ....................Technische Daten ......................28 | Ottobock...
-
Page 29: Hinweise Zum Dokument
Bewegungswiderstand zu gering Optimaler Bewegungswiderstand Bewegungswiderstand zu stark Ist-Position Soll-Position 2 Produktbeschreibung Das Produkt 3R120* zeichnet sich durch folgende Hauptmerkmale aus (siehe Abb. auf Sei te 5): • Polyzentrisches Prothesenkniegelenk • Produktvarianten mit folgenden proximale Anschlüssen: Justierkern: 3R120, 3R120=HD Eingussanker: 3R120=KD •... -
Page 30: Verwendung
• Friktionsbremse zur Optimierung der Schwungphase (Extension und Flexion) Einstellbar über Werkzeug • Anschläge zur Flexionsdämpfung (entnehmbar) 3 Verwendung 3.1 Verwendungszweck Das Produkt ist ausschließlich für die prothetische Versorgung der unteren Extremität einzuset zen. 3.2 Einsatzgebiet VORSICHT Überbeanspruchung des Produkts Sturz durch Bruch tragender Teile ►... -
Page 31: Wiederverwendung Und Nutzungsdauer
► Wenn das Produkt unzulässigen Umgebungsbedingungen ausgesetzt war, prüfen Sie es auf Schäden. ► Verwenden Sie das Produkt bei offensichtlichen Schäden oder im Zweifelsfall nicht weiter. ► Sorgen Sie im Bedarfsfall für geeignete Maßnahmen (z. B. Reinigung, Reparatur, Ersatz, Kontrolle durch den Hersteller oder eine Fachwerkstatt, etc.). Zulässige Umgebungsbedingungen Einsatztemperaturbereich -10 °C bis +45 °C Zulässige relative Luftfeuchtigkeit 0 % bis 90 %, nicht kondensierend... -
Page 32: Lieferumfang
► Sorgen Sie im Bedarfsfall für geeignete Maßnahmen (z. B. Reparatur, Austausch, Kontrolle durch den Kunden-Service des Herstellers, etc.). Anzeichen von Funktionsveränderungen oder -verlust beim Gebrauch Funktionsveränderungen können sich z. B. durch Schwergängigkeit, Geräuschentwicklung, etc. bemerkbar machen. 5 Lieferumfang Der Lieferumfang (Produktkomponenten und Menge ) ist in den Abbildungen ... -
Page 33: Sperre Deaktivieren Und Aktivieren
► VORSICHT! Um den Patienten ein sicheres Stehen zu ermöglichen, die Prothese anhand der Aufbaubilder für die Sagittalebene (siehe Abb. auf Seite 10 – Aufbaulinie, Prothe senfuß, Prothesenknie, Prothesenschaft) und für die Frontalebene (siehe Abb. Seite 10 – Aufbaulinie, Prothesenfuß, Prothesenknie, Prothesenschaft) und der nachfolgenden Unterkapitel aufbauen. -
Page 34: Prothesenschaft Für Feststellschieber Vorbereiten
6.2.7 Prothesenschaft für Feststellschieber vorbereiten ► Den Prothesenschaft für die Montage des Feststellschiebers, wie in der Abbildung der Seite 15 gezeigt, vorbereiten und folgende Punkte beachten: • Positionshöhe in optimaler Höhe für die Hand des Patienten • Verlauf des Perlondrahts im Prothesenschaft geradlinig vom Prothesenkniegelenk zum Fest stellschieber ... -
Page 35: Feststellschieber Und Sperren-Entriegelungszugseil Montieren
INFORMATION: Die Gesamtsystemhöhe aller Prothesenkomponenten entspricht dem Schaft-Bo den-Maß (siehe Abb. auf Seite 17). ► Den Rohradapter kürzen und entgraten. 6.2.11 Feststellschieber und Sperren-Entriegelungszugseil montieren ► VORSICHT! Den Feststellschieber nur wie in der Abbildung auf der Seite 18 gezeigt ver wenden und zusammen mit dem Sperren-Entriegelungszugseil montieren. 6.2.12 Beschädigungen bei maximaler Flexion verhindern ►... -
Page 36: Gehen Üben
6.4.3 Gehen üben ► VORSICHT! Mit dem Patienten anhand eines Gehbarrens oder Handlaufs das Gehen üben (siehe Abb. auf Seite 22). ► HINWEIS! Auf eine funktionale Fußaußenrotation achten. ► Die Außenrotation des Prothesenkniegelenks prüfen. ► Die Schaftflexion prüfen. ► Die Schaftadduktion prüfen. ► Während der dynamischen Anprobe prüfen, ob die in der Abbildung auf Seite 23 und nachfolgend aufgelisteten Abweichungen auftreten und entsprechend korrigieren: •... -
Page 37: Gebrauch Des Feststellschiebers
► Sorgen Sie im Bedarfsfall für geeignete Maßnahmen (z. B. Reparatur, Austausch, Kontrolle durch den Kunden-Service des Herstellers, etc.). 7.2 Gebrauch des Feststellschiebers VORSICHT Fehlfunktionen und unsachgemäßer Gebrauch der Sperre Sturz durch unvorhergesehene Deaktivierung der Sperre des Prothesenkniegelenks ► Strecken Sie zum Aktivieren der Sperre das Prothesenkniegelenk vollständig durch. Prüfen Sie anschließend vorsichtig, ob die Sperre auch wirklich eingerastet ist. - Page 38 ► VORSICHT! Bei Testversorgungen die Prothese entsprechend dem Testzeitraum und der Nutzung mehrmals überprüfen. ► VORSICHT! Bei jeder Wartung und vor jedem Gebrauch die Kunststoffkomponenten des Produkts auf Verformungen, Beschädigungen und Risse kontrollieren. ► HINWEIS! Das Prothesengelenk nicht schmieren und fetten. ► HINWEIS! Reparaturen nur durch den Service des Herstellers durchführen lassen. ►...
- Page 39 Table of contents Notes regarding the document ................... Explanation of Warning Symbols ................Meanings of pictograms ..................Product Description ..................... Application ........................Indications for use ....................Area of Application ..................... Combination Possibilities ..................Environmental Conditions ..................Reuse and service life ..................
- Page 40 Maintenance ......................... Disposal ......................... Legal Information ......................11.1 Liability ......................11.2 CE Conformity ....................Technical data ......................40 | Ottobock...
-
Page 41: Notes Regarding The Document
Movement resistance too high Actual position Nominal position 2 Product Description The product 3R120* distinguishes itself with the following key features (see Fig. on page 5): • Polycentric prosthetic knee joint • Product versions with the following proximal connections: Pyramid adapter: 3R120, 3R120=HD ... -
Page 42: Application
3 Application 3.1 Indications for use The product is to be used solely for lower limb prosthetic fittings. 3.2 Area of Application CAUTION Excessive strain on the product Falling due to breakage of load-bearing components ► Use the product exclusively according to its MOBIS classification (see Fig. on page 5). -
Page 43: Reuse And Service Life
Allowable environmental conditions Temperature range for use: -10 °C to +45 °C Allowable relative humidity 0 % to 90 %, non-condensing Unallowable environmental conditions Mechanical vibrations or impacts Perspiration, urine, fresh water, salt water, acids Dust, sand, highly hygroscopic particles (e.g. talcum) 3.5 Reuse and service life CAUTION Reuse on another patient Fall due to loss of functionality as well as damage to the product... -
Page 44: Scope Of Delivery
5 Scope of Delivery The scope of delivery (product components and quantities ) is shown in the illustrations and on pages 8 and 9. Only product components with article numbers can be ordered separately. 6 Preparation for Use 6.1 Information on Fabrication of a Prosthesis CAUTION Incorrect alignment, assembly or adjustment Injuries due to incorrectly installed or adjusted as well as damaged prosthetic components... -
Page 45: Secure Connection Cord
► If the prosthetic socket is used with a lock slide, activate the lock according to figure on page 12 (factory default setting). 6.2.2 Secure connection cord ► Secure the connection cord, as shown in figure on page 12, to the prosthetic knee joint and to the spring travel limiter. -
Page 46: Positioning The Prosthetic Socket
6.2.9 Positioning the prosthetic socket ► For positioning the prosthetic socket, note Fig. on page 16 and the instructions that fol low. Thomas test ► Place the flat hand under the lumbar spine. ► Instruct the recumbent patient to flex the contralateral knee joint and hip joint. ►... -
Page 47: Optimising The Static Alignment
6.3 Optimising the static alignment 6.3.1 Checking the static alignment ► To check the static alignment, position the patient on the measuring device as shown in Fig. on page 19. 6.3.2 Optimising the static alignment ► In the sagittal plane, check the course of the load line relative to the alignment reference point ... -
Page 48: Attaching The Cosmetic Cover
6.5 Attaching the cosmetic cover CAUTION Use of talcum Falling, damage to the prosthetic knee joint due to lack of lubrication ► Do not use talcum on the prosthetic knee joint or other prosthetic components. ► Attach the cosmetic cover as shown in Fig. on page 24, noting the following points: •... - Page 49 ► Test the cleaning agents and disinfectants for material compatibility on non-critical parts of the product. ► For the prosthesis, observe the cleaning instructions for all prosthetic components. Cleaning light soiling 1) Clean the product with a damp, soft cloth. 2) Dry the product with a soft cloth.
- Page 50 11 Legal Information 11.1 Liability The manufacturer will only assume liability if the product is used in accordance with the descrip tions and instructions provided in this document. The manufacturer will not assume liability for damage caused by disregard of this document, particularly due to improper use or unauthorised modification of the product.
- Page 51 Ottobock | 51...
- Page 52 Otto Bock HealthCare GmbH Max-Näder-Straße 15 · 37115 Duderstadt · Germany T +49 5527 848-0 · F +49 5527 72330 healthcare@ottobock.de · www.ottobock.com Ottobock has a certified Quality Management System in accordance with ISO 13485.
Need help?
Do you have a question about the 3R120 and is the answer not in the manual?
Questions and answers