Table of Contents
Advertisement
Advertisement
Table of Contents

Related Manuals for Cardinal 200


Summary of Contents for Cardinal 200
- Page 1 WEIGHT INDICATOR INSTALLATION and TECHNICAL MANUAL 8200-M035-O1 Rev C 203 E. Daugherty, Webb City, MO 64870 USA Printed in USA Ph: 417-673-4631 Fax: 417-673-2153 02/14 http://www.cardinalscale.com Technical Support: Ph: 866-254-8261 tech@cardet.com...
- Page 2 8200-M035-O1 Rev C 200 Installation & Technical...
- Page 3 Configuration and upgrades can easily be performed in the field, while still maintaining the rigid control the most demanding installations require. This flexibility insures the Model 200 will be able to meet your weight indicating needs for years to come.
- Page 4 Please do your part by making certain that this device is properly disposed of. The symbol shown to the right indicates that this device must not be disposed of in unsorted municipal waste programs. 8200-M035-O1 Rev C 200 Installation & Technical...
-
Page 5: Table Of Contents
Optically Isolated Remote Inputs - - - - - - - - - - - - - - - - - - - - - - - - - - - - - - - - - - Page 10 Optional Analog Output (200-A Only) - - - - - - - - - - - - - - - - - - - - - - - - - - - - - - - Page 10 Main PCB (Figure No. -
Page 7: Specifications
0.5 or 1 through 9 divisions Weighing Units: Tons, Pounds, Pounds-Ounces, Ounces, Metric Tons, Kilograms, Grams Keypad: Color coded Membrane type - 7 keys Standard I/O: (1) bi-directional RS232 (20mA) (1) output only RS232 (20mA) 8200-M035-O1 Rev C 200 Installation & Technical... -
Page 8: Standard Features
Any application affected by vibration or ® movement on the scale platform can benefit using StableSENSE 8200-M035-O1 Rev C 200 Installation & Technical... -
Page 9: European Declaration Of Conformity
YY = last two digits of year ZZZ = sequential number The undersigned hereby declares, on behalf of Cardinal Scale Manufacturing Company of Webb City, Missouri, that the above-referenced product, to which this declaration relates, is in conformity with the provisions of:... -
Page 10: Precautions
ALWAYS store and transport electronic printed circuit cards and components in anti-static protective bags or packaging. 8200-M035-O1 Rev C 200 Installation & Technical... -
Page 11: Site Preparation Requirements
SITE PREPARATION REQUIREMENTS The Model 200 Weight Indicator is a precision weight-measuring instrument. As with any precision instrument, it requires an acceptable environment to operate at peak performance and reliability. This section is provided to assist you in obtaining such an environment. - Page 12 RFI (Radio Frequency Interference) in a digital weight indicator is weight indication instability during a radio transmission. Cardinal digital weight indicators are designed with special grounding and RFI shielding to achieve a high degree of immunity to common RFI. To maximize the digital weight indicator’s immunity to radio transmissions, follow these guidelines: 1.
-
Page 13: Installation
8. While supporting the weight of the indicator (to insure the bezel is flush against the panel), tighten the 2 screws Mounting Clamp to secure the indicator to the panel. See Figure No. 4. Figure No. 4 8200-M035-O1 Rev C 200 Installation & Technical... -
Page 14: Load Cell Connection
P1 Detail View LOAD CELL CONNECTOR P1 PIN NO. Function PIN NO. Function + EXCITATION - SIGNAL + SENSE - SENSE + SIGNAL - EXCITATION SHIELD 8200-M035-O1 Rev C 200 Installation & Technical... -
Page 15: Load Cell Connections With Over 30 Feet Of Cable
(see Figure No. 9). Serial I/O Cable Installation The 200 indicator may be connected to a printer to record weight and associated data or it may be connected to a remote display or even to a computer for transmission of weight data. The weight data may be transmitted on demand (pressing the PRINT key or on receipt of a command from the computer). -
Page 16: Optically Isolated Remote Inputs
Repeat the procedure until all wires are in place. Figure No. 8 P2 Detail View ANALOG OUTPUT (200-A Only) REMOTE INPUT PIN NO. Function PIN NO. Function 4-20mA OUTPUT GROSS / NET 0-10V OUTPUT PRINT COMMON ZERO TARE 8200-M035-O1 Rev C 200 Installation & Technical... -
Page 17: Main Pcb (Figure No. 9)
These jumpers attach the sense leads to the excitation leads. If sense leads ARE used (as in motor truck scales), these plug-in jumpers should be positioned on one plug- in pin only or removed and stored for later use. 8200-M035-O1 Rev C 200 Installation & Technical... - Page 18 8200-M035-O1 Rev C 200 Installation & Technical...
-
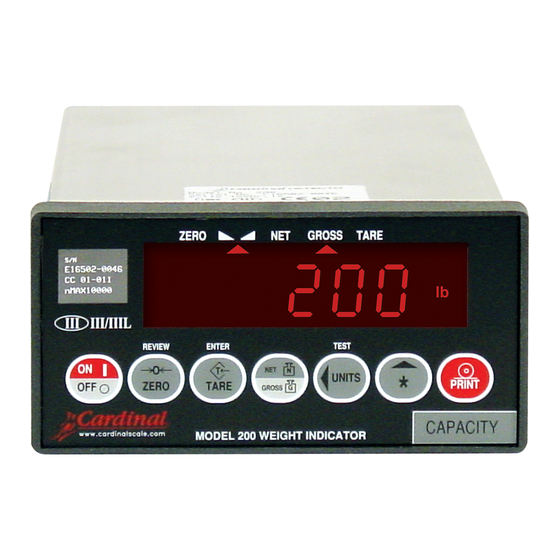
Page 19: Keypad Functions
KEYPAD FUNCTIONS The Model 200 Weight Indicator is equipped with a 7-key keypad. The keypad is used to enter commands and data into the indicator. This section describes each key along with its normal function. It is helpful to refer to the actual indicator while reading this section. - Page 20 2. All vertical segments and decimal points will turn on (no annunciators). 3. All annunciators will turn on. 4. All display elements off. 5. The model number (200) and the software version X.X. 6. The calibration numbers (C1 to C4). 8200-M035-O1 Rev C 200 Installation & Technical...
- Page 21 If displaying net weight, the gross, tare, and net weights will print. The 200 includes support for visual tickets. Visual tickets are designed by the PC based programs Visual Print or n Control, then downloaded to the indicator.
- Page 22 8200-M035-O1 Rev C 200 Installation & Technical...
-
Page 23: Annunciators
This annunciator is located to the right of the weight display and is used to indicate that the displayed unit of weight measurement is Tonnes (metric tons). 8200-M035-O1 Rev C 200 Installation & Technical... - Page 24 8200-M035-O1 Rev C 200 Installation & Technical...
-
Page 25: Setup And Calibration
SetUP prompt, you may proceed through to the next If you press the TARE/ ENTER section (up to and including f SPAn ) by pressing the TARE/ key. ENTER 8200-M035-O1 Rev C 200 Installation & Technical... - Page 26 CAP + 4% to OC NOTE: When LFt=1 and USA=0, the followings results occur: UnS = 1 trL = yes CAP + 9 grads to OC PT printed with tare Lamp test on power up 8200-M035-O1 Rev C 200 Installation & Technical...
- Page 27 NOTE: The selection for Unit2 cannot be the same as Unit1. In addition, dependent upon the selection for Unit1 and the interval and decimal point settings, not all unit combinations are available. 8200-M035-O1 Rev C 200 Installation & Technical...
- Page 28 (0 to 10) and then press the UP ARROW TARE/ key to store the new setting. Allowable values are: 0 through 10. Note that ENTER selecting 0 disables this feature. 8200-M035-O1 Rev C 200 Installation & Technical...
- Page 29 ENTER CLtAr = 1 (Yes) CLtAr = 0 (No) Automatically clears Stored Tare Stored Tare is not cleared when when Net weight goes below zero Net weight goes below zero 8200-M035-O1 Rev C 200 Installation & Technical...
- Page 30 8200-M035-O1 Rev C 200 Installation & Technical...
- Page 31 REMOTE, then both indicators MUST have Rev 2.6.3 or greater software installed. If a combination of a 200 and a 225 indicator are to be used in a LOCAL/REMOTE configuration, then the remote 200 indicator MUST have Rev 2.6.1 or greater software installed, and the 225 indicator MUST have Rev 1.0.K or greater software...
- Page 32 Otherwise, use the ASTERISK/ key to toggle to a new ENTER UP ARROW value and press the TARE/ key to save the new setting. Allowable values for the stable ENTER count are: 3 through 255. 8200-M035-O1 Rev C 200 Installation & Technical...
- Page 33 3. F= FILTER SETTING (1 to 99) determination: Set to desired results. 4. If stability is unacceptable with any setting of F=, reduce the sample rate and/or increase the break range, b= setting for increased filtering. 8200-M035-O1 Rev C 200 Installation & Technical...
- Page 34 8200-M035-O1 Rev C 200 Installation & Technical...
- Page 35 ENTER CALIBRATION MODES The 200 indicator has five modes that can be used to perform calibration. Three of the modes require a test load or test weights, one requires the scale to be empty (and at zero) and the last uses the calibration “C” numbers from a previous calibration. The modes are as follows: 1.
- Page 36 The dashes will stay on the display momentarily, then disappear, after which the display will show: CAL3=. CAL3= - Last Calibration Weight The display will show CAL3=0. This weight is not used. Press the TARE/ key to ENTER skip CAL3= and advance to Sio?. 8200-M035-O1 Rev C 200 Installation & Technical...
- Page 37 The display will show CAL2=0. This is the second of two calibration steps. Remove the weights on the scale platform, and then press the ZERO key. The display will advance to Sio?. 8200-M035-O1 Rev C 200 Installation & Technical...
- Page 38 NOTE: If any components have been changed that affect calibration and/or your scale is used in a commercial application and must be "Legal for Trade" you cannot use the “C” numbers to re-calibrate. 8200-M035-O1 Rev C 200 Installation & Technical...
- Page 39 UP ARROW LEFT ARROW value (pressing the NET key will change the sign) and then press the TARE/ key to ENTER save it and advance to the Sio? menu. 8200-M035-O1 Rev C 200 Installation & Technical...
- Page 40 8200-M035-O1 Rev C 200 Installation & Technical...
- Page 41 No Continuous Output If Cont1= YES (Continuous Output) is selected, an additional prompt, tYPE= will be displayed. If Cont1= no (No Continuous Output) is selected, proceed to the Weight On Demand section. 8200-M035-O1 Rev C 200 Installation & Technical...
- Page 42 CZ = center of zero MO = motion ee = weight not currently being displayed cr = Carriage Return (hex 0D) The SB-80, SB-300 (multiple displays not supported) and WinVRS use the SB-400 format. 8200-M035-O1 Rev C 200 Installation & Technical...
- Page 43 SETUP AND CALIBRATION, CONT. SB-200 – (Type = 2) If SB-200 is selected, the data will be transmitted in the following format: <cr><s><xxxxxx><d><c><uu><m> ETX Where: cr = Carriage Return (hex 0D) Sign "-" = negative, " " (blank) = positive xxxxxx.xxx = Weight...
- Page 44 If there is no decimal point, then the first character is a space. Leading zero blanking applies. Status = Provides information on the weight reading. The characters G/N/U/O/M/E represent Gross/Net/Underload/Overload/Motion/Error respectively. 8200-M035-O1 Rev C 200 Installation & Technical...
- Page 45 Device Number 01 thru 99. If set to 0 above, then nothing is output. Displayed weight. Weight On Demand If continuous output has not been selected for Serial Port 1 (Cont1=NO), the 200 indicator will respond to a weight request (ENQ). The host device (computer) sends:...
- Page 46 Red light will turn on. NOTE: If you enter a zero (0) for the threshold weight (THRS=0), the traffic light feature will be disabled (turned off). 8200-M035-O1 Rev C 200 Installation & Technical...
- Page 47 If the setting displayed is acceptable, press the TARE/ENTER key again to save it. Otherwise, use the ASTERISK/UP ARROW and UNITS/LEFT ARROW keys to input a new location and then press the TARE/ENTER key to save it. 8200-M035-O1 Rev C 200 Installation & Technical...
- Page 48 TARE/ENTER key to save it. Otherwise, use the ASTERISK/UP ARROW and UNITS/LEFT ARROW keys to input the number of End-Of-Print linefeeds and then press the TARE/ENTER key to save it. Allowable values are: 0 through 99. 8200-M035-O1 Rev C 200 Installation & Technical...
- Page 49 Option Card Configuration This prompt will ONLY be displayed when a 2XX Option Card is installed in the indicator. Refer to the manual for the 2XX option card installed for setup instructions. 8200-M035-O1 Rev C 200 Installation & Technical...
- Page 50 8200-M035-O1 Rev C 200 Installation & Technical...
-
Page 51: Setup Review
SETUP REVIEW The Model 200 Weight Indicator allows several operational parameters to be reviewed and changed without breaking the calibration seal. These operational parameters are: Power Up Zero Reset Enable/Disable Sleep Mode Feature Enable/Disable Auto Shutoff Feature Enable/Disable Clear Tare Feature Enable/Disable... - Page 52 8200-M035-O1 Rev C 200 Installation & Technical...
-
Page 53: Calibration "C" Numbers
NOTE: If any components have been changed that affect calibration and/or your scale is used in a commercial application and must be "Legal for Trade" you cannot use the “C” numbers to re-calibrate. 8200-M035-O1 Rev C 200 Installation & Technical... - Page 54 8200-M035-O1 Rev C 200 Installation & Technical...
-
Page 55: Accumulators
To clear (zero) the Gross accumulator: 1. Press the ASTERISK/ key, the NET/GROSS key twice, then the ZERO key UP ARROW 2. Press the ASTERISK/ key to return to normal operation. UP ARROW 8200-M035-O1 Rev C 200 Installation & Technical... - Page 56 8200-M035-O1 Rev C 200 Installation & Technical...
-
Page 57: Troubleshooting
TROUBLESHOOTING Error Codes The Model 200 Weight Indicator is equipped with software that indicates when an error in the operation takes place. The following lists the error codes displayed by the indicator along with their meaning. Should you encounter an error code, please refer to this list for the cause. - Page 58 UnStb (Unstable) Motion is present when trying to perform a print function. CORRECTIVE ACTION: Wait for a stable weight display (STABLE annunciator on) before performing any of this operation. 8200-M035-O1 Rev C 200 Installation & Technical...
-
Page 59: Before You Call Service
TROUBLESHOOTING, CONT. Before You Call For Service The Model 200 Weight Indicator has been designed to provide you with years of trouble-free operation. In spite of this, troubles sometimes happen. Before calling for service assistance you should make some initial checks to verify that a problem does exist. The following describes several types of symptoms along with suggested remedies. -
Page 60: Diagnostic Test Mode
IMPORTANT! Once Diagnostic Test Mode has been enabled, the indicator will power on with TEST on the display. Operator must press TARE/ key to ENTER stay in Diagnostic Test Mode or press ASTERISK/ key to disable UP ARROW Diagnostic Test Mode. 8200-M035-O1 Rev C 200 Installation & Technical... -
Page 61: Calibration Seal Installation
CALIBRATION SEAL INSTALLATION If your Model 200 Weight Indicator is used in a commercial application it must be tested and sealed by your local weights and measurements official. The indicator is designed to accept a lead and wire security seal to prevent unauthorized access to the calibration adjustments. - Page 62 8200-M035-O1 Rev C 200 Installation & Technical...
-
Page 63: Local/Remote Setup
In addition, the Continuous Output must be set to NO (Cont=no). Local/Remote 200 RS-232 Wiring LOCAL 200 REMOTE 200 TXD1 TXD1 RXD1 RXD1 Figure No. 13 8200-M035-O1 Rev C 200 Installation & Technical... -
Page 64: Part Identification
PCB ASSEMBLY – 200 CONTROLLER BOARD 8200-D001-0A 8200-D002-08 KEYPAD 5930-B126-08 LABEL: ETL FOR 180/200/204/750/758C 6800-1035 AC ADAPTER 90-264VAC/15VDC @ 1AMP NOT SHOWN NOTE: Quantities in () parenthesis are used on the 200-A only. 8200-M035-O1 Rev C 200 Installation & Technical... - Page 65 PART IDENTIFICATION, CONT. 8200-M035-O1 Rev C 200 Installation & Technical...
- Page 66 PART IDENTIFICATION, CONT. 8200-M035-O1 Rev C 200 Installation & Technical...
- Page 67 8200-M035-O1 Rev C 200 Installation & Technical...
- Page 68 8200-M035-O1 Rev C 200 Installation & Technical...
Need help?
Do you have a question about the 200 and is the answer not in the manual?
Questions and answers