Table of Contents
Advertisement
Quick Links
Advertisement
Table of Contents

Related Manuals for Cardinal 212G


Summary of Contents for Cardinal 212G
- Page 1 212G/212GX WEIGHT INDICATING INSTRUMENT INSTALLATION and TECHNICAL MANUAL 8200-M628-O1 Rev A 203 E. Daugherty, Webb City, MO 64870 USA Printed in USA Ph: 417-673-4631 Fax: 417-673-2153 09/10 www.cardinalscale.com Technical Support: Ph: 866-254-8261 tech@cardet.com...
- Page 2 8200-M628-O1 Rev A 212G/212GX Installation & Technical Page 2...
-
Page 3: Table Of Contents
____________________________________ ____________________________________ ____________________________________ RETAIN THIS INFORMATION FOR FUTURE USE PRECAUTIONS Before using this instrument, read this manual and pay special attention to all "WARNING" symbols: ELECTRICAL STATIC IMPORTANT WARNING SENSITVE 8200-M628-O1 Rev A 212G/212GX Installation & Technical Page 3... - Page 4 Seller is not able to guarantee the result of any procedure contained herein. Nor can they assume responsibility for any damage to property or injury to persons occasioned from the procedures. Persons engaging the procedures do so entirely at their own risk. 8200-M628-O1 Rev A 212G/212GX Installation & Technical Page 4...
-
Page 5: Specifications
SPECIFICATIONS Power Requirements: 212G/212GX: 90 to 264 VAC (50/60 Hz) at 0.4A Enclosure Type: Thermoplastic Enclosure Size: 9.0" H x 11.2” W x 4.3” D (229mm H x 284mm W x 109mm D) Shipping Weight: 12 lbs / 5.4 kg... -
Page 6: Standard Features
This equipment is certified to comply with the requirements for a Class III/IIIL device by the National Conference on Weights and Measurements (Certificate No. 01-011) Measurement Canada (Approval No. AM-5397) 8200-M628-O1 Rev A 212G/212GX Installation & Technical Page 2... -
Page 7: Precautions
Environmental The Cardinal 212G/212GX indicators meets or exceed all certification requirements within a Temperature range of 14 to 104 ºF (-10 to +40 ºC) In order to keep cooling requirements to... -
Page 8: Site Preparation Requirements
The AC power outlet for the 212G/212GX indicators should be on a separate circuit from the distribution panel. This circuit should be dedicated to the exclusive use of the indicator. The wiring should conform to national and local electrical codes and ordinances and should be approved by the local inspector to assure compliance. -
Page 9: Installation
Mounting The Model 212G/212GX indicators are housed in a thermoplastic enclosure. The gimbal may be mounted on a desktop or other smooth, flat, horizontal surface or may be mounted on a wall. - Page 10 INSTALLATION, CONT. Figure No. 2 8200-M628-O1 Rev A 212G/212GX Installation & Technical Page 6...
-
Page 11: Load Cell Cable Connection (Standard Gland Connection)
4 of the P1 terminal block connector. Figure No.3 LOAD CELL CONNECTOR P1 PIN NO. Function PIN NO. Function + EXCITATION - SIGNAL + SENSE - SENSE + SIGNAL - EXCITATION SHEILD 8200-M628-O1 Rev A 212G/212GX Installation & Technical Page 7... -
Page 12: Load Cell Connections With Over 30 Feet Of Cable
+EXCITATION, -EXCITATION wires of the load cells or the +SENS, -SENS terminals of the load cell trim board or the section seal trim board. 8200-M628-O1 Rev A 212G/212GX Installation & Technical Page 8... -
Page 13: Serial I/O Cable Installation
INSTALLATION, CONT. Serial I/O Cable Installation The 212G/212GX indicators may be connected to a printer to record weight and associated data or it may be connected to a remote display or even to a computer for transmission of weight data. The weight data may be transmitted on demand (pressing the PRINT key or on receipt of a command from the computer). -
Page 14: Optically Isolated Inputs
(requires additional hardware) PRESET WEIGHT COMPARATOR CHECKWEIGHER LOGIC LEVEL OUTPUT If desired, you may use the optically isolated outputs from your Model 212G/212GX indicators’ preset weight comparators or checkweigher to remotely (up to 100 feet) control peripheral devices used to manage the flow of material or signal when the weight is within preset limits. -
Page 15: Relay Board (Optional)
Relay Board - (Optional) The relay board (Cardinal p/n 8539-C062-0A) is mounted in the RB4-F external junction box for use with the 212G/212GX indicators. Connect devices to be controlled as shown in Figure No. 8. The relays must be configured to be on (closed) or off (open) at weights under the preset weight then switch at the preset weight from on-to-off or off-to-on by setting the under weight condition to on or off during setup and calibration or setup review. -
Page 16: Main Pcb (Figure No. 9)
INSTALLATION, CONT. Main PCB Figure No. 9 8200-M628-O1 Rev A 212G/212GX Installation & Technical Page 12... -
Page 17: Main Pcb Jumpers
J10 on the printed circuit board. J11 – PWC SRC (SOURCE) The J11 jumper, when connected (closed) supplies 12 VDC from the 212G/212GX indicators to a solid-state relay or other load of 200 ohms or greater. When J11 is open (positioned on one plug-in pin only or removed), the 12 to 24 VDC must be provided from an external source to P10-6. -
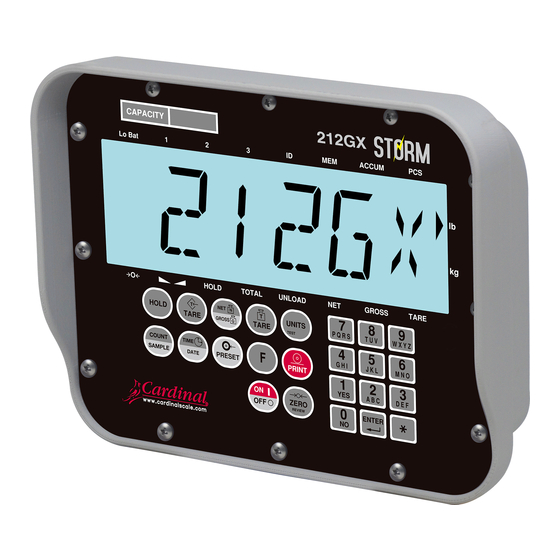
Page 18: Keypad Functions
KEYPAD FUNCTIONS The Model 212G/212GX is equipped with a 24-key keypad. The keypad is used to enter commands and data into the instrument. This section describes each key along with its normal function. It is helpful to refer to the actual instrument while reading this section. - Page 19 If the number displayed is incorrect, use the numeric keys to enter the correct consecutive number (up to 6 digits) and press the ENTER key to resume normal operation. 8200-M628-O1 Rev A 212G/212GX Installation & Technical Page 15...
- Page 20 Remember that both the preset weight comparators and checkweigher functions operate on the absolute value of weight ignoring the polarity. After the last preset value is entered, the indicator will return to normal operation. 8200-M628-O1 Rev A 212G/212GX Installation & Technical Page 16...
- Page 21 [NET annunciator (212GX) or N next to the weight display (212G)]. Pressing the key after entering a numeric value (Keypad Tare) will cause the value entered to be accepted as a new tare weight.
-
Page 22: Display Brightness
This combination will zero (clear) the Net accumulator. * and NET/GROSS KEY, NET/GROSS KEY This combination will display the Gross accumulator. * and NET/GROSS KEY, NET/GROSS KEY, PRINT KEY This combination will print the Gross accumulator. 8200-M628-O1 Rev A 212G/212GX Installation & Technical Page 18... - Page 23 (0, 1 or 2), followed by pressing the PRINT key. NOTE! When a print format is selected (by either method), it will remain active until changed by the operator. 8200-M628-O1 Rev A 212G/212GX Installation & Technical Page 19...
-
Page 24: Setup And Calibration
Figure No. 11 Enter Setup Mode 1. With the 212G/212GX indicator OFF; 2. Remove the front panel. 3. With the 212G/212GX indicator ON, press and release the calibration switch. Refer to Figure No. 11. SETUP 4. The menu prompt will be displayed. - Page 25 Lamp test on power up USA = 0 PASS= If you selected (International), an additional prompt, will be displayed. USA = 1 (Domestic) proceed to LFt If you selected (Legal For Trade). 8200-M628-O1 Rev A 212G/212GX Installation & Technical Page 21...
- Page 26 Date= mm/dd/yy Trl= no + 4% to OC USA=NO NOTE! When LFt=YES and , the followings results occur: Uns= 1 Date= dd/mm/yy + 9 grads to OC PT printed with tare 8200-M628-O1 Rev A 212G/212GX Installation & Technical Page 22...
- Page 27 Lamp test on power up 8200-M628-O1 Rev A 212G/212GX Installation & Technical Page 23...
- Page 28 ENTER key again to save it. Otherwise, using the numeric keys enter the new setting and then press the ENTER key to save it. Allowable values are: 0 (disables Zero Tracking), .5, or 1 through 9. 8200-M628-O1 Rev A 212G/212GX Installation & Technical Page 24...
- Page 29 13 = High state before cutoff with 3 active Presets 4 = Low State before cutoff on Checkweigher Mode 14 = High state before cutoff on Checkweigher Mode 5 = Axle Weigher Operation Mode 8200-M628-O1 Rev A 212G/212GX Installation & Technical Page 25...
- Page 30 ENTER key again to save it. Otherwise, use the numeric keys to enter a new value (0 to 10) and then press the ENTER key to store the new setting. 8200-M628-O1 Rev A 212G/212GX Installation & Technical Page 26...
- Page 31 0/NO or 1/YES, enter the new setting and then press the ENTER key to save it. A clr= YES a clr= NO Automatically clears the ID after the ID is not cleared when ticket prints ticket has printed. and can be used for next transaction. 8200-M628-O1 Rev A 212G/212GX Installation & Technical Page 27...
- Page 32 Press the ENTER key to save the displayed value or use the numeric keys to enter a new value (1 to 100) and then press the ENTER key to save it. 8200-M628-O1 Rev A 212G/212GX Installation & Technical Page 28...
- Page 33 3. F= FILTER SETTING (1 to 99) determination: Set to desired results. 4. If stability is unacceptable with any setting of F=, reduce the sample rate and/or increase the break range, b= setting for increased filtering. 8200-M628-O1 Rev A 212G/212GX Installation & Technical Page 29...
- Page 34 CALIBRATION MODES The 212G/212GX has five modes that can be used to perform calibration. Three of the modes require a test load or test weights, one requires the scale to be empty (and at zero) and the last uses the calibration “C” numbers from a previous calibration. The modes are as follows: 1.
- Page 35 Starting at the left and proceeding right, a series of dashes will appear on the display. The dashes will stay on the display momentarily and then disappear, after which the display will show: Sio?. 8200-M628-O1 Rev A 212G/212GX Installation & Technical Page 31...
- Page 36 Starting at the left and proceeding right, a series of dashes will appear on the display. The dashes will stay on the display momentarily, then disappear, after which the display will show: Sio?. 8200-M628-O1 Rev A 212G/212GX Installation & Technical Page 32...
- Page 37 NOTE! If any components have been changed that affect calibration and/or your scale is used in a commercial application and must be "Legal for Trade" you cannot use the “C” numbers to re-calibrate. 8200-M628-O1 Rev A 212G/212GX Installation & Technical Page 33...
- Page 38 ENTER key to save it. Allowable values are: 0 = SMA 1 = SB-400 2 = SB-200 3 = Rice Lake IQ355 4 = AnDFV 5 = WI110 6 = Number 7 = Toledo Short 8200-M628-O1 Rev A 212G/212GX Installation & Technical Page 34...
- Page 39 If Rice Lake IQ355 is selected, the data will be transmitted in the following format: <stx><s>xxxxxxx<u><m><s><cr><lf> If AnDFV is selected, the data will be transmitted in the following format: <hdr1>,xxxxx<uu><cr><lf> 8200-M628-O1 Rev A 212G/212GX Installation & Technical Page 35...
- Page 40 If Toledo Short is selected, the data will be transmitted in the following format: <stx><swa><swb><swc>xxxxxx<cr><sum> Weight On Demand If continuous output has not been selected for Serial Port 1 (Cont1=NO), the 212G/212GX indicators will respond to a weight request (ENQ). The host device (computer) sends:...
- Page 41 If the setting displayed is acceptable, press the ENTER key again to save it. Otherwise, use the numeric keys to enter a new location and then press ENTER to save it. 8200-M628-O1 Rev A 212G/212GX Installation & Technical Page 37...
- Page 42 If the setting displayed is acceptable, press the ENTER key again to save it. Otherwise, using the numeric keys, 0/NO or 1/YES, enter the new setting and then press the ENTER key to save it. 8200-M628-O1 Rev A 212G/212GX Installation & Technical Page 38...
- Page 43 "LoCd" and the key will be ignored. To exit the LoCoUt function, press the calibration switch or cycle power (press the ON/OFF key twice). NOTE! The menu selections Hi rES and LoCoUt can only be selected using the calibration switch. 8200-M628-O1 Rev A 212G/212GX Installation & Technical Page 39...
-
Page 44: Setup Review
SETUP REVIEW The 212G/212GX indicators allow several operational parameters to be reviewed and changed without breaking the calibration seal. These operational parameters are: Power Up Zero Reset Enable/Disable Time Format Digital Output Control Enable/Disable Sleep Mode Feature Enable/Disable Auto Shutoff Feature Enable/Disable... -
Page 45: Calibration "C" Numbers
2. The indicator will return to normal operation when printing has been completed. To clear (zero) the Count accumulator: 1. Press the * key, the COUNT/SAMPLE key and then the ZERO key 2. Press the * key to return to normal operation. 8200-M628-O1 Rev A 212G/212GX Installation & Technical Page 41... -
Page 46: Troubleshooting
TROUBLESHOOTING Error Codes The 212G/212GX indicators are equipped with software that indicates when an error in the operation takes place. The following lists the error codes displayed by the 212G/212GX along with their meaning. Should you encounter an error code, please refer to this list for the cause. - Page 47 Motion is present when trying to power up, print, zero or perform a push button tare function. CORRECTIVE ACTION: Wait for a stable weight display (STABLE annunciator on) before performing any of these operations. 8200-M628-O1 Rev A 212G/212GX Installation & Technical Page 43...
-
Page 48: Before You Call Service
TROUBLESHOOTING, CONT. Before You Call Service The 212G/212GX indicators have been designed to provide you with years of trouble-free operation. However, should you experience a problem, please refer to the troubleshooting guide below before you call for service. The following describes several types of symptoms along with suggested remedies. -
Page 49: Calibration Seal Installation
CALIBRATION SEAL INSTALLATION If your 212G/212GX Weight Indicating Instrument is used in a commercial application it must be tested and sealed by your local weights and measurements official. The 212G/212GX has been designed to accept a lead and wire security seal to prevent unauthorized access to the calibration adjustments. - Page 50 The example below illustrates a typical print ticket for a five-axle truck. Time 13:47 09-26-10 Date 15440 lb 16320 lb 15980 lb Axle Weights 15880 lb 15700 lb Total 79320 lb Total Vehicle Weight Axle Numbers 8200-M628-O1 Rev A 212G/212GX Installation & Technical Page 46...
- Page 51 Note, however, that as soon as the first axle of the next vehicle is printed, the weights from the previously weighed vehicle are cleared. 8200-M628-O1 Rev A 212G/212GX Installation & Technical Page 47...
- Page 52 8200-M628-O1 Rev A 212G/212GX Installation & Technical Page 48...
Need help?
Do you have a question about the 212G and is the answer not in the manual?
Questions and answers