Table of Contents
Advertisement
Installation and Operating Data
Installation and Operation Manual
covering:
Jandy AquaPure
Electronic Salt Water
Chlorinator
And
PureLink™
Water Purification System
Power Center and Cell Kit
FOR YOUR SAFETY - This product must be installed and serviced by a professional pool/spa
service technician. The procedures in this manual must be followed exactly. Failure to follow
warning notices and instructions may result in property damage, serious injury, or death.
Improper installation and/or operation will void the warranty.
®
For use with
WARNING
Advertisement
Table of Contents

Related Manuals for Jandy AquaPure


Summary of Contents for Jandy AquaPure
- Page 1 Installation and Operating Data Installation and Operation Manual covering: Jandy AquaPure ® Electronic Salt Water Chlorinator PureLink™ Water Purification System Power Center and Cell Kit For use with WARNING FOR YOUR SAFETY - This product must be installed and serviced by a professional pool/spa service technician.
- Page 2 Page 2...
-
Page 3: Table Of Contents
RS Power Center .....24 Replacement Kits ......47 ® 3.8.2 Connection of PureLink Chlorine Generator AquaPure and AquaLink RS PureLink Electronics to an AquaLink ® Control/Power Center Replacement Parts ..47 Control Center ..........25 3-Port Electrolytic Cell and Sensor Operation of External Control/ORP Replacement Parts with Universal Unions (2”-... - Page 4 Page 4 Figures ® Figure 1. Typical AquaPure and PureLink Figure 20a. AquaPure Control Center ...... 46 Installation Example With Options ..8 Figure 20b. AquaLink RS PureLink Power ® Figure 2a. 240 VAC Wiring Diagram for the Center, 6614AP ........47...
-
Page 5: Section 1. Important Safety Instructions
Page 5 Section 1. Important Safety Instruction READ AND FOLLOW ALL INSTRUCTIONS All electrical work must be performed by a licensed electrician and conform to all national, state, and local codes. When installing and using this electrical equipment, basic safety precautions should always be followed, including the following: DANGER To reduce the risk of injury, do not remove the suction fittings of your spa or hot tub. Never operate a spa or hot... - Page 6 Page 6 WARNING Prolonged immersion in hot water may induce hyperthermia. Hyperthermia occurs when the internal temperature of the body reaches a level several degrees above the normal body temperature of 98.6°F (37°C). The symptoms of hyperthermia include dizziness, fainting, drowsiness, lethargy, and an increase in the internal temperature of the body.
- Page 7 Page 7 CAUTION It is important to note that certain materials used in and around swimming pools and spas may not be compatible with chemicals commonly used to purify pool and spa water (e.g. acids, chlorine, salt, stabilizers, etc.). As such, Zodiac Pool Systems, Inc. does not warrant or guarantee that the chlorinated water generated by the salt water chlorinator will not damage or destroy certain types of plants, decking, coping and other materials in and around your pool and/or spa.
-
Page 8: Section 2. System Description
2.1 Product Description The AquaPure and PureLink systems use a process known as electrolysis to produce sodium hypochlorite (liquid chlorine) from a low concentration of salt added to the pool water. Hypochlorite kills bacteria, oxidizes organic material, and kills algae then reverts back to salt. -
Page 9: Electrical Specifications
Page 9 AquaLink® • The PureLink system is an all-in-one salt water chlorinator control system RS PureLink power center and cell kit for use with AquaLink RS PDA, All Button, Pool Link, Power Center or OneTouch controllers. (for PureLink • The AquaLink RS PureLink power center converts AC power into low voltage systems) DC current which is required by the cell to perform the electrolysis. -
Page 10: Figure 2A
Page 10 Flow, Salinity, Temp Sensors CHLORINE GENERATOR Factory wired to Multiplex Board USER INTERFACE To AquaLink® RS PRIMARY CHLORINE GENERATOR TRANSFORMER CHLORINE GENERATOR POWER INTERFACE SECONDARY J10 J8 HEAT SINK L - BRACKET (Middle primary wires not used) BLACK BLK/YEL Filter Pump Relay Aux. -
Page 11: Vac Wiring Diagram For The
Page 11 Flow, Salinity, Temp Sensors CHLORINE GENERATOR Factory wired to Multiplex Board USER INTERFACE To AquaLink® RS PRIMARY CHLORINE GENERATOR TRANSFORMER CHLORINE GENERATOR POWER INTERFACE SECONDARY J10 J8 HEAT SINK L - BRACKET BLK/WHT BLK/RED BLK/YEL Filter Pump Relay Aux. -
Page 12: Section 3. Installation Instructions
Filter Pump Bonding Point Load 1 (Hot) (240 VAC) Ground (Chassis) Figure 2c. Wiring Diagram for the AquaPure® System Section 3. Installation Instructions 3.1 Materials and Tools NOTE Salt not included. See Section 4, Pool Water Preparation. Installation Materials Furnished... -
Page 13: Plumbing Configurations
Page 13 WARNING When using electrical products, basic precautions should always be followed, including the following: • RISK OF ELECTRIC SHOCK WHICH CAN RESULT IN SERIOUS INJURY OR DEATH. Before attempting installation or service, ensure that all power to the device is disconnected/turned off at the circuit breaker. • Grounding is required. The unit should be installed by a qualified service representative and should be properly grounded. (See Section 3.4, Earth Grounding). • Install to permit access for servicing. -
Page 14: Recommended Plumbing Configuration
The preferred installation is that the cell and sensor are plumbed in the common line after (downstream) the heater. The sensor is designed to be plumbed into the 3-port cell. Figure 4 illustrates the recommended plumbing configuration, which results in the most reliable operation. NOTE The AquaPure® and PureLink systems are powered from the LOAD SIDE of the pool circulation pump relay. This ensures that the cell only operates when the pool pump is ON. The flow sensor serves as a secondary protection device to ensure there is sufficient flow for the cell to operate. -
Page 15: Installing Aquapure ® And Aqualink ® Rs
Page 15 3.3 Installing AquaPure® and AquaLink RS PureLink Control/Power Centers ® NOTE The control/power center should be located at or near the equipment pad. CAUTION The control/power center is not to be considered as suitable for use as service equipment. Therefore, it is required to have the appropriate means of disconnection, circuit isolation, and/or branch circuit protection installed upstream of the power center. -
Page 16: Earth Bonding (Grounding)
Page 16 Reinstall the mounting brackets to the top and bottom of the back of the control/power center using the four (4) screws that were removed in Step 2. Ensure that the brackets are rotated from the original shipping position (see Figure 8). Reinstall Mounting Brackets (Ensure to Rotate from Original Shipping Position) -
Page 17: Model Configuration
Page 17 3.5 Model Configuration The chlorine generator power interface board is configured as a 1400 model by factory default. However, the power interface board can be configured as a 700 model. To configure the board as a 700 model, use cutting pliers to cut the JL1 jumper as shown in Figure 9. Heat Sink L-Bracket Cut JL1 Jumper to configure board as Chlorine Generator Power Model AP700 Interface Board Figure 9. Chlorine Generator Power Interface Board 3.6 Installation of the Chlorine Generator User Interface on an AquaLink RS or PDA Bezel ®... -
Page 18: Installing The Electrolytic Cell And Flow/Temp/Salinity Sensor
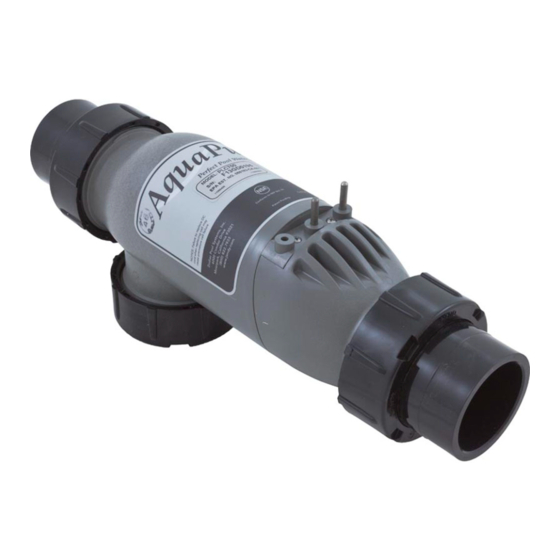
Page 18 3.7 Installing the Electrolytic Cell and Flow/Temp/Salinity Sensor Please choose one of the following instructions to either install or replace the cell and sensor assembly. 3.7.1 New Installation 3.7.2 Replacement of Existing 3-Port Cell 3.7.3 Replacement of 2-Port (square) Cell and Sensor Tee with 3-Port Cell NOTE: Maximum operating Pressure is 345 kPa or 50 PSI - Minimum Flow Rate is 30 GPM (114 LPM). -
Page 19: Replacement Of Existing 3-Port Cell (Universal Or 2" Pvc Unions)
Page 19 9. Connect the DC cord to the power center. Feed the DC cord through the same strain relief fitting as the flow/temp/salinity sensor. Plug the DC cord into the two spade connectors of the wiring harness located in the low voltage raceway of the control/power center, see Figure 2a, 2b, and 2c. This wiring harness establishes the connection between the cell and the power interface PCB. 10. Tighten strain relief fitting screws for the flow/temp/salinity sensor and the DC cord. -
Page 20: Replacement Of Old 2-Port (Square) Cell With New 3-Port Cell
Page 20 9. Connect the DC cord to the control center. Feed the DC cord through the same strain relief fitting as the flow/temp/salinity sensor. Plug the DC cord into the two spade connectors of the wiring harness as shown in Figures 2a, 2b, and 2c. CAUTION Do not bury the electrolytic cell DC cord or sensor cable directly in the ground. Direct burial can cause damage to an electrical cord/cable. 10. Tighten strain relief fitting screws for the flow/temp/salinity sensor cable and the DC cord. Do not pull flow/temp/salinity sensor cable or DC Cord too tight. - Page 21 Page 21 3a. Option 1 - Retain Existing Sensor in Threaded Tee a. Remove old 2-Port cell body by unscrewing coupling nuts on ports. The cell body will be free to pull out after nuts are clear of the threads. b.
-
Page 22: Figure 11. Cell Installation And Flow/Temp/Salinity Sensor
Page 22 5. Connect the DC cord to the control center. Feed the DC cord through the same strain relief fitting as the flow/temp/salinity sensor. Plug the DC cord as shown in Figure 2a, 2b, and 2c. CAUTION Do not bury the electrolytic cell DC cord or Sensor cable directly in the ground. Direct burial can cause damage to an electrical cord/cable. 6. Tighten strain relief fitting screws for the flow/temp/salinity sensor cable and the DC cord. Do not pull flow/temp/salinity sensor cable or DC Cord too tight. Allow a little cable slack inside of control center enclosure. 7. Check the wiring prior to reattaching front cover. Be sure the flow/temp/salinity sensor is plugged in. The DC cord should be plugged in. Also, check the AC wiring. CAUTION Do not over tighten the strain relief fitting. Over tightening can cause damage to the flow/temp/salinity sensor cable. -
Page 23: Figure 12. Pipe Cutout
Page 23 Universal Unions and Nuts For a 2" pipe, the cutout is 13⅞" with the full unions. For a 50 mm pipe, the cutout is 352 mm Sensor Port Plug and Nut with the full unions. NOTE: Total length of the electrolytic cell with the full unions is 16⅝". -
Page 24: Connection Of Chlorine Generator Electronics
AquaLink RS using firmware versions JJ or later. 3.8.1 Wiring AquaPure Control Center to an AquaLink RS Power Center In the AquaLink RS power center enclosure, wire the AquaPure Control Center input power directly to the LOAD SIDE of the filter pump relay (see Figure 14). AquaLink RS Power Center Filter Pump Relay Aux. -
Page 25: Connection Of Purelink Tm Chlorine Generator
Page 25 3.8.2 Connection of PureLink Chlorine Generator Electronics to an AquaLink ® Control System The chlorine generator electronics in the PureLink Power Center and the AquaLink RS controller require a four (4) wire connection to communicate. Any outdoor rated four (4) conductor cable, minimum 22 AWG, can be used. -
Page 26: Operation Of External Control/Orp Control Board
Page 26 3.9 Operation of External Control/ORP Control Board An external device such as an ORP (Oxidation Reduction Potential) controller supplying 24 Volts AC can be used to control the output of the chlorine generator. The chlorine generator power interface board can be set up in the field to operate in two (2) different modes. The mode of operation is determined by the position of a movable jumper J14. See Figure 17 for location. -
Page 27: Section 4. Pool Water Preparation
Page 27 Section 4. Pool Water Preparation ATTENTION INSTALLER: Various application notes (including more detailed instructions) are available from the Dealer covering installation, operation, maintenance, and plumbing of the chlorinator system. 4.1 Determining Pool Size (Liters of Water in Your Pool) •... -
Page 28: Chemistry You Need To Know
Page 28 Chemistry You Need to Know Chlorine Stabilizer (cyanuric acid) is needed to maintain proper levels of chlorine. Most unstable chlorine is destroyed by the UV radiation from the sun within 2 hours. Chlorine stabilizer should be maintained between 50 - 75 PPM. With high water temperatures above 30°C, stabilizer (cyanuric acid) must be kept at levels from 75 - 85 PPM. Nitrates can cause extremely high chlorine demands and will deplete chlorine from your swimming pool. -
Page 29: Optimum Pool Water Conditions
4.5 Optimum Pool Water Conditions In accordance with Association of Pool and Spa Professionals (APSP) standards, we recommend the following water balance conditions be maintained on an on-going basis to protect the pool finish and equipment and ensure the pleasing appearance of the water. The AquaPure is warranted to operate properly ® only if these conditions are met. -
Page 30: Salt (Nacl Sodium Chloride)
Page 30 4.7 Salt (NaCl sodium chloride) 4.7.1 When to Add Salt? For a new concrete pool or newly resurfaced pool it is recommended to wait 30 days (surface should be completely cured) before adding salt. Follow the pool surface manufacturer’s guidelines for your particular pool. For vinyl and fiberglass pools, salt can be added at start up. After start up add salt as necessary to maintain proper levels. -
Page 31: Approximate Kilograms (Pounds) Of Salt Needed To Obtain 3.0 Gpl (3,000 Ppm) In Pool
Page 31 Brush the pool bottom and allow water to circulate for 24 hours to dissolve completely and mix evenly with the pool water. After 24 hours, verify correct salt reading. Turn on the system and set to desired chlorine production rate (pressing the arrow buttons For a new concrete pool or newly resurfaced pool it is recommended to wait 30 days (surface should NOTE be completely cured) before adding salt. -
Page 32: Section 5. Operating Instructions
Page 32 Section 5. Operating Instructions NOTE The user interface is located inside the control/power center. To access the control panel, open the door to the control/power center. See Figure 18. Figure 18. User Interface 5.1 User Interface Controls Pressing the down arrow button or the up arrow button will change the Chlorine... -
Page 33: Reading The Display
Page 33 Operating User Interface Controls when AquaLink RS Control System is Online ® The user interface can be used to adjust the output production rate (%) when the salt Chlorine Production Rate water chlorinator system is controlled by the AquaLink RS only when the AquaLink Adjustment with RS is placed into service mode. - Page 34 Page 34 The automatic cleaning cycle is in progress. The cleaning cycle is factory set and CELL REVERSING cannot be adjusted. Cell Reversing does not interrupt the production of chlorine. Salinity is displayed along with the (grams per liter) indicator, when the SALINITY button is depressed.
-
Page 35: Operation
Try initially setting the pool pump run-time to 12 hours per day. It will take a few days to get just the right pool pump operating time. Adjust accordingly using the steps listed in Section 5.4.2, “Apply Power” steps 1-5. When the AquaPure is wired with a pool pump timer the results will vary greatly from one ®... -
Page 36: Startup
Page 36 5.4 Startup 5.4.1 Shocking Shock (superoxidation) (see Section 4.4, 6. Shocking) the pool water from an outside source at the time of pool startup to burn off contaminates. During normal operating conditions the chlorinator is capable of generating a sufficient level of chlorine for sanitation within several hours. However, if the pool water has a high chlorine demand due to startup conditions then the chlorinator will not be able to produce enough chlorine to reach break-point chlorination. -
Page 37: Recommendations
Page 37 5.6 Recommendations DO List • Read and keep your manual in a safe place. • Increase chlorine production rate before a large number of bathers enter the pool and return to normal afterwards. • Increase chlorine production rate when temperature goes up. • Increase chlorine production rate when the number of bathers goes up. • Use stabilizer (cyanuric acid) to stabilize chlorine in pool. • Mount power center in shade or out of the direct sunlight whenever possible. • Decrease production rate when temperature goes down (for example, in the Fall and Winter seasons). • Take pool water sample to pool professional once per month. DON’T List • Do not get fertilizer in your pool. Fertilizers contain nitrates which cause a high chlorine demand on pool water. • Never use dry acid to adjust pH in arid geographic areas with excessive evaporation and minimal dilution of pool water with fresh water. A build up of by products can damage the electrolytic cell. • Do not add chemicals or salt to the pool unless the chlorinator is turned off. -
Page 38: Section 6. User Maintenance Instructions
Page 38 Section 6. User Maintenance Instructions The following information describes how to care for your sanitizing system. Important: Always test the chlorine levels of your pool before each use. 6.1 Daily Chlorine Test. Test pool water chlorine level with a reliable test kit. Maintain ideal range by adjusting the chlorine production rate using Section 5.4, Startup. -
Page 39: Flow/Temp/Salinity Sensor Cleaning
Page 39 WARNING Always turn pump off prior to installing or removing any components from the pool’s plumbing. Your pump/filter system is operated under pressure and pressure must be released before you begin to avoid system damage or personal injury. Open the air relief valve on your pool filter to release the pressure in the system. Acid Wash Cleaning. If the electrolytic cell has a tendency to scale, it is recommended that every two (2) months the cell be removed and inspected for scale formation and/or debris. Some filters allow debris to pass through to the cell which could lodge between the plates in the cell. -
Page 40: Winterizing
Page 40 2. Brush with a mildly abrasive green fiber household cleaning pad. Contacts should be clean and bright. Thoroughly rinse the flow/temp/salinity sensor with clean tap water. Replace and resume normal operation. Turn power off and back on in order to recalibrate and reset Flow/Temp/Salinity Sensor. Reset anytime Flow/Temp/Salinity Sensor is unplugged. 6.5 Winterizing Very little chlorine is needed in cold water. Below 51°F (11°C), chlorine production is not permitted; operating the chlorinator in cold water might result in over-chlorinated pool water. -
Page 41: Section 7. Troubleshooting
Page 41 Section 7. Troubleshooting NOTE: Turn off power to unit prior to attempting service or repair. 7.1 Problems and Corrective Action Problem Possible Cause Corrective Action Low or no chlorine. Low stabilizer (cyanuric acid) level in pool Add stabilizer to maintain 50 - 75 PPM per water. - Page 42 Page 42 Corrective Action Problem Possible Cause “Cell On” indicator does not Chlorine Production set to 00%. Adjust CHLORINE PRODUCTION to desired come on. percentage. Insufficient water flow. Cell is plugged with Remove obstruction and/or clean cell. See If No Flow also…. debris, pump has lost prime. Section 6.3, Electrolytic Cell Cleaning. Prime pump if necessary.
- Page 43 Page 43 Problem Possible Cause Corrective Action “Service” Indicator On. Low salt level in pool water. Test salinity. Add salt as described in Section 4.7. Cell requires cleaning. Refer to Maintenance Procedure for acid wash cleaning. See Section 6.3, Step 2. Cell not working properly after cleaning Contact a pool professional.
-
Page 44: Service Codes
Pool Temperature is too high for operation of Flow/Salinity Sensor indicates water temperature AquaPure®. at sensor above 108ºF (42°C). Reduce water temperature. Flow Sensor air lock condition or very low salinity. Verify proper flow/temp/salinity sensor installation (see Section 3, Figure 11). -
Page 45: Additional Letter Codes
In “Boost” mode unit will operate at 100% production for 24 run time hours. High-High Input has exceeded Maximum Range. AquaLink® RS Online AquaLink RS is controlling the AquaPure and desired output percentages. Boost (AquaLink RS Interface) AquaLink RS is controlling the AquaPure and “Boost” is active. -
Page 46: Section 8. Temperature Conversion
Page 46 Section 8. Temperature Conversion To display Celsius or Fahrenheit on the digital display. Press and hold button for 15 POOL TEMP -BOOST- (D) seconds (third beep). 2. Within 5 seconds, momentarily press to enter SALINITY (C) the Fahrenheit/Celsius change mode. To toggle between Celsius and Fahrenheit, press down arrow (A) up arrow (B) -
Page 47: Exploded Views And Replacement Kits
Page 47 Section 9. AquaPure and PureLink Exploded Views and ® Replacement Kits 9.1 AquaPure and PureLink Control/Power Center Replacement Parts Dwg.# Kit # Description Qty. Dwg.# Kit # Description Qty. R0467400 User Interface Board R0447500 Wiring Harness, PureLink Back... -
Page 48: Figure 20B. Aqualink ® Rs Purelink Tm Power Center, 6614Ap
Page 48 4, 6 2, 3 Figure 20b. AquaLink RS PureLink Power Center, 6614AP ® 4, 6 2, 3 Figure 20c. AquaLink RS PureLink Power Center, 6613AP... -
Page 49: 3-Port Electrolytic Cell And Sensor Replacement Parts With Universal Unions (2"-2½")
Page 49 9.2 3-Port Electrolytic Cell and Sensor Replacement Parts with Universal Unions (2”-2½”) 1, 2, 3 Dwg. Kit # Description Qty. R0452100 Universal Union/Tailpiece/ 3, 7, 8 Plug, 3-Port Cell includes: Nut, Union Universal 1, 2, 3 O-Ring, #2-231 Tailpiece, 2”... -
Page 50: 3-Port Electrolytic Cell And Sensor Replacement Parts (2" Pvc Unions)
Page 50 9.3 3-Port Electrolytic Cell and Sensor Replacement Parts (2” PVC Unions) 1, 8 Dwg. # Kit # Description Qty. R0475300 3-Port Cell, APURE700, 2” Threaded PVC Unions R0475400 3-Port Cell, APURE1400, 2” 1, 2, 3 Threaded PVC Unions includes: 1, 8 Cell Assembly... - Page 51 Page 51 NOTES...
- Page 52 Limited Warranty Zodiac Pool Systems, Inc. (“Zodiac”) warrants all Baracuda®, Jandy®, Nature2® and Polaris® brand products to be free from manufacturing defects in materials and workmanship for a period of one (1) year from the date of retail purchase, with the following exceptions: 1.
Need help?
Do you have a question about the AquaPure and is the answer not in the manual?
Questions and answers