
Related Manuals for Promise Technology Vess A8600


Summary of Contents for Promise Technology Vess A8600
- Page 1 Vess A8600/Vess A8800 Storage Appliance for Video Surveillance Product Manual Version 1.0 © 2024 Promise Technology. All Rights Reserved.
- Page 2 Vess A8600 Series Storage Appliance for Video Surveillance Also included are four levels of notices: Warning A Warning notifies you of probable equipment damage or loss of data, or the possibility of physical injury, and how to avoid them. Caution A Caution informs you of possible equipment damage or loss of data and how to avoid them.
- Page 3 Promise Technology Product Manual Warning Turn off the power and disconnect the power cord before servicing this device. Warning The electronic components within the enclosure are sensitive to damage from Electro-Static Discharge (ESD). Observe appropriate precautions at all times when handling...
- Page 4 Compliance information Global notice for Class A equipment Operation of this equipment in a residential environment could cause radio interference. For questions regarding this product, go to the PROMISE TECHNOLOGY INC. Support Center Website: http://www.promise.com Notices for New Zealand and Australia Class A equipment This is a Class A product.
- Page 5 The installation and maintenance of products must be carried out by qualified personnel. If the product sustains damage requiring service, disconnect the product from all power sources and refer servicing to a PROMISE TECHNOLOGY INC. authorized service provider. Examples of damage requiring service include: •...
- Page 6 Vess A8600 Series Storage Appliance for Video Surveillance 甲類產品警語 警告:為避免電磁干擾,本產品不應安裝或使用於住宅環境。...
- Page 7 • Use an approved power cord. If you have questions about the type of power cord to use, contact your PROMISE TECHNOLOGY INC. authorized service provider. • If you have not been provided with a power cord for your product or for any AC-powered option intended for your product, purchase a power cord that is approved for use in your country.
- Page 8 Vess A8600 Series Storage Appliance for Video Surveillance WARNING Hazardous moving parts. Keep away from moving fan blades. To reduce the risk of injury from a hot component, allow the surface to cool before touching. AVERTISSEMENT Pièces mobiles dangereuses. Tenir à l’écart des pales de ventilateur en mouvement.
- Page 9 Promise Technology Product Manual Power supplies Hot-plug power supplies are not designed to be removed or installed with AC power connected to the power supply. To reduce the risk of electric shock or damage to the equipment when handling hot-plug power supplies: •...
- Page 10 Vess A8600 Series Storage Appliance for Video Surveillance Rack System Instructions The following or similar rack-mount instructions are included with the installation instructions: • Elevated Operating Ambient – If installed in a closed or multi-unit rack assembly, the operating ambient temperature of the rack environment may be greater than room ambient.
- Page 11 Promise Technology Product Manual Stability hazard : The rack may tip over causing serious personal injury. Before extending the rack to the installation position, read the installation instructions. Do not put any load on the slide-rail mounted equipment in the installation position.
- Page 12 Vess A8600 Series Storage Appliance for Video Surveillance Battery Handling WARNING Some PROMISE Technology Inc. products may contain internal replaceable battery cells or battery packs. There is a risk of fire, burns, or explosion if the battery pack is not handled properly. To reduce the risk of personal injury: •...
- Page 13 Promise Technology Product Manual xiii...
- Page 14 Vess A8600 Series Storage Appliance for Video Surveillance...
-
Page 15: Table Of Contents
Promise Technology Product Manual ontents ..........................1 ntroductIon �������������������������������������������������������������������������������������������������������������������������� 2 pecificationS ��������������������������������������������������������������������������������������������������������������������������������� 3 ardware ............................. 3 ront anel ardware a8600 ��������������������������������������������������������������������������������������������������������������������������� 4 ront of a8800 ��������������������������������������������������������������������������������������������������������������������������� 5 ront of ............................. 6 ront anel ............................8 anel ardware a8600 r ���������������������������������������������������������������������������������������������������� 8... - Page 16 Vess A8600/Vess A8800 Storage Appliance for Video Surveillance Table of Contents scsI s (san) .................... 26 onnect to I torage etwork guI ...................... 27 roMIse anageMent guI ......................27 oggIng Into roMIse anageMent ���������������������������������������������������������������������������������������������������������������� 27 ogging in at tHe ncloSUre ��������������������������������������������������������������������������������������������������������������...
- Page 17 Promise Technology Product Manual �������������������������������������������������������������������������������������������������������� 47 aking ettingS ����������������������������������������������������������������������������������������������������������� 47 Hanging aSSword ............................... 48 reatIng a ����������������������������������������������������������������������������������������������������������������������� 49 iSt of riVilegeS ���������������������������������������������������������������������������������������������������������������������������������� 49 eleting a ............................ 50 etwork ettIngs ............................. 50 oFtware anageMent �������������������������������������������������������������������������������������������������������� 51 mporting a onfigUration cript ������������������������������������������������������������������������������������������������������� 52...
- Page 18 Vess A8600/Vess A8800 Storage Appliance for Video Surveillance Table of Contents .......................... 72 aIntenance ����������������������������������������������������������������������������������������������������� 73 eplacing a ower Upply ........................73 eMovIng tHe ower uPPly ........................74 roublesHootIng ? ����������������������������������������������������������������������������������� 75 ow do know wHen a driVe iS failing ..........................
-
Page 19: I Ntroduction
GPU card can be used for video analytics or other processor intensive applications. Vess A8600/Vess A8800 subsystems are capable of continuous recording and playback operation without dropping frames for networked installations of up to 170 (for Vess A8600) and 200 (for Vess A8800) High- Definition IP cameras. -
Page 20: S Pecifications
Vess A8600/Vess A8800 Storage Appliance for Video Surveillance Introduction peCIfICatIons Model Vess A8600 Vess A8800 Form Factor 3U, 19” rack mount 4U, 19” rack mount Number of Bays 16 (front) 24 (front) Drive Support 16 x 3.5” 24 x 3.5”... -
Page 21: H Ardware
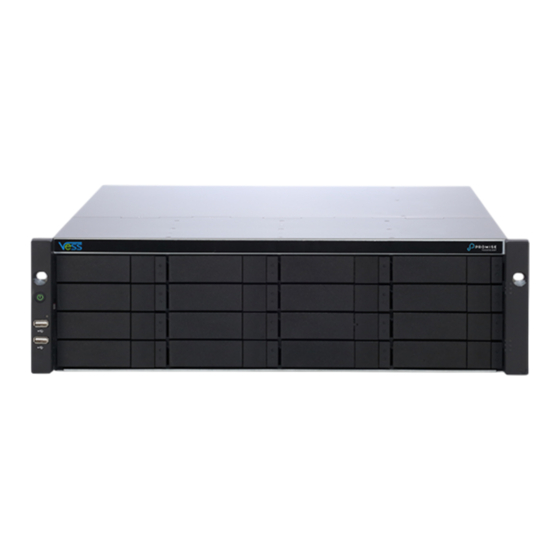
Promise Technology Product Manual ardware The following section provides a summary of the front and back panel hardware features of Vess A8600 and Vess A8800 Storage Appliance for Video Surveillance. ront anel ardware The front panel of Vess A8600/Vess A8800 enclosures provide access to drives carriers. LED indicators for individual drives as well as various system functions are also located on the front. -
Page 22: A8600
The Vess A8600 3U 16-bay enclosure features handles on each side used to secure the enclosure to an equipment rack. The system power button and two USB ports are located on the left side, and most of the front LED indicators are located on the right side. -
Page 23: A8800
The system power button and two USB ports are located on the left side, and most of the front LED indicators are located on the right side. Vess A8800 front view Vess A8600 front view Power and Status LEDs Drive carriers... -
Page 24: F Ront P Anel Led S
Vess A8600/Vess A8800 Storage Appliance for Video Surveillance Introduction ront anel Descriptions of the LED behavior and function for Vess A8600/Vess A8800 enclosures. Vess A8600 Front Panel LEDs - Left side Power button OPAS LED Drive Status one LED per carrier... - Page 25 Global RAID Status Global HDD Activity System Heartbeat Right side LED behavior for the Vess A8600/Vess A8800 . LED Description Power Lights BLUE to indicate the system is powered on. System Status Lights GREEN when healthy, RED if there is a critical problem (LD offline, fan mal- function, voltage out of range, system temperature alert), blinks RED for HDD high temperature alert remains dark when not ready.
-
Page 26: R Ear P Anel H Ardware
The rear panel of the Vess A8600/Vess A8800 enclosures provide access to the hot-swappable power supplies, local management connection (via USB keyboard and VGA or HDMI monitor port), iSCSI (Ethernet) data ports, some units also provide I/O connections for audio sensor and alarm systems, and two system fans. -
Page 27: Ess A8800 R Ear P Anel C Omponents
Promise Technology Product Manual A8800 r Anel omPonents The Vess A8600/Vess A8800 enclosure features two hot-swappable power supplies (PSU). Vess A8800 rear view 1 Power Supply Units (PSU) 2 System fan vents 3 I/O components (details on next page) 4 PCIe slots (six PCIe 3.0) -
Page 28: Ess A8600/V Ess A8800 R Ear Panel Led Indicators
A8600/V A8800 r eAr PAnel ConneCtions Access to physical data and management connections are located on the back panel of the Vess A8600/Vess A8800 including the optional I/O connections for sensor and alarm systems. Feature Description VGA This is also used for a video out connection for VGA monitors, it is also used to view the management interface. -
Page 29: H Ardware S Etup
This chapter presents the basics on unpacking, setting up hardware for the Vess A8600/Vess A8800 . Hardware installation includes installing the unit in an equipment rack, connecting the power, making network, data and management connection to the device, and installing hard drives. -
Page 30: U Npacking
Vess A8600/Vess A8800 Storage Appliance for Video Surveillance Introduction npaCkIng Note The Vess A8600/Vess A8800 Series can accommodate SATA hard drives. ACking The Vess A8600 box contains the following items: • Vess A8600 16-bay or Vess A8800 24-bay • Screws for disk drives Two 1.5m (4.9 ft) power cords... -
Page 31: M Ounting The E Nclosure In A Rack
In a raCk The instructions here apply to 3U 16-bay Vess A8600 and 4U 24-bay Vess A8800. For simplicity in this section, the two hardware versions will be referred to as the “Vess A8600/Vess A8800” or simply the “Vess unit”. -
Page 32: M Ounting E Nclosure In A R Ack
To install the Vess A8600/Vess A8800 into a rack with the supplied mounting rails: 1. Check the fit of the mounting rails in your rack system. 2. Adjust the length of the mounting rails as needed. - Page 33 3. Place the Vess A8600/Vess A8800 onto the rails. • At least two persons are required to safely lift the system. • Lift the Vess A8600/Vess A8800 itself. Do not lift the system by its brackets. Placing the system onto the rack rails...
- Page 34 • The unit attaches to the rack posts using the included screws and flange nuts. One screw each side, in the upper hole only. • Use the attaching screws and flange nuts that came with the Vess A8600/Vess A8800 . Secure to rack...
-
Page 35: Rives
3 to 32 RAID 30 6 or more *Must be an even number of drives. Caution The Vess A8600/Vess A8800 supports disk drive hot-swapping. To avoid hand contact with an electrical hazard, do not remove more than one drive carrier a time. -
Page 36: D Rive S Lot N Umbering
You can install any suitable disk drive into any slot in the enclosure. The diagram below shows how drive slots are numbered on the Vess A8600 and Vess A8800. Slot numbering is reflected in the web management user interfaces. -
Page 37: Emoving The D Rive C Arrier
Promise Technology Product Manual eMoving tHe rive arrier The drive carrier accommodates 2.5-inch and 3.5-inch drives. Disk carrier - front view Push here to release the carrier handle latch. Then pull the carrier straight out by the handle. Place your free hand under the carrier. - Page 38 Vess A8600/Vess A8800 Storage Appliance for Video Surveillance Introduction 3.5” d nstalling rive in tHe arrier The instructions below apply 3.5” hard disk drives installed in drive carriers intended for use with models Vess A8600. 1. Remove a disk drive carrier.
-
Page 39: I Nstalling 3.5" D Isk D Rive In The C Arrier
Promise Technology Product Manual 2.5” d nstalling rive in tHe arrier The instructions below apply 2.5” hard disk drives installed in drive carriers intended for use with models Vess A8600/Vess A8800 . 1. Remove a disk drive carrier. 2. Carefully lay the disk drive into the drive carrier at the front, so that the screw holes on the bottom of the carrier line up correctly with the power and data connectors facing away from the carrier handle. -
Page 40: M Anagement P Ath C Onnection
GUI. network ConneCtion Vess A8600/Vess A8800 has four Gigabit Ethernet RJ-45 LAN ports on the rear panel for connection to an Ethernet network. This interface is used for by the device administrator for management with Promise Management GUI. These ports are also used for data including Video Management Software and video surveillance data. -
Page 41: C Onnect The P Ower
Insert one power cable into the power receptacle for each power supply and connect the each PSU to a suitable power source. The Vess A8600/Vess A8800 subsystem is equipped with two power supplies in an N+1 arrangement. Each PSU has a Status LED. After boot up, check the LEDs on each power supply on the back of the device. -
Page 42: P Ower O N E Nclosure
With the power supplies connected, the system can now be powered on. To power on the Vess A8600/Vess A8800 subsystem, press the Power button on the front left bracket facing (see figure below). Observe the LEDs on the front panel to make certain the boot up proceeds smoothly. -
Page 43: F Ront Panel Led Behavior
Promise Technology Product Manual Vess A8600 front right side Power System Status Global RAID Status Global HDD Activity Not used System Heartbeat ront PAnel behAVior The table below describes LED behavior when boot-up is finished and the system is functioning normally: LED Description Power Lights BLUE to indicate the system is powered on. -
Page 44: C Onnect To I Scsi S Torage A Rea N Etwork (San)
Vess A8600/Vess A8800 Storage Appliance for Video Surveillance Introduction scsi s (san) onnect to i torage etwork Important For a list of supported HBA NICs and switches, download the latest compatibility list from PROMISE support: http://www.promise.com/support/. This arrangement requires: •... -
Page 45: P Romise M Anagement Gui
• “Logging in over the Network” on page 28 ogging in At the nClosure At the Vess A8600 enclosure to log into Promise Management GUI, do one of the following actions: • Double-click the Promise Management GUI desktop icon. •... -
Page 46: L Ogging In Over The N Etwork
GUI through the network interface. If the Firewall is running, no management access is permitted from the network. You can log into Promise Management GUI from any PC with a network connection to the and Vess A8600 Series enclosure. Follow the instructions for Secure Connection below. -
Page 47: Ogin S Creen
Promise Technology Product Manual ogin Creen When the opening screen appears: 1. Type administrator in the User Name field. 2. Type password in the Password field. 3. Click the Login button. The User Name and Password are case sensitive. The Promise Management GUI login screen After logging in, the Quick Links menu appears. -
Page 48: U Sing The P Romise M Anagement Gui I Nterface
Vess A8600/Vess A8800 Storage Appliance for Video Surveillance Managing with the Web Manager gui i sing tHe roMise anageMent nterFace Promise Management GUI is browser-based RAID management software with a graphic user interface. Basic user interface components and functions include:... -
Page 49: U Sing The H Eader
Logout – To logout sing Tree View enables you to navigate around all components of the Vess A8600 enclosure, software management, RAID controller, enclosure, physical drives, disk arrays, logical drives, and spare drives. The figure below shows the components of Tree View. -
Page 50: U Sing M Anagement V Iew
Management View displays information and settings menus according to the item you choose in Tree View. It presents the user interface for the Vess A8600 enclosure, including creation, maintenance, deletion, and monitoring of disk arrays and logical drives. Function tabs access menus to control specific actions and processes. -
Page 51: Iewing The E Vent F Rame
Promise Technology Product Manual iewing the Vent rAme To view the Event Frame, click Show Event Frame in the Header. To hide the Event Frame, click Hide Event Frame in the Header. In the event frame, events are listed and sorted by: •... -
Page 52: L Ogging Out Of P Romise M Anagement Gui
Vess A8600/Vess A8800 Storage Appliance for Video Surveillance Managing with the Web Manager ogging out oF romise AnAgement There are two ways to log out of Promise Management GUI: • Close your browser window • Click Logout in the Promise Management GUI Header Clicking Logout brings you back to the Login Screen. -
Page 53: S Ubsystem M Anagement
The menus listed under Subsystems are all the menus used for device management. Click on the Subsystems icon to view read-only information for the Vess A8600 including the management IP address, Alias, Model and WWN. To view the menus used for system management, click the + symbol of the Subsystems icon to reveal the child menu icons for the following: •... -
Page 54: Iew C Urrent B Ackground A Ctivities
Vess A8600/Vess A8800 Storage Appliance for Video Surveillance Managing with the Web Manager aCkground CtIvItIes Background activities perform a variety of preventive and remedial functions on your physical drives, disk arrays, logical drives, and other components. You can run a background activity immediately or schedule it to run at a later time. -
Page 55: M Anage B Ackground A Ctivities S Ettings
Promise Technology Product Manual anage ackground ctivities ettings The parameters listed in the Background Activities menu are configured in the Background Activities Settings menu. To change Background Activities settings 1. Click the Subsystem icon of the subsystem on which you want to view Background Activities. -
Page 56: Ebuild S Ettings
Vess A8600/Vess A8800 Storage Appliance for Video Surveillance Managing with the Web Manager ebuilD ettings To change Rebuild setting the in Background Activities Settings menu: 1. Use the Rebuild Rate drop-down menu to choose a rate: • Low – Fewer system resources to the Rebuild, more to data read/write operations. -
Page 57: L Ogical D Rive I Nitialization
Promise Technology Product Manual Background Synchronization Rate 1. To change Background Synchronization Rate setting the in Background Activities Settings menu: Click the Synchronization Rate drop-down menu and choose a rate: • Low – Fewer system resources to Synchronization, more to data read/write operations. -
Page 58: R Edundancy C Heck
Vess A8600/Vess A8800 Storage Appliance for Video Surveillance Managing with the Web Manager eDunDAnCy heCk Redundancy Check is a routine maintenance procedure for fault-tolerant disk arrays (those with redundancy) that ensures all the data matches exactly. Redundancy Check can also correct inconsistencies. -
Page 59: Pdm
Promise Technology Product Manual Predictive Data Migration (PDM) is the migration of data from the suspect physical drive to a spare drive, similar to rebuilding a logical drive. But unlike Rebuilding, PDM constantly monitors your physical drives and automatically copies your data to a spare drive before the physical drive fails and your logical drive goes Critical. -
Page 60: M Edia P Atrol
Vess A8600/Vess A8800 Storage Appliance for Video Surveillance Managing with the Web Manager edia atrol Media Patrol is a routine maintenance procedure that checks the magnetic media on each disk drive. Media Patrol checks are enabled by default on all disk arrays and spare drives. Media Patrol is concerned with the media itself, not the data recorded on the media. -
Page 61: M Anaging A Ctivity S Chedules
Promise Technology Product Manual anagIng CtIvIty CHedules Schedules for Media Patrol, Redundancy Check and Spare Drive Check can be created to run during off peak times. DD or Delete An ACtiVity sCheDule To add, enable or delete an activity schedule, click on the Subsystem in Tree View, then click on the Scheduler menu expander to the right of the Scheduler tab. -
Page 62: Ogs
Vess A8600/Vess A8800 Storage Appliance for Video Surveillance Managing with the Web Manager vent Event logs are useful for troubleshooting, tracking functions and monitoring subsystems. To view, save or clear subsystem event logs, click on the subsystem in Tree View, then click on the Event menu expander. Choose to display Runtime Events or NVRAM Events. -
Page 63: A Dministrative T Ools
Promise Technology Product Manual dMInIstratIve ools Click the + symbol of the Administrative Tools icon reveal subsystem administrative tools menu links for User Management, View Network Settings, Performance Monitoring and Software Management. The Administrative Tools menu lists text hyperlinks to these same menus, plus links to menus to Restore Factory Default settings, Clear Statistics and Save System Service Report. -
Page 64: U Ser M Anagement
Vess A8600/Vess A8800 Storage Appliance for Video Surveillance Managing with the Web Manager anageMent User Management deals with user accounts. iewing nForMation The view a list of users, their status, access privileges, display name, and email address: 1. Click the Administrative Tools icon. -
Page 65: M Aking Y Our O Wn U Ser S Ettings
Promise Technology Product Manual Aking ettings To change your own user settings: 1. Log into Promise Management GUI under your own user name. 2. Click the Administrative Tools icon. 3. Click the User Management icon. 4. Click the Settings tab in Management View. -
Page 66: C Reating A U Ser
Vess A8600/Vess A8800 Storage Appliance for Video Surveillance Managing with the Web Manager reating a To create a user: 1. Log into Promise Management GUI as the Administrator or a Super User. 2. Click the Administrative Tools icon. 3. Click the User Management icon. -
Page 67: L Ist Of U Ser P Rivileges
Promise Technology Product Manual ist oF riVileges • View – Allows the user to see all status and settings but not to make any changes • Maintenance – Allows the user to perform maintenance tasks including • Rebuilding, PDM, Media Patrol, and Redundancy Check. -
Page 68: Iew N Etwork S Ettings
Vess A8600/Vess A8800 Storage Appliance for Video Surveillance Managing with the Web Manager etwork ettings To view network settings for the Ethernet ports, including the port used for access to Promise Management GUI, click on the View Network Settings icon under Administrative Tools. Information listed for each port includes: •... -
Page 69: I Mporting A C Onfiguration S Cript
The script must be a plain, non-encrypted text file. This file can be saved from the same system, or from another Vess A8600 subsystem. See the next section, “Exporting a Configuration Script” on page 52 for instructions on how to save the file to your host PC. -
Page 70: E Xporting A C Onfiguration S Cript
Managing with the Web Manager xPorting A onFigurAtion CriPt You can save the configuration from one Vess A8600 subsystem, export it, and then import it to automatically configure your other Vess A8600 subsystems. To export a configuration script: 1. Click the Administrative Tools icon. -
Page 71: S Aving A S Ervice R Eport
Promise Technology Product Manual AVing A erViCe ePort A Service Report is a detailed report covering the configuration and status of all components in your RAID system. A support technician or field engineer might request a service report for the purpose of diagnosis and troubleshooting. - Page 72 Vess A8600/Vess A8800 Storage Appliance for Video Surveillance Managing with the Web Manager The Service Report includes the following topics: • About – Report utility • Network Info – Virtual port • BBM Info – Bad Block Manager • Phydriv Info – Basic physical drive information •...
-
Page 73: Mail S Ervice
Promise Technology Product Manual Mail ervice Email service enables the RAID subsystem to send you Email messages about events and status changes. By default, Email service is set to Automatic. mAil erViCe To stop the Email service: 1. Click the Administrative Tools icon. -
Page 74: E Mail S Ettings
Vess A8600/Vess A8800 Storage Appliance for Video Surveillance Managing with the Web Manager mAil ettings To change Email service settings: 1. Click the Administrative Tools icon. 2. Click the Software Management icon. 3. Click on Email in the Service List of the Service Management menu. -
Page 75: P Erformance M Onitoring
Promise Technology Product Manual erForMance onitoring The Performance Monitor displays real-time performance statistics for logical drives and physical drives. The vertical scale adjusts dynamically to accommodate the statistical data. Because it reports performance in real-time, to see data in the monitor, there must be I/O data activity taking place between the subsystem and the Host. - Page 76 Vess A8600/Vess A8800 Storage Appliance for Video Surveillance Managing with the Web Manager 6. Under Physical Drive, choose the metric you want to see from the Measurement drop-down menu. Information Read/Write • Bandwidth in MB/s • Read bandwidth • Maximum latency in ms •...
-
Page 77: Ontrollers
Promise Technology Product Manual ontrollers Click on a specific controller in Tree view to display information or statistics for a controller. Or to change controller settings. See the following sections: • “View Controller Information” • “Viewing Controller Statistics” • “Controller Settings”... - Page 78 Vess A8600/Vess A8800 Storage Appliance for Video Surveillance Managing with the Web Manager Controller information includes: • Controller ID • Serial Number • Alias • Hardware Revision • Operational Status • • Power on Time • SCSI Protocols Supported •...
-
Page 79: Iewing C Ontroller S Tatistics
Promise Technology Product Manual iewing ontroller tatistics To view controller statistics: 1. Click the Controllers icon. 2. Click the specific Controller icon of the controller for which you want to view statistics. 3. At the top of the Information display menu, between the Information and Settings tabs, click on the menu expander to reveal the Statistics link. -
Page 80: C Ontroller S Ettings
Vess A8600/Vess A8800 Storage Appliance for Video Surveillance Managing with the Web Manager ontroller ettings To make controller settings: 1. Click the Controllers icon. 2. Click the specific Controller icon of the controller you want to manage. 3. Click the Settings tab. -
Page 81: L Ocate An Enclosure
Promise Technology Product Manual nClosures The Enclosure menus are used to provide information for and monitor the status about the various components of the enclosure unit. Click on a specific enclosure in Tree view or in the Enclosures list to display information or settings menus for an enclosure. -
Page 82: E Nclosure Temperature Sensor Settings
Vess A8600/Vess A8800 Storage Appliance for Video Surveillance Managing with the Web Manager Enclosure Information display nclosure teMPerature sensor settings The temperature threshold settings are used to send event notices when the internal temperature reaches a high level. To set enclosure temperature thresholds, click on the enclosure in Tree View, then click on the Settings tab to view the Enclosure Settings menu. -
Page 83: Hysical D Rives
Promise Technology Product Manual HysICal rIves The Physical Drives menus are used to view information and statistics about physical hard drives installed in the enclosure and to set Global Settings for hard drives. To see the Physical Drives List, expand the individual Enclosure icon in Tree View to see the Physical Drives icon for the enclosure. - Page 84 Vess A8600/Vess A8800 Storage Appliance for Video Surveillance Managing with the Web Manager The information listed for individual physical drives includes: Physical Drive Information • Physical Drive ID • Configuration Status • Location [Enclosure # Slot #] • Model •...
-
Page 85: Rives
Promise Technology Product Manual rrays and ogICal rIves Disk arrays and logical drives are created and managed using the Disk Arrays menu. Use the Array Configuration menu to view the Disk Array List, and to create and delete disk arrays on the enclosure. Expand the Disk Arrays icon in Tree View to view menu links for existing arrays. -
Page 86: L Ogical Drive Management
Vess A8600/Vess A8800 Storage Appliance for Video Surveillance Managing with the Web Manager Disk Array Operational Status OK – This is the normal state of a logical drive. When a logical drive is Functional, it is ready for immediate use. - Page 87 Promise Technology Product Manual Logical Drive Information Information displayed in the menu includes: • Logical Drive ID • Read Policy • Alias • Write Policy • Raid Level • Current Write Policy • Operational Status • Serial Number • Capacity •...
-
Page 88: S Pare D Rives
Vess A8600/Vess A8800 Storage Appliance for Video Surveillance Managing with the Web Manager pare rIves When a physical drive in a disk array fails and a spare drive of the same type and adequate capacity is available, the disk array will begin to rebuild automatically using the spare drive. -
Page 89: L Ogical D Rive S Ummary
Promise Technology Product Manual ogICal rIve uMMary The Logical Drive Summary displays a list of all logical drives in the Subsystem. This list does not arrange the logical drives under the disk array to which they belong nor under the enclosure in which they are located. The menu... -
Page 90: M Aintenance
Vess A8600/Vess A8800 Storage Appliance for Video Surveillance Maintenance aIntenanCe This chapter covers the following topics: • “Replacing a Power Supply” Warning Make certain the replacement power supply unit (PSU) is identical to the PSU already installed. All PSU installed must be the same make and model. -
Page 91: R Emoving The P Ower S Upply U Nit
Vess A8600/Vess A8800 systems can accommodate two AC power supplies in the bay at the rear of the chassis. Each unit provides up to 1100 Watts of power. Only a single power supply is required for operation, with the second power supply purely as a redundant, load-sharing backup. -
Page 92: T Roubleshooting
Troubleshooting roublesHootIng This section focuses on how to address issues that might appear during the lifetime of the Vess A8600 enclosure. Common issues that customers might see include hard drive problems and how to know when there is a problem with a hard drive, and how to create and send a service report to technical support. -
Page 93: H Ow Do I Know When A Drive Is Failing
The quickest way to check drive status if you are near the device is to simply look at the hard drive status LED indicators, then use the other LED indicators to help diagnose any problems that might exist. Vess A8600 front Status LEDs... - Page 94 Vess A8600/Vess A8800 Storage Appliance for Video Surveillance Troubleshooting The Vess A8600 has hard drive status and activity LEDs on each drive carrier. Also check the status indicators on the right side of the front of the device for clues about what is wrong.
-
Page 95: Heck Rive Tatus In Anagement Gui
Promise Technology Product Manual heCk riVe tAtus in AnAgement To see the Event Frame, click Show Event Frame in the Web PAM PROe Header and check the list under Device , any physical drive problems will be indicated in the right most column, the top rows of the event table list the installed physical drives. -
Page 96: A Nticipating H Ard D Rive P Roblems
Vess A8600/Vess A8800 Storage Appliance for Video Surveillance Troubleshooting View individual physical drive information Note In order that hard disk problems can be anticipated and dealt with smoothly, it is highly recommended to make sure that Media Patrol is enabled and running and Auto Rebuild is enabled if you are not using a spare drive. - Page 97 Promise Technology Product Manual Enable Media Patrol To enable Media Patrol, click on Background Activities in the Quick Links • menu in the Home page, or, click on the Subsystem in Tree View then click on the Background Activities menu tab, click the expander to the right of the tab and select the Settings option from the pull down menu.
-
Page 98: Ebuilding A Isk Rray
Vess A8600/Vess A8800 Storage Appliance for Video Surveillance Troubleshooting ebuilding a rray When you rebuild a disk array, you are actually rebuilding the data on one physical drive. • When a physical drive in a disk array fails and a spare drive of adequate capacity is available, the disk array begins to rebuild automatically using the spare drive. -
Page 99: Ow To Ebuild A Isk Rray
Promise Technology Product Manual ow to ebuild a rray When a physical drive is indicated to be degraded or in critical state, the array that contains that drive needs to be rebuilt. If you are not using Auto Rebuild (requires a Spare Drive), then you must rebuild the array manually after the affected drive has been replaced. - Page 100 Vess A8600/Vess A8800 Storage Appliance for Video Surveillance Troubleshooting Now determine the source and target for the rebuild. In the new menu, choose the Source Physical Drive and Target Physical Drive from the menus, and click on the Submit button.
-
Page 101: H Ow To S Ave A S Ervice R Eport
Promise Technology Product Manual ow to ave a ervICe eport A Service Report is a detailed report covering the configuration and status of all components in your RAID system. A support technician or field engineer might request a service report for the purpose of diagnosis and troubleshooting. - Page 102 Vess A8600/Vess A8800 Storage Appliance for Video Surveillance Troubleshooting The Service Report includes the following topics: • About – Report utility • Network Info – Virtual port • BBM Info – Bad Block Manager • Phydriv Info – Basic physical drive information •...
-
Page 103: He A Larm B Uzzer Is S Ounding , What Does This Mean
Mean When you first power-up the Vess A8600 system beeps twice to show normal operation. The audible alarm sounds at other times to inform you that the system needs attention. But the buzzer alarm is not specific. Check the device LEDs and Events displays or logs for more information. -
Page 104: H Ow To Disable The Alarm Buzzer
Vess A8600/Vess A8800 Storage Appliance for Video Surveillance Troubleshooting ow to DisAble the AlArm buzzer To disable the buzzer with Web PAM PROe, open Web PAM PROe, click on the enclosure in Tree View, then click on the Buzzer menu expander, scroll to Settings and click the Enable Buzzer option box to remove the... -
Page 105: Faq
Promise Technology Product Manual Q: What is Vess A-Series Storage Appliance for Video Surveillance? A: The Vess A-Series platforms are engineered specifically to be the best solution for midsize to large IP video surveillance deployments. Q: How does it work for surveillance video recording? A: The Vess A-Series comes complete with your choice of Windows OS, a leading Video Management Software suite, or Disk Drives, minimizing the integration and installation process. -
Page 106: Ontacting Echnical Upport
Vess A8600/Vess A8800 Storage Appliance for Video Surveillance Contact Technical Support ontaCtIng eCHnICal upport PROMISE Technical Support provides several support options for PROMISE users to access information and updates. We encourage you to use one of our electronic services, which provide product information updates for the most efficient service and support. - Page 107 Promise Technology Product Manual United States 39889 Eureka Drive, Newark, CA 94560, USA Technical Support (E-Support): https://support.promise.com Web site: http://www.promise.com// Australia Technical Support (E-Support): https://support.promise.com Web site: http://www.promise.com// EMEA Netherlands Beatrix de Rijkweg 8 (2F), 5657 EG, Eindhoven, Netherlands Technical Support (E-Support): https://support.promise.com Web site: http://www.promise.com//...
- Page 108 Vess A8600/Vess A8800 Storage Appliance for Video Surveillance Contact Technical Support Sweden Technical Support (E-Support): https://support.promise.com Web site: http://www.promise.com// Switzerland ITF Technical Support (E-Support): https://support.promise.com Web site: http://www.promise.com// Norway ITF Technical Support (E-Support): https://support.promise.com Web site: http://www.promise.com// Belgium Technical Support (E-Support): https://support.promise.com Web site: http://www.promise.com//...
- Page 109 Promise Technology Product Manual Korea Technical Support (E-Support): https://support.promise.com Web site: http://www.promise.com// Hong Kong Technical Support (E-Support): https://support.promise.com Web site: http://www.promise.com// Singapore Technical Support (E-Support): https://support.promise.com Web site: http://www.promise.com// Japan 3F, Mura Matsu Bldg, 3-8-5, Hongo Bunkyo-ku Tokyo 113-0033, Japan Technical Support (E-Support): https://support.promise.com...
-
Page 110: Imited Arranty
Contact Technical Support iMited arranty PROMISE Technology, Inc. (“PROMISE”) warrants that this product, from the time of the delivery of the product to the original end user: a) all components, except the cache backup battery, for a period of three (3) years;... -
Page 111: D Isclaimer Of Other Warranties
Promise Technology Product Manual isClAimer oF other wArrAnties This warranty covers only parts and labor, and excludes coverage on software items as expressly set above. Except as expressly set forth above, PROMISE disclaims any warranties, expressed or implied, by statute or otherwise, regarding the product, including, without limitation, any warranties for fitness for any purpose, quality, merchantability, non-infringement, or otherwise. -
Page 112: Esponsibilities
Vess A8600/Vess A8800 Storage Appliance for Video Surveillance Contact Technical Support esPonsibilities You are responsible for determining whether the product is appropriate for your use and will interface with your equipment without malfunction or damage. You are also responsible for backing up your data before installing any product and for regularly backing up your data after installing the product. - Page 113 Promise Technology Product Manual You must follow the packaging guidelines for returning products: • Use the original shipping carton and packaging • Include a summary of the product’s problem(s) • Write an attention line on the box with the RMA number •...
Need help?
Do you have a question about the Vess A8600 and is the answer not in the manual?
Questions and answers