
Subscribe to Our Youtube Channel
Related Manuals for ESP APWIFIDS2


Summary of Contents for ESP APWIFIDS2
- Page 1 Remote View Door Phone Installation and Operating Instructions PLEASE READ THESE INSTRUCTIONS CAREFULLY BEFORE USING THIS PRODUCT AND KEEP THIS MANUAL FOR FUTURE REFERENCE.
- Page 2 to your smart-mobile device(s), which would require higher internet bandwidth. Due to your local internet environment condition, your mobile device(s) may display black-screen or temporary disconnect to the Remote View Door Phone (RVDP). speed) are suggested. * For best performance, the smart-mobile device(s) need to be on Wi-Fi or 4G mobile network in order to receive maximum download speed.
-
Page 3: Table Of Contents
CONTENTS INTRODUCTION ....................2 PLEASE READ BEFORE YOU START ..............2 SPECIAL NOTICE OF HUMAN DETECTION FEATURES .........3 WIRELESS DEVICES OPERATING RANGE ............3 IMPORTANT SAFETY PRECAUTIONS ..............4 KIT CONTENT ....................6 HARDWARE OVERVIEW ................. 7 OPERATION DIAGRAM ................... 9 SETUP THE APP ................... 10 MAIN PAGE OVERVIEW ................ -
Page 4: Introduction
INTRODUCTION PLEASE READ BEFORE YOU START Always use discretion when installing CCTV equipment, especially when there is perceived policy. Enquire relevant local regulations applicable to the lawful installation of video recording/ surveillance. Third party consent may be required. Installation Notice: It is recommended to install the camera at the 1.3 M height above ground to have better performance of the objects detection. -
Page 5: Wireless Devices Operating Range
Cautions for Use Following tips will help the device to reduce false trigger: • Reduce detection sensitivity • Keeping treetop, brushes and leafs away from the 3-meter diameter detection area • Remove small and swaying objects that may block the viewing area SPECIAL NOTICE OF OBJECTS DETECTION FEATURES It is recommended to install the camera at 1.3 Meters height to have the best detection coverage. -
Page 6: Important Safety Precautions
IMPORTANT SAFETY PRECAUTIONS Damages caused by non-compliance with this operating manual will void the warranty! We will not assume any liability for damages to items or persons caused by improper handling or non- compliance with the safety notices! Any warranty claim will be null and void in such cases. 1. - Page 7 DISPOSAL If the camera system no longer functions or can no longer be repaired, it must be disposed of according to the valid statutory regulations. Disposal of spent batteries/accumulators: You are required by law (Battery Ordinance) to return all spent batteries and accumulators. Disposing of spent batteries/accumulators with common household waste is prohibited! Batteries/ accumulators that contain hazardous substances are marked with the symbols on the side.
-
Page 8: Kit Content
KIT CONTENT RVDP DC Power Cable Black Screw Pack Power Adapter Quick Start Guide Dry/Wet Contact Cable Black Black Optional Wall-Bracket 15° Wall-Bracket 0° Positioning Card Note: Please use maximum 128GB of Micro SD card XC class 10 or Micro SD card XC class 10 UHS1. -
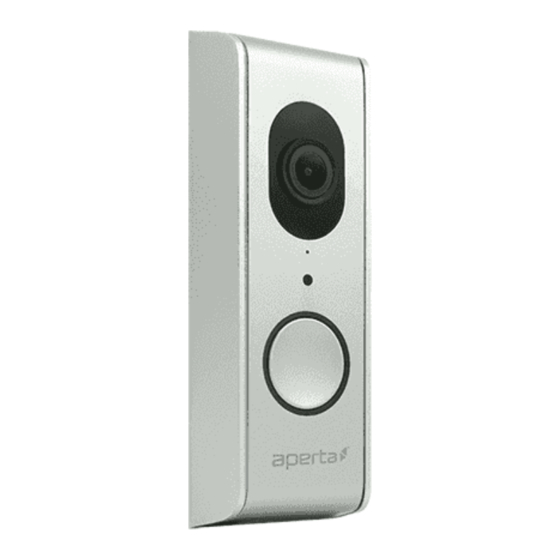
Page 9: Hardware Overview
HARDWARE OVERVIEW Full HD Camera Microphone Light senso r Push Button Speaker Memory Card Slot I/O Pin Connector Reset Button 1.B2/B1: Dry Contact I/O for door lock 2. V-/V+: Power Input I/O* 3. RD+/RD-/TD+/TD-: Ethernet Cable I/O* 4. C2/C1: Dry Contact I/O for door chime *Power input jack can be safely connected with DC 9~48V power cable in any polarity. - Page 10 REMOTE VIEW DOOR PHONE SETUP & INSTALLATION BEFORE YOU START • Do not mount the RVDP until completing the Wi-Fi connection setup. • Install the RVDP where is can receive excellent Wi-Fi network signals. Under weak Wi-Fi signal environment, install the RVDP by using Ethernet cable. •...
-
Page 11: Operation Diagram
OPERATION DIAGRAM The Remote View Door Phone (RVDP) is designed to deliver live video directly to your smart mobile devices after visitor have pressed the communication button on the door unit. The RVDP app will allow you to see live video, speak to the visitor, manually capture snapshot/video and even open the door (3rd party door lock device required) for the visitor. -
Page 12: Setup The App
SETUP THE APP Please download and install the "ESP Smart” APP to your device. Search the app in the App Store or Google Play. Download and open the app. The app will guide you step-by-step through the install. ESP Smart... -
Page 13: Main Page Overview
MAIN PAGE OVERVIEW The MAIN PAGE section offers you an overview for RVDP and access to different management functions. MAIN PAGE List of all registered RVDP. You can quickly access preferred RVDP in the list even when multiple RVDP are registered by scrolling the list up or down. - Page 14 ADD RVDP to add RVDP. Please refer to page 10 "APP Setup" section for more details. SETTING and additional setup selection icons will appear. Tap to exit. Setting Setting Additional setup selection (iOS) (Android) RVDP INFORMATION: Change RVDP name, reset Wi-Fi router setting and access Advanced Setting section.
- Page 15 SETUP PIN LOCK MUST enter PIN code when you have enable PIN lock function with launching the APP. 1. Enable "Enable lock when starting" and enter your PIN code. Info (iOS) Info (Android) Note: If you forgot the PIN code, please delete and reinstall the app. ABOUT APP/API VERSION INFO Info (iOS)
-
Page 16: Visitor Call-In Page
VISITOR CALL-IN PAGE (iOS) (Android) Press to talk and release to Tap and hold the icon to speak with visitor listen Snapshot Tap to take a picture. Pictures are saved to your mobile device Tap once to mute the audio coming from the door unit. Tap again Mute/Unmute to resume Record... -
Page 17: Event Video Playback
EVENT VIDEO PLAYBACK for playback. on the main page. Edit Ev en t Pause icon to pause/resume the playback. The local network environment condition (example: upload/ download speed) may cause improper video playback, such as black screen. When it happens please leave the playback mode and try again later when the internet condition improved. -
Page 18: Playback
PLAYBACK When you record a video clip from your camera. You can pause/play the video during the playback, to deactivate/activate the audio function. 1. Tap to pause/play video 2. Tap to view full screen DELETE Select the video you want to delete 2. -
Page 19: Download
DOWNLOAD the video by the third party (iOS) (Android) Note: During the download process, the system will stop both the live view and recording functions. APP will automatically inform any user accessing the camera that the system is busy and the connection has been terminated. -
Page 20: Answering A Call
ANSWERING A CALL Above screen would appear When visitor pressed the bell button. 1. Ignore the communication request. 2. Accept the communication request. Note: accept incoming communication request via pop-ups first before the answering section would appear. For more details, please refer to the manual. -
Page 21: Advanced Setting
ADVANCED SETTING This chapter explains the advanced settings for administrator. Administrator is the one who owns the administration password and has the full control to the WAPP camera. The administrator can access all WAPP functions and settings, while general users can receive the surveillance images for live view/screen capture/video recording and may not manage the camera settings. - Page 22 Admin Password The Admin Password is a specific security code for the administrator to change the advanced settings. The default admin password is 123456. This function allows you to change the default admin password into your personal admin when changing the advanced settings. We strong suggest that you change the admin password periodically.
- Page 23 Device Security Code This section allows you to setup the security code, limiting who can access to the device form aremote location. The default password of the camera is 123456, you can enter character a~z, A~Z, 0~9, “_”, “-“, “!“, “#“, “$“, “%“, “*“...
- Page 24 SETUP THE DOOR CHIME W/ VIDEO DOOR PHONE Please follow the setups in case accidentally delect the doorchime in the advanced setting. (1) Insert three pieces of AA batteries into the Door Chime. (2) Adjust the desired volume of Door Chime by pressing the volume key on the side of the Door Chime.
-
Page 25: Time Zone
Time Zone The drop-down list shows the world time zone. Select the time zone that will work the best for you. If your date/time is during the daylight saving time period, please check the Daylight Saving box to adjust the system time properly. Wi-Fi The Wi-Fi setting allows you to choose the wireless connection and setup the Wi-Fi environment. -
Page 26: Time Stamp
Time Stamp This section allows you to change the time stamp background color. And drag anf drop where you want to place the time stamp. Place the time stamp. 1. The time stamp locates at the coner where you tap. 2. -
Page 27: E-Mail Setting
E-MAIL SETTING The email setting allows you to configure the email environment, email account and password. Gmail account is suggested. Click the “Use SSL” check box will transmit the data in encryption. This setting requires the Simple mail via the internet. Only use the SMTP that supports SSL. Gmail Setting (suggested) SMTP Server smtp.gmail.com... -
Page 28: Video Setting
VIDEO SETTING Video Quality The Video Quality setting section allows you to adjust the video streaming to the app with options of 1080P, 720P, and VGA. -
Page 29: Environment Mode
Environment Mode The Environment Mode settings allows you to select the power line frequency used at the location of the camera. The power line frequency varies depending on geographic region. It may cause There are two type video color tone, user can change the video color tone between warmyellow( indoor) and cool-white (outdoor). -
Page 30: Sensitivity Setting
SENSITIVITY SETTING Software use advance software analysis to trigger motion alarm. Motion Mask This fuction allows you quickly select motion mask from 3 default model. In addition to, the user is able to tap screen which area you don’t want to be detected. -
Page 31: Push Notify Settings
DOORBELL SETTING This setting is provided for the connection of your existing wired door chime. The function supports mechenical chime only. By wiring up the dry contact wires from the back of camera. You can allow the wire chime to ring the host.Set"MUTE" to mute the chime, set 1 sec-3 sec to control the duration of the chime sound. -
Page 32: Sd Card Setting
SD CARD SETTING Formatting your memory card will ERASE all the data from it and you will not be able to get the BEFORE formatting the memory card. Note: The system is optimized to Class 10 memory card. Memory card with lower During format process, all recording &... -
Page 33: Overwrite Sd Card
Overwrite SD card This function will overwrite the oldest files when the micro memory card is full. Turning on this capacity is not enough. This ensures the most up to date video recordings can be saved so that you won’t miss any important information. Note: You will want to reformat the memory card from time to time to ensure the condition of the storage device. -
Page 34: Melody Setting
MELODY SETTING Mange doorbell melody and volume. UNLOCK DURATION This section allows you setup the length of time the trigger for door. According to different device to setup the duration. (1, 3, or 5 seconds). -
Page 35: About Device
ABOUT DEVICE This section shows the device information about the including device version, total size and available size of the memory card. -
Page 36: Install The Micro Sd Card
INSTALL THE MICRO SD CARD 2. Slid the metal housing down and camera up to separate the camera with back cover. 3. Remove the rubber cover of the Micro SD Card slot on the left side of the camera. 4. Insert the Micro SD Card and put back the rubber cover. 5. -
Page 37: Setup The Rvdp
SETUP THE RVDP 1. Fasten the wall-mount bracket to the wall by using 2pcs screws provided. 2. Connect power cable to the power input I/O pins by through the water-resistant cover. 3. Place the device on the wall-mount bracket. 4. After supplying power, the boot up process will begin (> 2 minutes), the circle LED will repeatedly Water-resistant Power cable cover... -
Page 38: Additional Wiring Diagrams
ADDITIONAL WIRING DIAGRAMS A. Ethernet (Wet supplier) Connection Cable Color Tx + Orange / White Tx - Orange Rx + Green / White Green Enthernet Cable B. Existing Bell Wiring DoorBell C. Electronic Gate (2/4-Wire Type Connection) 4-WIRE TYPE CONNECTION DIAGRAM Input Power 2-WIRE TYPE CONNECTION DIAGRAM... -
Page 39: Mounting The Door Unit
MOUNTING THE DOOR UNIT Do not mount the RVDP until you have completed the Wi-Fi connection setup and have all the wiring process completed. It is best to test the camera function properly with app prior mounting the door unit. Please make sure the installation location is free from moisture and wires are not exposed in any form. -
Page 40: Production Specification
PRODUCTION SPECIFICATION Connectivity Wi-Fi 802.11b/g/n + Ethernet connection Transmission Frequency 2.4GHz Transmission Range Up to 150 Meters (LoS) Image Sensor 1080P Video Compression H.264 Two-Way Audio One-Way Video Yes / iOS and Android Event List Yes / Snapshot and Video Playback App / iOS and Android Night Vision...
Need help?
Do you have a question about the APWIFIDS2 and is the answer not in the manual?
Questions and answers