
Related Manuals for ESP APWIFIDSBP2


Summary of Contents for ESP APWIFIDSBP2
- Page 1 Wireless Battery Powered Video Door Phone w/ Wireless Hub Installation and Operating Instructions PLEASE READ THESE INSTRUCTIONS CAREFULLY BEFORE USING THIS PRODUCT AND KEEP THIS MANUAL FOR FUTURE REFERENCE.
- Page 2 OVERVIEW The state of art Video Doorphone is capable of deliver high quality Digital High Definition (HD) video to your smart-mobile device(s), which would require higher internet bandwidth. Due to your local internet environment condition, your mobile device(s) may display black-screen or temporary disconnect to the Video Doorphone.
-
Page 3: Table Of Contents
CONTENTS INTRODUCTION ....................2 PLEASE READ BEFORE YOU START ..............2 WIRELESS DEVICES OPERATING RANGE ............2 IMPORTANT SAFETY PRECAUTIONS ..............2 KIT CONTENT ....................4 SAFETY AND INSTALLATION TIPS ..............5 VIDEO DOOR PHONE INSTALLATION ............6 VIDEO DOOR PHONE ..................7 APP DOWNLOAD AND INSTALL .............. -
Page 4: Introduction
INTRODUCTION IMPORTANT SAFETY PRECAUTIONS Damages caused by non-compliance with this operating manual will void the warranty! We will not assume any liability for damages to items or persons caused by improper handling or non- compliance with the safety notices! Any warranty claim will be null and void in such cases. 1. -
Page 5: Please Read Before You Start
INTRODUCTION PLEASE READ BEFORE YOU START Always use discretion when installing CCTV equipment, especially when there is perceived policy. Enquire relevant local regulations applicable to the lawful installation of video recording/ surveillance. Third party consent may be required. Installation Notice: It is recommended to install the camera at the 1.3 M height above ground to have better performance of the Human detection. - Page 6 FCC Compliance Statement: This Products with CE Marking comply device complies with Part 15 of the with EMC Directive (2004/108/EC); FCC rules. Operation is subjected to Low Voltage Directive (2006/95/ the following two conditions: (1) this E C ) ; R E D ( 2 0 1 4 / 5 3 / E U ) ; R O H S device may not cause harmful interference, and (2) this Directive (2011/65/EU) issued by the Commission device must accept any interference received, including...
-
Page 7: Kit Content
KIT CONTENT Video Bracket Door Phone USB Charglng Screw Pack Cable Quick Start Wireless Hub Guide... -
Page 8: Video Door Phone Installation
VIDEO DOOR PHONE INSTALLATION Use a phillips screwdriver to remove the set screw. Remove the device from the wall mount bracket. Fully charge the video door phone before installation. Confirm position and mount the bracket via the screws supplied. Placing video door phone at 150cm~160cm above the ground is the ideal position. -
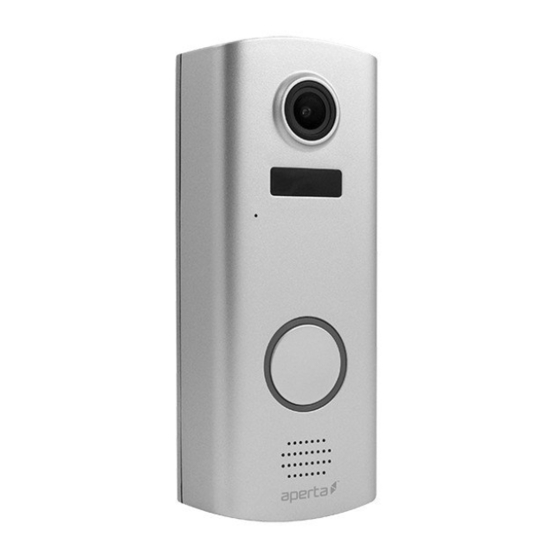
Page 9: Video Door Phone
VIDEO DOOR PHONE HD Camera Pairing Button Power On/Off Motion Sensor Microphone LED Status Indicator Doorbell Button Speaker Micro USB Port (For battery charging) -
Page 10: App Download And Install
The Wireless APP camera is designed to deliver live video footage directly to your smart phone or tablet device. Please follow these steps to download, setup and use the APP. Download the App Please download and install the " ESP Smart " APP to your device. ESP Smart... -
Page 11: App Setup
(1) Download and install the "ESP Smart" APP to your device. (2) Plug in the Wireless Hub to USB power adaptor which support 5V/1A power output. voice prompt “Ready for Router Setup”. (3) To connect wireless hub to your home Wi-Fi router by ESP Smart APP. ESP Smart... -
Page 12: Setup Steps
Setup Steps 1. Open the app, and the press ” ” button to add new system. 2. Select “Battery Camera Kit” and follow the wizard to complete setup. ice list, please select “New Device” to add the wireless hub. If you’ve set it up before, please select “Existing Device” to add it to your list by entering DID and security code information. - Page 13 Setup Steps 6. Ensure the router you wish to connect is 2.4GHz. Wireless Hub/ Device do NOT support 5G network, then press “OK”. 7. Please scan the QR code label which be placed on the back of wireless hub. 8. If your mobile phone is not on the Wi-Fi, please follow the instruction in the pop-up window.
- Page 14 Setup Steps 9. Please check the Wi-Fi SSID is correct and enter the password, then press “OK”. After pressing OK, your mobile phone will transfer the Wi-Fi setup information to your wireless hub via ultrasonic. You will hear a voice prompt “Receive Router Setup Information”.
- Page 15 Setup Steps 11. For you own security concern, please modify the sucurity code of your new added device. Please press “OK” for processing. 12. Please modify your security code. Default password “123456” is NOT recommended. Note: You are not able to use switch function while threre is only one camera be purchased and paired to your wireless router.
-
Page 16: Home Page / Device List
Home Page / Device List 1. ADD Device: To add the new devices in list. 2. Edit Setting: To access “Setting”, “Delete” & “Event”. 3. Reconnect: Refresh connection of all the devices in list. 4. Quad:Select the devices and click the icon to combine the devices liveview into same image(It is available for more than 1 devices). -
Page 17: Pin Lock
PIN Lock 1. Enable/ Disable PIN Lock: You will be required for entering PIN when you launch APP. 2. Enter your PIN Code: 4 digits number for setup your PIN. Note: If you forget your PIN, please remove your APP and reinstall it. -
Page 18: Live View
Live View 1. Connection status of the Wireless HUB. 2. RSSI between Wireless HUB and end device. (Received Signal Strength Indication) 3. Remaining Battery Indication: It turns to Red, while battery is below 15% of power. 4. Talk: Tap to enable the audio transmmition from smart phone to end device. 5. -
Page 19: Edit Setting
Edit Setting 1. Setting: Tap to access Basic and Advance setting, Please refer to “Basic & Advance Setting” Section. 2. Delete: Tap to delete the device. 3. Event: Tap to review recording clips, please refer to “Event” section. In case more than 1 pcs devices, select on the top left and click the 4. -
Page 20: Edit Setting_Basic Setting
Edit Setting _ Basic Setting 1. Search: Auto search for available devices under your LAN (Local Area Network). 2. Cancel: Back to previous step. 4. System Name: Name your device. 6. Security Code: Password for remote access to device. 7. Advanced: Access to advance setting, Admin Password is required. (Default Admin Password is “123456”) -
Page 21: Edit Setting_Event
Edit Setting_Event Tapthe to access the edit menu. 1. Set Event Filter Note: The channel selecting is needed while there are two devices paired with one wireless HUB. - Page 22 2. Play Back 2-1. Select the event you would like to play back. 2-2. Download the video clip into your mobile device. 2-3. Delete All: Delete all the video clips in the event list. 2-4. Delete One: Delete individual clip you selected. Note: During the download process, system will stop both the live view streaming and recording functions.
-
Page 23: Play Back
Play Back 1. Tap to pause/play video 2. Tap to view full screen 3. Tap to take snapshot of the playback video. The captured snapshots will store in your mobile device. 4. Mute/Unmute: Mute or unmute the audio. -
Page 24: App Advanced Settings
APP ADVANCED SETTINGS 1. Wireless Hub Settings... -
Page 25: Admin Password
(1-1) Admin Password settings. The default admin password is 123456. Please use this function to change the default admin password into your personal admin advanced settings, you need to enter the admin password. Please change the admin password periodically. (1-2) Cancel Auto Login Press to enable password to enter advance setting. -
Page 26: Device Security Code
(1-3) Device Security Code ra. The default password of the camera is 123456, you can enter character a~z, A~Z, 0~9, “_”, “-“ with max 31 characters. Please use this function to change the default password into your personal security code. (1-4) Wi-Fi Setting The Wi-Fi setting allows you to choose the wireless connection and setup the Wi-Fi environment. -
Page 27: Notify Setting
Note: Wireless HUB is ONLY compatible with 2.4GHz, NOT 5GHz router. (1-5) Notify Setting (1-6) Voice Command Audio Off It can turn off the voice prompt in the setup and pairing (Wireless Hub) -
Page 28: Doorbell Melody Enable/Disable
(1-7) Doorbell Melody Enable/Disable Please note this function ONLY supports the Video Door Phone. Battery IP camera is NOT supported. (1-8) Change Melody Type There are 3 types of ringtone for your selection. the wireless hub will play each ringtone while you tap this function. -
Page 29: Time Zone
(1-9) Time Zone The drop-down list shows the world time zone. Select the time zone that will work the best for you. If your date/time is during the daylight saving time period, please check the Daylight Saving box to adjust the system time properly. (1-10) Format SD Card This function allows you to format your SD card. -
Page 30: Overwrite Sd Card
(1-11) Overwrite SD Card Turning on memory card capacity is not enough. This ensures the most up to date video recordings can be saved so that you won’t miss any important information. 1-11 (1-12) Recording time There are three durations: 15 sec,20 sec & 30 sec. 1-12... -
Page 31: Device Information
(1-13) Record without audio This function would allow you to make video only recording (without audio). 1-13 (1-14) Device Information This section shows the device information about the including device version, total size and available size of the memory card. 1-14... -
Page 32: Channel 2 Settings(Rvdp/ Video Door Phone)
2. Channel 2 Settings (Door Station) -
Page 33: Device Name
(2-1) Device Name This function allows you to name your own device which is set up in your place. (2-2) Motion Detection The device comes with motion detection by the PIR sensor. You are able to enable/ disable PIR detection. Note:... -
Page 34: Melody Enable/Disable
(2-3) Melody Enable/Disable The Video Door Phone will play the melody when the call key is pressed. This function mobile device even the melody function is disabled. (2-4) Video Resolution There are three resolutions for your selection, VGA (640 x 480), 720p (1280 x 720) and 1080p (1920 x 1080). -
Page 35: Environment Mode
(2-5) Environment Mode There are 3 options for the place you hook up the device. Indoor(50Hz), Indoor(60Hz) and Outdoor. please select the correct option according to your household electricity (2-6) Delete Device This function allows you to delete the device which is paired with your wireless HUB. Note: One Wireless Hub only supports Max. -
Page 36: Device Information
(Please follow the steps and recheck it in case the hub in the advanced setting is delected accidentally) 1. Press and hold the pair button for 3 seconds. Wireless Hub will enter to pairing mode. You will hear a voice prompt “Waiting for Device Pairing”. The LED status light will quicky flash. 2. -
Page 37: Production Specification
PRODUCTION SPECIFICATION Wireless Hub Wireless Connectivity Wi-Fi 802.11b/g/n (2.4GHz) Transmission Range Up to 150 Meters (LoS) Door Bell Melody 3 Selectable from APP Data Storage Micro SD Card up to 128GB (class10) Power Option USB 5V Operating Temperature -22°F/-10°C ~ 122°F/50°C Door Station Wireless Connectivity 1 Wi-Fi 2.4GHz...
Need help?
Do you have a question about the APWIFIDSBP2 and is the answer not in the manual?
Questions and answers