Table of Contents
Advertisement
Quick Links
Advertisement
Table of Contents

Related Manuals for ESP Aperta APWIFIDS-BLK


Summary of Contents for ESP Aperta APWIFIDS-BLK
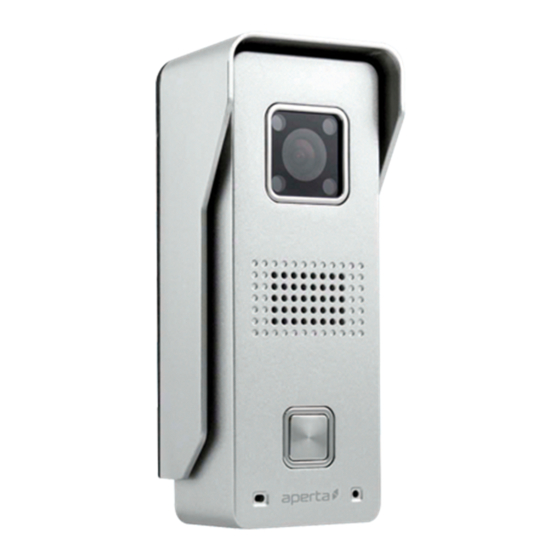
- Page 1 WI-FI DOOR STATION www.espuk.com APWIFIDS-BLK Manual.indd 1 19/05/2017 14:59:13...
-
Page 2: System Overview
System Overview Optional accessories: Sunshield EVBPSBB Lock power Camera lens supply IR LED EV-EXIT Speaker Push to release EV-EBG Call button Emergency release Microphone Kit contains: EV-ML-250/500XT Electro-magnetic lock Reset pin tool ■ Wifi door station ■ LAN terminal ■ 12vDC (500mA) power supply ■... - Page 3 Connections It is recommended the door station is programmed prior to installation. Rear of door Input 12vDC 500mA station Black Antenna Purple Output for lock Yellow (Volt-free) White Output for doorbell Grey (Volt-free) Orange Orange & White connection (Not required Green for Wifi use) Green &...
-
Page 4: Installation
Installation Site the door station 1.5 meters from the ground, 90 。 or to suit application. Position camera in the direction of where a visitor will stand during operation. Avoid areas of high sunlight and noise levels. Surface mount the sunshield of the door station and connect the system cabling. -
Page 5: System Setup
System set up Please ensure the following; 1. The user’s smart-phone is connected to the Wi-Fi network. 2. The Door Station is within the network’s Wi-Fi range. 3. The network’s key/password is available. Tamper switch Whilst the door station is powered, the rear tamper switch will be active. - Page 6 Step One: Connect the Antenna and power supply to the door station. Apply power. The Micro SD card is pre-installed and is not accessible. Antenna Power supply Page 6 APWIFIDS-BLK Manual.indd 6 19/05/2017 14:59:14...
- Page 7 Step Two: After 60 seconds of the power applied. The door station will sound a registration tone every 5 seconds. If the registration tone is not heard; Tamper switch Reset Press and hold the Reset button on the rear of the door station for 5 seconds using the supplied reset pin tool.
- Page 8 Step Three: Download the required APP by searching for ESP Aperta on the APP market. Once installed open the APP and allow any notifications to be enabled; Page 8 APWIFIDS-BLK Manual.indd 8 19/05/2017 14:59:14...
- Page 9 Step Four: Follow the on screen instructions to register an account; 1. Select ‘Register’ 2. Input email 4. Select ‘ Login’ 3. Create Password Page 9 APWIFIDS-BLK Manual.indd 9 19/05/2017 14:59:15...
- Page 10 Step Five: Login to the APP 1. In the Device list select the 2. Select ‘Add New Device’ 3. Select ‘Smartlink’ ‘+’ symbol Page 10 APWIFIDS-BLK Manual.indd 10 19/05/2017 14:59:15...
- Page 11 Step Six: 1. Enter Network Password 2. Ensure the Door station is 3. Follow the on screen and Select ‘Next’ sounding the registration instructions tone and Select ‘Hear a beep ...’ Page 11 APWIFIDS-BLK Manual.indd 11 19/05/2017 14:59:15...
- Page 12 Step Seven: 1. Hold smart phone close to 2. Enter a name for the door 3. The door station will appear door station and follow the station and enter the default on the device list page prompts on screen password 123 Device Name Page 12 APWIFIDS-BLK Manual.indd 12...
- Page 13 Step Eight: Review APP notification settings; 1. Select ‘Settings’ menu 2. Select ‘Alarm Settings’ menu 3. Ensure ‘Receive Alarm Prompt’ is enabled. Page 13 APWIFIDS-BLK Manual.indd 13 19/05/2017 14:59:15...
- Page 14 Step Nine: If test is successful; Press the call button on the retest Door Station in Door Station to test alerts installation position before fixing. Page 14 APWIFIDS-BLK Manual.indd 14 19/05/2017 14:59:15...
-
Page 15: App Operation
APP Operation During a Connection Image/ Video Lock release Disable snapshot Press and hold for 3 audio seconds to activate doorstation lock output Page 15 APWIFIDS-BLK Manual.indd 15 19/05/2017 14:59:15... -
Page 16: Adding A New User
Adding a new user Install the APP on the new user’s smart phone and register an account; 1. Ensure smart phone is connected 3. Select the ‘+’ on the 3. Enter a name for the door to the same Wi-Fi as door station. ID number of the device station and enter the default to be added. -
Page 17: Set Time And Date
Set Time and Date From the device list tap once and select Settings; 1.Select ‘Settings’ 2. Select ‘Time Setting’ 3. Adjust accordingly Page 17 APWIFIDS-BLK Manual.indd 17 19/05/2017 14:59:16... -
Page 18: Record Setup
Record Set Up Ensure that the time and date is set correctly 1. Select ‘Settings’ 2. Select ‘Record Settings’ 3. Select ‘Format SD card’ Page 18 APWIFIDS-BLK Manual.indd 18 19/05/2017 14:59:16... - Page 19 1. Select ‘Settings’ 2. Select ‘Record Settings’ 3. Select ‘Record Alarm’ Page 19 APWIFIDS-BLK Manual.indd 19 19/05/2017 14:59:16...
-
Page 20: Record Playback
Record Playback From the Device list tap once and select ‘Playback’; If recordings cannot be seen, please ensure the time and date has been set and the SD card formatted before re- attempting. Page 20 APWIFIDS-BLK Manual.indd 20 19/05/2017 14:59:16... - Page 21 Door Station. Another solution is to use the LAN connection facility where applicable. ESP are unable to guarantee that every device will be compatible with any ESP product and In addition, network connection for all software supplied. Specific models of phone,...
-
Page 22: Support Guide
Support Guide Setup If there are any issues encountered in the setup steps 1-9; Check the correct APP has been installed ■ Check the Door Station has sufficient power. Power OFF door station for 10 seconds and reapply ■ power , then default the Door Station as instructed in Step 2, and re-attempt setup. If issues persist;... -
Page 23: Lan Connection
LAN Connection Rear of door station Network cable to router Orange & White Orange Green & White Green Supplied RJ45 LAN connector LAN setup 2. Select ‘Wired Connection’ 1. Select the ‘+’ symbol and follow the on-screen instructions. Page 23 APWIFIDS-BLK Manual.indd 23 19/05/2017 14:59:16... - Page 24 Telephone: 01527 51 51 50 Elite Security Products Fax: 01527 51 51 43 Unit 7, Target Park, Email: info@espuk.com Shawbank Road, Lakeside, www.espuk.com Redditch B98 8YN E&OE - Errors and omissions excepted.E17 APWIFIDS-BLK Manual.indd 24 19/05/2017 14:59:16...
Need help?
Do you have a question about the Aperta APWIFIDS-BLK and is the answer not in the manual?
Questions and answers