ESP Aperta APWIFIDS2 Quick Start Manual
Wi-fi video door station
Hide thumbs
Also See for Aperta APWIFIDS2:
Advertisement
Quick Links
QUICK START GUIDE
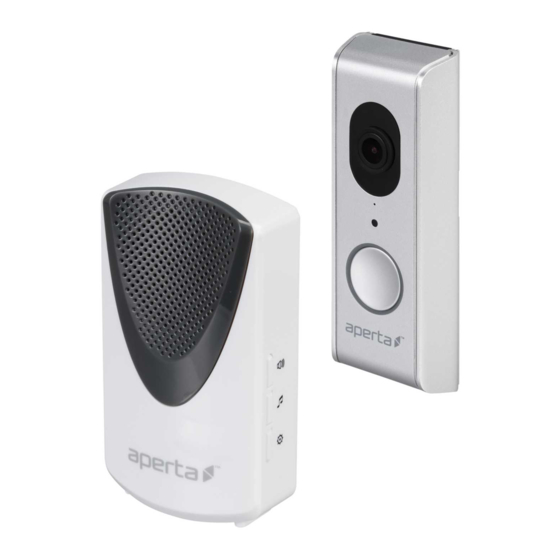
APWIFIDS2 APWIFIDSBLK2
CONTENT
Door Station &
Power Adapter
DC Power Cable
MicroSD
x 1
x 1
Quick Start Guide
Wall-Bracket
x 1
x 1
HARDWARE OVERVIEW
Full HD Camera
Microphone
Light sensor
Push Button
Speaker
Memory Card Slot
INSTALLATION OVERVIEW
Prior to installation, please ensure that a strong and stable Wi-Fi signal
can be achieved at the installation position. A 2.4GHz Wi-Fi connection is required
For additional guidance refer to the notes in the back of this guide.
Screw Pack
Dry/Wet Contact Cable
Black
Black
Black
Red
x 1
x 2
Screw Pack
Door Chime
Battery AA 1.5V
x 1
x 3
I/O Pin Connector
Reset Button
4
3
1.B2/B1: Dry Contact I/O for door lock
2. V-/V+: Power Input I/O*
3. RD+/RD-/TD+/TD-: Ethernet Cable I/O*
4. C2/C1: Dry Contact I/O for door chime
*Power input jack can be safely connected
with DC 9~48V power cable in any polarity.
AC power input not supported.
*Ethernet cable not included in the package.
INSTALLATION
1. The SD card will be pre-installed, if upgrading the SD card:
2. Slide the metal housing down and camera up to seperate the camera with back cover.
3. Remove the rubber cover of the SD Card slot on the left side of the camera.
x 1
4. Insert the SD Card and put back the rubber cover.
1
x 1
Note:
2
1
1. Fasten the wall-mount bracket to the wall by using 2pcs screws provided.
2. Connect power cable to the power input I/O pins by through the water-resistant cover.
3. Place the device on the wall-mount bracket.
4. Apply power to the device
1
4. After supplying power, the boot up process will begin (around 2 minutes),
the push button LED will flash once the boot up process is complete and registration ready
(check connectors and power source if red LED do not come on).
2
3
2
Water-resistant
cover
4
SD
Power cable
Advertisement

Related Manuals for ESP Aperta APWIFIDS2


Summary of Contents for ESP Aperta APWIFIDS2
- Page 1 QUICK START GUIDE APWIFIDS2 APWIFIDSBLK2 INSTALLATION CONTENT 1. The SD card will be pre-installed, if upgrading the SD card: Screw Pack Door Station & Power Adapter DC Power Cable Dry/Wet Contact Cable MicroSD 2. Slide the metal housing down and camera up to seperate the camera with back cover. Black Black 3.
- Page 2 APP DOWNLOAD AND INSTALL SETUP THE DOOR CHIME W/ DOOR STATION - Please download and install the "ESP Smart” APP to your device. (1) After complete the Wi-Fi setup procedure on Door Station. (2) Insert three pieces of AA batteries into the Door Chime.
- Page 3 General ESP are unable to guarantee that every device on the market will be compatible with any ESP product and software supplied. Specific models of phone, tablet or other device, the hardware it contains, the updates installed, APP store requirements, the service provider, the type of data services, the device plan will all affect the performance of PC / mobile device for remote viewing.
Need help?
Do you have a question about the Aperta APWIFIDS2 and is the answer not in the manual?
Questions and answers