Table of Contents
Advertisement
Quick Links
Advertisement
Table of Contents

Related Manuals for Vivo MOUNT-VC55A


Summary of Contents for Vivo MOUNT-VC55A
- Page 1 TV Ceiling Mount Instruction Manual SKU: MOUNT-VC55A Scan the QR code with your mobile device or follow the link for helpful videos and specifications related to this product. https://vivo-us.com/products/mount-vc55a help@vivo-us.com www.vivo-us.com 309-278-5303...
- Page 2 CAUTION! DO NOT INSTALL INTO DRYWALL ALONE. VERIFY YOUR WALL CONSTRUCTION. USE WOOD STUDS TO MOUNT. We include mounting for brick and concrete walls. If unsure, please contact us at vivo-us. com, email at help@vivo-us.com, or call us at 309-278-5303.
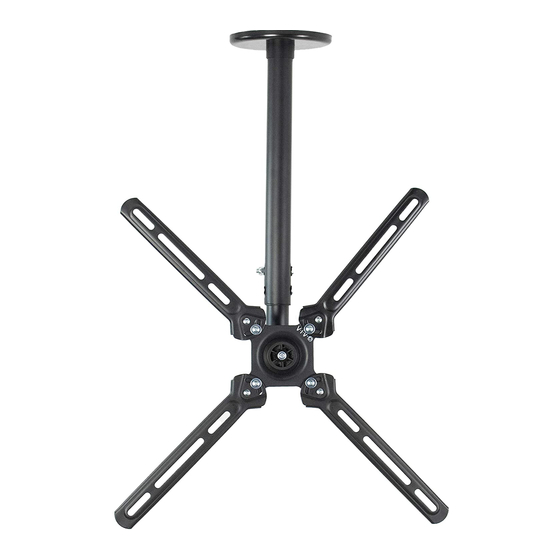
- Page 3 TOOLS NEEDED Phillips Drill Pencil Screwdriver ASSEMBLY STEPS STEP 1 Remove the bolt and nut from the post (A) with a Phillips screwdriver, then separate the post into two parts. STEP 2 Assemble the VESA arms (D) to the VESA plate on the post (A) using M5x12 bolts (F), washers (G) and M5 nuts (E).
- Page 4 STEP 3 Slip the top half of the post (A) down through the ceiling plate (B).
- Page 5 STEP 4 OPTION A: Wood Beam Ceiling Locate beam using a stud finder, then using a 1/8” drill bit, drill two 2.3” deep holes exactly 4” apart. Insert M8x60 screws (N), leaving 10mm of thread exposed, then hang the ceiling plate (B) with post (A) on the screws and tighten.
- Page 6 STEP 5 Slide the cover (C) up on the post and snap onto the ceiling plate. Reassemble the post at the desired height using previously removed bolt and nut. STEP 6 OPTION A: Flat Back TV Attach TV to the mount using bolts (H, J, L).
- Page 7 STEP 6 (Continued) OPTION B: Curved Back TV Attach TV to the mount using bolts (I, K) and spacers (M). STEP 7 Adjust the TV to the desired position. Use the 5mm Allen wrench (P) to adjust the swivel joint behind the VESA plate on the post if needed.
- Page 8 - 83% within < 2hr - 92% within < 3hr www.vivo-us.com : < 15 M AVG. RESOLUTION TIME (within office hrs) : 5M 4S 309-278-5303 AVG. RESOLUTION TIME (within office hrs) FOR MORE VIVO PRODUCTS, CHECK OUT OUR WEBSITE AT: www.vivo-us.com...
Need help?
Do you have a question about the MOUNT-VC55A and is the answer not in the manual?
Questions and answers