Table of Contents
Advertisement
Advertisement
Table of Contents

Subscribe to Our Youtube Channel
Related Manuals for Verathon GlideScope Cobalt AVL Single-Use


Summary of Contents for Verathon GlideScope Cobalt AVL Single-Use
- Page 1 GLIDESCOPE SYSTEM COBALT AVL SINGLE‑USE Operations & Maintenance Manual...
- Page 2 0900‑2184‑09‑60...
- Page 3 GLIDESCOPE SYSTEM COBALT AVL SINGLE‑USE Operations & Maintenance Manual Effective: January 10, 2017 Caution: Federal (United States) law restricts this device to sale by or on the order of a physician. For customers with GlideScope systems using the GlideScope Cobalt AVL Video Monitor (version 0570‑0304).
- Page 4 Fax: 604.439.3039 0413 Copyright © 2009, 2016 by Verathon Inc. All rights reserved. No part of this manual may be copied or transmitted by any method without the express written consent of Verathon Inc. GlideRite, GlideScope, the GlideScope symbol, GVL, Reveal, Verathon, and the Verathon Torch symbol are trademarks of Verathon Inc.
-
Page 5: Table Of Contents
TABLE OF CONTENTS IMPORTANT INFORMATION ..........................1 Product Information ............................1 Statement of Intended Use ..........................1 Essential Performance ............................1 Statement of Prescription ............................1 Notice to All Users ..............................1 Precautions & Warnings ............................2 Product Description ............................7 INTRODUCTION ..............................10 System Parts & Accessories ..........................10 Video Laryngoscope Components ........................ - Page 6 USING THE DEVICE .............................26 Procedure 1. Connect the Video Cable to the Monitor ................27 Procedure 2. Insert the Video Baton into the Stat (Single‑Use Only) ............28 Procedure 3. Prepare the GlideScope System ....................28 Procedure 4. Intubate Using the GlideScope 4‑Step Technique ..............29 Procedure 5.
-
Page 7: Important Information
® injury to the patient, compromise the performance of the system, and may void the system warranty. Verathon recommends that new GlideScope users: • Obtain instruction from a qualified individual • Practice using the system on a mannequin before clinical use •... -
Page 8: Precautions & Warnings
To maintain electromagnetic interference (EMI) within certified limits, the GlideScope AVL system must be used with the cables, components, and accessories specified or supplied by Verathon . For additional information, see the System Parts & Accessories Product ®... - Page 9 CAUTION When cleaning video laryngoscopes, do not use metal brushes, abrasive brushes, scrub pads, or rigid tools. They will scratch the surface of the unit or the window protecting the camera and light, which may permanently damage the device. CAUTION Bleach may be used on the video batons, but pay special attention to stainless steel components, as bleach can corrode stainless steel.
- Page 10 WARNING Availability of cleaning, disinfection, and sterilization products varies by country, and Verathon is unable to test products in every market. For more information, please contact Verathon Customer Care. For contact information, visit verathon.com/support.
- Page 11 Electric shock hazard. Do not attempt to open the system components. This may cause serious injury to the operator or damage to the instrument and will void the warranty. Contact Verathon Customer Care for all servicing needs. WARNING No modification of this equipment is allowed.
- Page 12 WARNING The external monitor must be safety‑approved medical equipment. WARNING Use only a passive‑type USB flash drive. Do not use USB drives powered by another external source. WARNING When cleaning the power adapter, use a cloth dampened with isopropyl alcohol on the outside of the enclosure.
-
Page 13: Product Description
The monitor can store up to one hour of video (approximately 40 typical intubations), which you can download to a USB flash drive for archiving and further review. The monitor also has a DVI video output through an HDMI connector. It is recommended that you use the HDMI‑to‑DVI cable provided by Verathon ®... - Page 14 SINGLE‑USE SYSTEM The AVL single‑use system can be used with a choice of two video batons and multiple GVL Stats. ® Single‑use GVL Stats are offered in a comprehensive range of sizes, allowing clinicians to meet the particular requirements of patients ranging in size from preterm infants to morbidly obese adults. The system may include the following components: •...
- Page 15 GLIDESCOPE DIRECT INTUBATION TRAINER The GlideScope Direct intubation trainer is designed to work with the Cobalt AVL Monitor. The GlideScope Direct resembles a traditional Macintosh direct laryngoscope with the addition of a video camera near the end of the blade, permitting both direct laryngoscopy and a video display of the airway. This provides the user with a laryngeal view, permits mentoring by an instructor, and combined with the system monitor allows the image to be captured for documentation, quality control, and teaching.
-
Page 16: Introduction
INTRODUCTION SYSTEM PARTS & ACCESSORIES The GlideScope AVL system consists of the following components. Table 1. System Components PARTS & ACCESSORIES Required Components Cobalt AVL Monitor Video batons (for Single‑Use system only) Stat sizes 0, 1, 2, 2.5, 3, and 4 (for Single‑Use system only) ®... - Page 17 PARTS & ACCESSORIES Optional Components GlideScope Premium Cart Mobile stand Universal accessory basket Note: For use with AVL portable stand Cradle for video baton GlideScope Direct IV pole mounting kit Intubation Trainer HDMI‑to‑DVI cable GlideRite ® Rigid Stylet Operations & Maintenance Manual: Introduction...
-
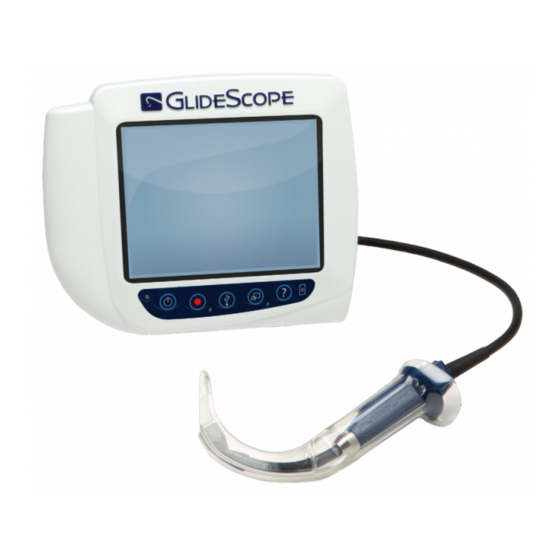
Page 18: Video Laryngoscope Components
VIDEO LARYNGOSCOPE COMPONENTS Figure 4. AVL Single‑Use Video Laryngoscope Components Video cable Video baton Single‑use Stat Camera and light Figure 5. GlideScope Direct Intubation Trainer Video cable (Shortened for illustration) Handle Connector (Attaches to the monitor) Lifter blade Cleaning cap Camera and light... -
Page 19: Buttons, Icons, & Connections
4‑Step Technique. Battery Indicator: LED is: Green: Unit fully charged Red: Unit charging Flashing Red: Indicates a problem with the battery. Charge for 12 hours, and if the LED is still flashing, contact Verathon Customer Care. ® Operations & Maintenance Manual: Introduction... - Page 20 Table 3. On‑Screen Icons ICON FUNCTION Battery Status: The remaining battery power is indicated by the Battery Status icon. If the icon is red, the battery should be charged as soon as possible. (See Charge the Monitor Battery.) Cancel Operation: Indicates the button that cancels the current operation, moves to the previous screen, or returns to the main menu.
- Page 21 Figure 7. Cobalt AVL Monitor Back Panel Video‑out port: Connect the HDMI‑to‑DVI cable from the external monitor Video cable port: Attach the video cable USB port: Product identification: Connect a USB Includes product serial flash drive to number download video Power socket: Connect the barrel plug from the 12 V...
-
Page 22: Setting Up
1. Verify that you have received the appropriate components for your system by referring to the packing list included with the system. 2. Inspect the components for damage. 3. If any of the components are missing or damaged, notify the carrier and Verathon Customer Care or your local representative. For contact information, visit verathon.com/support. -
Page 23: Procedure 2. Mount The Cobalt Avl Monitor (Optional)
PROCEdURE 2. MOUNT THE COBALT AVL MONITOR (OPTIONAL) If you choose to mount the system, you may use either of the following configurations: • Mount it on a GlideScope premium cart or mobile stand (Figure 8 Figure 9). These solutions make it easy for you to move the system from one location to another. - Page 24 4. Using the orientation shown in the following images, screw the quick‑release locking plate to the back panel of the monitor. Quick‑release locking plate 5. Seat the locking plate of the monitor on the quick‑release mount. When properly situated, the monitor sits securely on the mount, and the quick‑release lever automatically snaps into the locked (down) position.
-
Page 25: Procedure 3. Attach The Video Baton Cradle (Optional)
AdJUST THE MONITOR ANGLE Before you start using the video monitor, adjust the angle of the monitor for optimal viewing. The ideal angle minimizes glare and maximizes visibility. 1. Turn the angle adjustment knob counterclockwise. Angle adjustment knob 2. Tilt the monitor to the desired angle. 3. -
Page 26: Procedure 4. Charge The Monitor Battery
CHARGE THE MONITOR BATTERY WARNING In order to maintain electrical safety, use only the provided, medical‑approved power supply. The Cobalt AVL Monitor includes an internal lithium‑ion battery. Verathon ® recommends that you charge the battery fully prior to first use. -
Page 27: Procedure 5. Connect The Video Cable
PROCEdURE 5. CONNECT THE VIdEO CABLE This procedure connects the video cable to the monitor, which displays the image transmitted from the camera. Ensure that the video monitor is turned off prior to connecting or disconnecting the video cable. 1. Align the arrow on the video cable and the arrow on the video cable port. 2. -
Page 28: Procedure 6. Connect To An External Monitor (Optional)
Note: Image quality on the external monitor may vary according the resolution of the external monitor. Note: To maintain electromagnetic interference (EMI) within certified limits, the system must be used with the cables, components, and accessories specified or supplied by Verathon. For additional information, see sections. The use of accessories or cables other System Parts &... -
Page 29: Procedure 7. Configure User Settings
The Cobalt AVL Monitor imports most of its individual settings from a configuration file on a USB flash drive. Before importing the configuration file, you must create it using the Cobalt AVL User Settings Tool, which is available from Verathon Customer Care. The configuration file contains values for the following settings: • Date and Time (approximate) •... - Page 30 4. If you want to include date and time settings in the configuration file, under Date & Time, select the Include Date & Time check box. Underneath the check box, choose Use Current System Date & Time in order to include the current date and time in the configuration file automatically when you save it, or choose Set Date &...
-
Page 31: Procedure 8. Perform A Functional Check
PROCEdURE 8. PERFORM A FUNCTIONAL CHECK Before you use the device for the first time, perform the following functional check to ensure that the system is working properly. Please contact your local Verathon representative or Verathon Customer Care if your ®... -
Page 32: Using The Device
Before every use, ensure the instrument is operating correctly and has no sign of damage. Do not use this product if the device appears damaged. Always ensure that alternative airway management methods and equipment are readily available. Report any suspected defects to Verathon Customer Care. For contact information, visit ®... -
Page 33: Procedure 1. Connect The Video Cable To The Monitor
PROCEdURE 1. CONNECT THE VIdEO CABLE TO THE MONITOR Ensure that the video monitor is turned off prior to connecting or disconnecting the video cable. Table 4. Video Laryngoscope Sizes SIZES Stat Video Baton Recommended Patient Weight/Size 0 Stat Video baton 1‑2 Patients less than 1.5 kg (3.3 lbs)* ®... -
Page 34: Procedure 2. Insert The Video Baton Into The Stat (Single-Use Only)
PROCEdURE 2. INSERT THE VIdEO BATON INTO THE STAT (SINGLE‑USE ONLY) 1. Open the GVL ® Stat pouch, but do not remove the Stat from the packaging. 2. Ensure that the logo on the side of the baton and the logo on the side of the Stat are aligned. 3. -
Page 35: Procedure 4. Intubate Using The Glidescope 4-Step Technique
If continuous contact is maintained for longer than 1 minute, it is possible to cause thermal damage such as a burn to the mucosal tissue. To perform an intubation, Verathon recommends using the GlideScope 4‑Step Technique as outlined in this ®... -
Page 36: Procedure 5. Intubate Using The Glidescope Direct
Before every use, ensure the instrument is operating correctly and has no sign of damage. Do not use this product if the device appears damaged. Always ensure that alternative airway management methods and equipment are readily available. Report any suspected defects to Verathon Customer Care. For contact information, visit ®... -
Page 37: Procedure 6. Use The Recording Feature (Optional)
PROCEdURE 6. USE THE RECORdING FEATURE (OPTIONAL) WARNING Use only passive‑mode USB flash drives provided by Verathon . The monitor may not ® recognize some flash drives from other manufacturers. Never use USB drives powered by an external power source. The GlideScope AVL monitor contains enough internal memory to record about 60 minutes of video. Under typical conditions, this is equivalent to about 40 intubation procedures. - Page 38 7. Press the button for the action that you want to take next: Download only the new recordings (those that have not been downloaded previously) by pressing the Download Video button again. Download all recordings stored in the monitor by pressing the External Video button Exit from download mode by pressing the Record button 8.
- Page 39 TIPS FOR WORKING WITH ENDOTRACHEAL TUBES • Insert the ETT behind or immediately adjacent to the GlideScope video laryngoscope. • Do not insert the stylet into the larynx during intubation. • Carefully introduce the distal end of the ETT between the vocal folds. •...
-
Page 40: Cleaning & Disinfecting
WARNING Availability of cleaning, disinfection, and sterilization products varies by country, and Verathon ® is unable to test products in every market. For more information, please contact Verathon Customer Care. For contact information, visit verathon.com/support. WARNING This product may only be cleaned, disinfected, or sterilized by using the approved low‑temperature processes. - Page 41 • GlideScope System AVL Single‑Use Operations & Maintenance Manual (0900‑4200) • GlideScope AVL System Operations & Maintenance Manual (0900‑4521, Canada only) • GlideRite Rigid Stylet Operations & Maintenance Manual (0900‑4686) ® For the latest versions of these manuals, please visit verathon.com/product‑documentation. Operations & Maintenance Manual: Cleaning & Disinfecting...
-
Page 42: Maintenance & Safety
SYSTEM SOFTWARE Verathon creates software updates for the Cobalt AVL Monitor as needed. If an update is required, Verathon Technical Services must install it. This manual documents the most current version of the Cobalt AVL Monitor software. If your monitor does not function as described in this manual, or to determine if your software should be updated, contact Verathon Customer Care. -
Page 43: Device Repair
Contact Verathon Customer Care for all servicing needs. DEVICE DISPOSAL Disposal of this device in accordance with WEEE requirements can be coordinated through your Verathon Service Center. Operations & Maintenance Manual: Maintenance & Safety... -
Page 44: Warranty
® for one (1) year from the date of shipment from Verathon and applies only to the original purchaser of the system. The terms of this warranty are subject to the Terms and Conditions of Sale or any other contractual document between the parties. - Page 45 The information, descriptions, recommendations, and safety notations in this manual are based upon Verathon experience and judgment. The contents of this manual should not be considered to be all‑inclusive or to cover all contingencies.
-
Page 46: Product Specifications
PRODUCT SPECIFICATIONS SYSTEM SPECIFICATIONS Table 5. AVL System Specification GENERAL SPECIFICATIONS Classification: Electrical Class II, Applied Part BF Line voltage: Range: 100–240 VAC, 50 and 60 Hz. Connect to a medical‑grade power supply DC power supply: 12 V DC, 2.5 A max Fuse: Internal 2.5 A Hold / 5 A Trip, 15 V max Ingress protection... - Page 47 IV POLE MOUNT Weight: 0.9 kg Arm length: 27 cm Width: 6.2 cm GLIDESCOPE PREMIUM CART Wheelbase: 53.3 cm Min. height: 101.6 cm Max. height: 132.1 cm Weight: 8.0–8.4 kg MOBILE STAND Mobile Stand Wheelbase diameter: 61 cm Min. height: 76 cm Max. height: 122 cm Operations &...
- Page 48 AVL VIDEO BATON 1‑2 2041 ± 50 mm Length of flexible portion of baton: 66 mm Height at camera: 6 mm Width at camera: 7 mm Video cable length: 2041 ± 50 mm 66 mm 6 mm 7 mm AVL VIDEO BATON 3‑4 1540 ±...
- Page 49 0 STAT ® Blade tip to handle: 36.2 mm Height at camera: 8.6 mm 11.0 mm Width at camera: 11.0 mm 11.0 mm Blade length in front of camera: 6.5 mm Max blade width in front of camera: 11.0 mm 36.2 mm 8.6 mm 6.5 mm GVL 1 STAT...
- Page 50 2 STAT ® Blade tip to handle: 55.7 mm Height at camera: 8.6 mm 16.0 mm Width at camera: 11.2 mm Blade length in front of camera: 28.0 mm 11.2 mm Max blade width in front of camera: 16.0 mm 55.7 mm 8.6 mm 28.0 mm...
- Page 51 3 STAT ® Blade tip to handle: 77 mm Height at camera: 14 mm Width at camera: 16 mm 20 mm Blade length in front of camera: 37 mm 16 mm Max blade width in front of camera: 20 mm 77 mm 14 mm 37 mm...
-
Page 52: Battery Specifications
GLIDESCOPE DIRECT INTUBATION TRAINER Cable length: 1942 ± 100 mm Height at camera: 15 mm Width at camera: 23 mm Blade tip to handle: 119 mm Max blade width in front of camera: 23 mm BATTERY SPECIFICATIONS Table 7. Battery Specifications CONDITION DESCRIPTION Battery type... -
Page 53: Electromagnetic Compatibility
ELECTROMAGNETIC COMPATIBILITY GlideScope AVL system is designed to be in compliance with IEC 60601‑1‑2:2007, which contains electromagnetic compatibility (EMC) requirements for medical electrical equipment. The limits for emissions and immunity specified in this standard are designed to provide reasonable protection against harmful interference in a typical medical installation. - Page 54 Table 9. Guidance and Manufacturer’s Declaration —Electromagnetic Immunity The GlideScope AVL system is intended for use in the electromagnetic environment specified below. The customer or the user of the GlideScope AVL system should ensure that it is used in such an environment. COMPLIANCE ELECTROMAGNETIC ENVIRONMENT IMMUNITY TESTS...
- Page 55 Table 9. Guidance and Manufacturer’s Declaration —Electromagnetic Immunity The GlideScope AVL system is intended for use in the electromagnetic environment specified below. The customer or the user of the GlideScope AVL system should ensure that it is used in such an environment. COMPLIANCE ELECTROMAGNETIC ENVIRONMENT IMMUNITY TESTS...
- Page 56 ACCESSORY CONFORMANCE TO STANDARDS To maintain electromagnetic interference (EMI) within certified limits, the system must be used with the cables, components, and accessories specified or supplied by Verathon . For additional information, see the ®...
-
Page 57: Glossary
GLOSSARY The following table provides definitions for specialized terms used in this manual or on the product itself. For a full list of caution, warning, and informational symbols used on this and other Verathon products, please ® refer to the Verathon Symbol Directory at verathon.com/symbols. - Page 58 TERM DEFINITION OSHA Occupational Safety and Health Administration (federal agency in U.S.) Ounce Parts per million Water that is suitable for high‑level disinfection according to local regulations Pure water and your medical facility Radio frequency Relative humidity Volt Vrms Voltage root mean squared Watt WEEE Waste electrical and electronic equipment...
Need help?
Do you have a question about the GlideScope Cobalt AVL Single-Use and is the answer not in the manual?
Questions and answers