Table of Contents
Advertisement
Advertisement
Table of Contents

Subscribe to Our Youtube Channel
Related Manuals for Verathon GlideScope Ranger


Summary of Contents for Verathon GlideScope Ranger
- Page 1 GLIDESCOPE SYSTEM RANGER SINGLE USE Operations & Maintenance Manual...
- Page 2 0900‑1307‑19‑60...
- Page 3 GLIDESCOPE SYSTEM RANGER SINGLE USE Operations & Maintenance Manual Effective: December 7, 2018 Caution: Federal (United States) law restricts this device to sale by or on the order of a physician.
- Page 4 Copyright © 2018 by Verathon Inc. All rights reserved. GlideScope, the GlideScope symbol, GlideRite, GVL, Verathon, and the Verathon Torch symbol are trademarks of Verathon Inc. All other brand and product names are trademarks or registered trademarks of their respective owners.
-
Page 5: Table Of Contents
TABLE OF CONTENTS IMPORTANT INFORMATION ..........................1 Product Description ............................1 Statement of Intended Use ..........................1 Essential Performance ............................1 Statement of Prescription ............................1 Notice to All Users ..............................1 Precautions & Warnings ............................2 INTRODUCTION ..............................7 Single‑Use System ...............................7 System Parts & Accessories ..........................8 Monitor Controls &... - Page 6 Procedure 2. Clean & Disinfect the Video Baton ..................23 Procedure 3. Inspect the Video Baton .......................25 MAINTENANCE & SAFETY ..........................26 Periodic Inspections ............................26 System Software ...............................26 GlideScope Ranger Battery ..........................26 Device Repair ..............................27 Device Disposal ..............................27 WARRANTY.................................28 PRODUCT SPECIFICATIONS ..........................30 System Specifications ............................30...
-
Page 7: Important Information
ESSENTIAL PERFORMANCE Essential performance is the system performance necessary to achieve freedom from unacceptable risk. The essential performance of the GlideScope Ranger system is to provide a clear view of the vocal cords. STATEMENT OF PRESCRIPTION Caution: Federal (United States) law restricts this device to sale by or on the order of a physician. -
Page 8: Precautions & Warnings
For more information, see the Electromagnetic Compatibility section on page 36. To maintain electromagnetic interference (EMI) within certified limits, the system must be used with the cables, components, and accessories specified or supplied by Verathon . For additional ® information, see the System Parts &... - Page 9 Do not use an ultrasonic device or automated washing equipment to clean this product. CAUTION The GlideScope Ranger video monitor is manufactured to be IP68 compliant. If the monitor is disassembled during a service procedure, after reassembly, the monitor will not be IP68 compliant.
- Page 10 WARNING This product may only be cleaned, disinfected, or sterilized by using the approved low‑temperature processes provided in this manual. Cleaning, disinfection, and sterilization methods listed are recommended by Verathon based on efficacy or compatibility with component materials. WARNING Do not place the video baton in the cradle if any of the components are contaminated.
- Page 11 WARNING Availability of cleaning, disinfection, and sterlilization products varies by country, and Verathon ® is unable to test products in every market. For more information, please contact Verathon Customer Care. For contact information, visit verathon.com/support. WARNING Ensure that you follow the manufacturer’s instructions for handling or disposing of the cleaning, disinfection, or sterilization solutions provided in this manual.
- Page 12 Electric shock hazard. Do not attempt to open the system components. This may cause serious injury to the operator or damage to the instrument and will void the warranty. Contact Verathon Customer Care for all servicing needs. WARNING When cleaning the power adapter, use a cloth dampened with isopropyl alcohol on the outside of the enclosure.
-
Page 13: Introduction
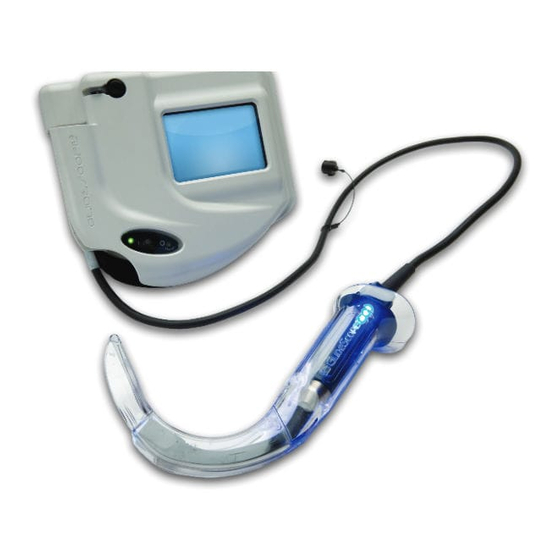
INTRODUCTION SINGLE‑USE SYSTEM The GlideScope Ranger system is available in a single‑use configuration. It features a video monitor, a reusable video baton, the cables and adapters to power the device, and any optional system components that may facilitate intubations or provide convenience. -
Page 14: System Parts & Accessories
SYSTEM PARTS & ACCESSORIES Table 1. Required System Components REQUIRED PARTS & ACCESSORIES Video monitor Power supply Power cable Video baton 1‑2 Video baton 3‑4 GVL Stat 0 GVL Stat 1 GVL Stat 2 GVL Stat 2.5 GVL Stat 3 GVL Stat 4 Table 2. -
Page 15: Monitor Controls & Connections
MONITOR CONTROLS & CONNECTIONS The digital, full‑color video monitor displays the images transmitted from the camera in the video baton. The monitor includes the screen and controls you use to operate the system. It contains a lithium battery that provides power to the system. The system must be operated exclusively on battery power, without a connection to an AC power source. -
Page 16: Setting Up
1. Verify that you have received the appropriate components for your system by referring to the packing list included with the system. 2. Inspect the components for damage. 3. If any of the components are missing or damaged, notify the carrier and Verathon Customer Care or your local representative. For contact information, visit verathon.com/support. -
Page 17: Procedure 2. Charge The Monitor
If you observe the flashing orange light, ensure the monitor power switch is in the off position, check the cable connections, and then disconnect and reconnect the charging cable to the monitor. If this does not resolve the issue, contact Verathon Customer Care. - Page 18 3. On the front of the monitor, unscrew the power socket cap, and then connect the charging cable to the power socket. 4. Plug the power cord into an AC power outlet. Note: Plug varies by region. 5. Allow the battery to charge. Fully charging the battery may take up to 5 hours. •...
-
Page 19: Procedure 3. Connect A Video Baton
PROCEdURE 3. CONNECT A VIdEO BATON The video baton attaches directly to the video monitor, supplying power to the video baton and transmitting video data from the camera to the monitor. When you are ready to intubate the patient, ensure that you also complete the procedure Insert the Video Baton into the Stat on page 17. -
Page 20: Procedure 4. Perform A Functional Check
PROCEdURE 4. PERFORM A FUNCTIONAL CHECK Before you use the device for the first time, perform the following functional check to ensure that the system is working properly. Please contact Customer Care if your system does not function as described below. 1. -
Page 21: Using The Device
Before every use, ensure the instrument is operating correctly and has no sign of damage. Do not use this product if the device appears damaged. Always ensure that alternative airway management methods and equipment are readily available. Report any suspected defects to Verathon Customer Care. For contact information, visit ®... -
Page 22: Procedure 1. Connect A Video Baton
PROCEdURE 1. CONNECT A VIdEO BATON Table 3. Video Laryngoscope Sizes SIZES Stat Video Baton Recommended Patient Weight/Size* ® 0 Stat Video baton 1‑2 Patients less than 1.5 kg (3.3 lbs) GVL 1 Stat Video baton 1‑2 Patients between 1.5–3.8 kg (3.3–8.4 lbs) GVL 2 Stat Video baton 1‑2 Patients between 1.8–10 kg (4–22 lbs) -
Page 23: Procedure 2. Insert The Video Baton Into The Stat
6. Insert the video cable connector into the port. You will hear a click when the cable is successfully connected. 7. Continue to the procedure Insert the Video Baton into the Stat. PROCEdURE 2. INSERT THE VIdEO BATON INTO THE STAT 1. -
Page 24: Procedure 3. Prepare The System
PROCEdURE 3. PREPARE THE SYSTEM 1. On the video monitor, turn the power switch to the ON position. 2. On the monitor screen, verify that the image displayed is from the video baton camera. 3. If needed, allow the anti‑fog feature to warm up for 30–120 seconds, and then continue to the procedure Intubate Using a Video Baton and Stat on page 19. -
Page 25: Procedure 4. Intubate Using A Video Baton And Stat
If continuous contact is maintained for longer than 1 minute, it is possible to cause thermal damage such as a burn to the mucosal tissue. To perform an intubation, Verathon recommends using the technique outlined in this procedure. Prior to ®... -
Page 26: Cleaning & Disinfecting
® component materials. WARNING Availability of cleaning and disinfection products varies by country, and Verathon is unable to test products in every market. For more information, please contact Verathon Customer Care. For contact information, visit verathon.com/support. WARNING Cleaning is critical to ensuring a component is ready for disinfection or sterilization. - Page 27 Cleaning and disinfecting the system is an important part of using and maintaining the system. Prior to each use, ensure that each system component has been cleaned and disinfected according to the guidance provided in Table The following table describes the risk classification for each system component, including the Spaulding’s/CDC classification for the minimum required disinfection level.
-
Page 28: Procedure 1. Clean The Video Monitor
PROCEdURE 1. CLEAN THE VIdEO MONITOR IMPORTANT Ensure that you do not use any abrasive substances, brushes, pads, or tools when cleaning the video monitor screen. The screen can be scratched, permanently damaging the device. Clean the video monitor when it is visibly soiled and on a regular basis, as per a schedule established by the medical care facility or provider. -
Page 29: Procedure 2. Clean & Disinfect The Video Baton
* Bleach may be used on the video batons, but pay special attention to stainless steel components, as bleach can corrode stainless steel. † GlideScope Ranger video batons designed to withstand vaporized hydrogen peroxide are identified by a metal label. If the component does not feature a metal label, do not use this solution. - Page 30 3. Place the protective cleaning cap over the connector. 4. Wash the component manually using a hospital‑grade equipment detergent or an enzymatic debridement agent, according to the chemical manufacturer’s instructions. 5. Using warm water, rinse the component in clean tap water and scrub with a soft‑bristled brush until all visible contamination has been removed.
-
Page 31: Procedure 3. Inspect The Video Baton
Before every use, ensure the instrument is operating correctly and has no sign of damage. Do not use this product if the device appears damaged. Always ensure that alternative airway management methods and equipment are readily available. Report any suspected defects to Verathon Customer Care. For contact information, visit ®... -
Page 32: Maintenance & Safety
SYSTEM SOFTWARE This manual documents the most current version of the software. If your system does not function as described in this manual, or to determine if your software should be updated, contact Verathon Customer Care. Do not perform any software upgrades from third‑party vendors or attempt to modify the existing software. -
Page 33: Device Repair
Contact Verathon Customer Care for all servicing needs. CAUTION The GlideScope Ranger video monitor is manufactured to be IP68 compliant. If the monitor is disassembled during a service procedure, after reassembly, the monitor will not be IP68 compliant. -
Page 34: Warranty
® for one (1) year from the date of shipment from Verathon and applies only to the original purchaser of the system. The terms of this warranty are subject to the Terms and Conditions of Sale or any other contractual document between the parties. - Page 35 The information, descriptions, recommendations, and safety notations in this manual are based upon Verathon experience and judgment. The contents of this manual should not be considered to be all‑inclusive or to cover all contingencies.
-
Page 36: Product Specifications
PRODUCT SPECIFICATIONS SYSTEM SPECIFICATIONS GENERAL SPECIFICATIONS Classification: Electrical Class II, Applied Part BF 100–240 VAC, 50 and 60 Hz (If the provided power cord has a third prong, it is Line voltage: used as a functional ground) DC power supply: Max 0.25 A Video monitor IP68... -
Page 37: Component Specifications
COMPONENT SPECIFICATIONS VIDEO MONITOR SPECIFICATIONS COMPONENT Ranger Video Monitor 176 mm LCD TFT, 320 x 240 px Monitor: 89 mm (3.5 in) 166 mm Height: 166 mm Width: 176 mm Depth: 53 mm Weight: 570 g 53 mm BATTERY SPECIFICATIONS CONDITION SPECIFICATION Battery type Lithium Under normal operating conditions, a fully charged battery lasts Battery life approximately 90 minutes. - Page 38 VIDEO BATONS & STATS SPECIFICATIONS COMPONENT Ranger Video Baton 1–2 968 mm Cable length: 968 mm Length of flexible baton: 66 mm Height at camera: 6 mm Width at camera: 7 mm 66 mm 6 mm 7 mm Ranger Video Baton 3–4 959 mm Cable length: 959 mm Length of flexible baton: 106 mm Height at camera: 11 mm Width at camera: 11 mm...
- Page 39 SPECIFICATIONS COMPONENT GVL 0 Stat Blade tip to handle: 36.2 mm Height at camera: 8.6 mm Width at camera: 11.0 mm 11.0 mm Blade length in front of camera: 6.5 mm 11.0 mm Max blade width in front of camera: 11.0 mm Direction of View (DOV): 0°...
- Page 40 SPECIFICATIONS COMPONENT GVL 2 Stat Blade tip to handle: 55.7 mm Height at camera: 8.6 mm Width at camera: 11.2 mm Blade length in front of camera: 28.0 mm 16.0 mm Max blade width in front of camera: 16.0 mm 11.2 mm Direction of View (DOV): 0°...
- Page 41 SPECIFICATIONS COMPONENT GVL 3 Stat Blade tip to handle: 77 mm Height at camera: 14 mm Width at camera: 16 mm Blade length in front of camera: 37 mm 20 mm Max blade width in front of camera: 20 mm 16 mm Direction of View (DOV): 0°...
-
Page 42: Electromagnetic Compatibility
ELECTROMAGNETIC COMPATIBILITY The system is designed to be in compliance with IEC 60601‑1‑2:2007, which contains electromagnetic compatibility (EMC) requirements for medical electrical equipment. The limits for emissions and immunity specified in this standard are designed to provide reasonable protection against harmful interference in a typical medical installation. - Page 43 ELECTROMAGNETIC IMMUNITY Table 7. Guidance and Manufacturer’s Declaration —Electromagnetic Immunity The system is intended for use in the electromagnetic environment specified below. The customer or the user of the system should ensure that it is used in such an environment. COMPLIANCE ELECTROMAGNETIC ENVIRONMENT IMMUNITY TESTS...
- Page 44 Table 7. Guidance and Manufacturer’s Declaration —Electromagnetic Immunity The system is intended for use in the electromagnetic environment specified below. The customer or the user of the system should ensure that it is used in such an environment. COMPLIANCE ELECTROMAGNETIC ENVIRONMENT IMMUNITY TESTS IEC 60601 TEST LEVEL LEVEL...
- Page 45 ACCESSORY CONFORMANCE TO STANDARDS To maintain electromagnetic interference (EMI) within certified limits, the system must be used with the cables, components, and accessories specified or supplied by Verathon . For additional information, see the ®...
-
Page 46: Glossary
GLOSSARY The following table provides definitions for specialized terms used in this manual or on the product itself. For a full list of caution, warning, and informational symbols used on this and other Verathon products, please ® refer to the Verathon Symbol Glossary at verathon.com/symbols.
Need help?
Do you have a question about the GlideScope Ranger and is the answer not in the manual?
Questions and answers