Table of Contents
Advertisement
Quick Links
Advertisement
Table of Contents

Related Manuals for DMP Electronics EBOX-58 Series


Summary of Contents for DMP Electronics EBOX-58 Series
- Page 1 EBOX-58 Series User’s Guide...
-
Page 2: Safety Information
No part of this manual may be reproduced, copied, translated or transmitted, in whole or in part, in any form or by any means without the prior written permission of the DMP Electronics Inc. Copyright 2019 DMP Electronics Inc. - Page 3 DMP Electronics Inc.
-
Page 4: Product Description
DMP and Users in pursuant of trading. Product Description: With this product, herewith known as EBOX-58 Series which is a simplified & an economical design of an embedded device for Special Purpose Personal Computing. The basic specification of this product is comprised of Intel®... -
Page 5: Table Of Contents
30 Onboard Connectors Summary 30 Pin Assignments Chapter 5 34 Taking Care of EBOX 35 Troubleshooting Chapter 6 38 Terms and Condition 38 Warranty 38 Service and Support 38 Return Merchandise Authorization (RMA) Policy 38 Shipping Policy DMP Electronics Inc. - Page 6 EBOX-58 Braswell User Manual Chapter DMP Electronics Inc.
-
Page 7: Unpacking Ebox Mini Pc
Unpacking EBOX Mini PC Component List: Item No. Description Quantity EBOX-58 Series Mini PC 40W Power Adaptor, Vin: 100~240V AC 50~60Hz Power cable (available US, UK, EU, AU types ) VESA screw Note: The accessories are subject to change without immediate notice. - Page 8 EBOX-58 Series can be easily integrated with VESA monitor to access at any time. EBOX-58 Series can be attached to any VESA mounting fixture; allowing it to be securely mounted onto desks, walls, or buildings, and thereby optimizes your work area. It can also attach directly to any size LCD for a mobile system for the use at trade shows, presentations, promotions, etc.
- Page 9 EBOX-58 Braswell User Manual Chapter DMP Electronics Inc.
-
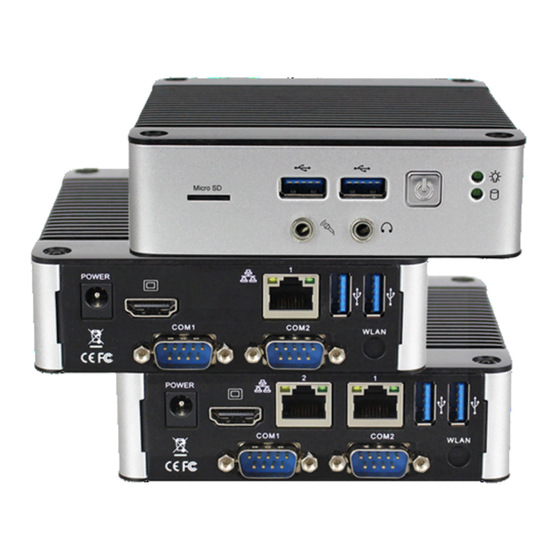
Page 10: Overview
MicroSD slot for expanded storage (not bootable) Back Panel H: RJ-45 LAN Jack Realtek 8111H GigaLAN I: HDMI Output port Support HDMI display J: Power Jack Volt: DC +8 ~ +16V K: COM port Connection for RS-232 port DMP Electronics Inc. -
Page 11: Internal Description
User Manual EBOX-58 Internal description To use SATA SLIM DOM as a boot drive, connect SATA cable and place SATA SLIM DOM under the PCB, fixed at the bottom. Optional item DGF109A M.2 Wi-Fi/BT module info www.compactpc.com.tw DMP Electronics Inc. -
Page 12: Appearance Diagram
EBOX-58 Braswell User Manual Appearance Diagram DMP Electronics Inc. -
Page 13: System Specifications
EBOX-58 Braswell User Manual EBOX-58 Series System Specifications Intel® Atom® x5 –E8000 Quad Core 1.04GHz, 2.00GHz (Burst) Intel® Celeron® N3160 Quad Core 1.6GHz, 2.24GHz (Burst) BIOS AMI BIOS Memory SO-DIMM, DDR3L-1600MHz up to 8GB SATA SATA Gen3 x1, 7-pin internal... - Page 14 EBOX-58 Braswell User Manual Chapter DMP Electronics Inc.
-
Page 15: Bios Reconfiguring
1. AMI BIOS is used in EBOX; To reconfigure the hardware, press <Del> during unit boot up to get into BIOS menu. 1. Move to Save & Exit Restore Defaults, press Enter and select YES to execute. 2. After setting, press “F10” key to save and reboot EBOX. DMP Electronics Inc. -
Page 16: Hot Key
Press <F11> during unit boot up, a device select menu will appear. Use direction key to select boot device and enter to boot up. PXE diskless boot setting 1. Press <Del> during unit boot up to get into BIOS menu. 2. Move to “Advanced” “CSM Configuration” and press Enter. DMP Electronics Inc. - Page 17 3. Move to “Network” and set to UEFI or Legacy meet your PXE environment. Move to “Boot” “FIXED BOOT ORDER Priorities” and set Network as 1 Boot Option. 5. Press “F10” to save and reboot EBOX. DMP Electronics Inc.
-
Page 18: Boot Mode Select
1. Press <Del> during unit boot up to get into BIOS menu, then move to “Boot” “Boot mode select”. 2. Select UEFI or Legacy according to operating system requirements. 3. After setting, press “F10” key to save and reboot EBOX. DMP Electronics Inc. -
Page 19: Bios Com Setting
To use Linux, DOS and real time OS, select PCI Mode for COM1 LPSS HSUART #1 (D30:F3) and COM2 LPSS HSUART #2 (D30:F3). Then, user need to change to Legacy boot mode instead of UEFI boot mode. There is no RS-232 driver required for Legacy boot mode. DMP Electronics Inc. -
Page 20: Drivers Installation Guide
Chipset driver: (Intel® Chipset Device Software) 1. Unzip Chipset file, execute SetupChipset.exe, then click “Next” to continue. 2. A license agreement message will pop out, click Accept and install. 3. Click Finish to complete the setup process. DMP Electronics Inc. -
Page 21: Graphic Driver
1. Unzip Graphic file and execute igxpin.exe, then click “Next” to continue. 2. A license agreement message will pop out, click Accept and install. 3. After installed, select “Yes, I want to restart this computer now” and click Finish to reboot. DMP Electronics Inc. -
Page 22: Audio Driver
EBOX-58 Braswell User Manual Audio driver: 1. Unzip Audio file, execute Setup.exe, and then click “Next” to install. 2. After installed, select “Yes, I want to restart this computer now” and click Finish to reboot. DMP Electronics Inc. -
Page 23: Lan Driver
EBOX-58 Braswell User Manual LAN driver: 1. Unzip LAN file, execute Setup.exe and then click “Next” to install. 2. After installed, click “Finish” to exit the wizard. DMP Electronics Inc. -
Page 24: Txe Driver
1. Unzip TXE file, execute SetupTXE.exe and click “Next” to install: 2. Check “I accept the term in the License Agreement and click “Next” to install. 3. Click “Finish” after successfully installed. DMP Electronics Inc. -
Page 25: Serial Io Driver
User Manual Serial IO driver: (Serial IO & RS-232 driver) EBOX-58 Series RS-232 port support TX/ RX two pins only, driver installation steps as below: 1. ACPI mode BIOS setting: A. Power on and press "Del" key and log into BIOS setup menu. - Page 26 EBOX-58 Braswell User Manual 2. Disable driver signature enforcement permanently: A. Search "cmd" and right click mouse to choose "Run as administrator" B. Type "bcdedit.exe /set testsigning on". C. Reboot system. DMP Electronics Inc.
- Page 27 C. Right-click on two unknown devices, and select Update driver to install RS-232 driver. E. Windows Security message will pop out; click “Install this driver software anyway. F. After installed, RS-232 port TX/ RX can be used. DMP Electronics Inc.
-
Page 28: Additional Information
DMP’s modified driver. For users who need to resume default setting, follow Step 2 and change B. Type "bcdedit.exe /set testsigning off" to undo permanently setting. And the Device Manager will show UartSample Device with exclamation mark and unable to use. DMP Electronics Inc. - Page 29 EBOX-58 Braswell User Manual Chapter DMP Electronics Inc.
-
Page 30: Onboard Connectors Summary
Pin # Signal Name Pin # Signal Name TMDS_Data2+ TMDS CLK Shield TMDS_Data2_Shield TMDS_CLK- TMDS_Data2- TMDS_Data1+ Reserved TMDS_Data1_Shield TMDS_Data1- TMDS_Data0+ DDC/CEC_GND TMDS_Data0_Shield +5V Power TMDS_Data0- Hot Plug Detect TMDS_CLK+ J2: DC Power Input Pin # Signal Name +12VDC DMP Electronics Inc. - Page 31 Pin # Signal Name Pin # Signal Name Received Data Request to Send Transmit Data Clear to Send Signal Ground J12: USB 3.0 connector Pin # Signal Name Pin # Signal Name Receive+ DATA- DATA+ Transmit- Transmit+ Receive- DMP Electronics Inc.
- Page 32 PESERVED_38 PERP0 PESERVED_40 PERPN0 PESERVED_42 GND_45 COEX3 REFCLKP0 COEX2 REFCLKN0 COEX1 GND51 SSCLK CLKREQ0_N PERST0_N PEWAKE0_N PESERVED_W_DISABLE_N GND_57 W_DISABLE1_N PESERVED_2ND_PETP1 I2C_DATA PESERVED_2ND_PERN1 I2C_CLK GND_63 ALERT PESERVED_2ND_PERP1 RESERVED_64 PESERVED_2ND_PERN1 UIM_SWP/PERST1_N GND_69 UIM_PWR_SNK/CLKREQ1_N PESERVED/REFCLKN1 UIM_PWR_SRC/GPIO1/PEWAKE1_N PESERVED/REFCLKP1 3.3V_72 GND_75 3.3V_74 DMP Electronics Inc.
- Page 33 EBOX-58 Braswell User Manual Chapter DMP Electronics Inc.
-
Page 34: Taking Care Of Ebox
EBOX-58 Braswell User Manual Taking Care of EBOX This section provide guidelines on using EBOX-58 Series – Safe using, Storing and Handling. Storing Do not place EBOX in a location that is subject to: Heating sources, such as stove, oven, heater, radiator or air duct ... -
Page 35: Troubleshooting
Go to “Save & Exit” menu using the Direction keys <↑↓> and choose the option “Restore Defaults”, then press <Enter>. A message dialog appears as seen below, hit “Y” key and presses <Enter> to save and recover to the factory setting. “Restore Defaults (Y/N)? Y” DMP Electronics Inc. - Page 36 If EBOX unit connected to a CD/ DVD or USB Drivers, remove all peripherals. And restart to check if Windows operating system starts properly. If EBOX unit continues to display the message “Operating system not found,” and Windows does not start, please contact nearest dealer for servicing. DMP Electronics Inc.
- Page 37 EBOX-58 Braswell User Manual Chapter DMP Electronics Inc.
-
Page 38: Warranty
6. A copy of the invoice for the RMA product(s) will also be shipped to Purchaser. 7. The freight of return to DMP Electronics Inc. is charged to the Purchaser's account and accompanied by an RMA number. Any Returns with freight collect will be refused and returned to you. After Repairing, the cost of freight will be paid by Seller.
Need help?
Do you have a question about the EBOX-58 Series and is the answer not in the manual?
Questions and answers