Table of Contents
Advertisement
Quick Links
Advertisement
Table of Contents

Related Manuals for DMP Electronics EBOX-336 Series


Summary of Contents for DMP Electronics EBOX-336 Series
- Page 1 EBOX-336x Series User’s Guide...
- Page 2 No part of this manual may be reproduced, copied, translated or transmitted, in whole or in part, in any form or by any means without the prior written permission of the DMP Electronics Inc. Copyright 2019 DMP Electronics Inc.
- Page 3 DMP Electronics Inc.
- Page 4 This expense includes the cost of material and the cost of labor. Note: If there is other particular issue, not listed in the above conditions, both parties agreed to follow the General Law of Commerce with fair and reasonable discussion in handling and resolving the argument. DMP Electronics Inc.
-
Page 5: Table Of Contents
37 Onboard Connectors Summary 38 Pin Assignments Chapter 5 45 Taking Care of EBOX 46 Troubleshooting Chapter 6 49 Terms and Condition 49 Warranty 49 Service and Support 49 Return Merchandise Authorization (RMA) Policy 49 Shipping Policy DMP Electronics Inc. - Page 6 EBOX-336x Series User Manual Chapter DMP Electronics Inc.
-
Page 7: Unpacking Ebox Mini Pc
Power plug (available US, UK, EU, AU types ) VESA screw Note: The accessories are subject to change without immediate notice. Check before Use 1. EBOX-336x Unit 2. 22.5W Power adapter 3. Switchable Power Plug 4. VESA screw DMP Electronics Inc. - Page 8 The VESA® FDMI™ Standard defines mounting interfaces, hole patterns and associated cable/ power supply locations for LCD monitors, plasma displays and other flat panel devices. The EBOX-336x Series is designed to fit this standard to make monitor attachment quickly and easily. DMP Electronics Inc.
- Page 9 EBOX-336x Series User Manual Chapter DMP Electronics Inc.
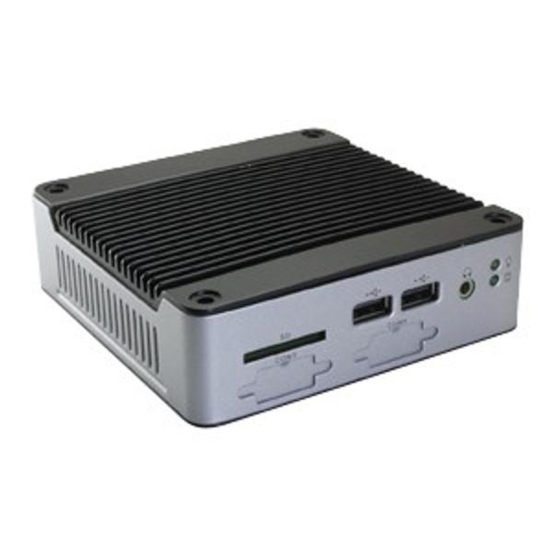
- Page 10 COM3 is optional for RS-232/485 or 8-bit GPIO port G: COM port COM4 is optional for RS-232/485, 8-bit GPIO or CANbus port H: CF card Slot The system is bootable from CF Card H: Mic in For Microphone input DMP Electronics Inc.
- Page 11 Realtek 8111F GBE 1 Gbps LAN G: COM port Optional for RS-232, 485, 422 or GPIO H: HDMI Output port Support HDMI display I: COM port Optional for RS-232 port J: Printer port Parallel port for connecting peripheral DMP Electronics Inc.
-
Page 12: Ebox-336X Series Overview
Mounting VESA 100 x 100 mm Auto Power On Supported Weight 510 g 0-60℃ / -20-60℃ Operating Temp. Certifications CE, FCC, VCCI OS Support Windows 7, WES7, Windows XP, XPe, CE 6.0, Compact 7 and Linux OS DMP Electronics Inc. - Page 13 For system power on/off Note: Unit with Auto Power On function, system will boot up automatically after power restored Connecting the Monitor B: VGA Connection Connecting VGA display via VGA cable C: HDMI Connection Connect HDMI display via HDMI cable DMP Electronics Inc.
-
Page 14: Sd Card Recommendation
SD card: Kingston Canvas Select SDXC UHS-I 64GB Class 10 BIOS: AMI BIOS OS: WES7 (Windows embedded standard 7) Disk benchmark software: CrystalDiskMark 6.0.2 Test result: Seq Q32T1 Seq Q32T1 Read Write SD card Speed 21.34 MB/ s 15.39 MB/ s DMP Electronics Inc. - Page 15 EBOX-336x Series User Manual Chapter DMP Electronics Inc.
-
Page 16: Bios Reconfiguring
2. Move to Advanced “Primary IDE Pin Select”: Parallel IDE = use 2.5” SATA HDD, SATA DOM or CF card as main storage. SD Card = use SD card as main storage. 3. Press <F10> to save the setting and exit. DMP Electronics Inc. -
Page 17: Mpcie Signal Setting
For user want to use mPCIe via COM port signal, set BIOS COM9 Port Interface enabled as below: Move to Security I/O Interface Security and set BIOS COM9 Port Interface as enabled. Press <F10> to save the setting and exit. DMP Electronics Inc. -
Page 18: Boot Setting
1. Boot up EBOX unit and press <Del> to get enter BIOS menu. 2. Move to Boot “Boot Settings Configuration” and press Enter 3. Set your main storage as 1 boot. 4. Press <F10> to save the setting and exit. DMP Electronics Inc. -
Page 19: Pxe Diskless Boot Setting
1. Boot up EBOX unit and press <Del> to enter BIOS menu. 2. Move to Boot then select “Boot Settings Configuration” and press ENTER. 3. Move to “Boot From LAN” and choose “Used INT 19h” then press “F10” to save the setting and exit. DMP Electronics Inc. - Page 20 1. Boot up EBOX unit and press <Del> to enter BIOS menu. 2. Move to Security then select “I/O Interface Security” and press ENTER. 4. Disable “COM5 port” and “COM6 port” interface then press “F10” to save setting and exit. DMP Electronics Inc.
- Page 21 1. Select “Security” then move to “I/O Interface Security” and press ENTER. Enable “COM5 port” and “COM6 port“ interface then press “F10” to save setting and exit. 2. Or move to EXIT and select “Load Optimal Defaults” then press “F10” to save the setting. DMP Electronics Inc.
-
Page 22: Drivers Installation
Unzip downloaded file and double click to execute .exe file then “Next” as below to install: After VGA driver installation completed, you will have to restart the computer. Then you will be able to select the resolution up to 1920 x 1080 pixels. DMP Electronics Inc. - Page 23 4. After installation completed, the Device Manager will update and show the correct device. Note: 1. For dual LAN version, the 1 question mark required 1G LAN driver installation. 2. For EBOX-336x-L3U4C1, the 1 and 2 question marks required 1G LAN driver installation. DMP Electronics Inc.
- Page 24 EBOX-336x Series User Manual Audio driver: Unzip the downloaded file and double click to execute .exe file, then “Next” as below to install. After the installation completed, the Device Manager will update and show the correct device. DMP Electronics Inc.
-
Page 25: Additional Information
DisableDelecteNotify = 0 (Windows TRIM commands are enabled) 3. To disable the TRIM function by executing fsutil behavior set disabledeletenotify 1 Execute fsutil behavior query disabledeletenotify again and make sure the TRIM Commands are disabled. ie: DisableDelecteNotify = 1. DMP Electronics Inc. -
Page 26: Screen Rotation
3. A blue icon = Graphic Utility appears on screen, double click it. 4. In Graphic Utility, go to Rotation section. Select the direction of rotation then press Apply to test and OK to save the changes. DMP Electronics Inc. -
Page 27: Turn Off The Display Function Setting
From the options, you can set the amount of idle time. EBOX-336x Series does not support sleep function; it cannot wake up after sleep. To avoid the unwakeable sleep, please disable function by setting “Put the computer to sleep” to “Never”. DMP Electronics Inc. -
Page 28: Hdmi 1080P Video Playback
“2” to decrease screen height if the screen display is not 100% fitting the monitor. * DMP_mpc-hc_R7 video player is capable of MPEG-2, AVI, MP4…formats without additional software or codecs installation. For Linux platform: Click here to download EBOX HDMI 1080p video playback Linux Driver & GStreamer Installation Guide. DMP Electronics Inc. -
Page 29: Canbus Information
This protocol specifies the high-speed at transmission rates of up to 1 Mbit/s. Supports a cable length of up to 40 meters b. ISO 11898-3: This protocol specifies low-speed at transmission rates above 40 kBit/s up to 125 kBit/s. Support a much longer cable length, 500 to 1000 meters. DMP Electronics Inc. -
Page 30: Linux Installation Guide
Next the system will detect multiple network interfaces on EBOX-336x Series, and users have to decide the primary network interface, both of them could be chosen. Note: the Ethernet cable must be plugged in during this period. DMP Electronics Inc. - Page 31 Please check both Debian desktop environment and standard system utilities, then click to continue. It would start the package installation, and around hundred packages would be installed, after installation completed, the next indication message would pop up. DMP Electronics Inc.
- Page 32 Answer YES to complete the installation as last procedure. When it's completed, the disc tray will eject with pop-up message, press continue to restart and be ready to enjoy the new system! The Debian7.0 The Ubuntu10.04 DMP Electronics Inc.
- Page 33 Reboot and make sure all the display is normal then set the resolution as requested. The supported resolutions: 1920x1080 (16:9) 1280x1024 (5:4) 1280x720 (16:9) 1600x1200 (4:3) 1440x900 (16:10) 1024x768 (4:3) 1680x1050 (16:10) 1280x960 (4:3) 800x600 (4:3) 1400x1050 (4:3) 1366x768 (16:9) 640x480 (4:3) 1440x960 (3:2) 1360x768 (16:9) 1400x960 1280x768 (16:10) DMP Electronics Inc.
- Page 34 Set the Log in as “user account” automatically. Disable the power saving mode when system idle, System / Preference / Screensaver Unmarked the option “Active the screensaver when computer is idle” Click close to complete the system configuration. DMP Electronics Inc.
- Page 35 To add the parameters “pci=nomsi” in the line of Linux of GRUB as below. The MSI/MSI-X must disabled for application of Gigabit LAN (RTL-8111/8168) on the EBOX-336x Series, and it could be set permanent by edition of file /boot/grub/grub.cfg. DMP Electronics Inc.
- Page 36 EBOX-336x Series User Manual Chapter DMP Electronics Inc.
-
Page 37: Onboard Connectors Summary
50-pin (CF Card Series) Printer port Parallel port 25-pin (Printer port Series) SIM card holder SIM card holder 6-pin HDMI HDMI connector 19-pin Note: J11, J12, J14, J15, J17 and Rear are specific for EB-336x-L3U4C1 unit only. DMP Electronics Inc. -
Page 38: Pin Assignments
FTXD- FRXIN+ FRXIN- J16: Power switch J15, J17: DC-IN 2-pin Jack Pin # Status Pin # Signal Name +8V~+24V Input J25: LAN: RJ-45 connector Pin # Signal Name Pin # Signal Name SIM-VCC SIM-RST SIM-VPP SIM-CLK SIM-IO DMP Electronics Inc. - Page 39 J11 (COM1), J12 (COM2): RS-232/ RS-485/ RS-422, 9-pin D-Sub connector Pin # Signal Name Pin # Signal Name DCD/ RS-485- / 422TX- RXD/ RS-485+ / 422TX+ TXD/ 422RX+ DTR1/ 422RX- J13 (COM3), J14 (COM4): RS-232, 9-pin D-Sub connector Pin # Signal Name Pin # Signal Name DMP Electronics Inc.
- Page 40 PORT 47/ PORT 57 PORT 43/ PORT 53 J13 (COM3): RS-232, 9pin D-Sub connector Pin # Signal Name Pin # Signal Name J14 (COM4): CANbus, 9pin D-sub connector Pin # Signal Name Pin # Signal Name CANL CAN_GND CANH DMP Electronics Inc.
- Page 41 Signal Name Pin # Signal Name PORT 50 PORT 54 PORT 51 PORT 55 PORT 56 PORT 52 PORT 57 PORT 53 J13 (COM3), J14 (COM4): RS-232, 9-pin D-Sub connector Pin # Signal Name Pin # Signal Name DMP Electronics Inc.
- Page 42 PORT 02 PORT 07 PORT 03 J14 (COM4): GPIO P1, 9-pin D-Sub connector Pin # Signal Name Pin # Signal Name PORT 10 PORT 14 PORT 11 PORT 15 PORT 16 PORT 12 PORT 17 PORT 13 DMP Electronics Inc.
- Page 43 J14 (COM4): RS-232, RS-485, GPIO P1, 9-pin D-Sub connector Pin # Signal Name Pin # Signal Name DCD/ RS-485-/ PORT 10 RXD/ RS-485+/ PORT 14 TXD/ PORT 11 DTR/ PORT 15 DSR/ PORT 16 RTS/ PORT 12 CTS/ PORT 17 RI/ PORT 13 DMP Electronics Inc.
- Page 44 EBOX-336x Series User Manual Chapter DMP Electronics Inc.
-
Page 45: Taking Care Of Ebox
When a solid object falls or a liquid spills onto EBOX, turn off EBOX immediately; unplug the LAN and power cables. Contact a qualified person or your dealer to check the EBOX before you use it again. Always disconnect the power cord from the power source before cleaning EBOX. DMP Electronics Inc. -
Page 46: Troubleshooting
Go to “Save & Exit” menu using the Direction keys <↑↓> and choose the option “Restore Defaults”, then press <Enter>. A message dialog appears as seen below, hit “Y” key and presses <Enter> to save and recover to the factory setting. “Restore Defaults (Y/N)? Y” DMP Electronics Inc. - Page 47 If EBOX unit connected to a CD/ DVD or USB Drivers, remove all peripherals. And restart to check if Windows operating system starts properly. If EBOX unit continues to display the message “Operating system not found,” and Windows does not start, please contact nearest dealer for servicing. DMP Electronics Inc.
- Page 48 EBOX-336x Series User Manual Chapter DMP Electronics Inc.
-
Page 49: Warranty
6. A copy of the invoice for the RMA product(s) will also be shipped to Purchaser. 7. The freight of return to DMP Electronics Inc. is charged to the Purchaser's account and accompanied by an RMA number. Any Returns with freight collect will be refused and returned to you. After Repairing, the cost of freight will be paid by Seller.
Need help?
Do you have a question about the EBOX-336 Series and is the answer not in the manual?
Questions and answers