Table of Contents
Advertisement
Quick Links
Advertisement
Table of Contents

Related Manuals for DMP Electronics EBOX-3350EX Series


Summary of Contents for DMP Electronics EBOX-3350EX Series
- Page 1 EBOX-3350EX Series User’s Guide DMP Electronics Inc.
- Page 1 EBOX-3350EX Series User’s Guide DMP Electronics Inc.
- Page 2 Copyright 2019 DMP Electronics Inc. Special Notice to Users DMP Electronics Inc. provides no warranty with regard to this manual, the software, or other information contained herein and hereby expressly disclaims any implied warranties of merchantability or fitness for any particular purpose with regard to this manual, the software, or such other information.
- Page 2 Copyright 2018 DMP Electronics Inc. Special Notice to Users DMP Electronics Inc. provides no warranty with regard to this manual, the software, or other information contained herein and hereby expressly disclaims any implied warranties of merchantability or fitness for any particular purpose with regard to this manual, the software, or such other information.
- Page 3 EBOX-3350EX Series User Manual Trademarks Acknowledgment is the registered trademarks of DMP Electronics Inc. Other brand names, product names or trade names appearing in this document are the properties and registered trademarks of their respective owners. All names mentioned herewith are served for identification purpose only.
- Page 3 EBOX-3350EX Series User Manual Trademarks Acknowledgment is the registered trademarks of DMP Electronics Inc. Other brand names, product names or trade names appearing in this document are the properties and registered trademarks of their respective owners. All names mentioned herewith are served for identification purpose only.
- Page 4 EBOX-3350EX Series User Manual Safety Information WARNING Do not expose EBOX to rain or moisture, in order to prevent shock and fire hazard. Never install EBOX in wet locations. Do not open the cabinet to avoid electrical shock. Refer to your nearest dealer for qualified personnel servicing.
- Page 4 EBOX-3350EX Series User Manual Safety Information WARNING Do not expose EBOX to rain or moisture, in order to prevent shock and fire hazard. Never install EBOX in wet locations. Do not open the cabinet to avoid electrical shock. Refer to your nearest dealer for qualified personnel servicing.
- Page 5 EBOX-3350EX Series User Manual Regulatory FCC Class A Note This equipment has been tested and found to comply with the limits for a Class A digital device, pursuant to Part 15 of the FCC Rules. These limits are designed to provide reasonable protection against harmful interference when the equipment is operated in a commercial environment.
- Page 5 EBOX-3350EX Series User Manual Regulatory FCC Class A Note This equipment has been tested and found to comply with the limits for a Class A digital device, pursuant to Part 15 of the FCC Rules. These limits are designed to provide reasonable protection against harmful interference when the equipment is operated in a commercial environment.
- Page 6 DMP and Users in pursuant of trading. Product Description: With this product, herewith also known as EBOX-3350EX Series, which is a simplified & an economical design of an embedded device for Special Purpose Personal Computing. The basic specification of this product is comprised of the x86 technology, design, and with onboard 512 MB DDR3 System memory, VGA display, USB, COM ports and LAN Interfaces.
- Page 6 DMP and Users in pursuant of trading. Product Description: With this product, herewith also known as EBOX-3350EX Series, which is a simplified & an economical design of an embedded device for Special Purpose Personal Computing. The basic specification of this product is comprised of the x86 technology, design, and with onboard 512 MB DDR3 System memory, VGA display, USB, COM ports and LAN Interfaces.
-
Page 7: Table Of Contents
EBOX-3350EX Series User Manual Contents Chapter 1 02 Unpacking your EBOX Mini PC Chapter 2 05 EBOX-3350EX Series Overview 06 System Specifications 07 Peripherals Connecting Chapter 3 10 BIOS Reconfiguring 10 Linux Installation Guide Chapter 4 18 Technical Specifications Chapter 5... -
Page 7: Table Of Contents
EBOX-3350EX Series User Manual Contents Chapter 1 02 Unpacking your EBOX Mini PC Chapter 2 05 EBOX-3350EX Series Overview 06 System Specifications 07 Peripherals Connecting Chapter 3 10 BIOS Reconfiguring 10 Linux Installation Guide Chapter 4 18 Technical Specifications Chapter 5... - Page 8 EBOX-3350EX Series User Manual Chapter DMP Electronics Inc.
- Page 8 EBOX-3350EX Series User Manual Chapter DMP Electronics Inc.
-
Page 9: Unpacking Your Ebox Mini Pc
EBOX-3350EX Series User Manual Unpacking Your EBOX Mini PC Congratulation! You have just acquired EBOX-3350EX Series, please check the following items: Packing List: Q’ty Item No. Description EBOX-3350EX Series Mini PC 75 x 75mm to 100 x 100mm VESA mounting rack (Optional) Note: The accessories are subject to change without immediate notice. -
Page 9: Unpacking Your Ebox Mini Pc
EBOX-3350EX Series User Manual Unpacking Your EBOX Mini PC Congratulation! You have just acquired EBOX-3350EX Series, please check the following items: Packing List: Q’ty Item No. Description EBOX-3350EX Series Mini PC 75 x 75mm to 100 x 100mm VESA mounting rack (Optional) Note: The accessories are subject to change without immediate notice. - Page 10 No matter you are in a jammed office, a crowded place, or public transportation, it can be easily integrated with a VESA LCD to bring you EBOX-3350EX Series access at any time. It can attach to any VESA mounting fixture; allowing it to be securely mounted onto desks, walls, or buildings, and thereby optimizes your work area.
- Page 10 No matter you are in a jammed office, a crowded place, or public transportation, it can be easily integrated with a VESA LCD to bring you EBOX-3350EX Series access at any time. It can attach to any VESA mounting fixture; allowing it to be securely mounted onto desks, walls, or buildings, and thereby optimizes your work area.
- Page 11 EBOX-3350EX Series User Manual Chapter DMP Electronics Inc.
- Page 11 EBOX-3350EX Series User Manual Chapter DMP Electronics Inc.
-
Page 12: Ebox-3350Ex Series Overview
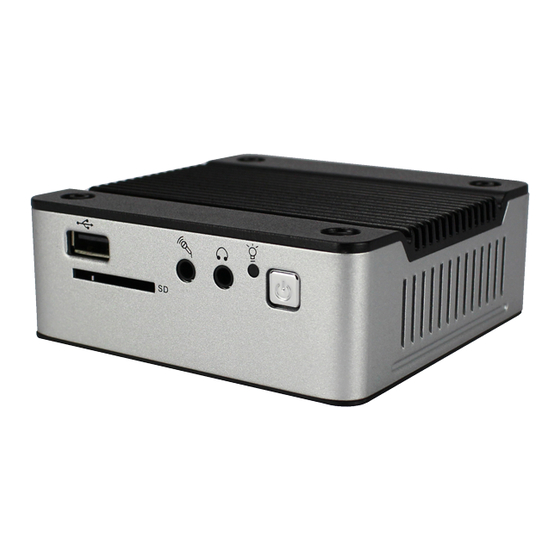
EBOX-3350EX Series User Manual EBOX-3350EX Series Overview Front Panel A: Reset Button For system reset or turn on. (Available in 3350EX/ 3350EX-C2). B: Power LED The power LED lights up when the system is turned on. C: Audio Line Out Audio output to speaker. -
Page 12: Ebox-3350Ex Series Overview
EBOX-3350EX Series User Manual EBOX-3350EX Series Overview Front Panel A: Reset Button For system reset or turn on. (Available in 3350EX/ 3350EX-C2). B: Power LED The power LED lights up when the system is turned on. C: Audio Line Out Audio output to speaker. -
Page 13: System Specifications
EBOX-3350EX Series User Manual System Specification Supported Operating System Windows XP Vortex86EX (400MHz) Windows XP Embedded Main Memory Windows Embedded CE 512MB DDR3 (32-bit DRAM bus) Linux OS (click Linux Support List for details) BIOS SeaBIOS Resolution up to 1024 x 768 pixels Peripheral 1. -
Page 14: Peripherals Connecting
User Manual Peripherals Connecting the Power Adaptor A: Mini 5pin USB DC Power Jack To use EBOX-3350EX Series please attach the USB cable or spec in +5V@2A AC adapter for the power source. Note: Unit with Auto Power On support function, it will turned on automatically after power adaptor plug on. -
Page 14: Peripherals Connecting
User Manual Peripherals Connecting the Power Adaptor A: Mini 5pin USB DC Power Jack To use EBOX-3350EX Series please attach the USB cable or spec in +5V@2A AC adapter for the power source. Note: Unit with Auto Power On support function, it will turned on automatically after power adaptor plug on. - Page 15 EBOX-3350EX Series User Manual Peripherals Connecting the USB EBOX-3350EX series provides 2 external USB ports (1 at the front, 1 at the rear). C: SD Card Slot For booting device by SD Card. D: Microphone/ Earphone The EBOX-3350EX Series supports...
- Page 15 EBOX-3350EX Series User Manual Peripherals Connecting the USB EBOX-3350EX series provides 2 external USB ports (1 at the front, 1 at the rear). C: SD Card Slot For booting device by SD Card. D: Microphone/ Earphone The EBOX-3350EX Series supports...
- Page 16 EBOX-3350EX Series User Manual Chapter DMP Electronics Inc.
- Page 16 EBOX-3350EX Series User Manual Chapter DMP Electronics Inc.
-
Page 17: Bios Reconfiguring
EBOX-3350EX Series User Manual BIOS Reconfiguring SeaBIOS is used in EBOX-3350EX Series, press <F12> during boot up and enter SeaBIOS setup menu. (SeaBIOS Setup menu) SeaBIOS time and date setting is fixed, it can’t be change. Suggest to chage the setting from operating system (i.e DOS or Linux) . -
Page 17: Bios Reconfiguring
EBOX-3350EX Series User Manual BIOS Reconfiguring SeaBIOS is used in the EBOX-3350EX Series. To reconfigure the EBOX-3350EX Series, press or hit the <F12> key to enter your BIOS setup main menu as below. (SeaBIOS Setup menu) Linux installation For Debian7.0/ Ubuntu10.04 Regarding the system installation of Debian7.0/Ubuntu10.04, please follow the steps... - Page 18 EBOX-3350EX Series User Manual Then the system will detect the network hardware, and requires users to load the firmware files for network device rtl8168, just answer no for this inquiry and move forward. Next the system will detect multiple network interfaces on the EBOX-336x Series, and users have to decide the primary network interface, both of them could be chosen.
- Page 18 EBOX-3350EX Series User Manual Then the system will detect the network hardware, and requires users to load the firmware files for network device rtl8168, just answer no for this inquiry and move forward. Next the system will detect multiple network interfaces on the EBOX-336x Series, and users have to decide the primary network interface, both of them could be chosen.
- Page 19 EBOX-3350EX Series User Manual Then the system would keep asking you few questions for configuration, suggestions were attached as follow. Then the system would keep popping out questions for configuration, suggestions as below: For Software selection: Please remark both the Debian desktop environment and standard system utilities, then click to continue.
- Page 19 EBOX-3350EX Series User Manual Then the system would keep asking you few questions for configuration, suggestions were attached as follow. Then the system would keep popping out questions for configuration, suggestions as below: For Software selection: Please remark both the Debian desktop environment and standard system utilities, then click to continue.
- Page 20 EBOX-3350EX Series User Manual 2. Kernel and graphic driver installation Install the Kernel Package (Console mode) For Debian7.0, you can skip this procedure for kernel installation; Because system could work with default kernel version (3.2.0). Clicking the icon of the terminal from the application. And download the kernel 2.6.32-21 from below link then to store the kernel package.
- Page 20 EBOX-3350EX Series User Manual 2. Kernel and graphic driver installation Install the Kernel Package (Console mode) For Debian7.0, you can skip this procedure for kernel installation; Because system could work with default kernel version (3.2.0). Clicking the icon of the terminal from the application. And download the kernel 2.6.32-21 from below link then to store the kernel package.
- Page 21 EBOX-3350EX Series User Manual Or you can remove the default kernel 2.6.32-??-generic that be arranged as a higher priority than the kernel we installed for the EBOX-3350EX platform, with the instruction below through the terminal. First, check what version be installed as default in the system: # grep –w linux-image-2.6.32 /var/log/dpkg.log...
- Page 21 EBOX-3350EX Series User Manual Or you can remove the default kernel 2.6.32-??-generic that be arranged as a higher priority than the kernel we installed for the EBOX-3350EX platform, with the instruction below through the terminal. First, check what version be installed as default in the system: # grep –w linux-image-2.6.32 /var/log/dpkg.log...
- Page 22 EBOX-3350EX Series User Manual Install the VGA driver (Console mode) Switch to console mode by pressing key <Ctrl> + <Alt> + <F1>, then copy the VGA driver rdc_drv.so to the driver folder /usr/lib/xor/modules/drivers/, before that, you can download the drivers as below for Debian7 and Ubuntu10.04 individually.
- Page 22 EBOX-3350EX Series User Manual Install the VGA driver (Console mode) Switch to console mode by pressing key <Ctrl> + <Alt> + <F1>, then copy the VGA driver rdc_drv.so to the driver folder /usr/lib/xor/modules/drivers/, before that, you can download the drivers as below for Debian7 and Ubuntu10.04 individually.
- Page 23 Set the Log in as “user account” automatically. Disable the power saving mode when system idle, System / Preference / Screensaver Unmarked the option “Active the screensaver when computer is idle”. Now, it is a workable Linux system for your EBOX-3350EX Series. DMP Electronics Inc.
- Page 23 Set the Log in as “user account” automatically. Disable the power saving mode when system idle, System / Preference / Screensaver Unmarked the option “Active the screensaver when computer is idle”. Now, it is a workable Linux system for your EBOX-3350EX Series. DMP Electronics Inc.
- Page 24 EBOX-3350EX Series User Manual Chapter DMP Electronics Inc.
- Page 24 EBOX-3350EX Series User Manual Chapter DMP Electronics Inc.
-
Page 25: Technical Specifications
1. SD Slot x 1 (Bootable but hot-swappable not support). 2. “AP” indicated Auto Power On supported feature, system will turned on automatically after power adapter is plug on. EBOX-3350EX Series Models Listing: EBOX-3350EX: Standard Version. EBOX-3350EX-AP: Standard Version with Auto Power On Support. -
Page 25: Technical Specifications
1. SD Slot x 1 (Bootable but hot-swappable not support). 2. “AP” indicated Auto Power On supported feature, system will turned on automatically after power adapter is plug on. EBOX-3350EX Series Models Listing: EBOX-3350EX: Standard Version. EBOX-3350EX-AP: Standard Version with Auto Power On Support. - Page 26 EBOX-3350EX Series User Manual Chapter DMP Electronics Inc.
- Page 26 EBOX-3350EX Series User Manual Chapter DMP Electronics Inc.
-
Page 27: Onboard Connectors Summary
EBOX-3350EX Series User Manual Onboard Connectors Summary Summary Table for CPU Board Description Type of Connections Pin nbrs. D-Sub connector 15-pin DC +5V Input Mini USB Jack 1-pin Line out Audio Jack 2-pin Mic in Audio Jack 2-pin USB (Front) -
Page 27: Onboard Connectors Summary
EBOX-3350EX Series User Manual Onboard Connectors Summary Summary Table for CPU Board Description Type of Connections Pin nbrs. D-Sub connector 15-pin DC +5V Input Mini USB Jack 1-pin Line out Audio Jack 2-pin Mic in Audio Jack 2-pin USB (Front) - Page 28 EBOX-3350EX Series User Manual Rear Connectors Outline EBOX-3350EX/ AP REAR LOOK G: USB 2.0 H: VGA I: RJ-45 LAN J: Mini 5pin USB DC Power Jack EBOX-3350EX-C2/ C2AP REAR LOOK K: RS-232 port *Available in EBOX-3350EX-C2/ 3350EX-C2AP DMP Electronics Inc.
- Page 28 EBOX-3350EX Series User Manual Rear Connectors Outline EBOX-3350EX/ AP REAR LOOK G: USB 2.0 H: VGA I: RJ-45 LAN J: Mini 5pin USB DC Power Jack EBOX-3350EX-C2/ C2AP REAR LOOK K: RS-232 port *Available in EBOX-3350EX-C2/ 3350EX-C2AP DMP Electronics Inc.
-
Page 29: Pin Assignments
EBOX-3350EX Series User Manual Pin Assignments J3: VGA – 15-pin D-Sub connector Pin # Signal Name Pin # Signal Name Pin # Signal Name HYSYNC VSYNC J4: Mini USB DC Power Input Pin # Signal Name +5V Input Data ---... -
Page 29: Pin Assignments
EBOX-3350EX Series User Manual Pin Assignments J3: VGA – 15-pin D-Sub connector Pin # Signal Name Pin # Signal Name Pin # Signal Name HYSYNC VSYNC J4: Mini USB DC Power Input Pin # Signal Name +5V Input Data ---... - Page 30 EBOX-3350EX Series User Manual J12: LAN: RJ-45 connector Pin # Signal Name Pin # Signal Name FTXD+ FTXD- FRXIN+ FRXIN- J13, J14: COM - 9-pin D-Sub connector Pin # Signal Name Pin # Signal Name LEDS: POWER ON/ OFF LED Color...
- Page 30 EBOX-3350EX Series User Manual J12: LAN: RJ-45 connector Pin # Signal Name Pin # Signal Name FTXD+ FTXD- FRXIN+ FRXIN- J13, J14: COM - 9-pin D-Sub connector Pin # Signal Name Pin # Signal Name LEDS: POWER ON/ OFF LED Color...
- Page 31 EBOX-3350EX Series User Manual Chapter DMP Electronics Inc.
- Page 31 EBOX-3350EX Series User Manual Chapter DMP Electronics Inc.
- Page 32 When this happens, relocate the EBOX-3350EX Series by a suitable distance away from it. Do not drop the EBOX-3350EX Series from working table nor place heavy objects on top of it. DMP Electronics Inc.
- Page 32 When this happens, relocate the EBOX-3350EX Series by a suitable distance away from it. Do not drop the EBOX-3350EX Series from working table nor place heavy objects on top of it. DMP Electronics Inc.
- Page 33 EBOX-3350EX Series User Manual Cleaning Your VESA PC Clean the VESA PC with a soft, dry cloth or a soft cloth lightly moistened with a mild detergent solution. Do not use any type of abrasive pad, scouring powder, or solvent such as alcohol or benzene, as these may damage the finish of EBOX.
- Page 33 EBOX-3350EX Series User Manual Cleaning Your VESA PC Clean the VESA PC with a soft, dry cloth or a soft cloth lightly moistened with a mild detergent solution. Do not use any type of abrasive pad, scouring powder, or solvent such as alcohol or benzene, as these may damage the finish of EBOX.
-
Page 34: Troubleshooting
Remove the power adaptor from the EBOX-3350EX Series, unplug the power supply, and plug it in again. Then turn on the power. If you have just connected EBOX-3350EX Series to a CD/ DVD or USB Drivers, remove these peripherals. And restart to confirm that the Windows operating system starts properly. If EBOX- 3350EX Series continues to display the message ”Operating system not found,”... -
Page 34: Troubleshooting
Remove the power adaptor from the EBOX-3350EX Series, unplug the power supply, and plug it in again. Then turn on the power. If you have just connected EBOX-3350EX Series to a CD/ DVD or USB Drivers, remove these peripherals. And restart to confirm that the Windows operating system starts properly. If EBOX- 3350EX Series continues to display the message ”Operating system not found,”... - Page 35 EBOX-3350EX Series User Manual Chapter DMP Electronics Inc.
- Page 35 EBOX-3350EX Series User Manual Chapter DMP Electronics Inc.
-
Page 36: Terms And Condition
The Purchaser must pre-pay shipping for any defective system or parts returned under the warranty. DMP Electronics Inc. shall not be liable for risk of loss or damage during shipment of your returned system or parts if you fail to insure the shipment. -
Page 36: Terms And Condition
The Purchaser must pre-pay shipping for any defective system or parts returned under the warranty. DMP Electronics Inc. shall not be liable for risk of loss or damage during shipment of your returned system or parts if you fail to insure the shipment.
Need help?
Do you have a question about the EBOX-3350EX Series and is the answer not in the manual?
Questions and answers