Table of Contents
Advertisement
Quick Links
Advertisement
Table of Contents

Related Manuals for DMP Electronics EBOX-ALN3350 Series


Summary of Contents for DMP Electronics EBOX-ALN3350 Series
- Page 1 EBOX-ALN3350/ALJ3455 Series Mini PC User’s Guide...
- Page 2 No part of this manual may be reproduced, copied, translated or transmitted, in whole, in part, or in any form or by any means without the prior written permission of the DMP Electronics Inc. Copyright 2021 DMP Electronics Inc.
- Page 3 DMP Electronics Inc.
- Page 4 This expense includes material costs and the cost of labor. Note: If there is other particular issue, not listed in the above conditions, both parties agreed to follow General Law of Commerce with fair and reasonable discussion in handling and resolving the argument. DMP Electronics Inc.
-
Page 5: Table Of Contents
33 Onboard Connectors Summary 34 Pin Assignments Chapter 5 39 Taking Care of EBOX 41 Troubleshooting Chapter 6 43 Terms and Condition 43 Warranty 43 Service and Support 43 Return Merchandise Authorization (RMA) Policy 43 Shipping Policy DMP Electronics Inc. - Page 6 EBOX-ALN3350/ALJ3455 Series User Manual Chapter DMP Electronics Inc.
-
Page 7: Unpacking Ebox Mini Pc
Power cable (Available US, UK, EU, AU types) VESA screw Note: The accessories are subject to change without immediate notice. Check before Use 1. EBOX-ALN3350/ALJ3455 Series Unit 2. Power adapter 40W 3. Power cable 4. VESA screws DMP Electronics Inc. - Page 8 With FANLESS design, it’s ideal to be used in the environment where temperature demand is critical. This Series supports Windows 10, Windows 10 IoT and Linux OS that meet ready-to-market demand and provide competitive advantages for customers. DMP Electronics Inc.
- Page 9 EBOX-ALN3350/ALJ3455 Series User Manual Chapter DMP Electronics Inc.
- Page 10 Connection for GPIO applications Back Panel I: RJ-45 LAN Jack Realtek 8111H GigaLAN J: HDMI Output port Support HDMI display K: Mic in/Line out phone jack Realtek ALC662VD Mic in/Line out combo jack L: Power Jack DC +12V~+16V DMP Electronics Inc.
-
Page 11: Internal Description
EBOX-ALN3350/ALJ3455 Series User Manual Internal description Optional item MINIPCIE-WLAN-161H WiFi/BT module info www.compactpc.com.tw DMP Electronics Inc. -
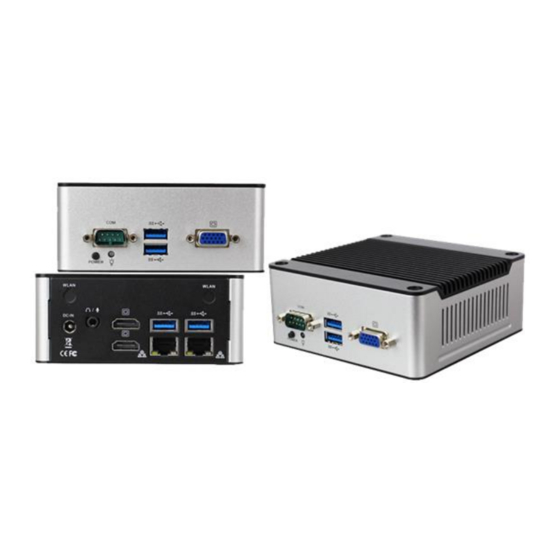
Page 12: Appearance Diagram
EBOX-ALN3350/ALJ3455 Series User Manual Appearance Diagram DMP Electronics Inc. - Page 13 EBOX-ALN3350/ALJ3455 Series User Manual Order information DMP Electronics Inc.
-
Page 14: Peripherals
A: DC power Jack +12V/3.33A AC adapter with power cable is used for the power source Connecting the Monitor B: VGA Connection Connecting VGA display via VGA cable C: HDMI Connection Connect HDMI display via HDMI cable DMP Electronics Inc. - Page 15 Connection for 8-bit GPIO applications H: D-Sub 9-pin connector (w/COM & 8-bit GPIO) Connection for 8-bit GPIO applications I: RJ-45 LAN RJ-45 LAN jack for Ethernet connection J: Microphone/Earphone Functions as audio Line out and Mic in DMP Electronics Inc.
- Page 16 EBOX-ALN3350/ALJ3455 Series User Manual Chapter DMP Electronics Inc.
-
Page 17: Bios Reconfiguring
Load Default Setting 1. To reconfigure the hardware, press <Esc> key to enter BIOS setup main menu. 2. Press “F3” key to load optimized defaults as below: 3. After setting, press “F4” key to save & exit. DMP Electronics Inc. - Page 18 Press <F7> after boot up, a select menu will appear. Use direction key to select boot device. BIOS COM Setting (RS-232/485/422) 1. Press <Esc> during boot up, enter BIOS menu, move to “Advanced” for “Super IO Configuration”. DMP Electronics Inc.
- Page 19 EBOX-ALN3350/ALJ3455 Series User Manual 2. Move to “Serial Port 1 Configuration”. 3. Next to Transmission Mode and select COM port Mode. 4. Press “F4” key to save & exit. DMP Electronics Inc.
-
Page 20: Gpio Setting
In addition, the voltage at the output is different than general GPIO Ports, see below: Port 1, 2, 3, 4, 5, 6, 8 -> Output: Low: 0V Port 1, 2, 3, 4, 5, 6, 8 -> Output: High: 5V Port 7 -> Output: Low: 0V Port 7 -> Output: High: 3.1V DMP Electronics Inc. -
Page 21: At Mode Setting (Auto Power On Function)
EBOX-ALN3350/ALJ3455 Series supports “Auto Power On function”, it’s a function allows system to boot up automatically after power restored. 1. In BIOS Menu, move to “Chipset” and “South Cluster Configuration”. 2. Set “System State after Power Failure” as “Always On”, press “F4” key to save & exit. DMP Electronics Inc. -
Page 22: Serial Port Console Redirection
2. Set “Terminal Type” as “VT100+”, press “F4” key to save & exit. Terminal Type Emulation: [ANSI]: Extended ASCII char set; [VT100]: ASCII char set; [VT100+]: Extended VT100 to support color, function keys, etc. [VT-UTF8]: Uses UTF8 encoding to map Unicode chars onto 1 or more Bytes. DMP Electronics Inc. -
Page 23: Os Selection
Three optional settings: [Windows], [Intel Linux] and [MSDOS]. Note: User need to select OS mode before installing corresponding OS drivers, otherwise problems will occur when installing drivers. 3. After setting, press “F4” key to save & exit. DMP Electronics Inc. -
Page 24: Pxe Diskless Boot Selection
2. Set “Network Stack” Enabled and Ipv4 & Ipv6 PXE Support will appear. Note: Ipv4 & Ipv6 stand for Internet Protocol version 4 & 6, when Network Stack set to Enabled, PXE diskless boot will be created. DMP Electronics Inc. -
Page 25: Drivers Installation Guide
Chipset driver: (Intel® Chipset Device Software) 1. Unzip the downloaded file and execute SetupChip.exe, then click “Next” to install: 2. A license agreement message will pop out, click Accept and install. 3. Click Finish to complete the setup process. DMP Electronics Inc. -
Page 26: Graphic Driver
1. Execute igxpin.exe and click “Next” to install: 2. A license agreement message will pop out, click Accept and install. 3. After installed, select “Yes, I want to restart this computer now” and click Finish to reboot. DMP Electronics Inc. -
Page 27: Audio Driver
EBOX-ALN3350/ALJ3455 Series User Manual Audio driver: 1. Execute Setup.exe and installer will pop out, then click “Next” to install: 2. After installed, select “Yes, I want to restart this computer now” and click Finish to reboot. DMP Electronics Inc. -
Page 28: Lan Driver
EBOX-ALN3350/ALJ3455 Series User Manual LAN driver: 1. Execute Setup.exe and InstallShield Wizard will pop out, then click “Next” to install: 2. After installed, click “Finish” to exit the wizard. DMP Electronics Inc. -
Page 29: Txe Driver
Trusted Execution Engine is a hardware technology, primary goals are attestation of the authenticity of a platform and its operating system. 1. Execute SetupTXE.exe and click “Next” to install: 2. Check “I accept the term in the License Agreement and click “Next” to install. 3. Click “Finish” after successfully installed. DMP Electronics Inc. -
Page 30: Irmt Driver
1. Execute Setup.exe and click “Next” to install: 2. Check “I accept the term in the License Agreement and click “Next” to install. 3. Click “Finish” after successfully installed. DMP Electronics Inc. -
Page 31: Ish Driver
EBOX-ALN3350/ALJ3455 Series User Manual ISH driver: (Intel® Integrated Sensor Solution) Intel® Integrated Sensor Solution installs Intel Integrated Sensor Solution driver to EBOX. 1. Double click SetupISS.exe and click install. 2. Click “Finish” after successfully installed. DMP Electronics Inc. - Page 32 EBOX-ALN3350/ALJ3455 Series User Manual Chapter DMP Electronics Inc.
-
Page 33: Onboard Connectors Summary
G-LAN RJ45 connector 8-pin SIM card holder SIM card holder 6-pin Audio jack Mic in/Line out Combo connector 2-pin USB 3.0 x 4 USB 3.0 connector 9-pin COM (RS-232/485/422) 9-pin D-Sub connector 9-pin GPIO 9-pin D-Sub connector 9-pin DMP Electronics Inc. -
Page 34: Pin Assignments
Signal Name Pin # Signal Name Pin # Signal Name HYSYNC VSYNC J5: SATAIII connector Pin # Signal Name Pin # Signal Name Receive- Transmit+ Receive+ Transmit- LEDS: POWER ON/ OFF LED Color State Blue Power On DMP Electronics Inc. - Page 35 1.5V COEX2/NC UIM_PER CLKREQ# UIM_DATA UIM_CLK REFCLK- UIM_PESET REFCLK+ UIM_VCCP/NC Mechanical Key Reserved/NC W_DISABLE# Reserved/NC RESET# 3.3V PERN0/MSATA_RXP PERP0/MSATA_RXN 1.5V SMB_CLK SMB_DATA PERTN0/MSATA_TXN PERTP0/MSATA_TXP USB_D- USB_D+ 3.3V LED_WWAN#/NC 3.3V LED_WLAN#/NC LED_WPAN#/NC Reserved/NC 1.5V Reserved/NC Reserved/NC 3.3V MSATA_DET DMP Electronics Inc.
- Page 36 1.5V COEX2/NC LFRAME_N CLKREQ# LAD3 LAD2 REFCLK- LAD1 REFCLK+ LAD0 Mechanical Key PLTRST_N W_DISABLE# LPC_CLK RESET# 3.3V PERN0 PERP0 1.5V SMB_CLK SMB_DATA PERTN0 PERTP0 USB_D- USB_D+ 3.3V LED_WWAN#/NC 3.3V LED_WLAN#/NC LED_WPAN#/NC Reserved/NC 1.5V Reserved/NC Reserved/NC 3.3V Reserved/NC DMP Electronics Inc.
- Page 37 J13: RS-232/485/422 9-pin D-Sub connector Pin # Signal Name Pin # Signal Name DCD/RS-422 TX-/RS-485 DATA- DSR1 RXD/RS-422 TX+/RS-485 DATA+ RTS1 TXD1/RS-422 RX+ CTS1 DTR1/RS-422 RX- J14: GPIO 9-pin D-Sub connector Pin # Signal Name Pin # Signal Name DMP Electronics Inc.
- Page 38 EBOX-ALN3350/ALJ3455 Series User Manual Chapter DMP Electronics Inc.
-
Page 39: Taking Care Of Ebox
When a solid object falls or a liquid spills onto EBOX, turn off EBOX immediately; unplug LAN and power cables. Contact your dealer to check the EBOX before you use it again. Always disconnect the power cord from the power source before cleaning EBOX. DMP Electronics Inc. -
Page 40: Troubleshooting
Go to “Save & Exit”, use Direction keys <↑↓> to choose option “Restore Defaults”, press <Enter>. A message dialog appears as seen below, hit “Y” and presses <Enter> to recover to the factory setting. “Restore Defaults (Y/N)? Y” DMP Electronics Inc. - Page 41 If EBOX unit connected to a CD/DVD or USB Drivers, remove all peripherals. Restart to check if operating system starts properly. If EBOX unit continues to display “Operating system not found,” please contact nearest dealer for servicing. DMP Electronics Inc.
- Page 42 EBOX-ALN3350/ALJ3455 Series User Manual Chapter DMP Electronics Inc.
-
Page 43: Warranty
The Purchaser must pre-pay shipping for any defective system or parts returned under the warranty. DMP Electronics Inc. shall not be liable for risk of loss or damage during shipment of the returned system or parts All products must be shipped back to DMP Electronics Inc. in original or equivalent packaging.
Need help?
Do you have a question about the EBOX-ALN3350 Series and is the answer not in the manual?
Questions and answers