Table of Contents
Advertisement
Quick Links
Advertisement
Table of Contents

Related Manuals for DMP Electronics EBOX-335xDX3Series


Summary of Contents for DMP Electronics EBOX-335xDX3Series
- Page 1 EBOX-335xDX3 Series User’s Guide...
- Page 2 DMP Electronics reserves the right to make any modification to this manual or the information contained herein at any time without notice. The software described herein is governed by the terms of a separated user license agreement or label sticker.
- Page 3 Trademarks Acknowledgment The EBOX-335xDX3 Series is the registered trademarks of DMP Electronics Inc. Microsoft, Windows, and AMI are registered trademarks of Microsoft Corporation and American Megatrends Inc. in the United States and/ or other countries respectively. Other brand names, product names or trade names appearing in this document are the properties and registered trademarks of their respective owners.
-
Page 4: Safety Information
Safety Information WARNING Do not expose EBOX to rain or moisture, in order to prevent shock and fire hazard. Never install EBOX in wet locations. Do not open the cabinet to avoid electrical shock. Refer to your nearest dealer for qualified personnel servicing. - Page 5 Regulatory FCC Class A Note This equipment has been tested and found to comply with the limits for a Class A digital device, pursuant to Part 15 of the FCC Rules. These limits are designed to provide reasonable protection against harmful interference when the equipment is operated in a commercial environment. This equipment generates, uses and can radiate radio frequency energy and, if not installed and used in accordance with the instruction manual, may cause harmful interference in which case the user will be required to correct the interference at his own expense.
-
Page 6: Product Description
Purchase Agreement Purpose: In accordance to the general commercial conduct of Trust and Fair Trade, herewith below is the agreement for the protection for both parties, DMP and Users in pursuant of trading. Product Description: With this product, herewith also known as EBOX-335xDX3 Series, which is a simplified & an economical design of an embedded device for Special Purpose Personal Computing. -
Page 7: Table Of Contents
Contents Chapter 1 02 Unpacking Your EBOX Mini PC Chapter 2 05 EBOX-335xDX3 Series Overview 06 System Specification 07 Peripherals Chapter 3 10 BIOS Reconfiguring 11 Drivers Installation Guide 14 Additional Information 14 Screen rotation 15 Turn off the display function setting 16 PXE Diskless boot setting 17 Linux installation Chapter 4... - Page 8 Chapter...
-
Page 9: Unpacking Your Ebox Mini Pc
Unpacking Your EBOX Mini PC Congratulation! You have just acquired EBOX-335xDX3 Series, please check the following items: Packing List: Q’ty Item No. Description EBOX-335xDX3 Series VESA PC 75 x 75 mm to 100 x 100 mm VESA mounting rack (Optional) Note: The accessories are subject to change without immediate notice. - Page 10 Preface EBOX-335xDX3 Series: VESA PC The EBOX-335xDX3 Series is a revolutionary device which is especially designed for limited physical space and temperature concerns. No matter you are in a jammed office, a crowded place, or public transportation, EBOX-335xDX3 Series can be easily integrated with a VESA LCD to bring it to access at any time.
- Page 11 Chapter...
-
Page 12: Ebox-335Xdx3 Series Overview
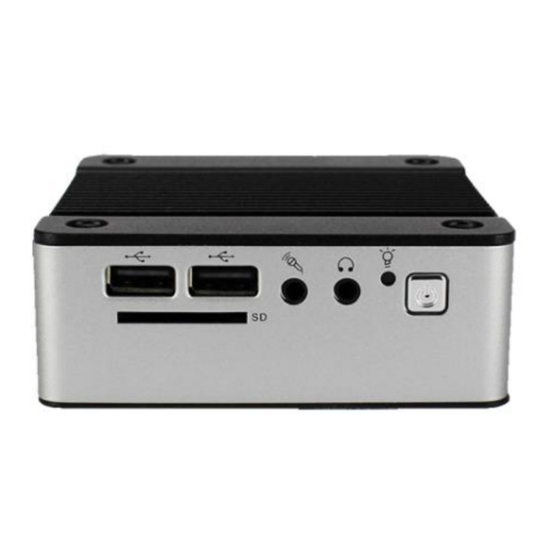
EBOX-335xDX3 Series Overview Front Panel A: Reset Button For system reset or turn on. Available in 335xDX3/ 335xDX3-C2 B: Power LED The power LED lights up when the system is turned on. C: Audio Line Out Audio output to speaker. D: Audio Mic In For Microphone input. -
Page 13: System Specification
System Specifications Supported Windows O/S Windows 7 Home/ Pro Vortex86DX3 (1GHz) Windows 7 Embedded Windows XP Home/ Pro Main Memory Windows XP Embedded 1GB DDR3 (32-bit DRAM bus, EBOX-3350DX3 Series) Linux OS 2GB DDR3 (32-bit DRAM bus, EBOX-3352DX3 Series) (click Linux Support List for details) For Windows 7 users, EBOX-335x Series support... -
Page 14: Peripherals
Peripherals Connecting the Power Adaptor A: DC Power Jack To use EBOX-335xDX3 Series immediately, please attach the USB cable or supplied AC adapter for the power source. Note: With the Auto Power On support function (Optional), the system then will be turned on automatically. - Page 15 Peripherals Connecting the USB EBOX-335xDX3 series provides 3 external USB ports (2 at front, 1 at rear). C: SD Slot For booting device by SD Card. D: Microphone/ Earphone The EBOX-335xDX3 Series supports Microphone Input and Speaker Output E: Reset Button For system reset or turn on Note: Models with Auto Power On feature has Reset Button Eliminated.
- Page 16 Chapter...
-
Page 17: Bios Reconfiguring
BIOS Reconfiguring AMI BIOS is used in the EBOX-335xDX3 Series. To reconfigure the EBOX- 335xDX3 Series, press or hit the <Del> key to enter the BIOS setup main menu as below: Press <Esc> to go back to main menu. Press <F9> to load factory default setting. Adjust your BIOS settings, and be sure that your settings will affect. -
Page 18: Drivers Installation Guide
Drivers Installation guide Under the Windows series OS, the following drivers need to be installed manually. VGA driver Ethernet driver Wireless USB wifi Dongle driver (Optional) Audio driver (for windows XP only) Note: Please download EBOX-335xDX3 Series from EBOX Support Page For Windows 7 or Windows 7 Embedded OS, install the XMPlay for audio player download here. - Page 19 Ethernet driver: Find the yellow question mark of Ethernet in the Device Manager under the control panel/ system. Select “Update Driver Software” and choose the right path, then click “ Install this driver software anyway ” when Windows Security popped out. After installation completed, the Device Manager will update and show the correct device.
-
Page 20: Audio Driver
Audio driver: Unzip the downloaded file and double click the setting .exe file, then “Next” as below to install. After the installation completed, the Device Manager will update and show the correct device. -
Page 21: Additional Information
Additional information Screen rotation: After VGA driver installation completed, type “Customize icons” in search bar. Adjust Utility Application to “Show icon and notifications”. A blue icon = Graphic Utility appears on screen, double click it. In Graphic Utility, go to Rotation section. Select the direction of rotation then press Apply to test and OK to save the changes. -
Page 22: Turn Off The Display Function Setting
Turn off the display function setting: For Windows 7 or Windows 7 Embedded OS users, click Start Menu > Control Panel > Power Options or simply search for "Power Options" (without quotes). You will see a list of different power plans. The plan currently in use has a blue dot in front of it. -
Page 23: Pxe Diskless Boot Setting
PXE Diskless boot setting: Boot up EBOX unit and press <Del> to get into BIOS menu. Select “Boot” then move to “Boot Settings Configuration” and press ENTER. Move to “Boot From LAN” and choose “Used INT 19h” then press “F10” to save setting and exit. -
Page 24: Linux Installation
Linux installation For Debian7.0/ Ubuntu10.04 Regarding the system installation of Debian7.0/ Ubuntu10.04, please follow the steps and suggestions to complete the system installation on the EBOX-335xDX3 Series platform. The following is a brief instruction, users may configure it according to their specific needs. 1. - Page 25 During the installation process, the system would ask users to create partitions for the operating system. Following example is using entire disk for the beginner. Choose “Guided - use entire disk”. Select “Yes” to create the partition. Then the system would keep asking you few questions for configuration, suggestions were attached as follow.
- Page 26 For Install the GRUB boot loader on a hard disk: Answer YES to complete the installation as last procedure. When it's completed, the disc tray will eject and inform you, then press continue to restart and be ready to enjoy the new system! The Debian7.0 The Ubuntu10.04...
- Page 27 2. Install the VGA driver (Console mode) Switch to console mode by pressing key <Ctrl> + <Alt> + <F1>, then copy the VGA driver rdc_drv.so to the driver folder /usr/lib/xor/modules/drivers/, please refer to Linux support page for most updated drivers. ...
- Page 28 3. The system configuration Enable the Auto login System / Administration / Login Screen Execute the utility “Login Screen” and enter the password to process it. Set the Log in as “user account” automatically. Disable the power saving mode when system idle, System / Preference / Screensaver Unmarked the option “Active the screensaver when computer is idle”.
- Page 29 Chapter...
-
Page 30: Onboard Connectors Summary
Onboard Connectors Summary Summary Table for CPU Board Nbr. Description Type of Connections Pin nbrs. D-Sub Connector 15-pin DC +5V Input Micro USB B Type 5-pin Line out Audio Jack 2-pin Mic in Audio Jack 2-pin USB (Front) USB Connector 4-pin USB (Front) USB Connector... - Page 31 Rear Connectors Outline EBOX-335xDX3/ 335xDX3-AP REAR LOOK G: USB V2.0 H: VGA I : RJ-45 LAN J : DC Power Jack EBOX-335xDX3-C2/ 335xDX3-C2AP REAR LOOK K: RS-232 Port Only Available in EBOX-335xDX3-C2/ 335xDX3-C2AP...
-
Page 32: Pin Assignments
Pin Assignments J3: VGA – 15-pin D-Sub Connector Pin # Signal Name Pin # Signal Name Pin # Signal Name HYSYNC VSYNC J4: Micro-B USB DC Power Input Pin # Signal Name Data -- Data + ) : For connection to external USB device – 4-pin USB Type 1 Connector (H) J7, J8: USB (180 Pin # Signal Name Data --... - Page 33 Pin Assignments ) – For connection to external USB device – 4-pin USB Type 1 Connector (V) J9: USB (90 Pin # Signal Name Data -- Data + J12: LAN: RJ-45 Connector Pin # Signal Name Pin # Signal Name FTXD+ FTXD- FRXIN+...
- Page 34 Chapter...
-
Page 35: Taking Care Of Your Ebox
Taking Care of your EBOX This section gives you some guidelines on using EBOX-335xDX3 Series – Safe using, Storing and Handling. Storing Do not place EBOX-335xDX3 Series in a location that is subject to: Heating sources, such as stove, oven, heater, radiator or air duct ... - Page 36 Using Cables for Connection To avoid the problem, use only the specified interface cables in your accessory bag. The supplier will not be responsible for the connection arising from the other unspecified peripheral equipment. Do not use cut or damaged cables for connection. Cleaning Your VESA PC Clean the VESA PC with a soft, dry cloth or a soft cloth lightly moistened with a mild detergent solution.
-
Page 37: Troubleshooting
Troubleshooting This section describes the techniques of resolving some basic problems that you encounter when using EBOX-335xDX3 Series. For more troubleshooting guidelines, please contact your nearest dealer for technical support. Troubleshooting Your VESA PC A. VESA PC does not start – Make sure the EBOX-335xDX3 Series is properly secured and plugged into a power source before it is turned on. - Page 38 (BIOS Setup menu “Exit”) C. “Operating System Not Found” – A message indicating that “Operating system not found” appear when my VESA PC starts (Windows won’t start) Enter your BIOS setup main menu by pressing <DEL> key, be sure that the C: drive is enable. If Windows still does not start, follow these steps to initialize the BIOS: Turn off the EBOX-335xDX3 Series.
- Page 39 Chapter...
-
Page 40: Terms And Condition
The Purchaser must pre-pay shipping for any defective system or parts returned under the warranty. DMP Electronics Inc. shall not be liable for risk of loss or damage during shipment of your returned system or parts if you fail to insure the shipment.
Need help?
Do you have a question about the EBOX-335xDX3Series and is the answer not in the manual?
Questions and answers