Table of Contents
Advertisement
Quick Links
Advertisement
Table of Contents

Related Manuals for DMP Electronics EBOX-333x Series


Summary of Contents for DMP Electronics EBOX-333x Series
- Page 1 EBOX-333x Series User Manual EBOX-333x Series User’s Guide DMP Electronics Inc.
- Page 2 DMP Electronics reserves the right to make any modification to this manual or the information contained herein at any time without notice. The software described herein is governed by the terms of a separated user license agreement or label sticker.
- Page 3 EBOX-333x Series User Manual Trademarks Acknowledgment is the registered trademarks of DMP Electronics Inc. Other brand names, product names or trade names appearing in this document are the properties and registered trademarks of their respective owners. All names mentioned herewith are served for identification purpose only.
-
Page 4: Safety Information
EBOX-333x Series User Manual Safety Information WARNING Do not expose EBOX to rain or moisture, in order to prevent shock and fire hazard. Never install EBOX in wet locations. Do not open the cabinet to avoid electrical shock. Refer to your nearest dealer for qualified personnel servicing. - Page 5 EBOX-333x Series User Manual Regulatory FCC Class A Note This equipment has been tested and found to comply with the limits for a Class A digital device, pursuant to Part 15 of the FCC Rules. These limits are designed to provide reasonable protection against harmful interference when the equipment is operated in a commercial environment.
-
Page 6: Product Description
DMP and Users in pursuant of trading. Product Description: With this product, herewith also known as EBOX-333x Series, which is a simplified and economical design of an embedded device for Special Purpose Personal Computing. The basic specification of this product is comprised of the x86 technology design, and with onboard 1GB/ 2GB DDR2 System memory, VGA display, USB, COM ports, and LAN Interfaces. -
Page 7: Table Of Contents
EBOX-333x Series User Manual Contents Chapter 1 02 Unpacking your EBOX Mini PC Chapter 2 05 EBOX-333x Series Overview 07 System Specifications 08 Peripherals Connecting Chapter 3 10 BIOS Reconfiguring 11 mPCIe signal setting 12 Boot Setting 13 ACPI setting... - Page 8 EBOX-333x Series User Manual Chapter DMP Electronics Inc.
-
Page 9: Unpacking Your Ebox Mini Pc
EBOX-333x Series User Manual Unpacking Your EBOX Mini PC Congratulation! You have just acquired EBOX-333x Series, please check the following items: Packing List: Q’ty Item No. Description EBOX-333x Series VESA PC Max. 22.5 watts External Power Adaptor, Vin: 100~240VAC 50/ 60Hz. - Page 10 LCD for a mobile system for the use at trade shows, presentations, promotions, etc. Unlike traditional portable laptop design, the EBOX-333x Series can be used with a large size LCD. Furthermore, with FANLESS design, the EBOX-333x Series is ideal to be used in the environment where temperature demand is critical.
- Page 11 EBOX-333x Series User Manual Chapter DMP Electronics Inc.
-
Page 12: Ebox-333X Series Overview
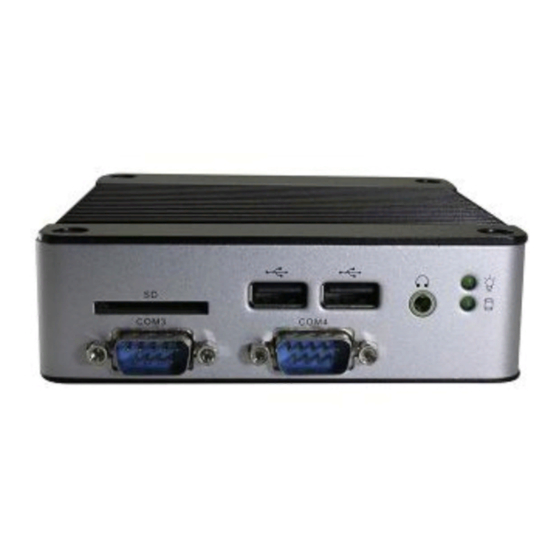
B: SD Card LED Green flashing LED indicates SD card activity. C: Line Out EBOX-333x Series default audio in Line out. Note: Mic in instead Line out can be optional. D: USB 2.0 port Connection for external USB devices. -
Page 13: Back Panel
EBOX-333x Series User Manual Back Panel A: Power Jack Volt: DC +8V~+24V. B: VGA port C: Power switch D: USB 2.0 port E: RJ-45 LAN Jack LAN 1 is 10/100 Mbps. F: RJ-45 LAN Jack LAN 2 is 1Gbps. (Optional) -
Page 14: System Specifications
1GB DDR2 (32-bit DRAM bus, EBOX-3330 Series) Windows XP Embedded 2GB DDR2 (32-bit DRAM bus, EBOX-3332 Series) Windows Embedded CE ※ For Windows 7 users, EBOX-333x Series support Linux OS: 32-bit version only, 64-bit version does not support. (click Linux Support List... -
Page 15: Peripherals Connecting
Peripherals Connecting the Power Adaptor A: DC Power Jack To use EBOX-333x Series immediately, please attach the supplied adapter for the power source. See the left diagram for visual connection. Connect the DC power jack of the power adaptor to the DC Input of EBOX-333x Series. - Page 16 EBOX-333x Series User Manual Chapter DMP Electronics Inc.
-
Page 17: Bios Reconfiguring
User Manual BIOS Reconfiguring AMI BIOS is used in the EBOX-333x Series. To reconfigure the BIOS, press <Del> key repeatedly to enter BIOS setup main menu as below: Use and keys to select screen; and keys to scroll the selected item. Press <ESC> return to previous screen and press <F9>... -
Page 18: Mpcie Signal Setting
EBOX-333x Series User Manual mPCIe signal setting: EBOX-333x with mPCIe socket support both USB and COM port signals. And EBOX-333x mPCIe Series COM port signal support function defaulted as disabled, user can use mPCIe via USB signal without setting. For user want to use mPCIe via COM port signal, set BIOS SB Serial Port9 enabled as below: Move to Chipset ... -
Page 19: Boot Setting
EBOX-333x Series User Manual Boot setting: Boot up EBOX unit and press <Del> to get into BIOS menu. Move to Boot “Boot Settings Configuration” and press Enter Set your main storage as 1 boot.. Press <F10> to save the setting and exit. -
Page 20: Acpi Setting
EBOX-333x Series User Manual ACPI setting: For Windows XP or XPe OS users, please set ACPI Aware O/S to [No], steps as below: Boot up EBOX unit and press <Del> to get into BIOS menu. Move to Advanced and select “ACPI Configuration” then press ENTER. -
Page 21: Pxe Diskless Boot Setting
EBOX-333x Series User Manual PXE Diskless boot setting: Boot up EBOX unit and press <Del> to get into BIOS menu. Move to Chipset then select “SouthBridge Configuration” and press ENTER. Move to “LAN Configuration” and enter “SB LAN Boot” to choose “Used INT 19h”. -
Page 22: Drivers Installation Guide
EBOX-333x Series User Manual Drivers Installation guide Under the Windows series OS, the following drivers need to be installed manually. 1. VGA driver 2. Ethernet driver 3. Wireless LAN Dongle driver (Optional) 4. Audio driver (for windows XP only) Note:... - Page 23 User Manual Ethernet driver: Download corresponding Ethernet drivers from EBOX-333x Series driver page and unzip. Find the yellow question mark of Ethernet in the Device Manager under the control panel/ system. Select “Update Driver Software” and choose the right path, then click “ Install this driver software anyway ”...
-
Page 24: Audio Driver
EBOX-333x Series User Manual Audio driver: Unzip the downloaded file and double click the setting .exe file, then “Next” as below to install. After the installation completed, the Device Manager will update and show the correct device. DMP Electronics Inc. -
Page 25: Additional Information
Additional information Disable TRIM function: TRIM function sets enable as default in Windows 7 and WES7 OS. EBOX-333x Series does not support storages with TRIM function (SSD/ Disk on Module). User has to disable TRIM function manually by following steps: Open command prompt as Administrator. -
Page 26: Screen Rotation
EBOX-333x Series User Manual Screen rotation: After VGA driver installation completed, type “Customize icons” in search bar. Adjust Utility Application to “Show icon and notifications”. A blue icon = Graphic Utility appears on screen, double click it. In Graphic Utility, go to Rotation section. Select the direction of rotation then press Apply to test and OK to save the changes. -
Page 27: Turn Off The Display Function Setting
From the options, you can set the amount of idle time. EBOX-333x Series does not support sleep function, it cannot wake up after sleep. To avoid the unwakeable sleep, please disable function by setting “Put the computer to sleep” to “Never”. -
Page 28: Canbus Information
EBOX-333x Series User Manual CANbus information: In EBOX-333x CANbus Series, the serial port (COM4) has been adapted for CANbus use. And the CANbus is onboard, it doesn't need extra external power. PIN assignmnet: J14: COM - 9-pin D-Sub connector (CANbus) -
Page 29: Linux Installation Guide
Linux installation guide For Debian7.0/ Ubuntu10.04 Regarding the system installation of Debian7.0/ Ubuntu10.04, please follow the steps and suggestions to complete the system installation on the EBOX-333x Series platform. The following is a brief instruction, users may configure it according to their specific needs. - Page 30 Next the system will detect multiple network interfaces on the EBOX-333x Series, and users have to decide the primary network interface, both of them could be chosen. Note: the Ethernet cable must be plugged in during this period.
- Page 31 EBOX-333x Series User Manual During the installation process, the system would ask users to create partitions for the operating system. Following example is using entire disk for the beginner. Choose “Guided - use entire disk”. Select “Yes” to create the partition.
- Page 32 EBOX-333x Series User Manual For Install the GRUB boot loader on a hard disk: Answer YES to complete the installation as last procedure. When it's completed, the disc tray will eject with pop-up message, press continue to restart and be ready to enjoy the new system! The Debian7.0...
- Page 33 EBOX-333x Series User Manual 3. Install the VGA driver (Console mode) Switch to console mode by pressing key <Ctrl> + <Alt> + <F1>, then copy the VGA driver rdc_drv.so to the driver folder /usr/lib/xor/modules/drivers/, please refer to Linux support page for most updated drivers.
- Page 34 EBOX-333x Series User Manual 4. The system configuration: Enable the Auto login System / Administration / Login Screen Execute the utility “Login Screen” and enter the password to process it. Set the Log in as “user account” automatically. Disable the power saving mode when system idle, System / Preference / Screensaver Unmarked the option “Active the screensaver when computer is idle”.
- Page 35 To add the parameters “pci=nomsi” in the line of Linux of GRUB as below. The MSI/MSI-X must disabled for application of Gigabit LAN (RTL-8111/8168) on the EBOX-333x Series, it could be set permanent by edition of file /boot/grub/grub.cfg. DMP Electronics Inc.
- Page 36 EBOX-333x Series User Manual Chapter DMP Electronics Inc.
-
Page 37: Onboard Connectors Summary
EBOX-333x Series User Manual Onboard Connectors Summary Summary Table for EBOX PCB Board Description Type of Connections Pin nbrs. SODIMM-SOC-200P-1.8V SODIMM socket 200 Pin 200-pin SATA SATA socket 7-pin USB1 (Front) USB connector 4-pin USB2 (Front) USB connector 4-pin USB3 (Back) - Page 38 EBOX-333x Series User Manual Front Connectors Outline A: SD Card Slot B: USB 2.0 C: Line out D: COM or GPIO port E: COM, GPIO or CANbus port F: CF Card Slot G: Power & HDD LED H: Mic in...
- Page 39 EBOX-333x Series User Manual Rear Connectors Outline B: VGA C: 1 Gbps LAN A: DC Power Jack D: 10/100 Mbps LAN E: GPIO or COM ports I: G-LAN, RJ-45 LAN2 F: Printer port G: Power Switch H: 10/100 Mbps LAN I: USB 2.0...
-
Page 40: Pin Assignments
EBOX-333x Series User Manual Pin Assignments For standard version : J16: Power SW - Push Button Switch Pin # Status J15: DC-IN (+8V~+24V) - 2-pin Jack Pin # Signal Name +8~+24V Input J5, J5, J6, J8: USB 2.0 (180 J7: USB 2.0 (90... - Page 41 EBOX-333x Series User Manual J11 (COM1), J12 (COM2): RS-232/ RS-485/ RS-422, 9-pin D-Sub connector Pin # Signal Name Pin # Signal Name DCD/ RS-485- / 422TX- RXD/ RS-485+ / 422TX+ TXD/ 422RX+ DTR1/ 422RX- J13 (COM3), J14 (COM4): RS-232, 9-pin D-Sub connector...
- Page 42 EBOX-333x Series User Manual For 8-bit GPIO version with RS-232 port : J11 (COM1): GPIO P4, 9-pin D-sub connector Pin # Signal Name Pin # Signal Name PORT 40 PORT 44 PORT 41 PORT 45 PORT 46 PORT 42 PORT 47...
- Page 43 EBOX-333x Series User Manual For RS-485 x3, x4 version : J11 (COM1): RS-232, GPIO P4, 9-pin D-sub connector Pin # Signal Name Pin # Signal Name DCD/ PORT 40 RXD/ PORT 44 TXD/ PORT 41 DTR/ PORT 45 DSR/ PORT 46...
- Page 44 EBOX-333x Series User Manual Chapter DMP Electronics Inc.
-
Page 45: Taking Care Of Your Ebox
When this happens, relocate the EBOX-333x Series by a suitable distance away from the set. Do not drop the EBOX-333x Series from the working table nor place heavy objects on top of it. DMP Electronics Inc. -
Page 46: Cleaning Your Vesa Pc
EBOX-333x Series User Manual Cleaning Your VESA PC Clean the VESA PC with a soft dry cloth to lightly moistened with a mild detergent solution. Do not use any type of abrasive pad, scouring powder, or solvent such as alcohol or benzene, these may damage the finish of EBOX. -
Page 47: Troubleshooting
A. VESA PC does not start – Make sure the EBOX-333x Series is properly secured and plugged into a power source before it is turned on. Make sure the power indicator shows the power is on. See section 2 for more information about “EBOX-333x Series Overview”. - Page 48 Follow the steps as written in item B. BIOS error message. If you have just connected EBOX-333x Series to a CD/DVD or USB Drivers, remove these peripherals. And restart to confirm that the Windows operating system starts properly. If EBOX-333x unit continues to display the message ”Operating system not found,”...
- Page 49 EBOX-333x Series User Manual Chapter DMP Electronics Inc.
-
Page 50: Terms And Condition
The Purchaser must pre-pay shipping for any defective system or parts returned under the warranty. DMP Electronics Inc. shall not be liable for risk of loss or damage during shipment of your returned system or parts if you fail to insure the shipment.
Need help?
Do you have a question about the EBOX-333x Series and is the answer not in the manual?
Questions and answers