Table of Contents
Advertisement
Quick Links
Advertisement
Table of Contents

Related Manuals for DMP Electronics EBOX-58 Series


Summary of Contents for DMP Electronics EBOX-58 Series
- Page 1 EBOX-58 Series Mini PC User’s Guide...
- Page 2 No part of this manual may be reproduced, copied, translated or transmitted, in whole or in part, in any form or by any means without the prior written permission of the DMP Electronics Inc. Copyright 2021 DMP Electronics Inc.
- Page 3 EBOX-58 Series User Manual Regulatory FCC Class A Note This equipment has been tested and found to comply with the limits for a Class A digital device, pursuant to Part 15 of the FCC Rules. These limits are designed to provide reasonable protection against harmful interference when the equipment is operated in a commercial environment.
- Page 4 DMP and Users in pursuant of trading. Product Description: EBOX-58 Series industrial fanless PC integrates an Intel® Braswell E8000 or N3160 series processor. Supports memory up to 8GB DDR3L, Dual Giga LAN, Dual RS-485/RS-232 up to 4 ports, etc. Suitable platform for IoT, M2M, Industry 4.0, Home Automation Security, Point-of-sales, Public transportation and many more.
-
Page 5: Table Of Contents
EBOX-58 Series User Manual Contents Chapter 1 07 Unpacking EBOX Mini PC Chapter 2 10 EB-58 Series no COM ports model types 11 EB-58 Series COM ports model types 12 EB-58 Internal description 13 Appearance Diagram 14 System Specifications Chapter 3... - Page 6 EBOX-58 Series User Manual Chapter DMP Electronics Inc.
-
Page 7: Unpacking Ebox Mini Pc
User Manual Unpacking EBOX Mini PC Component List: Item No. Description Quantity EBOX-58 Series Mini PC Power Adaptor 40W; Vin: 100~240V AC 50~60Hz Power cable ( available US, UK, EU, AU types ) VESA screw SATA SLIM 7+15 pin cable Note: The accessories are subject to change without immediate notice. - Page 8 IoT, M2M, Industry 4.0, Home Automation Security, Point-of-sales, Public transportation and many more. EBOX-58 Series can be attached to any VESA mounting fixture; allowing it to be securely mounted onto desks, walls, or buildings, and thereby optimizes your work area. It can also attach directly to any size LCD monitor, for the use at trade shows, presentations, promotions, etc.
- Page 9 EBOX-58 Series User Manual Chapter DMP Electronics Inc.
-
Page 10: Series No Com Ports Model Types
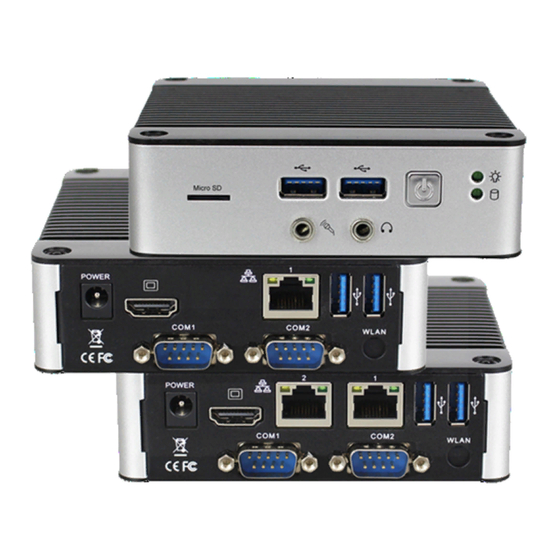
EBOX-58 Series User Manual EBOX-58 Series no COM ports model types: Front Panel A: Power LED Green flashing LED indicates SATA storage activity B: SATA LED LED lights up when the system is turned on C: Power Button System power on/off D: USB 3.0 ports... -
Page 11: Series Com Ports Model Types
EBOX-58 Series User Manual EBOX-58 Series COM ports model types: Front Panel A: Power LED Green flashing LED indicates SATA storage activity B: SATA LED LED lights up when the system is turned on C: Power Button System power on/off D: USB 3.0 ports... -
Page 12: Internal Description
EBOX-58 Series User Manual EBOX-58 Internal description To use SATA SLIM DOM as a boot drive, connect SATA SLIM 7+15 pin cable and place SATA SLIM DOM under the PCB, fixed at the bottom. Optional item DGF109A M.2 Wi-Fi/BT module info www.compactpc.com.tw... -
Page 13: Appearance Diagram
EBOX-58 Series User Manual Appearance Diagram DMP Electronics Inc. - Page 14 EBOX-58 Series User Manual Order information DMP Electronics Inc.
- Page 15 EBOX-58 Series User Manual Chapter DMP Electronics Inc.
-
Page 16: Bios Reconfiguring
EBOX-58 Series User Manual BIOS Reconfiguring Load Default Setting 1. To reconfigure the hardware, press <Del> during unit boot up to enter BIOS menu. 2. Move to “Save & Exit” Restore Defaults, press Enter and select YES to execute. -
Page 17: Uefi Pxe Diskless Boot Setting
EBOX-58 Series User Manual UEFI PXE diskless boot setting 1. Press <Del> during unit boot up to enter BIOS menu. 2. Move to “Advanced” “CSM Configuration” and press Enter. 3. Move to “Network” and select “UEFI”. Move to “Boot” FIXED BOOT ORDER Priorities Boot Option #1 select “UEFI Network”. -
Page 18: Legacy Pxe Diskless Boot Setting
EBOX-58 Series User Manual LEGACY PXE diskless boot setting 1. Press <Del> during unit boot up to enter BIOS menu. 2. Move to “Advanced” “CSM Configuration” and press Enter. 3. Move to “Network” and select “Legacy”. 4. Move to “Boot” “Boot mode select” select “LEGACY”. -
Page 19: Drivers Installation Guide
EBOX-58 Series User Manual Drivers Installation guide Under Windows 10, the following drivers need to be installed manually. 1. Chipset 2. Graphic 3. Audio 4. LAN 5. TXE Please download above drivers from EBOX website. Chipset driver: (Intel® Chipset Device Software) 1. -
Page 20: Graphic Driver
EBOX-58 Series User Manual Graphic driver: 1. Unzip Graphic file and execute igxpin.exe, then click “Next” to continue. 2. A license agreement message will pop out, click Accept and install. 3. After installed, select “Yes, I want to restart this computer now” and click Finish to reboot. -
Page 21: Audio Driver
EBOX-58 Series User Manual Audio driver: 1. Unzip Audio file, execute Setup.exe, and then click “Next” to install. 2. After installed, select “Yes, I want to restart this computer now” and click Finish to reboot. DMP Electronics Inc. -
Page 22: Lan Driver
EBOX-58 Series User Manual LAN driver: 1. Unzip LAN file, execute Setup.exe and then click “Next” to install. 2. After installed, click “Finish” to exit the wizard. DMP Electronics Inc. -
Page 23: Txe Driver
EBOX-58 Series User Manual TXE driver: (Intel® Trusted Execution Engine) Trusted Execution Engine is a hardware technology, primary goals are attestation of authenticity of a platform and its operating system. 1. Unzip TXE file, execute SetupTXE.exe and click “Next” to install: 2. - Page 24 EBOX-58 Series User Manual Chapter DMP Electronics Inc.
-
Page 25: Onboard Connectors Summary
EBOX-58 Series User Manual Onboard Connectors Summary Summary Table for CPU Board Description Type of Connections Pin nbrs. HDMI HDMI connector 19-pin Power DC Jack DC Jack connector 2-pin J3, J4 Ethernet G-LAN RJ45 connector 8-pin J5, J6 USB 3.0 USB 3.0 connector... - Page 26 EBOX-58 Series User Manual J3, J4: LAN: RJ-45 connector Pin # Signal Name Pin # Signal Name TP0+ TP2- TP0- TP1- TP1+ TP3+ TP2+ TP3- J5, J6: USB 3.0 connector Pin # Signal Name Pin # Signal Name Receive+ DATA-...
- Page 27 EBOX-58 Series User Manual J21: M.2 E Key M.2 SOCKET-1: KEY-E CONNECTOR Pin N/B Pin N/B GND_1 USB_D+ 3.3V_2 USB_D- 3.3V_4 GND_7 LED1_N SDIO_CLK PCM_CLK/12S_SCK SDIO_CMD PCM_SYNC/I2S_WS SDIO_DATA0 PCM_IN/I2S_SD_IN SDIO_DATA1 PCM_OUT/I2S_SD_OUT SDIO_DATA2 LED2_N SDIO_DATA3 GND_18 SDIO_WAKE_N UART_WAKE_N SDIO_RESET_N UART_RX GND_33...
- Page 28 EBOX-58 Series User Manual Chapter DMP Electronics Inc.
-
Page 29: Taking Care Of Ebox
EBOX-58 Series User Manual Taking Care of EBOX This section provide guidelines on using EBOX-58 Series – Safe using, Storing and Handling. Storing Do not place EBOX in a location that is subject to: Heating sources, such as stove, oven, heater, radiator or air duct ... -
Page 30: Troubleshooting
EBOX-58 Series User Manual Troubleshooting This section describes the techniques of resolving some basic problems that you encounter when using EBOX. For more troubleshooting guidelines, please contact your nearest dealer for technical support. Troubleshooting EBOX A. EBOX does not start –... - Page 31 EBOX-58 Series User Manual (BIOS Setup menu “Save & Exit”) C. “Operating System Not Found” – A message indicating “Operating system not found” appears when unit starts Enter BIOS setup main menu by pressing <DEL> key, be sure that the C: drive is enable.
- Page 32 EBOX-58 Series User Manual Chapter DMP Electronics Inc.
-
Page 33: Warranty
The Purchaser must pre-pay shipping for any defective system or parts returned within the warranty. DMP Electronics Inc. shall not be liable for risk of loss or damage during shipment of the returned system or parts. All products must be shipped back to DMP Electronics Inc. in original or equivalent packaging.
Need help?
Do you have a question about the EBOX-58 Series and is the answer not in the manual?
Questions and answers