
Related Manuals for Schiller FRED easy


Summary of Contents for Schiller FRED easy
- Page 1 FRED easy® Automated external defibrillator (AED) FRED easy® - SD Card - Ethernet/Online - Life User Guide...
- Page 2 Sales and service information The SCHILLER sales and service centre network is world-wide. For the address of your local distributor, contact your nearest SCHILLER subsidiary. In case of difficulty, a complete list of all distributors and subsidiaries is provided on our internet site: http://www.schiller.ch...
-
Page 3: Table Of Contents
FRED easy User Guide Table of Contents Safety Notes ..........5 User profiles................5 Responsibility of the User ........... 5 Intended Use ................. 6 Organisational Measures ............. 7 Safety-Conscious Operation ..........7 Operation with other Devices ..........8 Maintenance................8 General Notes Regarding the Unit ........ - Page 4 Installing the ferrite core..............53 Online version..............54 5.3.1 Ensuring data transmission.............. 55 5.3.2 Placing the FRED easy® in the docking station ......56 5.3.3 Activating the maintenance mode............ 57 Configuration Ethernet/Online using FRECO ....58 5.4.1 Configuring the "Network" tab............58 5.4.2...
- Page 5 Disposal at the end of its useful life..........72 Trouble Shooting ..............73 7.5.1 Error messages................73 7.5.2 Transmission error Ethernet/Online FRED easy®......75 7.5.3 Trouble Shooting................78 7.5.4 Measures to prevent electromagnetic interferences ......80 Technical Data ........81 System Specifications ............
- Page 6 FRED easy Page 4...
-
Page 7: Safety Notes
Responsibility of the User Regulations on who is allowed to use devices like the FRED easy® and which training is required, are country-specific. In any case, legal regulations have to be observed. -
Page 8: Intended Use
– is breathing – has pulse The FRED easy® is an emergency device and must be ready for operation at any time and in all situations. Make sure that – the device is always equipped with a sufficiently charged battery and that a spare battery is at hand –... -
Page 9: Organisational Measures
25 %. Immediately report any changes that impair safety (including operating behav- iour) to the responsible person. Only use original SCHILLER electrodes. Before switching on, check that the unit's casing and electrode connections are not damaged. -
Page 10: Operation With Other Devices
(see section 8.4) . Avoid using such devices or keep a sufficient distance from them. A 16.7 Hz filter allows to operate the FRED easy in the vicinity of a mains network with a frequency of 16.7 Hz (railway lines in some countries). -
Page 11: Additional Terms
• spare parts used for assembly operations, extensions, readjustments, modifica- tions or repairs are recommended or supplied by SCHILLER, and, • the SCHILLER FRED easy® and approved attached equipment is used in ac- cordance with the manufacturer's instructions. There are no express or implied warranties which extend beyond the warranties here- inabove set forth. -
Page 12: Display Symbols/Indicators
BF symbol. The device's signal input is defibrillation-protected. Caution! High voltage! Observe the user guide CE-0459 marking (notified body LNE/G-MED) Do not dispose of the FRED easy® and its accessories in the household waste. Manufacturer symbol, manufacturing date Page 10... -
Page 13: Symbols Used On The Battery
Safety Notes FRED easy Display Symbols/Indicators 1.10 User Guide 1.10.3 Symbols used on the battery The battery is recyclable Do not recharge Do not short-circuit Do not incinerate Do not cut Do not crush Battery storage: – unlimited storage duration between +15°C and +25°C (within the limit of the specified expiry date), –... -
Page 14: Symbols Used On The Electrode Packaging
Safety Notes FRED easy 1.10 Display Symbols/Indicators 1.10.4 Symbols used on the electrode packaging • Remove the patient's clothes • Open the electrode packaging • Peel off the protective foil Disposable item; do not reuse Do not bend packing Storage temperature for the electrodes Expiry date of the electrodes An open package cannot be conserved more than one day. -
Page 15: Components And Operation
FRED easy® is available as a semi- or fully automatic defibrillator. The regulations governing the use and training requirements for AEDs such as FRED easy® differ from country to country. The laws and regulations for the use of automatic defibrillators need to be strictly observed. -
Page 16: Design
Moreover, the user is guided with acoustic and written instructions (display/loud- speaker). The device recognises the connected electrodes (adult or children elec- trodes) and selects the defibrillation energy accordingly. When the "metronome" is activated, the FRED easy® sets a configurable pace for the Metronome cardiopulmonary resuscitation (CPR). - Page 17 Standard features for this device are the metronome and a non rechargeable Li/MnO2 FRED easy Life battery. All other options listed above for semi-automatic operation are not available. SCHILLER's service centre is able to configure various device functions by means of a dedicated PC connection (see Function).
-
Page 18: Function
Function Function Immediately after a battery has been inserted, the FRED easy® performs a self-test of the device and battery. If this test is completed successfully, the green indicator starts blinking, showing that the device is ready for operation and the information is displayed. -
Page 19: Overview On The Configurable Settings
These modifications need to be registered in the device documentation as well as communicated to all users. SCHILLER's service centre can configure the following parameters: Configurable parameters (by means of FREDCO®) • Volume of language output •... -
Page 20: Operating And Display Elements
The Online/Ethernet versions are available with the same operational modes as the SD card version: • semi-automatic • semi-automatic with option for switchover to manual mode • Automatic • Silent mode FRED easy® Online FRED easy® Online with docking station Online with Ethernet adapter Page 18... - Page 21 Operating and Display Elements User Guide FRED easy Life FRED easy Life has got the same functions as the versions listed above; the only ex- ceptions are: different printing on the foil, not possible to switch to manual or silent mode.
-
Page 22: Operation And Display
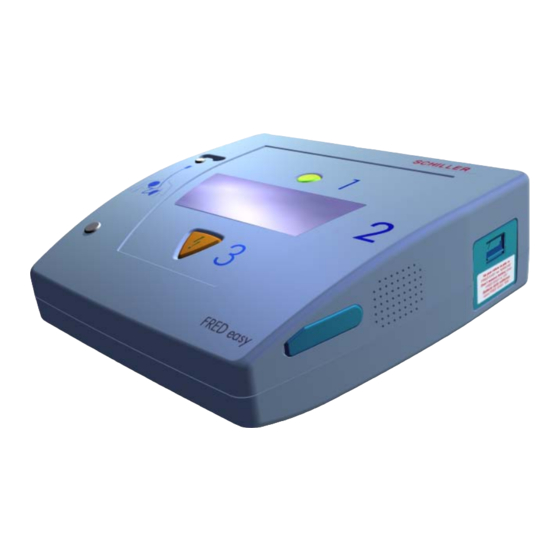
2.4.2 Operation and display The FRED easy® versions SD Card (removable memory card), ETHERNET (with Ether- net adaptor) and ONLINE (with docking station) only differ from each other in point 8. (1) The green indicator is blinking if no problem was detected during the last self- test (see Fig. -
Page 23: Display
ANALYSING! FRED easy® display Fig. 2.3 (1) Symbol display line. (2) Text display lines. The written instructions issued by the FRED easy® are dis- played on these 3 lines. 2.4.4 Symbols used on the display Number of shocks delivered since the device was turned on. -
Page 24: Initial Operation
Inserting the battery 3 Initial operation Danger of explosion — The FRED easy® must not be used in areas where there is any danger of explosion. Areas may be susceptible to explosion if flammable substances (gas), flammable anaesthetics, or products used to clean or disinfect the skin are used. -
Page 25: Switching Device On And Off
Insert the battery as indicated in the illustration on the left. – Firmly press the battery into the battery compartment until it clicks into place. – As soon as the battery is inserted, the FRED easy® runs a self-test to check the condition of the device and the battery. -
Page 26: Battery Monitoring
Battery monitoring Battery monitoring • The FRED easy® checks the capacity of the rechargeable NiCd battery or the lith- ium battery and warns the user when the battery is "low" or "depleted". • The lithium battery ensures that the device stays fully operative (and performs the self-test) for several years (at a temperature between 15 °C and 25 °C), provided... -
Page 27: Low Battery Capacity During Use
Initial operation FRED easy Battery monitoring User Guide 3.2.2 Low battery capacity during use • Despite the acoustic and written warnings, the device can still be used as normal and is still able to perform defibrillations. • Always switch off the device before removing the battery. -
Page 28: Battery Depleted During Use, Limited Mode (Cpr)
Initial operation FRED easy Battery monitoring 3.2.3 Battery depleted during use, limited mode (CPR) Patient hazard — Defibrillation is no longer possible if a depleted battery is detected. The battery needs to be replaced immediately. If a depleted battery is detected while the device is in use, a message is displayed prompting the user to replace the battery and to perform CPR. -
Page 29: Defibrillation
Improper use can endanger life. • Non medical personnel is only permitted to use an AED such as the FRED easy® if local law approves of this practice. Make sure that the FRED easy® is only accessi- ble to persons who are legally authorised to use an AED. - Page 30 Defibrillation FRED easy Instructions and Safety Notes Shock hazard — for user and assistants Wear gloves when performing a defibrillation, if possible. Position the patient flat on a firm, electrically insulated surface. Make sure that there are no conductive connections between the patient and other persons during ECG analysis and defibrillation.
-
Page 31: Defibrillation Procedure
Both the voice prompts and text instructions can be issued as "long instructions" as well as "short instructions". Contact your SCHILLER distributor for more information. The following procedure is applicable when "long instructions" have been config- ured. Once the device is turned on (by pressing thre green button ), an instruction text Switch on the device and call the... - Page 32 Open the electrode packaging electrodes are pre-connected). and connect the electrodes FRED easy® prompts the user to apply the electrodes on the patient’s chest. Applying the electrodes • The yellow indicator is lit and the device repeats the instructions twice until the...
- Page 33 In automatic as well as semi-automatic mode (with automatic analysis activated), the FRED easy® informs the user that the analysis is going to be performed. The ECG analysis is started without any intervention by the user.
- Page 34 FRED easy® informs the user that the shock has been can- celled. The FRED easy® informs the user that the patient can be touched again and prompts • Each shock is the user to perform a cardiopulmonary resuscitation cycle.
- Page 35 The device has not detected a shockable rhythm. No shock advised If the analysis algorithm does not detect a shockable rhythm, the FRED easy® in- forms the user that no shock is necessary and prompts him or her to perform CPR.
-
Page 36: Applying The Adhesive Electrodes
Defibrillation FRED easy Applying the adhesive electrodes Applying the adhesive electrodes 4.3.1 General information Only use the pads up to their expiration date. Please note that the expiration date of the pads only applies if the vacuum pack is intact. -
Page 37: Apply The Adhesive Electrodes And Connect Them To The Device
Defibrillation FRED easy Applying the adhesive electrodes User Guide 4.3.2 Apply the adhesive electrodes and connect them to the device Step 1 Open the electrode packaging Opening the electrode packaging Fig. 4.2 Risks for the user and the patient — The packaging of pre-connected electrodes is welded to the electrode cable. - Page 38 Defibrillation FRED easy Applying the adhesive electrodes Step 3 Applying the electrodes to the patient’s chest Risk of skin burns/equipment damage — Do not apply the defibrillation pads on top of: – the sternum or clavicle, – the nipples, –...
-
Page 39: Checking The Electrodes
Defibrillation FRED easy Applying the adhesive electrodes User Guide 4.3.3 Checking the electrodes If the resistance (impedance) reaches an unacceptable value, the device interrupts and prompts the user to check the electrode application and connection(CHECK CONNECTOR IS FITTED AND ELECTRODE APPLIED ON CHEST). In addition, the yellow indicator is lit. -
Page 40: Semi-Automatic Defibrillation
(max. 1 second) to start the analysis. Otherwise, the de- vice will switch off. • The semi-automatic version of the FRED easy® can be configured so that the ECG analysis is initiated automatically. In this case, the device prompts the user to con- nect the electrodes and then automatically runs the analysis without any interven- tion by the user. - Page 41 Defibrillation FRED easy Semi-automatic defibrillation User Guide Step 3 Shock delivery When the energy is charged, the user is prompted to trigger the shock by pressing the orange button. Shock hazard! Do not, under any circumstances, touch the patient during shock delivery.
-
Page 42: Automatic Defibrillation
Voice and text prompts displayed on the screen keep the user informed regarding the therapy. If a shock is advised, the energy is automatically charged. A countdown accompanies the last 3 seconds before the shock is delivered. FRED easy® Automatic Fig. 4.9 4.5.2 Safety notes for automatic defibrillation... - Page 43 Defibrillation FRED easy Automatic defibrillation User Guide Automatic defibrillation Step 1 Switching on and preparing the device Briefly press the green button (max. 1 second) to switch on the device. Assess the patient's condition (see 4.2 Defibrillation procedure). Connect the electrode cable to the device (see 4.3 Applying the adhesive elec-...
- Page 44 Defibrillation FRED easy Automatic defibrillation Step 3 Automatic shock delivery As soon as the energy charge is completed, the device automatically delivers the shock, without user intervention. A countdown is displayed on the screen and the or- ange button blinks until the shock is delivered.
-
Page 45: Manual Defibrillation (Option)
The option to switchover to manual mode is only available for the semi-automatic ver- sion of FRED easy®. The FRED easy® with manual mode is indicated by a red foil on the casing. If the user does not activate the manual mode after switchon, the unit remains in semi-automatic mode. -
Page 46: Manual Defibrillation - Description
Connect the electrode cable and apply the electrodes to the patient's chest (see sec- tion 4.3 Applying the adhesive electrodes). The patient's ECG signal is automatically displayed when the FRED easy® is switched to manual mode. In manual defibrillation, the energy values of the first 3 shocks are those defined for Defibrillator charging... -
Page 47: Manual Defibrillation Procedure
Defibrillation FRED easy Manual Defibrillation (option) User Guide 4.6.2 Manual defibrillation procedure Patient hazard — Only a physician is allowed to enable manual mode. Observe the instructions given in section 4.1 Instructions and Safety Notes. Step 1 Switching on and preparing the device 1. -
Page 48: Switching To Semi-Automatic Operational Mode
Finishing the 4.8 Finishing the therapy. therapy 4.6.3 Switching to semi-automatic operational mode To return to semi-automatic mode, turn off the FRED easy® and leave it turned off for at least 5 minutes before switching it on again. Page 46... -
Page 49: Internal Safety Discharge
Defibrillation FRED easy Internal safety discharge User Guide Internal safety discharge If the device's behaviour differs from the description given in this user guide, the device is defective and must be repaired. An internal safety discharge ensures that the stored energy is discharged within the device every time a defibrillation shock was not delivered correctly. -
Page 50: Versions
The SD card must only be used in one single device. Before being used in another device, the SD card must be reformated with the Schiller data viewing software; otherwise, the recorded information will be incor- rect. Only use SD cards supplied by SCHILLER. -
Page 51: Inserting The Sd Card
If the symbol is not displayed even though the card has been inserted, check that the card has been recommended by SCHILLER for the use in this type of device. Inserting the SD card automatically activates the memory function and the symbol is displayed (see Fig. -
Page 52: Ethernet Version
Stored data will be cleared once it has been transmitted. Trans- mitted data can be viewed using LifeDataNet®. • The memory card cannot be removed for the FRED easy® Ethernet version. • All events transmitted by the device are listed on page 48. -
Page 53: Data Transmission Procedure
The device configures the necessary parameters, logs on and sends its authentifica- tion information to the server on which LifeDataNet® is installed. CONNECTION AND Once a connection has been established, the internal time of the FRED easy® is syn- AUTHENTIFICATION chronised with the server clock. - Page 54 At the end of the transmission procedure, the following message is displayed: You can switch off the device and remove the Ethernet adapter. TRANSMISSION COMPLETE FRED easy automatically aborts the connection 5 minutes after the data transfer has been completed, or if the Ethernet connection is interrupted. Page 52...
-
Page 55: Installing The Ferrite Core
Installing the cable within the fer- Fig. 5.6 rite core Reducing the loop Fig. 5.7 Correctly installed ferrite core Fig. 5.8 FRED easy® Ethernet accessories Part No. Description 1-58-5303 Ethernet adapter 5-30-0003 Ethernet cable (3 m, category 5) 4-33-0002... -
Page 56: Online Version
Just as with the Ethernet version, this version is able to send intervention data (stored on the internal memory) as well as detailed device configuration data to the LifeDa- taNet® web server. It also allows a total remote control of the FRED easy® using Life- DataNet® (see table below). -
Page 57: Ensuring Data Transmission
FRED easy® Online. • The "Network" and "Online" sections of the device settings must be configured us- ing the FREDCO® software program, • The FRED easy® Online needs to be inserted in the docking station (see section 5.3.2 page 56). -
Page 58: Placing The Fred Easy® In The Docking Station
Versions FRED easy Online version 5.3.2 Placing the in the docking station FRED easy® Switch off device. Position the device as shown in illustration (1). Push the device into the docking station (2) until it clicks into place (3). Fig. 5.10 Inserting the device into the docking station –... -
Page 59: Activating The Maintenance Mode
Versions FRED easy Online version User Guide 5.3.3 Activating the maintenance mode While inserted in the docking station, the device can be switched to maintenance mode. To do so, simultaneously press the buttons . The message "MAINTE- NANCE IN PROGRESS" is displayed. -
Page 60: Configuration Ethernet/Online Using Freco
(6) IP address of the network gateway (depends on the network infrastructure) (7) IP address of the domain name system (depends on the network infrastructure) (8) MAC address of the FRED easy® Ethernet version (located on the label on the underside of the device) (9) IP address of the server's network interface, used by FRED easy®... - Page 61 "schiller". • To apply any changes to the parameters, click the "Update" button (12). • Once the battery is inserted, FRED easy® Ethernet offers the option to manually configure the IP addresses without using FREDCO®, if configured so.
-
Page 62: Configuring The "Online" Tab
Configuring the "Online" Tab • Start the FREDCO® software program and select the "Online" tab (1). A password provided by SCHILLER must be entered to access the network parameters. Fig. 5.14 Network configuration ("Online" tab) (1) "Online" tab in FREDCO®. -
Page 63: Configuring The Date And Time As Well As Ip Addresses Without Using Fredco
Versions FRED easy Configuration Ethernet/Online using FRECO User Guide without using 5.4.3 Configuring the date and time as well as IP addresses FREDCO® • Date and time setting can also be done on non Ethernet/Online devices if the pa- rameter has been activated in FREDCO. -
Page 64: Options
Fig. 6.1ECG display • The "ECG Display" option is only available for the FRED easy® semi-automatic. • This option is automatically activated when the FRED easy® is switched to manual mode. • When the ECG signal is displayed, messages are only displayed on one single line. -
Page 65: Rechargeable Nicd Battery
NiCd battery charging unit Fig. 6.2 The FRED easy® also detects when the NiCd battery is "depleted". In this case, the device does not allow the user to perform defibrillation and instead prompts him or her to perform CPR. The battery must be recharged/replaced immediately. -
Page 66: Silent Mode
Silent mode Silent mode The FRED easy with silent mode option is intended for locations where a quick trans- ferral to a hospital cannot be guaranteed. If in Silent mode a change in the cardiac rhythm is detected the device reactivates the AED mode and the user will be prompt to check the patient. -
Page 67: Switching To Silent Mode
Options FRED easy Silent mode User Guide 6.4.2 Switching to silent mode Defibrillation is performed according to the safety notes in section 4.1 Instructions and Safety Notes and the procedure in section 4.4 Semi-automatic defibrillation. Switchover to silent mode can be done at the earliest after Step 2, as long as no shockable rhythm has been detected, or after a successful defibrillation (Step 3) fol- lowed by a "normal"... -
Page 68: Deactivating Silent Mode
Options FRED easy Silent mode 6.4.3 Deactivating silent mode If the patient is no longer responsive (i.e. loses consciousness), immediately press the green button (max. 1 second) to deactivate the silent mode again start an analysis (Step 2). 6.4.4 Erasing the memory card The function "Erasing memory"... -
Page 69: Special Operating Conditions
(e.g. for the maritime sector). 6.5.1 Maritime use The following device is approved for maritime use: • FRED easy with silent mode • Basic wall mounting without mains connection • Sufficient spare batteries • LAN cable for the transmission of the ECG... - Page 70 Options FRED easy Special operating conditions Operating conditions below deck In addition to the operating conditions on deck, the following regulations apply: • If the patient is lying on a conducting surface (e.g. metal floor in the engine or stor- age room), the patient needs to be positioned on an insulating mat prior to defibril- lation.
-
Page 71: Maintenance
7 Maintenance Maintenance Intervals • FRED easy® is an emergency device that must always be in proper working or- der. The device must be serviced on a regular basis. The test results must be re- corded and compared to the values in the accompanying documents (see 9.5 Inspection... -
Page 72: Green Indicator
Patient hazard — If the device's behaviour differs from the description given in this user guide, the device is defective and must be repaired. In case of intensive use of the device, SCHILLER recommends that these in- spections be performed at shorter interval. -
Page 73: Cleaning And Disinfection
Your local representative stocks all the consumables and accessories for the FRED easy®. A full list of all SCHILLER representatives can be found on the SCHIL- LER website (www.schiller.ch). In case of difficulty, contact our head office in Switzer- land. -
Page 74: Disposal Information
In accordance with national law, the battery must be dis- posed of at an appropriate waste disposal station or returned to SCHILLER. According to European legislation, this device is considered as electronic waste equipment. -
Page 75: Trouble Shooting
Maintenance FRED easy Trouble Shooting User Guide Trouble Shooting • If it is not possible to get the device back into operating condition within a reason- able period of time, continue cardiopulmonary resuscitation until the rescue service arrives. • If the device switches to Limited mode (CPR) due to an error, the alarm messages Error may differ. - Page 76 Maintenance FRED easy Trouble Shooting Error message Possible cause Remedy • Technical problem Switch the unit off and then on again to con- Error firm. If the message still appears, the device – The device has detected an must be repaired.
-
Page 77: Transmission Error Ethernet/Online Fred Easy
Maintenance FRED easy Trouble Shooting User Guide 7.5.2 Transmission error Ethernet/Online FRED easy® If the connection to the network fails, an error message is issued. Potential error mes- sages include the following: Error message Cause Remedy • Error reading SD card ... - Page 78 Maintenance FRED easy Trouble Shooting Error message Cause Remedy • The device is not able to con- Check the connection to the server, the net- nect to the server work configuration and check that the device TRANSMISSION FAILURE is added in the "Device Manager" of LifeDa- taNet®...
- Page 79 ERROR CODE : 024 vice must be repaired. SUPERVISION STOP ACK • These errors are not applicable for the FRED easy® SD Card version. • Error 004 (ADAPTER DISCONNECTED) only applies to the FRED easy® Ethernet version. • Errors 023 and 024 (SUPERVISION STOP REQ and SUPERVISION STOP ACK) only apply to the FRED easy®...
-
Page 80: Trouble Shooting
Maintenance FRED easy Trouble Shooting 7.5.3 Trouble Shooting Forced shutdown procedure If the device cannot be switched off via normal OFF procedure (press and hold the green button for approx. 3 seconds), remove the battery and inserting again. Problem Possible causes Remedy The green "OK"... - Page 81 Maintenance FRED easy Trouble Shooting User Guide Problem Possible causes Remedy Switch the device off and insert the card the right way • No SD card is inserted. The SD card symbol is not around. displayed, or the symbol •...
-
Page 82: Measures To Prevent Electromagnetic Interferences
It can be deducted from the table that portable HF telecommunication devices must not be used within a radius of 3 m from the FRED easy® and its cables. Further measures to prevent electromagnetic interferences: The user can take the following measures to prevent electromagnetic interferences: •... -
Page 83: Technical Data
Technical Data FRED easy System Specifications User Guide 8 Technical Data Unless otherwise stated, all specifications are valid at a temperature of 25 °C. System Specifications SCHILLER MEDICAL Manufactured by Device name FRED easy® Dimensions 70 x 230 x 220 mm (h x l x w) -
Page 84: Classification And Safety Standards
• FRED easy® is a class IIb device. BF type, resistant to defibrillation shocks. Patient Protection FRED easy® is not designed to be used in the presence of flammable mixtures of Explosions protection anaesthetic agents with air or oxygen. The SCHILLER quality management system complies in full with the international standards ISO 9001 and ISO 13485. -
Page 85: Defibrillation Pulse
Accuracy at 50Ω: ± 3 J or ± 15 % (the higher value is assumed) Default energy settings SCHILLER's customer service department can change the default energy levels to the following values: 1 – 2 – 4 – 6 – 8 – 15 – 30 – 50 – 70 – 90 –110 – 130 – 150 J (adults) 1 –... - Page 86 Technical Data FRED easy Defibrillation pulse Shock delivery • With the orange button (in semi-automatic or manual mode) • Via disposable pads applied to the patient in an anterior-anterolateral or anteri- or-posterior position • A non shockable rhythm has been detected Safety discharge when: •...
-
Page 87: Electromagnetic Interferences
Electromagnetic interferences The FRED easy® is intended to be used in the electromagnetic environments listed in the following tables. The owner or user of the FRED easy® has to ensure that the device is operated in an adequate environment. 8.4.1... - Page 88 HF transmitters, an electromagnetic analysis on site should be considered. If the measured field strength exceeds the HF conformity level, it needs to be checked whether the FRED easy® can be used in this environment. If an abnormal behaviour is detected, additional measures need to be taken, e.g.
-
Page 89: Recommended Minimum Distances
Recommended minimum distances The FRED easy® is intended to be used in electromagnetic environments in which it is possible to control radiated HF interferences. The user of the FRED easy® can pre- vent electromagnetic interferences by always keeping a minimum distance between portable/mobile HF communication devices (transmitters) and the FRED easy®. -
Page 90: Appendix
Instrument bag 0-80-0008 Instrument bag, reinforced EASY CARD Formatted SD card 5-35-0037 Formatted SD card (for FRED easy® with software version ≥ 06.00) Required accessories • User Guide • One pair of adhesive pads • 1 lithium batteries • One SD card (only for the SD Card version) -
Page 91: Literature
Appendix FRED easy Literature User Guide Literature European Resuscitation Council Guidelines for Resuscitation 2010 (doi:10.1016/j.re- European Resuscitation Council suscitation.2010.08.021). (2010) International Consensus on Cardiopulmonary Resuscitation and Emergency Cardi- American Heart Association (2010) ovascular Care Science With Treatment Recommendations (DOI: 10.1161/CIRCU- LATIONAHA.110.971010). -
Page 92: Inspection Report
Date: Performed by: In case of problems, please notify your Biomedical Department , your local SCHILLER distributor , or the authorized Custom- er Service for your area Name: ..............Tel.: ..............Page 90... - Page 93 Appendix FRED easy Inspection report User Guide Page 91...
-
Page 94: 10 Index
Danger of explosion ....... 7 Operating principle.........54 Defibrillation SNMP protocol........54 Automatic defibrillation ......40 FRED easy® SD Card Biphasic pulsed defibrillation impulse ... 14 Controls and indicators ......20 Cardiopulmonary resuscitation....32 Inserting the Memory Card ....49 Defibrillation procedure ......29 Operating principle.........48...
Need help?
Do you have a question about the FRED easy and is the answer not in the manual?
Questions and answers