
Related Manuals for Schiller BR-102 PLUS


Summary of Contents for Schiller BR-102 PLUS
- Page 1 BR-102 PLUS BR-102 PLUS PWA 24/48 Hour Ambulatory Blood Pressure Recorder User Guide...
- Page 2 Switzerland www.schiller.ch BR-102 plus / BR-102 plus PWA bears the CE-0123 mark (Notified Body TÜV-SÜD Produkte Ser- vice GmbH, Ridlerstr. 65, 80339 Munich, Germany), indicating its compliance with the essential re- quirements of the Annex I of the Medical Device Directive 93/42/EE regarding safety, functionality and labelling.
-
Page 3: Table Of Contents
Safety Symbols and Pictograms ......11 1.11.1 Symbols used in this Document ........... 11 1.11.2 Symbols on the Device, Batteries, and Accessories .... 11 Introduction ..........13 BR-102 plus / BR-102 plus PWA ....... 14 2.1.1 BR-102plus................14 2.1.2 BR-102 plus PWA..............14 ®... - Page 4 Changing the Batteries During a 48 Hr Recording ....38 3.4.5 Stopping the Recording ............39 3.4.6 Displaying a Recording on the BR-102 plus ......39 3.4.7 Uploading the Recording to the medilogDARWIN2 ....40 Patient Information .........41 General ............... 42 Taking an Extra Measurement........
- Page 5 BR-102 plus / BR-102 plus PWA User Guide General Accessories..........63 Cuff and Cuff Accessories ........64 BR-102 plus PWA ........65 Overview ..............65 Measurements ............65 Display of Pulse Wave Analysis ....... 65 Method ................ 66 Patient Diary ........... 67 10.1...
- Page 6 BR-102 plus / BR-102 plus PWA Page 6...
-
Page 7: Safety Notes
Further, with each measurement, the PWA data will be saved for subsequent external assessments. The BR-102 plus / BR-102 plus PWA can be used for adults and children (3 years old onwards) of both sexes and all ethnic origins. -
Page 8: Contraindications
BR-102 plus / BR-102 plus PWA Contraindications 1.3 Contraindications The BR-102 plus / BR-102 plus PWA has not been designed for, and must not be used for the following patients: – neonates and children under the age of 3. -
Page 9: Maintenance
Connecting the unit to a PC with defective cables may constitute a danger to life. Therefore: – Do not connect the BR-102 plus / BR-102 plus PWA to any PC if the earth connection is suspect or if the mains lead is damaged or suspected of being damaged. -
Page 10: Operation With Other Devices
IEC/EN 60601-1. If in doubt, consult the technical service department or your local representative. The BR-102 plus / BR-102 plus PWA is safe during defibrillation. However, as a safety precaution remove the cable assembly between the recorder and the PC and when possible, remove the BR-102 plus from the patient before defibrillation. -
Page 11: Safety Symbols And Pictograms
Equipment/components and accessories no longer required must be disposed of in a municipally approved collection point or recycling centre. Alternatively, you can return the equipment to your supplier or SCHILLER AG for disposal. Improper disposal can harm the environment and human health. Page 11... - Page 12 Safety Notes BR-102 plus / BR-102 plus PWA 1.11 Safety Symbols and Pictograms BR-102 plus / BR-102 plus PWA battery type 2 x AA 1.2 V / 2700 mAh, NiMH. Use NiMH charger only. NiMH NiMH Do not disassemble, mutilate, incinerate, or heat. Do not short circuit a battery.
-
Page 13: Introduction
Safety Symbols and Pictograms 1.11 2 Introduction The SCHILLER BR-102 plus / BR-102 plus PWA is an Ambulatory Blood Pressure Recorder used for single and long-term recordings. The device can take up to 100 measurements over a 24 hour recording period, and up to 200 measurements over a 48 hour recording period. -
Page 14: Br-102 Plus / Br-102 Plus Pwa
The recorders are available as follows: 2.1.1 BR-102plus The Standard BR-102 plus is identified by the black front casing. There are two measurement methods available as follows: • Option 1 employs the auscultatory (Riva-Rocci, Korotkoff) method of measurement, with an oscillometric method as back-up. This means that when a clear measurement cannot be obtained with the auscultatory method, the oscillometric value is used. -
Page 15: The Medilog Darwin2 Program
63). 2.3 Inserting/Changing the Batteries Use NiMH rechargeable batteries supplied or recommended by SCHILLER. Full capacity of new NIMH batteries are only reached after three charge/discharge cycles. Eneloop Pro NiMH rechargeable batteries (Panasonic 2450 mA) or Energizer Ultimate Lithium batteries (ENERGIZER L91-FR6) can also be used. -
Page 16: Connecting The Pressure Hose And Microphone
/ BR-102 plus PWA by gently pressing until the connector clicks in place. If the version is with a microphone (c), the plug is combined with the hose and the assembly is inserted into BR-102 plus / BR-102 plus PWA at the same time. -
Page 17: Main Components Of The Device
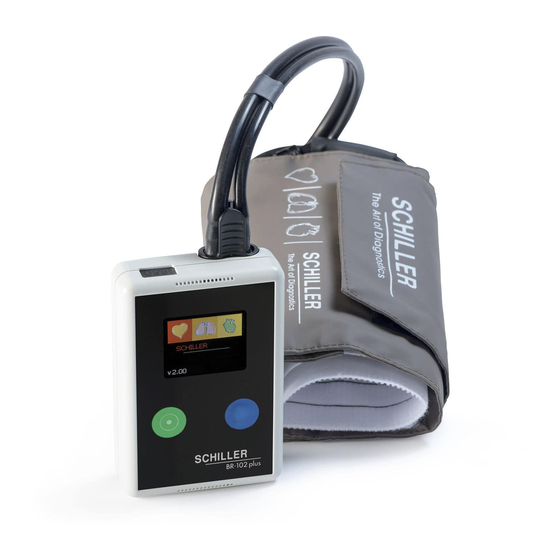
Introduction BR-102 plus / BR-102 plus PWA User Guide Main Components of the Device 2.5 Main Components of the Device 05:16PM NEW RECORD LAST RECORD SINGLE MEAS. SYSTEM NEXT SCHILLER BR-102plus (a) USB cable connection (b) OLED display (c) Loudspeaker... -
Page 18: Operating And Display Elements
Main Components of the Device 2.5.1 Operating and Display Elements Menu option selection and control of the BR-102 plus / BR-102 plus PWA is with two function keys. The green and blue function information boxes at the bottom of the screen indicate the function... -
Page 19: Switching Off
Introduction BR-102 plus / BR-102 plus PWA User Guide Main Components of the Device 2.5.3 Switching Off With the main menu displayed and the cursor at any position, press and hold the Green control button for 4 seconds. When the button is released, the device is switched off. -
Page 20: Battery Status For Nimh Rechargeable Batteries
The battery status display is a guide to battery capacity when using NiMH rechargeable batteries supplied or recommended by SCHILLER. If Energizer Ultimate Lithium Batteries are used, a different battery symbol is displayed (see next page). The battery symbol in the upper right of the screen, indicates the Full battery status. -
Page 21: Battery Display For Energizer Ultimate Lithium Battery
Introduction BR-102 plus / BR-102 plus PWA User Guide Main Components of the Device 2.5.5 Battery Display for Energizer Ultimate Lithium Bat- tery If Energizer Ultimate Lithium batteries are used, the battery status display is shown blue and always ‘full’. This is because the voltage hysteresis curve for these types of battery is not linear and the device cannot accurately determine battery capacity. -
Page 22: Menu Structure
Introduction BR-102 plus / BR-102 plus PWA Menu Structure 2.6 Menu Structure The menus are selected with the green function key (Next). A selected menu is opened with the blue function key (OK) and values selected with the blue function key (Change). Depending on the selected menu, the button functions will change. -
Page 23: Menu Overview
Introduction BR-102 plus / BR-102 plus PWA User Guide Menu Structure 2.6.1 Menu Overview Sub Menu Main Menu Value/Info Value/Info Value/Info Menu 1 Menu 3 Defines the RECORD Patient Adult / Child - Maximum initial pressure for adult is recording... - Page 24 Introduction BR-102 plus / BR-102 plus PWA Menu Structure Sub Menu Main Menu Value/Info Value/Info Value/Info Menu 1 Menu 3 Plays recorded Play Voice patient identifica- Stop Stop Playing Voice. tion. Yes / No - Confirm Press either of the two Recording start.
- Page 25 Introduction BR-102 plus / BR-102 plus PWA User Guide Menu Structure Sub Menu Main Menu Value/Info Value/Info Value/Info Menu 1 Menu 3 Measurement is displayed (or an error message is given). Measurement Press OK again to return to the previous menu.
-
Page 26: Bp Recording
BP recording BR-102 plus / BR-102 plus PWA Safety 3 BP recording 3.1 Safety Danger of unnoticed necrosis especially in patients with decreased pain sensitivity (due to medication), or with older patients with decreased blood circulation of the extremities. Only carry out long-term measurement with these patients under constant medical supervision. - Page 27 If the unit gets wet accidentally, switch off and dry with a cloth. If the unit is accidentally immersed in liquid, remove the batteries and return to SCHILLER for checking. A list of BR-102 plus error messages is given in the Maintenance section (see Error Messages, page 58). Page 27...
-
Page 28: Applying The Cuff
BR-102 plus / BR-102 plus PWA Applying the Cuff 3.2 Applying the Cuff The BR-102 plus is supplied with one of two cuff types. Both are applied in the same way. The instructions detailed here give general guidelines and apply to both types of cuffs: 1. - Page 29 User Guide Applying the Cuff 8. Secure BR-102 plus / BR-102 plus PWA to the right or left side of the patient for preference using the holding pouch and belt – Ensure that there is enough slack not to strain the hose when the patient moves.
-
Page 30: Cuff Type With D-Ring
BP recording BR-102 plus / BR-102 plus PWA Applying the Cuff 3.2.1 Cuff Type with D-ring There are three sizes available for the cuff with D-ring: To fit arm size Midpoint arm circumference Cuff designation [cm] 18 - 26 S (Small adult, Child) -
Page 31: Patient Comfort Sleeve
BP recording BR-102 plus / BR-102 plus PWA User Guide Applying the Cuff 3.2.3 Patient Comfort Sleeve If the Patient comfort sleeve is to be used, the sleeve can be positioned on the patients arm and then the cuff applied. Alternatively attach the sleeve to the cuff with the velcro strip before applying to the patient and then apply the cuff and sleeve together to the patient. -
Page 32: Securing The Cuff With The Fixation Pad
BP recording BR-102 plus / BR-102 plus PWA Applying the Cuff 3.2.5 Securing the Cuff with the Fixation Pad A velcro cuff fixing pad is a standard accessory that‘s available to help secure the cuff from dislodging during long term measurement. -
Page 33: Single Measurement
BP recording BR-102 plus / BR-102 plus PWA User Guide Single Measurement 3.3 Single Measurement 1. Apply the cuff as previously described. 2. Select Single measurement from the main menu: 05:16PM NEW RECORD LAST RECORD SINGLE MEAS. SYSTEM NEXT Left... -
Page 34: Long Term Recording
BP recording BR-102 plus / BR-102 plus PWA Long Term Recording 3.4 Long Term Recording A long term recording can also be started and the recording times defined from the medilogDARWIN2 program. See the user guide for details. Use the function keys on the recorder to select all settings... -
Page 35: Record Setup
BP recording BR-102 plus / BR-102 plus PWA User Guide Long Term Recording 3.4.1 RECORD SETUP Select Record Setup to define the following settings: • Patient group: adult or child • Duration: 24 hours or 48 hours • Deflation speed: 2, 3, 4, 5, 6, 7, 8, 9 mmHg/s, or Auto. -
Page 36: Starting A Recording
1. Position the cuff on the patient (see Applying the Cuff, page 28). 2. Insert fully charged batteries in the BR-102 plus / BR-102 plus (see Inserting/Changing the Batteries, page 15). 3. Check that the correct time (and date) is displayed. These can be changed in System Setup. - Page 37 • Check the battery display and ensure that it still shows full capacity. 10. After checking the first measurement and battery display, position the BR-102 plus / BR-102 plus PWA in the pouch and secure. – Subsequent measurements are taken as defined for the program selected.
-
Page 38: Changing The Batteries During A 48 Hr Recording
BP recording BR-102 plus / BR-102 plus PWA Long Term Recording 3.4.4 Changing the Batteries During a 48 Hr Recording An interrupted recording during battery change (unit is switched off), is automatically continued when battery replacement occurs within 5 hours and the unit is switched on again. -
Page 39: Stopping The Recording
Stopped LAST RECORD BP recording? SINGLE MEAS. SYSTEM NEXT If no confirmation is received within 30 seconds, the recording continues. 3.4.6 Displaying a Recording on the BR-102 plus 05:16PM MEASUREMENTS LAST RECORD 12.05.2013 10:19 RECORD DATA NEW RECORD PATIENT DATA... -
Page 40: Uploading The Recording To The Medilogdarwin2
BP recording BR-102 plus / BR-102 plus PWA Long Term Recording 3.4.7 Uploading the Recording to the medilogDARWIN2 The recording can be reviewed, analysed and a report created with the medilogDARWIN2 program. Print report or save as PDF file. Connect BR-102 plus / BR- Use medilogDARWIN2 to retrieve data, 102 plus PWA to PC. -
Page 41: Patient Information
Patient Information BR-102 plus / BR-102 plus PWA User Guide Long Term Recording 4 Patient Information Danger of strangulation. The shoulder strap or cuff tube can become entangled around the patient’s neck and lead to strangulation. The danger increases at night. Ensure the patient is aware of the danger. -
Page 42: General
• The equipment must not be used in the vicinity of an MRI scanner. • The performance of the BR-102 plus / BR-102 plus PWA can be af- fected by extremes of temperature, humidity and altitude. -
Page 43: Interrupting A Measurement During The Recording
Patient Information BR-102 plus / BR-102 plus PWA User Guide Interrupting a measurement during the recording 4.3 Interrupting a measurement during the recording To interrupt a measurement, press either of the control buttons during the measurement. This will deflate the cuff. An interrupted measurement will be recorded with an error and will not be repeated. -
Page 44: Cleaning
• Do not autoclave the unit or any accessories. • Do not immerse the device in liquid. If liquid does penetrate the unit, switch it off immediately and send it to SCHILLER for testing. • Never use a wet or dripping cloth and never spray the equipment with detergent. -
Page 45: Admissible Detergents
Look for any signs of damage and any improper mechanical function of buttons or connectors. The casing of the BR-102 plus / BR-102 plus PWA and the cable assemblies can be cleaned with a cloth slightly moistened (not wet) on the surface only. -
Page 46: Cleaning The Cuff And Pouch
Cleaning BR-102 plus / BR-102 plus PWA Cleaning the Cuff and Pouch 5.2 Cleaning the Cuff and Pouch 5.2.1 Cleaning the Cuff • Do not use bleach • Do not iron • Do not tumble dry • Do not spin dry •... -
Page 47: Cuff Preparation
Cleaning BR-102 plus / BR-102 plus PWA User Guide Cleaning the Cuff and Pouch 5.2.2 Cuff Preparation Two types of cuff are available: Cuff type with a D-ring and cuff type without a D-ring. Both are available in various sizes. The cuff preparation procedure for cleaning is the same for both type and all sizes. - Page 48 Cleaning BR-102 plus / BR-102 plus PWA Cleaning the Cuff and Pouch Re-inserting the Microphone and the Bladder and Connecting the Pressure Hose For cuffs with D-ring only: When re-inserting the bladder, ensure that the correct bladder size is inserted in the cuff. The bladders come in three sizes and are labelled accordingly.
- Page 49 Cleaning BR-102 plus / BR-102 plus PWA User Guide Cleaning the Cuff and Pouch Bladder hose and connector Gently push the microphone out of the cuff and disconnect the pressure hose from the bladder (connector quarter twist). Remove the bladder from the cuff.
-
Page 50: Cleaning The Pouch (As Well As The Shoulder And Waist Strap)
Cleaning BR-102 plus / BR-102 plus PWA Cleaning the Cuff and Pouch 5.2.3 Cleaning the Pouch (as well as the Shoulder and Waist strap) Clean the pouch with a damp cotton cloth (do not use corrosive liquids or solvents) or can be washed in a washing machine at 30°C using a mild washing powder (do not spin). -
Page 51: Disinfection
(see Cleaning the Device, page 45). For cleaning and disinfecting the cuff, wipe with a damp cloth. SCHILLER has tested and recommends the following solutions: • Terralin Liquid (manufacturer: Schuelke & Mayr) • Promanum N (manufacturer: B. Braun) Additionally, the cuff can be disinfected with the following: •... -
Page 52: Admissible Disinfectants For The Casing
Cleaning BR-102 plus / BR-102 plus PWA Cleaning the Cuff and Pouch 5.2.5 Admissible Disinfectants for the Casing • 50 % isopropyl alcohol • Propanol (50 %) • Ethyl hexanal • Aldehyde (2-4%) • Ethanol (50%) • All products that are suitable for ABS plastic 5.2.6... -
Page 53: Maintenance
Visual Inspection 6 Maintenance All maintenance work must be carried out by a qualified technician authorised by SCHILLER AG. Only maintenance procedures given in this book may be carried out by the user. The following table indicates the maintenance intervals, the maintenance requirement, and the person authorised to carry out the procedure. -
Page 54: Battery Maintenance
• No harm will be done to the batteries by leaving them in the charger unit. Remove the batteries from the BR-102 plus / BR-102 plus PWA (see Inserting/Changing the Batteries, page 15), and place in the battery charger unit. -
Page 55: Calibration
The message is displayed for approximately 60 seconds before the main BR-102 plus / BR-102 plus PWA menu is displayed. Select OK to display the main menu immediately for normal use. 6.4 Measurement Check... -
Page 56: Measurement Accuracy
6.4.3 Measurement accuracy 1. Remove the pressure hose and microphone from the BR-102 plus / BR-102 plus PWA and connect the manometer to the unit as shown. The setup shown is an example connection only. Dependent on the type of manometer and hose connector used, the cuff connector can be removed from the BR-102 plus / BR-102 plus PWA and connected directly to the manometer. -
Page 57: Overpressure Relieve Valve
Maintenance BR-102 plus / BR-102 plus PWA User Guide Measurement Check 6.4.4 Overpressure Relieve Valve The overpressure relieve valve can be checked for correct release for both the adult settings and paediatric setting. Adult 1. Set / check that Adult is set in the record setup. This can be done... -
Page 58: Error Messages
Maintenance BR-102 plus / BR-102 plus PWA Error Messages 6.5 Error Messages The following is a list of the error message that can appear on the device. A common occurrence of errors is movement or a noisy environment during measurement. In most cases checking the hose connections and cuff placement, and then retaking the measurement without moving the arm will solve the error. - Page 59 Maintenance BR-102 plus / BR-102 plus PWA User Guide Error Messages Message Cause Remedy Signal • Too much interference in Ko- Perform measurement in quiet environment; disturbed rotkoff signal. avoid moving the arm during measurement. No signal • Pressure reached 50 mmHg Check cuff.
-
Page 60: Technical Data
Auscultatory (Korotkoff / Riva-Rocci) with additional oscillometric method as backup or only oscillometric, both with linear adjustable deflation rate. BR-102 plus PWA Same as BR-102 plus but with additional 10 second oscillometric signal recording for PWA. Measurement duration 24 hours or 48 hours... - Page 61 CE 0123 according to Annex II 93/42/EEC (medical devices) Classification IIa according to MDD 93/42/EEC Trusted Accuracy The BR-102 plus / BR-102 plus PWA is clinically validated to all internationally recognised organisations: – BHS (in progress) – ESH (2002) – AAMI SP10:2002...
-
Page 62: Preventing Electromagnetic Interferences
Portable HF telecommunication devices must not be used within a radius of 0.3 m from the BR-102 plus / BR-102 plus PWA and its cables. Do not place the BR-102 plus / BR-102 plus PWA on top of other ... -
Page 63: Accessories
2.200119 Battery Ni-MH AA BR-102 plus / BR-102 plus PWA, BP-200 plus, rechargeable. 2.200179 Charging unit BR-102 plus / BR-102 plus PWA, BP-200 plus, MS-12blue, 90-264 VAC (4 batteries can be charged at the same time). 2.310215 USB / mini USB cable for MT-101, BR-102 plus / BR-102 plus PWA, BP-200plus. -
Page 64: Cuff And Cuff Accessories
8.3 Cuff and Cuff Accessories Part Number Description 2.100325 Velcro plaster for BR-102, BR-102 plus / BR-102 plus PWA, BP-200plus, set of 10. 2.100326 Adhesive plaster for microphone, BR-102, BR-102 plus / BR-102 plus PWA and BP-200 plus, set of 10. -
Page 65: Br-102 Plus Pwa
BR-102 plus PWA BR-102 plus / BR-102 plus PWA User Guide Overview 9 BR-102 plus PWA 9.1 Overview The clinical usefulness of central blood pressure (BP) as an index of risk for cardiovascular disease and the augmentation index (AIx) is often cited with relation to sex, age and heart rate. -
Page 66: Method
BR-102 plus PWA BR-102 plus / BR-102 plus PWA Method 9.4 Method Ten pulse waves are filtered and averaged to determine the central arterial pulse wave. The augmentation index is standardised for a pulse rate of 75 bpm (see reference [1]). This parameter is then described as Alx@75. -
Page 67: Patient Diary
Patient Diary BR-102 plus / BR-102 plus PWA User Guide Patient Diary Example 10.1 Based on research with a surveyed cross-section of the population of about 2,000 people average values and 90% confidence interval were determined. An increase of the Alx until the 55th year has been identified and after the 55th year the increase slows for both sexes. - Page 68 • The unit is not waterproof, do not get wet - remove the recorder and cuff if you take a bath or shower. NOTE • If using the BR-102 plus/PWA outdoor at significant lower temperature as 5°C, make sure that you wear a warm long coat to keep the device temperature above 5°C. Significant lower temperature may reduce the battery performance and therefore the max.
- Page 69 SCHILLER BR-102 plus / BR-102 PWA Patient Diary Changing the batteries during a 48 hours recording • Preventive changing the batteries after 24 hours: 1. Press the blue button for 4 seconds. Confirm message “Change battery” again with the blue button.
- Page 70 SCHILLER BR-102 plus / BR-102 PWA Patient Diary Time Event / Comment Time Event / Comment Time Event / Comment Time Event / Comment Time Event / Comment Time Event / Comment...
-
Page 71: Index
Index 11 BR-102 plus / BR-102 plus PWA User Guide 11 Index Pressure Hose and Microphone Connection ........Battery Pulse Wave Analysis ......Capacity Display ......Changing During a Recording (48 hour) ..........Condition .......... RECORD SETUP ......Disposal ........... -
Page 73: Appendix - Symbols
Appendix - Symbols 12 Appendix - Symbols This appendix lists all general symbols that may be present on the device, label and accessories. Not all of those symbols are necessarily present on your device. This appendix has its own article number, which is independent of the user guide's article number. - Page 74 Appendix - Symbols CE marking, affirms its conformity with European standards Regulatory Compliance Mark for the Australian standards The device is recyclable Symbol for the recognition of electrical and electronic equipment. Device must not be disposed of in the household waste. Symbol for the recognition of a battery.
- Page 75 Appendix - Symbols Keep dry (store in a dry location) Keep away from sunlight (protect from direct sunlight) Fragile, handle with care Transport upwards (this way up) Do not use hooks EIP = electronic information product (dos not contain any toxic and hazardous substances or elements above the maximum concentra- tion values (product can be recycled and re-used).
- Page 76 Device availability in your market is subject to regulatory approval. LT Book für inhouse-Druck Manufacturer: SCHILLER AG, Altgasse 68, CH-6341 Baar, Switzerland, Phone + 41 41 766 42 42, Fax + 41 41 761 08 80, sales@schiller.ch, www.schiller.ch Extra Light für Offset-Druck...
Need help?
Do you have a question about the BR-102 PLUS and is the answer not in the manual?
Questions and answers
Si se mne cae al agua que puedo hacer?no me enciende
If your Schiller BR-102 PLUS falls in water and won't turn on, it may be damaged because the unit is not waterproof and must remain dry. There is no specific recovery procedure mentioned. You should stop using the device and contact the appropriate service or support for inspection and repair.
This answer is automatically generated