
Related Manuals for Adaptec ANA-62000


Summary of Contents for Adaptec ANA-62000
- Page 1 OVER FOR PREPRINTED SHELL ’ UIDE LAN™ F ANA™-69000/62000 F 511589-00 R THERNET AMILY...
- Page 2 Adaptec, Inc. 691 South Milpitas Boulevard Milpitas, CA 95035 © 1999 Adaptec, Inc. All rights reserved. Adaptec, and the Adaptec logo are trademarks of Adaptec, Inc. which may be registered in some jurisdictions. Printed in Singapore STOCK NO.: 512293-00, Rev. A DK 4/99...
- Page 3 DuraLAN™ Fast Ethernet NICs Including Duralink64™ Software ANA -69000/62000 Family User’s Guide...
-
Page 4: Electronic Support
Copyright © 1999 Adaptec, Inc. All rights reserved. No part of this publication may be reproduced, stored in a retrieval system, or transmitted in any form or by any means, electronic, mechani- cal, photocopying, recording or otherwise, without the prior written consent of Adaptec, Inc., 691 South Milpitas Blvd., Milpitas, CA 95035. -
Page 5: Sales And Ordering Information
To submit your electronic mail message to Adaptec Technical Support use the product sup- port information Webmail form at http://www.adaptec.com/support/webmail.html. To speak with a product support representative, call 408-934-7274, M–F, 6:00 5:00 ., Pacific Time. -
Page 6: Safety Standards
This device complies with part 15 of the FCC rules. Operation is subject to the following two conditions: (1) this device may not cause harmful interference and (2) this device must accept any interference received, including interference that may cause undesired operation. Adaptec, Inc. Tested To Comply With FCC Standards FOR HOME OR OFFICE USE... -
Page 7: Limited Warranty
Limited Warranty SOFTWARE. Adaptec, Inc. warrants to you that for a period of ninety (90) days from the date you receive this software Product the magnetic media contains an accurate reproduction of the Software. This limited warranty covers only the original user of the Product. If the Product media should become defective within the warranty period, Adaptec at its option, will repair or replace the Product media, provided it is delivered at your expense to Adaptec as provided below. -
Page 9: Table Of Contents
Part 1 Introduction to DuraLAN Getting Started System Requirements ...1-2 Hardware Requirements ...1-2 Software Requirements ...1-2 Fast Ethernet ...1-3 Adaptec DuraLAN NICs ...1-3 Duralink64 Failover ...1-6 Duralink64 Port Aggregation ...1-7 FEC (Fast EtherChannel) ...1-8 Advisories ...1-9 Introduction to Duralink64 Port Aggregation Traditional Network Configurations ...2-2... - Page 10 DuraLAN Fast Ethernet NICs User’s Guide Connecting the Network Cable ... 3-6 Installing the Appropriate NIC Driver ... 3-7 Network Configuration Examples Network Without Duralink64 Failover Protection ... 4-2 Single Hub or Switch on an Ethernet Segment ... 4-3 Dual Hubs ... 4-4 Dual Hubs with an Ethernet Switch ...
- Page 11 Duralink64 Standard Driver for Windows Configuring the Standard Driver Ports in Windows NT 4.0 and 3.51 ...6-2 Configuring the Ports in Windows 98/95 ...6-4 Duralink64 Failover for Windows NT Configuring the Ports ...7-2 Creating the Failover Pair ...7-3 Windows NT 4.0 ...7-3 Windows NT 3.51 ...7-6 Monitoring Failover Pairs ...7-8 Note on DuraLAN NIC Ports ...7-8...
- Page 12 DuraLAN Fast Ethernet NICs User’s Guide Part 4 The Duralink64 Driver for NetWare Duralink64 Standard Driver for NetWare Before you Begin ... 9-2 Note on NetWare ... 9-2 Install of Duralink64 Driver during NetWare 5.0 Operating System Installation ... 9-3 Installing the NetWare Standard Driver ...
- Page 13 Duralink64 Port Aggregation for NetWare Before you Begin ...11-2 Note on NetWare ...11-2 Installing the NetWare Port Aggregation Driver ...11-3 Configuring Ports ...11-4 Creating Port Aggregation Groups ...11-6 Creating Fast EtherChannel Groups ...11-9 Assigning Protocols ...11-12 Verifying Configuration ...11-15 Copying and Saving the Configuration ...11-16 Viewing System Status ...11-17 System Status Data ...11-17 Setting Time Intervals ...11-18...
- Page 14 DuraLAN Fast Ethernet NICs User’s Guide Part 5 Appendices Cables and LEDs Connection Types ... A-2 Full Duplex Support ... A-2 Cable Requirements ... A-3 Straight-through Cable ... A-4 Pinout and Color Requirements ... A-5 Diagnostics Loop-Back Cable ... A-5 Diagnostic LEDs ...
- Page 15 The Diagnostics Utility Running the Diagnostics ... D-2 From the Hard Drive ... D-2 From the Floppy Drive ... D-2 Diagnostic Tests ... D-3 Index Contents xiii...
-
Page 17: Part 1 Introduction To Duralan
Part 1 Introduction to DuraLAN... -
Page 19: Getting Started
Duralink64 Failover Duralink64 Port Aggregation FEC (Fast EtherChannel) Advisories This user’s guide describes how to install and configure Adaptec DuraLAN™ Fast Ethernet network interface cards (NICs). Please review the system requirements before you begin. User’s guide summary: Part 1, Introduction to DuraLAN , describes how to install your Adaptec DuraLAN NIC. -
Page 20: System Requirements
Part 5, Appendices , provides supplemental information that may be required for a proper installation. System Requirements Hardware Requirements The minimum hardware system requirements for using the Adaptec DuraLAN NIC are as follows: System Component Requirements Available bus mastering PCI slot. -
Page 21: Fast Ethernet
Adaptec DuraLAN NICs Note: 64-bit NICs will also work in 32-bit PCI slots. Adaptec provides the following PCI 10/100 DuraLAN Fast Ethernet NIC models: ANA-69011/ Single32™—a single-port 32-bit NIC supporting autosensing between 10 and 100-Mbps line speeds. - Page 22 DuraLAN Fast Ethernet NICs User’s Guide ANA-62011/ Single64™—a single-port 64-bit/32-bit NIC supporting autosensing between 10 and 100-Mbps line speeds. Single RJ-45 Port Figure 1-2. ANA-62011 ANA-62022—a two-port NIC that offers two high-performance 10/100 Fast Ethernet ports on a single 64-bit/32-bit NIC. Each port runs at independent speeds for maximum flexibility.
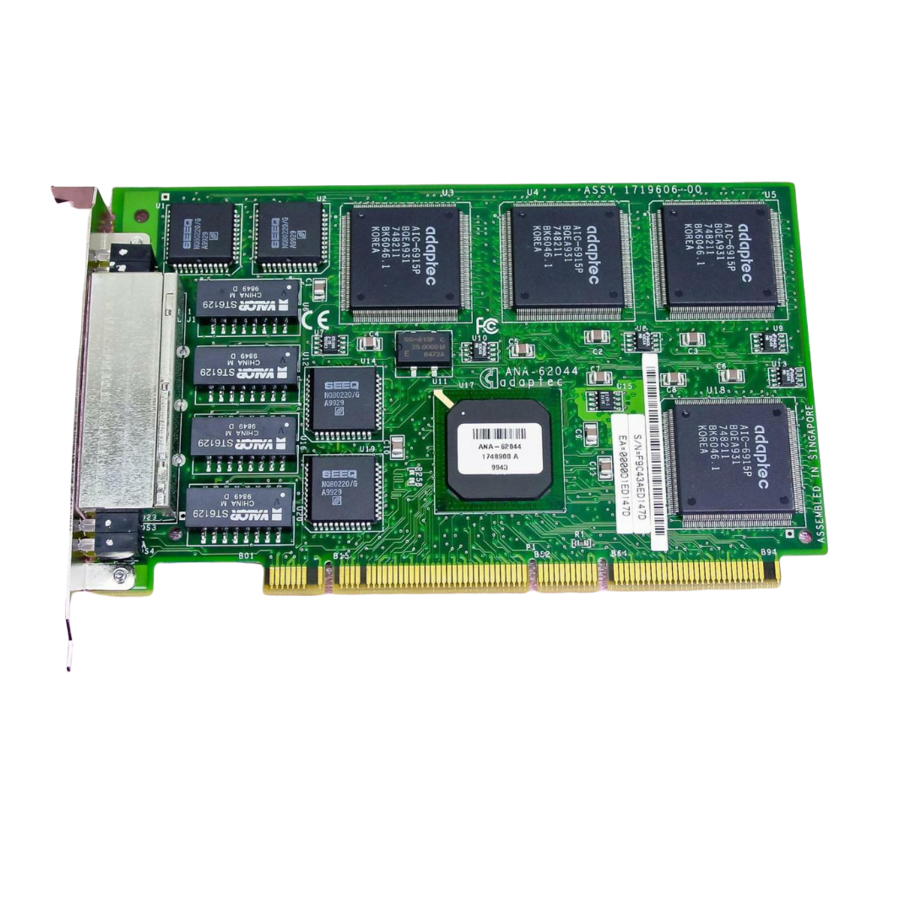
- Page 23 ANA-62044—a four-port NIC that offers four high performance 10/100 Fast Ethernet ports on a single 64-bit/32-bit NIC. Each port runs at independent speeds for maximum flexibility. This NIC supports Full Duplex to deliver speeds up to 800-Mbps cumulative throughput. RJ-45 Port 1 RJ-45 Port 2 RJ-45 Port 3 RJ-45 Port 4...
-
Page 24: Duralink64 Failover
Duralink64 Failover supports Windows NT 4.0 and 3.51, and Novell NetWare 4.x and 5.0 based servers. Duralink64 Failover is compatible with Adaptec ANA and ANA-62011/ single-port NICs, ANA-62022 two-port NICs, and ANA-62044 four-port NICs. -
Page 25: Duralink64 Port Aggregation
Duralink64 Port Aggregation supports Windows NT 4.0 and 3.51, and Novell NetWare 4.x and 5.0 -based servers. Duralink64 Port Aggregation is compatible with Adaptec ANA-69011/ and ANA-62011/ single-port NICs, ANA-62022... -
Page 26: Fec (Fast Etherchannel)
In addition, FEC technology provides redundancy in the event of link failure. Duralink64 v4.2 software and all of Adaptec DuraLAN NICs support Fast EtherChannel technology, allowing redundancy and high-speed aggregation between switches and servers. -
Page 27: Advisories
To avoid injury to people or damage to equipment and data, be sure to follow the cautions and warnings in this document. Adaptec does not claim to have included in this document every condition or situation that might require a caution or warning notice. -
Page 29: Introduction To Duralink64 Port Aggregation
Introduction to Duralink64 Port Aggregation In this Chapter Traditional Network Configurations Servers with Duralink64 Port Aggregation This chapter compares traditional Ethernet configurations to Ethernet servers using Duralink64 Port Aggregation. These examples show the impact Duralink64 Port Aggregation has on network performance and hardware investment. -
Page 30: Traditional Network Configurations
DuraLAN Fast Ethernet NICs User’s Guide Traditional Network Configurations The following three examples show some typical configuration methods. The figure below illustrates a single segment server initialized at 100 Mbps with Full Duplex Ethernet (FDE). In this example, the segmented server is limited to 200 Mbps. In addition, if the connection to the server fails, the network may go down. - Page 31 Introduction to Duralink64 Port Aggregation The next traditional method provides network Fault Tolerance through doubling the hardware and addition of a special version of NetWare (SFT3). Data is kept current between servers via a Mirrored Server Link (MSL). In the illustration below, one server is active while the other is ready to take over all duties if the other fails.
- Page 32 DuraLAN Fast Ethernet NICs User’s Guide The illustration below illustrates a configuration with Windows NT Server (Wolfpack). Clients Central switching area with lines to workgroups Ethernet Switch Figure 2-3. Fault Tolerance Using NT Primary Server Ethernet Link Storage Devices Secondary Server...
-
Page 33: Servers With Duralink64 Port Aggregation
Servers with Duralink64 Port Aggregation A server with Duralink64 Port Aggregation can use up to 12 Adaptec PCI Fast Ethernet ports in one aggregated group (at 1.2 Gbps per group). If any of the contributing members of a specific aggregated group should fail, that member is excluded from the group. -
Page 35: Part 2 Installing The Duralan Nic
Part 2 Installing the DuraLAN NIC... -
Page 37: Installing The Duralan Nic
Installing the DuraLAN NIC Connecting the Network Cable Installing the Appropriate NIC Driver This chapter provides instructions on installing your Adaptec DuraLAN NIC. If you are a Windows 95 user, please read Important Note for Windows 95 Users! before proceeding with this installation. -
Page 38: Important Note For Windows 95 Users
DuraLAN Fast Ethernet NICs User’s Guide Important Note for Windows 95 Users! Before installing the DuraLAN NIC, verify which version of Windows 95 is installed. (You either have OSR1 or OSR2.) You will need to know which version you have if you install the DuraLAN Standard driver. -
Page 39: Installing The Appropriate Nic
ANA-69011 and 5.0 ANA-62011 ANA-62011 ANA-62022 ANA-62022 ANA-62044 ANA-62044 Windows 95 OSR1 and OSR2 use two different Adaptec drivers, see the appropriate installation instructions. Requires at least two DuraLAN NICs. DuraLAN NIC Installation Duralink64 Port Aggregation/Cisco’s Fast Ethernet Channel ANA-69011... -
Page 40: Installing The Duralan Nic
Unscrew the bracket screw, and then remove the expansion slot bracket cover. Note: PCI slots and NICs come in two varieties: 3.3-volt, and the more common 5-volt. All Adaptec PCI NICs support 5-volt and 3.3-volt slots. Carefully remove the DuraLAN NIC from its antistatic container. - Page 41 Replace the screw that was removed in step 4, see the figure below. ISA Expansion Slot Expansion 32-bit PCI Slots Figure 3-1. Install the DuraLAN NIC in a 64-bit PCI expansion slot. Replace the computer cover. Continue with Connecting the Network Cable on page 3-6. DuraLAN NIC Installation 64-bit PCI Expansion Slots...
-
Page 42: Installing The Appropriate Nic Driver
DuraLAN Fast Ethernet NICs User’s Guide Connecting the Network Cable Cable requirements for Adaptec DuraLAN NICs vary according to network speed, cabling standard, and the connector to be used. See Appendix A, Cables and LEDs for detailed information on cabling. -
Page 43: Installing The Appropriate Nic Driver
DuraLAN NIC driver. You may install one of three drivers: the DuraLAN Standard driver, Duralink64 Failover, or Duralink64 Port Aggregation. Please note that you may install one type only. The Adaptec Duralink64 diskettes provide the following drivers: Disk 1 Windows NT 4.0 Standard Driver Windows NT 3.51 Standard... - Page 44 Fast EtherChannel. Always use the latest software version available for your DuraLAN NIC. Drivers are updated regularly on Adaptec’s World Wide Web, FTP, and BBS sites to provide enhanced performance and new features. See Technical and Product Support on page iii.
-
Page 45: Network Configuration Examples
This chapter describes the benefits of using Duralink64 Failover and some typical network configurations. The primary and backup Adaptec DuraLAN Fast Ethernet NICs or ports reside in the server. Duralink64 Failover operates on these NICs to provide redundancy on the server. The backup port does not operate until the primary... -
Page 46: Network Without Duralink64 Failover Protection
DuraLAN Fast Ethernet NICs User’s Guide Network Without Duralink64 Failover Protection This configuration uses one NIC connected to a hub or switch on an Ethernet segment. If the NIC fails, all network traffic is stopped. Ethernet Switch or Ethernet Hub Clients Figure 4-1. -
Page 47: Single Hub Or Switch On An Ethernet Segment
Single Hub or Switch on an Ethernet Segment This configuration uses two NICs connected to a hub or switch on an Ethernet segment. Duralink64 Failover provides failover capability if one NIC fails. Ethernet Switch or Ethernet Hub Clients Figure 4-2. Single hub or switch on an Ethernet segment Network Configuration Examples Primary Server... -
Page 48: Dual Hubs
DuraLAN Fast Ethernet NICs User’s Guide Dual Hubs In this example, each NIC is connected to a separate hub to provide redundancy. If the hub port being used by the primary NIC fails, the backup NIC becomes active and all network traffic is immediately directed through it. -
Page 49: Dual Hubs With An Ethernet Switch
Network Configuration Examples Dual Hubs with an Ethernet Switch This example shows how Duralink64 Failover provides network redundancy to a switched network. Ethernet switches provide network traffic segmentation. Clients Ethernet Hub Primary Ethernet Switch Server Ethernet Hub Backup Clients Figure 4-4. Duralink64 Failover on a network with dual hubs and an Ethernet switch... -
Page 50: Dual Hubs With Routers
DuraLAN Fast Ethernet NICs User’s Guide Dual Hubs with Routers The following example shows how to set up Duralink64 Failover in a network configuration using routers. Routers provide WAN and LAN connectivity and allow physical network protocol redundancy. Router Ethernet Hub Primary Uplink Server... -
Page 51: Dual Hubs With A Four-Port Nic
Network Configuration Examples Dual Hubs with a Four-Port NIC This example shows port redundancy, using Duralink64 Failover, within a 4-port NIC. As shown in the illustration below, Ports 1 and 3 are used as the primary ports to each Ethernet hub. Ports 2 and 4 are backup ports connected to each hub. -
Page 53: Part 3 The Duralink64
Part 3 The DuraLink64 Driver for Windows... -
Page 55: Duralink64 Driver Installation For Windows
Duralink64 Driver Installation for Windows In This Chapter Before You Begin Note on DuraLAN NIC Ports Installing the DuraLAN Driver Installation Tips Removing Previously Installed Drivers This chapter provides instructions for installing the DuraLink64® driver of your choice on a server running Windows NT versions 4.0 and 3.51. -
Page 56: Before You Begin
Note on DuraLAN NIC Ports When you are installing Adaptec DuraLAN NICs, it is a good idea to document where each port physically resides in the server, especially when two or more identical NICs exist. This is important because ports are identified by generic port names, such as Adptsf1, Adptsf2, Adptsf3, etc. -
Page 57: Installing The Duralan Driver
Duralink64 Driver Installation for Windows Installing the DuraLAN Driver Windows NT 4.0 If you are installing Windows NT at this time, start with step 6 when prompted for the DuraLAN NIC. To install the DuraLAN driver on a Windows NT 4.0 platform follow these steps: Start Windows NT. - Page 58 DuraLAN Fast Ethernet NICs User’s Guide At the Insert Disk window, insert the Duralink64 for Windows diskette, and then click OK. Figure 5-2. Insert Disk Window In the Select OEM Option window, click the DuraLAN NIC model that is installed and then click OK. Figure 5-3.
- Page 59 Duralink64 Driver Installation for Windows In the Adaptec DuraLAN NIC Driver Installation window, select the driver and then click OK. Figure 5-4. Adaptec NIC Driver Installation Window Continue to the appropriate configuration chapter: – Chapter 6, Duralink64 Standard Driver for Windows.
-
Page 60: Windows Nt 3.51
DuraLAN Fast Ethernet NICs User’s Guide Windows NT 3.51 If you are installing Windows NT at this time, start with step 6 when prompted for the DuraLAN NIC. To install the DuraLAN driver on a Windows NT 3.51 platform, follow these steps: Start Windows NT. - Page 61 In the Select OEM Option window, click the DuraLAN NIC model that is installed and then click OK. Figure 5-7. Select OEM Option Window In the Adaptec DuraLAN NIC Driver Installation window, select the driver and then click OK. Figure 5-8. Adaptec DuraLAN Driver Installation Continue to the appropriate configuration chapter: –...
-
Page 62: Windows 98
DuraLAN Fast Ethernet NICs User’s Guide Windows 98 To install the DuraLAN Driver on the Windows 98 platform, follow these steps: Start Windows 98, and wait for the New Hardware window to open. In the first screen, click Next. In the next window, click Search for the best driver for your device. -
Page 63: Windows 95
Duralink64 Driver Installation for Windows Windows 95 This section provides instructions for installing the DuraLAN Standard driver in Windows 95 OSR1 and OSR2. To verify which version of Windows 95 is installed, see Important Note for Windows 95 Users! on page 3-2. Windows 95 OSR2 To install the DuraLAN Standard driver on a Windows 95 OSR2 platform, follow these steps:... -
Page 64: Windows 95 Osr1
DuraLAN Fast Ethernet NICs User’s Guide Windows 95 OSR1 To install the DuraLAN Standard Driver Windows 95 OSR1 platform, follow these steps: Start Windows 95. The New Hardware Found wizard opens. In the wizard, click Driver from disk provided by hardware manufacturer, and then click OK. -
Page 65: Installation Tips
Duralink64 Driver Installation for Windows Installation Tips This section provides tips to assist you in the DuraLAN driver installation. Windows 95 How do I verify that the DuraLAN Standard driver is installed properly? From the Start menu, point to Settings, then click Control Panel. In the Control Panel, double-click System. -
Page 66: Windows 98
DuraLAN Fast Ethernet NICs User’s Guide A yellow exclamation ! appears beside the DuraLAN NIC. What should I do? Remove the current DuraLAN Standard driver and then reinstall it. See Windows 98 and 95 OSR1/OSR2 on page 5-14. In the Device Manager, the new NICs replace the older NICs, but the Network window lists both. -
Page 67: Removing Previously Installed Drivers
Double-click Control Panel. Double-click Network. In the Network window, click the Adapters tab. In the Network Adapters list, click the Adaptec DuraLAN NIC you want to remove, and then click Remove. When asked if you wish to continue, click Yes. -
Page 68: Windows Nt 3.51
From the Start menu, point to Settings, and then click Control Panel. In the Control Panel, double-click System. Select the Device Manager tab, then click Network Adapters. Select Adaptec DuraLAN NIC to remove, then click Remove. Repeat steps 3 and 4 for each existing DuraLAN NIC. Restart the system. 5-14... -
Page 69: Configuring The Ports
Duralink64 Standard Driver for Windows In This Chapter Configuring the Standard Driver Ports in Windows NT 4.0 and 3.51 Configuring the Ports in Windows 98/95 This chapter describes how to configure the DuraLAN Standard driver for Windows. -
Page 70: Configuring The Standard Driver Ports
Microsoft Windows NT Service Pack, and then restart the system. In the Adaptec New Hardware Found window, make sure all the DuraLAN NIC ports appear. Figure 6-1. This window identifies each port’s PCI bus and PCI slot In the New Adaptec NIC Port(s) Available for DuraLAN NIC box, click the appropriate port. - Page 71 Duralink64 Standard Driver for Windows Click Apply. Repeat steps 1 through 4 for each existing port. When you are done, click OK. When you are done, click Close in the Network window. Restart the system.
-
Page 72: Configuring The Ports In Windows 98/95
DuraLAN Fast Ethernet NICs User’s Guide Configuring the Ports in Windows 98/95 To configure ports in Window 98 and Windows 95 OSR2 or OSR1, follow these steps: From the Start menu, point to Settings, and then click Control Panel. In the Control Panel, double-click Network. In the Network window, click the appropriate DuraLAN NIC, and then click Properties. - Page 73 Duralink64 Standard Driver for Windows In the Value list, click the appropriate connection type. (Connection Types on page A-2 provides descriptions.) Figure 6-3. Advanced Tab Click OK. In the Configuration tab, click OK. Restart your system.
-
Page 75: Monitoring Failover Pairs
Duralink64 Failover for Windows NT In This Chapter Configuring the Ports Creating the Failover Pair Monitoring Failover Pairs Note on DuraLAN NIC Ports This chapter provides instructions for installing Duralink64 Failover on a server running Windows NT versions 4.0 and 3.51. -
Page 76: Configuring The Ports
Autodetect, the default connection type that will always detect port connection and negotiate a compatible speed and transmission mode. In the Adaptec New Hardware Found window, make sure all the DuraLAN NIC ports appear. Figure 7-1. This window identifies each port’s PCI bus and PCI slot... -
Page 77: Creating The Failover Pair
Windows NT 4.0 To create Failover pairs, follow these steps: From the Available Adaptec Ports box, click a port to be designated as a primary port. Figure 7-2. Failover Configuration Tab Click Add. The port is added under Primary Port in the Failover Pair list. - Page 78 . To remove a Failover pair: PTIONAL Click the port from the Primary Ports list, and then click Remove. Both ports return to the Available Adaptec Ports box. Click Apply. When you are done, click OK. you will return to the Adapters tab.
- Page 79 Duralink64 Failover for Windows NT If SNMP is not set up, you will receive the Setup Message below. Click OK. Figure 7-4. This message may be ignored during this installation. Enter the protocol information. Consult your Microsoft Windows NT 4.0 documentation for help configuring the protocol. When you are done, remove the floppy disk from the floppy drive.
-
Page 80: Windows Nt 3.51
DuraLAN Fast Ethernet NICs User’s Guide Windows NT 3.51 To create Failover pairs, follow these steps: From the Available Adaptec Ports box, click the port you want as the primary port. Figure 7-5. Configuration Tab Click Add. The port is added under Primary Port in the Failover Pair list. - Page 81 Duralink64 Failover for Windows NT When you are done, click OK. you will return to the Network Settings Window. Figure 7-6. Network Setting Window Click OK. Note: The Adapters tab identifies one model only, even when several DuraLAN NIC models are installed. The DuraLAN NIC model displayed is the same as the first model you chose in step 8 during the driver installation.
-
Page 82: Monitoring Failover Pairs
Note on DuraLAN NIC Ports When you are installing Adaptec DuraLAN NICs, it’s a good idea to document where each port physically resides in the server, especially when two or more identical NICs exist. This is important because ports are identified by generic port names, such as Adptsf1, Adptsf2, Adptsf3, etc. -
Page 83: Duralink64 Port Aggregation
Duralink64 Port Aggregation for Windows NT In This Chapter Configuring the Ports Creating Port Aggregation Groups Creating Fast EtherChannel Groups Assigning the TCP/IP Address Modifying Groups Checking System Status Windows NT Performance Monitor This chapter provides instructions for configuring Duralink64 Port Aggregation on a server running Windows NT. -
Page 84: Configuring The Ports
DuraLAN Fast Ethernet NICs User’s Guide Configuring the Ports In the Adaptec New Hardware Found window, each port is assigned to Autodetect, the default connection type that will always detect port connection and negotiate a compatible speed and transmission mode. - Page 85 Duralink64 Port Aggregation for Windows NT In the Connection Types list, click the connection type for your network or use Autodetect Default Connection. For descriptions, see Connection Types on page A-2. Click Apply. Repeat steps 1 through 4 for each existing port. When you are done, click OK.
-
Page 86: Creating Port Aggregation Groups
Figure 8-2. Duralink64 Port Aggregation Configuration Tab In the Link Aggregation Type field, click the appropriate link type. For a description of Adaptec’s Port Aggregation, see Chapter 2, Introduction to Duralink64 Port Aggregation. Note on Cisco’s Fast EtherChannel. This option allows you to fully aggregate two or four ports over transmit and receive under all protocols. - Page 87 Duralink64 Port Aggregation for Windows NT Cisco switch documentation to configure the ports in Fast EtherChannel mode. If you select Fast EtherChannel on the server, the connection type for each port is automatically configured to 100 Mbps TX/Full Duplex. You must also configure the ports on the Cisco switch (used by the Fast EtherChannel group) to either Auto Negotiation or 100 Mbps/Full Duplex mode.
- Page 88 DuraLAN Fast Ethernet NICs User’s Guide In the Available Adaptec Ports box, click the available port to add to the group, and then click Add. Repeat step 3 for each additional port. Note: You must assign the same connection type to each port in the same group.
- Page 89 Duralink64 Port Aggregation for Windows NT In the Network window, click Close. Figure 8-5. Ports and Groups Listed in Adapters Tab Continue to Assigning the TCP/IP Address on page 8-11.
-
Page 90: Creating Fast Etherchannel Groups
DuraLAN Fast Ethernet NICs User’s Guide Creating Fast EtherChannel Groups Fast EtherChannel (FEC) allows you to fully aggregate two or four ports over transmit and receive under all protocols. The ports that are configured as the FEC group must be physically connected to the FEC ports on the Cisco switch. - Page 91 For a description of Adaptec’s Port Aggregation, see Chapter 2, Introduction to Duralink64 Port Aggregation. In the Available Adaptec Ports box, click the available port to add to the group, and then click Add. Repeat step 3 for each additional port.
- Page 92 DuraLAN Fast Ethernet NICs User’s Guide In the Network window, click Close. Figure 8-8. Ports and Groups Listed in Adapters Tab. Continue to Assigning the TCP/IP Address on page 8-11. 8-10...
-
Page 93: Assigning The Tcp/Ip Address
Duralink64 Port Aggregation for Windows NT Assigning the TCP/IP Address Note: If you are an Windows NT 3.51 user, please refer to the Windows NT 3.51 documentation for help configuring protocols. Once you have configured Duralink64 Port Aggregation, Windows NT prompts you to configure the protocol. IP addresses to groups and stand-alone ports are assigned in the IP Address tab, such as shown in the following figure. - Page 94 DuraLAN Fast Ethernet NICs User’s Guide In the Subnet Mask field, type the subnet mask number. Click Apply. Repeat steps 1 through 4 for any other port or group. Click OK when you are finished configuring all groups. Restart your computer to complete the changes. Click Yes at the message prompt to restart your computer.
-
Page 95: Modifying Groups
Duralink64 Port Aggregation for Windows NT Modifying Groups This section provides instructions for modifying the group or port configurations. You may rename groups, as well as add or remove ports from existing groups. Renaming Groups In the Duralink64 Port Aggregation window, go to the Configuration tab. -
Page 96: Adding Or Removing Ports
– To add ports to the group, click the appropriate port from the Available Adaptec Ports box, and then click Add. – To remove ports from the group, click the appropriate port from the Group Ports box, and then click Remove. - Page 97 Duralink64 Port Aggregation for Windows NT When adding or deleting a group or port, you will receive a message such as shown below. Click OK. Figure 8-12. This message appears when you add ports with IP Addresses to a new group. Figure 8-13.
- Page 98 DuraLAN Fast Ethernet NICs User’s Guide In the Network window, click Close. Figure 8-14. Ports and Groups Listed in Adapters Tab 8-16...
-
Page 99: Checking System Status
Panel. In the Control Panel, double-click Network. In the Network window, click the Adapters tab. In the Adapters tab, select the Adaptec DuraLAN NIC. The Duralink64 Port Aggregation window appears. Click Properties. Click the Status tab to view the group and independent port information, such as shown in below. -
Page 100: Understanding The Status Tab
DuraLAN Fast Ethernet NICs User’s Guide Understanding the Status Tab Figure 8-16. Status Tab Fields Field Descriptions a Model Adaptec DuraLAN NIC model number. b Port No. Port identification assigned by the system. c Trans Kbps Total Kilobits per second (Kbps) transmitted per port (stand-alone and group). -
Page 101: Viewing The Groups
Duralink64 Port Aggregation for Windows NT Speed is either 10 or 100. This value depends on the f Speed connection type you chose in Configuring the Ports on page 8-2. Duplexity is either half or full. This value depends g Duplexity on the connection type you chose in Configuring the Ports on page 8-2. -
Page 102: Windows Nt Performance Monitor
DuraLAN Fast Ethernet NICs User’s Guide Windows NT Performance Monitor You can view system traffic for selected groups and stand-alone ports in the Performance Monitor, as shown in Figure 8-18. In this window, each line represents the performance of the group or port listed at the bottom of the screen. - Page 103 Duralink64 Port Aggregation for Windows NT Figure 8-19. Add to Chart Window From the Object list box, select ADPTSF. In the Instance box, click the port or group, and then click the appropriate setting from the Counter box. To distinguish ports and groups in the Performance Monitor, adjust the following parameters: Color—...
-
Page 105: Part 4 The Duralink64 Driver For Netware
Part 4 The Duralink64 Driver for NetWare... -
Page 107: Duralink64 Standard Driver For Netware
Duralink64 Standard Driver for NetWare In This Chapter Before you Begin Note on NetWare Install of Duralink64 Driver during NetWare 5.0 Operating System Installation Installing the NetWare Standard Driver Configuring the Ports Assigning the Protocols Viewing the Configuration Restarting the Server Removing Drivers This chapter provides instructions for installing and configuring the DuraLAN Standard driver for NetWare 4.x or NetWare 5.0. -
Page 108: Before You Begin
NetWare 4.11. This pack may be downloaded from: http://suport.novell.com Note on NetWare When you are installing Adaptec DuraLAN NICs, it is a good idea to document where each port physically resides in the server, especially when two or more identical NICs exist. This is important because ports are identified by generic port names, such as Adptsf1, Adptsf2, Adptsf3, etc. -
Page 109: Install Of Duralink64 Driver During Netware 5.0 Operating System Installation
Duralink64 Standard Driver for NetWare Install of Duralink64 Driver during NetWare 5.0 Operating System Installation Follow this procedure when installing the Duralink driver during the installation of the NetWare 5.0 Operating System. Install the NetWare 5.0 Operating System following the NetWare instructions until you reach the Network Boards screen, as shown below. -
Page 110: Installing The Netware Standard Driver
Enter. The Select Driver window appears. Figure 9-3. The Standard driver is selected in this illustration. Select Standard and press Enter. In the message indicating the New Adaptec NICs have been detected, press Enter. Press Enter to continue through the messages that appear until the Board Configuration screen appears. -
Page 111: Configuring The Ports
Duralink64 Standard Driver for NetWare Configuring the Ports After installing the Duralink64 Standard driver, use the following steps to configure the ports. In the Main Menu, select Configure Ports, and then press Enter. Figure 9-4. Duralink64 Standard Setup Main Menu In the Ports screen, make sure you know which port names are assigned to the actual ports on the NIC. - Page 112 DuraLAN Fast Ethernet NICs User’s Guide . The Autodetect (default) detects which device the port is PTIONAL connected to and negotiates the port speed and transmission mode accordingly. Autodetect is recommended; however, to change the connection type(s): Select the port, and then press Enter. (To select multiple ports, select the port, and then press F5 one at a time.) In the Type of Connection menu, select the type, and then press Enter.
-
Page 113: Assigning The Protocols
Duralink64 Standard Driver for NetWare Assigning the Protocols You can assign IP or IPX protocols to Failover pairs and stand-alone ports. Note: The IPX protocol supports all four frame types and multiple frame types simultaneously. IP supports either Ethernet_II or Ethernet_SNAP, but never both at the same time. - Page 114 DuraLAN Fast Ethernet NICs User’s Guide Configuring IPX In the List of Frame Types box, select the frame type, and then press Enter. List of Frame Types ETHERNET_802.2 ETHERNET_802.3 ETHERNET_II ETHERNET_SNAP Figure 9-9. List of Frame Types Box In the IPX Network Number box, type the network number, and then press Enter.
- Page 115 Duralink64 Standard Driver for NetWare Configuring IP In the List of Frame Types box, select the frame type, and then press Enter. In the IP Parameters box, select Enter IP Address, and then press Enter. IP Parameters Enter IP Address Enter Subnet Mask Figure 9-12.
-
Page 116: Viewing The Configuration
Marcom F E_802.2 Adptsf1 (Primary) Adptsf2 <ESC> to go back to the previous menu. © Copyright 1998, Adaptec Inc. < F1> Help Figure 9-15. View Configuration Screen Press Esc to return to the Main Menu. Netware Loadable Module Network IP Address 00000001 <... -
Page 117: Restarting The Server
Duralink64 Standard Driver for NetWare Restarting the Server After installing the Standard driver and configuring the ports, you must restart the server. In the Internetworking Configuration menu, press Esc. In the Exit INETCFG box, select Yes, and then press Enter. In the Add Initialize Commands to autoexec.ncf box, select Yes, and then press Enter. -
Page 118: Removing Drivers
In the Internetworking Configuration menu, select Boards, and then press Enter. A list of NICs appears. In the Configured Boards screen, delete all existing Adaptec NICs drivers by selecting the NIC(s) and pressing Del. When you are finished, press Esc. -
Page 119: Note On Netware
Duralink64 Failover for NetWare In This Chapter Before you Begin Note on NetWare Installing the NetWare Failover Driver Configuring the Ports Creating the Failover Pairs Assigning the Protocols Viewing the Configuration Copying and Saving the Configuration Viewing the System Status Modifying the Driver Configuration Removing Drivers This chapter provides instructions for installing Duralink64 Failover... -
Page 120: Before You Begin
NetWare 4.11. This pack may be downloaded from: http://suport.novell.com Note on NetWare When you are installing Adaptec DuraLAN NICs, it is a good idea to document where each port physically resides in the server, especially when two or more identical NICs exist. This is important because ports are identified by generic port names, such as Adptsf1, Adptsf2, Adptsf3, etc. -
Page 121: Configuring The Ports
Press Enter. The Select Driver window appears. Figure 10-1. The Select Driver Window Select Failover and press Enter. In the message indicating that New Adaptec NICs have been detected, press Enter. Continue to Configuring the Ports, page 10-4. Duralink64 Failover for NetWare... -
Page 122: Configuring The Ports
DuraLAN Fast Ethernet NICs User’s Guide Configuring the Ports In the Main Menu, select Configure Ports, and then press Enter. Adaptec DuraLAN NIC Installation 4.2 Main Menu Configure Ports Set Failover Pairs Configure Protocols View Configuration Install Software Uninstall Software Use arrow keys to move, <Enter>... - Page 123 . The Autodetect default detects which device the port is PTIONAL connected to and negotiates the port speed and transmission mode accordingly. Autodetect is recommended; however, to change the connection type(s): Select the port, and then press Enter. (To select multiple ports, select the port, and then press F5 one at a time.) In the Type of Connection menu, select the type, and then press Enter.
-
Page 124: Creating The Failover Pairs
DuraLAN Fast Ethernet NICs User’s Guide Creating the Failover Pairs The Failover pair consists of two ports only: the primary port and the backup port. In the Main Menu, select Set Failover Pairs, and then press Enter. In the List of Existing Pairs box, press Ins. List of Existing Pairs No Failover Pairs currently exist Figure 10-5. - Page 125 In the Existing Ports box, press Ins. The message No Ports Present appears the first time you add a new pair. Existing Ports No Ports Present Figure 10-8. Existing Ports Box In the Available Ports box, select the primary port, and then press Enter.
- Page 126 DuraLAN Fast Ethernet NICs User’s Guide . To rename the default Failover pair name: PTIONAL From the Failover Pair Configuration menu, select Set Failover Pair Name, and press Enter. In the Failover Pair Name box, type the pair name, and then press Enter.
-
Page 127: Assigning The Protocols
Assigning the Protocols You can assign IP or IPX protocols to Failover pairs and stand-alone ports. Note: The IPX protocol supports all four frame types and multiple frame types simultaneously. IP supports either Ethernet_II or Ethernet_SNAP, but never both at the same time. - Page 128 DuraLAN Fast Ethernet NICs User’s Guide Configuring IPX In the List of Frame Types box, select the frame type, and then press Enter. List of Frame Types ETHERNET_802.2 ETHERNET_802.3 ETHERNET_II ETHERNET_SNAP Figure 10-16. List of Frame Types Box In the IPX Network Number box, type the network number, and then press Enter.
- Page 129 Configuring IP In the List of Frame Types box, select the frame type, and then press Enter. In the IP Parameters box, select Enter IP Address, and then press Enter. IP Parameters Enter IP Address Enter Subnet Mask Figure 10-19. IP Parameters Box In the IP Address box, type the address number, and then press Enter.
-
Page 130: Viewing The Configuration
E_802.2 Adptsf1 (Primary) Adptsf2 <ESC> to go back to the previous menu. © Copyright 1998, Adaptec Inc. < F1> Help Figure 10-22. View Configuration Screen Press Esc to return to the Main Menu. Continue to Copying and Saving the Configuration. -
Page 131: Copying And Saving The Configuration
Copying and Saving the Configuration After verifying all port and group configurations, you can install the program and configuration-related files to the server. From the Main Menu, select Install Software, and then press Enter. When the Copy New Files box appears, select Yes, and then press Enter. -
Page 132: Viewing The System Status
Adptsf2 ANA-62044 < F1> Help <F8> Refresh Interval © Copyright 1998, Adaptec Inc. Figure 10-24. Duralink64 Failover Status Screen Note: This requires that the Failover software be loaded or an error will occur. If you have not rebooted since you installed the software, reboot and the above screen will appear automatically. -
Page 133: Element Descriptions
Element Descriptions A status screen is provided, showing the following information: NIC model number. Transmit Kbps (Kilobits per second) per port. Receive Kbps per port. The present status of all ports and Failover Pairs. – ACTIVE: This port is currently used for data transfer, and is connected with data being sent and/or received. -
Page 134: Modifying The Driver Configuration
Modifying the Driver Configuration After installing Duralink64 Failover for NetWare, use configsf to add, remove, or change a configuration for Adaptec NIC drivers. You will be familiar with the screens in this program since they are similar to the ones in fosetsf. -
Page 135: Removing Drivers
Insert the Duralink64 Drivers For Netware diskette. At the system console prompt, type load a:\nwserver\setupsf and press Enter. Select Failover from the Adaptec window. In the Main Menu, select Uninstall Software, and press Enter. In the Uninstall the Software box, select Yes and press Enter. -
Page 137: Before You Begin
Duralink64 Port Aggregation for NetWare In this Chapter Before you Begin Note on NetWare Installing the NetWare Port Aggregation Driver Configuring Ports Creating Port Aggregation Groups Creating Fast EtherChannel Groups Assigning Protocols Verifying Configuration Viewing System Status Modifying Driver Configurations Removing Drivers This chapter provides instructions for configuring Duralink64 Port Aggregation on a server running NetWare 4.x or NetWare 5.0. -
Page 138: Before You Begin
NetWare 4.11. This pack may be downloaded from: http://suport.novell.com Note on NetWare When you are installing Adaptec DuraLAN NICs, it is a good idea to document where each port physically resides in the server, especially when two or more identical NICs exist. This is important because ports are identified by generic port names, such as Adptsf1, Adptsf2, Adptsf3, etc. -
Page 139: Installing The Netware Port Aggregation Driver
Press Enter. The Select Driver window appears. Figure 11-1. The Select Driver Window Select Port Aggregation/FEC and press Enter. In the message indicating the New Adaptec NICs have been detected, press Enter. Continue to Configuring Ports on page 11-4. 11-3... -
Page 140: Configuring Ports
DuraLAN Fast Ethernet NICs User’s Guide Configuring Ports In the Main Menu, select Configure Ports, and then press Enter. Adaptec DuraLAN NIC Installation 4.2 Main Menu Configure Ports Set Groups Configure Protocols View Configuration Install Software Uninstall Software Use arrow keys to move, <Enter> to Select, <ESC> to Exit. -
Page 141: Creating Port Aggregation Groups
Duralink64 Port Aggregation for NetWare . The Autodetect default detects which device the port is PTIONAL connected to and adjusts the port speed and transmission mode accordingly. Autodetect is recommended; however, to change the connection type(s): Select the port, and then press Enter. (To select multiple ports, select the port, and then press F5 one at a time.) In the Type of Connection menu, select the type, and then press Enter. -
Page 142: Creating Port Aggregation Groups
DuraLAN Fast Ethernet NICs User’s Guide Creating Port Aggregation Groups After configuring ports, you may create Port Aggregation groups using the following steps: In the Main Menu, select Set Groups, and then press Enter. In the List of Existing Groups box, press Ins to add a new group. - Page 143 Duralink64 Port Aggregation for NetWare In the Existing Ports box, press Ins. The message No Ports Present appears the first time you add a new group. Existing Ports No Ports Present Figure 11-8. This message appears the first time you add a new group. In the Available Ports box, use F5 to select the ports for the new group, and then press Enter.
- Page 144 DuraLAN Fast Ethernet NICs User’s Guide In the Group Type menu select, Adaptec Duralink Port Aggregation and press Enter. Press the Esc key to return to the Group Configuration menu. . setupsf automatically assigns a name to each new PTIONAL group.
-
Page 145: Creating Fast Etherchannel Groups
Duralink64 Port Aggregation for NetWare Creating Fast EtherChannel Groups Fast EtherChannel supports either two or four ports. One, three, or more than four ports are not acceptable. After configuring ports, you may create Fast EtherChannel groups using the following steps: In the Main Menu, select Set Groups, and then press Enter. - Page 146 DuraLAN Fast Ethernet NICs User’s Guide In the Existing Ports box, press Ins. The message No Ports Present appears the first time you add a new group. Existing Ports No Ports Present Figure 11-16. This message appears the first time you add a new group.
-
Page 147: Assigning Protocols
Duralink64 Port Aggregation for NetWare In the Group Configuration menu, select Group Type and press Enter. The Group Type menu appears. Figure 11-19. Group Type menu In the Group Type menu select, Cisco Fast EtherChannel and press Enter. Press the Esc key to return to the Group Configuration menu. . -
Page 148: Assigning Protocols
DuraLAN Fast Ethernet NICs User’s Guide Assigning Protocols You can assign the IP or IPX protocols to groups and stand-alone ports. The IPX protocol supports the following frame types simultaneously: ETHERNET_802.2 ETHERNET_802.3 ETHERNET_II ETHERNET_SNAP IP supports either ETHERNET_II at the same time. In the Main Menu, select Configure Protocols, and then press Enter. - Page 149 Duralink64 Port Aggregation for NetWare In the List of Protocols box, select the protocol for the current group/port, and then press Enter. List of Protocols Figure 11-22. List of Protocols Box – If you are configuring IPX: In the List of Frame Types box, select the frame type, and then press Enter.
- Page 150 DuraLAN Fast Ethernet NICs User’s Guide – If you are configuring IP: In the List of Frame Types box, select the frame type, and then press Enter. List of Frame Types ETHERNET II ETHERNET SNAP Figure 11-26. List of Frame Types Box In the IP Parameters box, select Enter IP Address, and then press Enter.
-
Page 151: Copying And Saving The Configuration
Adptsf1 Adptsf2 Adptsf3 <ESC> to go back to the previous menu. © Copyright 1998, Adaptec Inc. < F1> Help Figure 11-28. View Configuration Screen Figure 11-28 summarizes that currently five stand-alone ports without configurations and one group named Marcom are enabled. -
Page 152: Copying And Saving The Configuration
DuraLAN Fast Ethernet NICs User’s Guide Copying and Saving the Configuration Once you have established and verified all port and group configurations in lbsetsf, you are ready to install program and configuration related files to the server. From the Main Menu, select Install Software, and then press Enter. -
Page 153: Viewing System Status
Figure 11-30. Data sample provided in the System Status screen. System Status Data Adaptec NIC model number Total Kilobits/second (Kbps) transmitted per port (stand-alone and group). Total Kbps transmitted per group. The Kbps sum of aggregated ports in a group equals the total Kbps transmitted by their group. -
Page 154: Setting Time Intervals
Modifying Driver Configurations Once Duralink64 Port Aggregation is installed, use configsf to add, remove, or change a driver configuration for an Adaptec DuraLAN NIC.You will be familiar with the screens in this program since they are similar to the ones in lbsetsf. -
Page 155: Removing Drivers
Insert the Duralink64 Drivers For Netware disk. At the system console prompt, type load a:\nwserver\setupsf and press Enter. Select Port Aggregation from the Adaptec window. In the Main Menu, select Uninstall Software, and press Enter. In the Uninstall the Software box, select Yes and press Enter. -
Page 157: Installing Duralink64 Netware Client
Installing Duralink64 NetWare Client In This Chapter Installing Novell Client32 Connecting Clients to the NetWare Failover Server Connecting Clients to the NetWare Port Aggregation Server This chapter provides instructions for installing Duralink64 on a NetWare client. 12-2 12-6 12-7 12-1... -
Page 158: Installing Novell Client32
DuraLAN Fast Ethernet NICs User’s Guide Installing Novell Client32 This section provides instructions on installing the ADPTSF 32-bit driver for Novell Client32 using the ODI driver. Please note that DuraLAN products do not support 16-bit drivers. Download the latest version of Novell NetWare Client32 via the Novell web site, www.novell.com. -
Page 159: Selecting Options
Choose 32-Bit. 32-Bit Network Board Choose User Specified 32 Bit Driver. Do not Drivers choose Adaptec PCI Ethernet Driver Failover! When asked to insert Insert the Duralan Driver for NetWare 4. the NetWare Client32 (disk 2 of 2), and then type a:\nwserver. -
Page 160: Editing Startnet.bat
DuraLAN Fast Ethernet NICs User’s Guide Editing startnet.bat To assign multiple ports, follow these steps: Load c:\novell\client32\adptsf.lan. In startnet.bat , type slot=[port slot number] at the end of each line. The following example shows the setting assigned to port 1: iomap=1 Frame=ETHERNET_802.2 slot=1 For the next port, enter iomap=1 Frame=[frame type] slot=[port slot number]... -
Page 161: Windows
Installing Duralink64 NetWare Client Windows This section describes how to install the ADPTSF 32-bit driver for Novell Client32. Please note that Adaptec does not support 16-bit drivers. Note: This procedure requires the NDIS driver with Client32. Do not use an ODI driver! If you are using Windows NT 4.0, install the Microsoft... -
Page 162: Connecting Clients To The Netware Failover Server
DuraLAN Fast Ethernet NICs User’s Guide Connecting Clients to the NetWare Failover Server For optimum performance of NetWare Duralink64 Failover, all clients (any brand) should increase their IPX retry count. For DOS clients using VLM or Novell Client32 Type the following lines in net.cfg (indent the second line): protocol ipx ipx retry count = 255 For Windows 95 Clients using Novell Client32... -
Page 163: Connecting Clients To The Netware Port Aggregation Server
Installing Duralink64 NetWare Client Connecting Clients to the NetWare Port Aggregation Server For optimum performance of NetWare Duralink64 Port Aggregation, all clients (any brand) should increase their IPX retry count. For DOS clients using VLM or Novell Client32 Type the following lines in net.cfg (indent the second line): protocol ipx ipx retry count = 255 For Windows 95 Clients using Novell Client32... - Page 165 Part 5 Appendices...
-
Page 167: Cables And Leds
This section is not intended to be an exhaustive explanation of connecting Ethernet networks but will provide some useful information on cabling suitable for Adaptec DuraLAN NICs. The following table outlines the two cable specifications of IEEE 802.3u: 100BASE-TX and 100BASE-FX. -
Page 168: Connection Types
NIC is being configured on. Autodetect Default Connection Detects the cable type, optimal line speed, and duplexity for the specific Adaptec PCI NIC model in use. This is the default and recommended connection type. 10 Mbps UTP/Half Duplex Forces the connection to 10 Mbps in Half Duplex mode. -
Page 169: Cable Requirements
Cable Requirements Cable requirements for Adaptec DuraLAN NICs vary according to network speed, cabling standard, and the connector to be used. The table below identifies appropriate cabling, based on these variables. The table applies to both Half Duplex and Full Duplex (for selected models) environments. -
Page 170: Straight-Through Cable
DuraLAN Fast Ethernet NICs User’s Guide Straight-through Cable The majority of twisted-pair environments use twisted-pair cables that are wired straight-through. This means that each pin of the modular plug connector is wired to the same pin on the opposite end of the cable (i.e., pin 1 is wired to pin 1). Straight-through cables connect workstations and servers to repeaters and switches. -
Page 171: Pinout And Color Requirements
Pinout and Color Requirements Straight-through Cable - 10BASE-T or 100BASE-TX Colors - Both Ends Diagnostics Loop-Back Cable The following pin-outs are used for Diagnostics external and autonegotiation tests. Refer to the Diagnostic Tests on page D-3. 1 3 4 5 6 7 8 Figure A-2. -
Page 172: Diagnostic Leds
DuraLAN Fast Ethernet NICs User’s Guide Diagnostic LEDs Diagnostic Light Emitting Diodes (LEDs) provide information about link status (ls) and network activity (act). The figure below shows the locations of LEDs for each board. See the descriptions on the following page for details on each LED display. Speed100 Speed10 ANA-69011... -
Page 173: Led Functions
LED Functions For ANA-69011, ANA-62011, and ANA-62022: Speed100 The Speed100 LED is green. When 100 Mbps link has been made. Speed10 The Speed10 LED is green. When 10 Mbps link has been made. When been made. The ACT LED is amber. The ACT LED lights up to signal the presence of incoming or outgoing traffic. -
Page 175: Troubleshooting Tips
Verify that you are using the latest BIOS for your computer, and the latest DuraLAN driver. Verify that your cable, terminators, and connectors are functioning properly, or install the NIC in a different slot. See Adaptec Technical Support and Services on page ii if you still have trouble. -
Page 176: Isolating Faulty Hardware
DuraLAN Fast Ethernet NICs User’s Guide Isolating Faulty Hardware If the problem persists, try the following: Replace the NIC with the same type of Adaptec NIC which is known to work. If the new NIC functions properly, the problem is related to the original NIC. - Page 177 Persistent problems with This occurs in Novell NetWare. Either an adapter card set to disable IRQ 15 or change the Adaptec IRQ 15. DuraLAN NIC to another interrupt. Please refer to your Novell documentation. System hangs at boot up.
-
Page 178: Configuring The Bios
Configuring the BIOS Your system BIOS may determine available NIC resources and configure the Adaptec PCI NICs automatically. However, depending on your system, you may need to configure the PCI BIOS. To do this, enter your computer BIOS Setup and select Advanced Settings from the Main Menu. -
Page 179: Frequently Asked Questions
Fast Ethernet networks. Duralink Server Manager is a robust utility that uses standard protocols, and graphically displays the status of each Adaptec NIC attached to the server. How do the standalone, Port Aggregation, and Failover drivers differ? The Duralink64 standalone driver is the minimum software required for DuraLAN NICs. - Page 180 Duralink64 v4.2 is the software written for Adaptec's DuraLAN ASIC (used on the ANA-69011/TX, ANA-62011/TX, ANA-62022, and ANA-62044). Duralink v3.0 is the software written for Adaptec's legacy NICs based on the DEC/Intel ASICs (used on the ANA-6911A/XX, ANA-6922A/XX, and ANA-6944A &B/XX.
-
Page 181: Duralink64 V4.2 Failover Software Questions
IPX/SPX under NetWare. Is Duralink64 software interoperable/compatible with other vendors' NICs and network devices? Duralink software only works with Adaptec DuraLAN NICs but is fully interoperable with network devices (such as switches and hubs) from other vendors. Does Duralink64 Failover work with a switch or a hub? Duralink64 Failover works with any switch or any hub. -
Page 182: Duralink64 V4.2 Port Aggregation Software Questions
Duralink64 Port Aggregation software groups up to 12 Fast Ethernet ports onto a single aggregated connection operating up to 1.2 Gbps per workgroup. See the Port Aggregation white paper on the Adaptec web site (http://www.adaptec.com). What are the key benefits of Duralink64 Port Aggregation software? –... - Page 183 If the primary port comes back online, the primary port's address is reassigned back to the primary port. What NICs support Duralink64 Port Aggregation? Adaptec's ANA-69011/TX, ANA-62011/TX, ANA-62022, and ANA-62044 NICs support Duralink64 Port Aggregation. Which network switches support Duralink64 Port Aggregation? Duralink64 Port Aggregation has been tested with all the leading vendors' switches.
-
Page 184: Duralink64 V4.2 Windows Nt - General Questions
DuraLAN Fast Ethernet NICs User’s Guide Which protocols and operating systems work with Duralink64 Port Aggregation? Adaptec's Port Aggregation driver works with TCP/IP and NetBEUI under Windows NT and TCP/IP and IPX/SPX under NetWare. Does Duralink64 Port Aggregation support multiple VLANs? Only one VLAN is supported per aggregated group or per port. -
Page 185: Duralink64 V4.2 Windows 95 And Windows 98 - General Questions
Note: Duralink64 software may not work properly with SP1 or SP2. Where are the NT drivers on the diskette? The standalone drivers are at the root directory (a:\). The Failover drivers are in the a:\NtFailover\i386 directory. Does Duralink64 v4.2 support Novell's 32-bit client for Windows NT? Yes. -
Page 186: Windows 98
DuraLAN Fast Ethernet NICs User’s Guide Which Duralink64 software should I use with Windows 95 OSR2? Use the software at the root directory on the disk (a:\). Does Duralink64 v4.2 support Novell's 32-bit client for Windows 95? Yes. However, connecting clients to the NetWare Duralink64 server requires the NDIS driver. - Page 187 It's not clear what should be done from the Failover Setup Menu. How do I configure the ports? To install the Duralink64 v4.2 Failover software on NetWare v4.11 or v4.2, use Setupsf from the Duralink64 v4.2 NetWare diskette. At the main menu, select Failover, then, Configure Ports, Set Failover Pairs, Configure Protocols, Install Software and then Save and Exit.
- Page 188 DuraLAN Fast Ethernet NICs User’s Guide B-14...
-
Page 189: Duralink Snmp Agents
Port 1 in any multiple group is always the port that is available to be bound to protocol stacks. Card information table—describing each Adaptec network card on the system. Card port information table—sorted by network card listing all ports and the interface to which they are assigned. -
Page 190: Monitoring The Nics By Snmp
DuraLAN Fast EtherNet NICs User’s Guide Monitoring the NICs by SNMP The duralink.mib file must be compiled on the SNMP Management station to manage the NICs. This file is located on the Duralink64 for Windows diskette, in the snmpmibs directory. Please refer to the Duralink Manager Server User’s Guide . -
Page 191: The Diagnostics Utility
The Diagnostics Utility Your Adaptec DuraLAN NIC is supplied with a DOS diagnostics utility which is found on the LAN and Duralink64 Failover Drivers NetWare disk. Use the diagnostics utility to check the functionality of your DuraLAN NICs. -
Page 192: Running The Diagnostics
DuraLAN Fast Ethernet NICs User’s Guide Running the Diagnostics From the Hard Drive Use the following steps to run the Diagnostics utility from your hard drive: Make sure himem.sys and emm386.exe are currently in config.sys and that files=30 is present. If they are not, add the following lines to the top of the config.sys file: device=c:\dos\himem.sys... -
Page 193: Diagnostic Tests
The easiest way of testing a DuraLAN NIC is running the Selftest. Diagnostic Tests The following table lists the tests which can be run on the Adaptec DuraLAN Fast Ethernet NIC(s). The diagnostics commands are case sensitive, please type these commands as they appear in the table. - Page 194 DuraLAN Fast Ethernet NICs User’s Guide Command Test internal_100_mac Test internal loop-back at 100 Mbps within the chip. internal_10_phy Tests loop-back from the physical device at 10 Mbps. internal_100_phy Tests loop-back from the physical device at 100 Mbps. external_10 This test requires a loop-back cable. It tests the loop-back from the cable at 10 Mbps.
- Page 195 Command Test timer Tests the interrupt delay time feature of the Ethernet controller. power-management Tests the power down features of the Ethernet controller. mod (mac offset Allows the modification of the Ethernet controller data) registers. help or ? Displays all diagnostics commands. The Diagnostics Utility...
-
Page 197: Index
100BASE-FX A-1 Adding or Removing Ports 8-14 ANA-62011 1-6, 1-7 ANA-62022 1-6, 1-7 ANA-62044 1-6, 1-7 ANA-69011 1-6, 1-7 Bios Setup B-4 Cables Pinout and Color Requirements A-5 Requirements A-3 Twisted Pair Straight-through clients connecting to the Failover server 12-6 connecting to the Port Aggregation server 12-7 Configuring Failover Pairs... - Page 198 DuraLAN64 Fast Ethernet NICs User’s Guide Duralink Software Installation NetWare 10-1 NetWare Client 12-1 Windows NT 5-1, 7-1 Event Viewer Dialog Box 7-8 F Keys NetWare 10-15 Failover driver installaion NetWare 10-3 Failover pair creating 7-3 Fast EtherChannel creating groups 8-8 Fast Ethernet 1-3 FEC 8-8 network cofigurations 2-2...
- Page 199 NIC Drivers,Duralink64 Port Aggregation 3-8 NICs Duo Port 1-4, 1-9 Quad Port 1-5 Single Port, 32 bit 1-3 Single Port, 64 bit 1-4 Novell 1-6, 1-7 Novell Client32 installation 12-2 Performance monitor Windows NT only 8-20 Port Aggregation creating groups 8-4 NetWare 11-3 network configurations 2-2 port configuration...
Need help?
Do you have a question about the ANA-62000 and is the answer not in the manual?
Questions and answers