Avaya J129 Instructions Manual
Hide thumbs
Also See for J129:
- Installing and administering (133 pages) ,
- Using manual (76 pages) ,
- User manual (61 pages)
Table of Contents
Advertisement
Quick Links
Advertisement
Table of Contents

Related Manuals for Avaya J129


Summary of Contents for Avaya J129
- Page 1 Using Avaya J129 IP Phone SIP Release 4.0.4 Issue 1 January 2020...
- Page 2 RESERVES THE RIGHT TO TAKE LEGAL ACTION AGAINST YOU the express behalf of Avaya. End User agrees to indemnify and hold AND ANYONE ELSE USING OR SELLING THE SOFTWARE harmless Avaya, Avaya's agents, servants and employees against all WITHOUT A LICENSE.
- Page 3 MAY BE OBTAINED FROM MPEG LA, L.L.C. SEE HTTP:// written consent of Avaya can be a criminal, as well as a civil offense WWW.MPEGLA.COM. under the applicable law. Compliance with Laws...
- Page 4 AC adapters shipped with the equipment or specified by device. Avaya to be used with the equipment. If you use any other equipment, it may cause failures, malfunctioning, Le présent appareil est conforme aux CNR d'Industrie Canada or fire.
- Page 5 Device Usage Consent harmful interference to radio communications. However, there is no By using the Avaya device you agree that Avaya, from time to time, guarantee that interference will not occur in a particular installation. If may collect network and device data from your device and may use this equipment does cause harmful interferences to radio or such data in order to validate your eligibility to use the device.
-
Page 6: Table Of Contents
Contents Chapter 1: Introduction......................9 ..........................9 Purpose Chapter 2: Avaya J129 IP Phone overview................10 ..................11 Physical layout of a J129 IP Phone .................. 12 Connection jacks for a J129 IP Phone: ........................ 14 Supported features Chapter 3: Getting started...................... 16 .................... - Page 7 Retrieving a voice mail ....................45 Setting up automatic call back ........................ 46 Shared control ......................46 Tracing a malicious call Chapter 9: Avaya J129 IP Phone customization..............48 ..........................48 Phone ...................... 48 Setting the Dial mode ....................... 48 Displaying сall timers .......................
- Page 8 Viewing the Device type ......................61 Viewing the Server type Chapter 11: Resources......................62 ........................62 Documentation ............. 64 Finding documents on the Avaya Support website ................64 Avaya Documentation Portal navigation ....................65 Viewing Avaya Mentor videos ..........................66 Support...
-
Page 9: Chapter 1: Introduction
Chapter 1: Introduction Purpose This document describes the features of Avaya J129 IP Phone and also provides instructions on how to use this phone. This document is for end users. January 2020 Using Avaya J129 IP Phone SIP Comments on this document? infodev@avaya.com... -
Page 10: Chapter 2: Avaya J129 Ip Phone Overview
Chapter 2: Avaya J129 IP Phone overview The Avaya J129 IP Phone is a SIP-based phone intended to be used for basic business communications. The phone supports two-call appearances with a single-line call display. Physical specifications • Single call appearance •... -
Page 11: Physical Layout Of A J129 Ip Phone
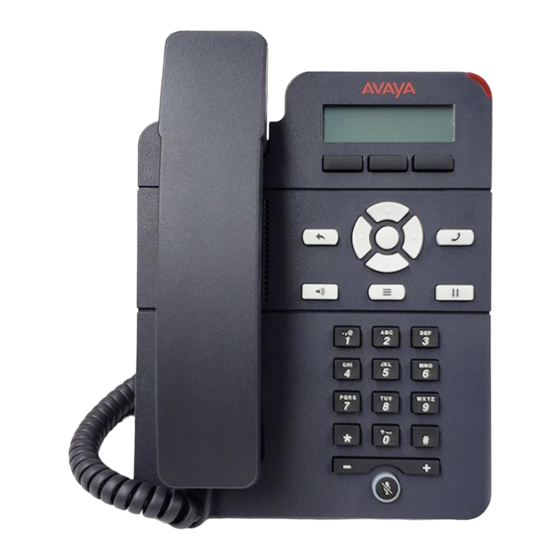
Physical layout of a J129 IP Phone Physical layout of a J129 IP Phone Callout number Name Description Beacon LED Displays a flashing red light to indicate a voice mail or incoming calls. The Beacon LED also flashes when you are on a call using the hands free speaker capability. -
Page 12: Connection Jacks For A J129 Ip Phone
J129D03A and later models. Connection jacks for a J129 IP Phone: The following image illustrates the connection jacks that are present on the back panel of Avaya J129 IP Phone. The image schematically describes which device to connect in which jack. - Page 13 Connection jacks for a J129 IP Phone: January 2020 Using Avaya J129 IP Phone SIP Comments on this document? infodev@avaya.com...
-
Page 14: Supported Features
Handset Jack To connect the handset. WLAN Module Panel To integrate the Wi-Fi module. Note: Headset is not supported in Avaya J129 IP Phones. Supported features ® Features Avaya Aura IP Office End to end security indicator Private Call Yes. - Page 15 Dial mode Yes. It supports only manual mode. Speed Dial The MDA feature is supported in Avaya J129 IP Phone with limitations. For more information, see “Multiple Device Access”. January 2020 Using Avaya J129 IP Phone SIP Comments on this document? infodev@avaya.com...
-
Page 16: Chapter 3: Getting Started
• Config: To enter the file server address. • Never: To never prompt for the file server address. • Cancel: To cancel the prompt and display the Login screen. January 2020 Using Avaya J129 IP Phone SIP Comments on this document? infodev@avaya.com... -
Page 17: Identifying The Device Type During Phone Boot-Up
Identifying the device type during phone boot-up About this task Avaya J100 Series IP Phones screen displays the device type during the phone boot-up. This feature is supported only in the phone software version 4.0.3 and later. Procedure 1. Set up the phone hardware. -
Page 18: Logging Out Of Your Phone
About this task If the administrator enables the offline call-log feature, missed calls are added to the call history. ® The offline call-log feature is only available in an Avaya Aura environment. Procedure 1. Press Main menu > Log out. -
Page 19: Chapter 4: Navigation
About IP Deskphone To display the phone software version, and the default device type. Icons on the phone The following table lists the icons used in the Avaya J129 IP Phone: Icon Description Line indicator; first call appearance Line indicator; second call appearance More than 10 recent missed calls Table continues…... - Page 20 New call setup Voicemail Checkbox off Checkbox on Active conference Conference on hold Contrast EC500 Failover Radio button off Radio button on Feature unavailable Call forward Handset Table continues… January 2020 Using Avaya J129 IP Phone SIP Comments on this document? infodev@avaya.com...
- Page 21 Icons on the phone Icon Description Hold Phone lock Ringer on Ringer off Speaker Do not disturb January 2020 Using Avaya J129 IP Phone SIP Comments on this document? infodev@avaya.com...
-
Page 22: Chapter 5: Handling Incoming Calls
Procedure Press one of the following: • The Answer soft key • OK The phone puts the first call on hold and moves to the second call. January 2020 Using Avaya J129 IP Phone SIP Comments on this document? infodev@avaya.com... -
Page 23: Ignoring A Call
MDA phone that is joining the call switches to using the signaling mode address family of the active call, the icon disappears. Related links Adding a participant to no hold conference on page 44 January 2020 Using Avaya J129 IP Phone SIP Comments on this document? infodev@avaya.com... -
Page 24: Making An Attended Transfer
The phone transfers the call to the selected number. If the called party does not answer the call, then the unanswered call returns to your phone as a recalled transfer call. January 2020 Using Avaya J129 IP Phone SIP Comments on this document? infodev@avaya.com... -
Page 25: Transferring A Call On Hold
2. When the called party answers the call or you answer the call, press the Transfer softkey. 3. Press the Transfer softkey again when the phone prompts for confirmation. January 2020 Using Avaya J129 IP Phone SIP Comments on this document? infodev@avaya.com... -
Page 26: Chapter 6: Handling Outgoing Calls
The phone initiates the call when the inter digit timer times out. Redialing a number About this task Use this procedure to redial a number. If you delete the outgoing call log, the last dialed number is deleted. January 2020 Using Avaya J129 IP Phone SIP Comments on this document? infodev@avaya.com... -
Page 27: Making A Call Using Speed Dial
Use this procedure to make a call from the local contacts list. In an Open SIP environment, the local contacts are synchronized with the network file server. Procedure 1. Press Main Menu > Contacts. The phone displays the message Use dialpad to search. January 2020 Using Avaya J129 IP Phone SIP Comments on this document? infodev@avaya.com... -
Page 28: Making A Call From The Corporate Database Сontacts List
Emerg softkey replaces the Recents soft key. Procedure 1. On the Phone screen, press one of the following: • Main menu > Recents • Recents January 2020 Using Avaya J129 IP Phone SIP Comments on this document? infodev@avaya.com... -
Page 29: Emergency Call
• On the Phone screen, press the Emerg soft key, and again press Emerg when the phone prompts you for confirmation. • Dial the emergency number by using the dial pad. January 2020 Using Avaya J129 IP Phone SIP Comments on this document? infodev@avaya.com... -
Page 30: Making An International Call
Making an international call Procedure 1. Press and hold the 0 key to enter the plus sign (+). 2. Dial the number that you want to call. January 2020 Using Avaya J129 IP Phone SIP Comments on this document? infodev@avaya.com... -
Page 31: Chapter 7: Call Related Features
About this task You can resume a held call by using the hold button. Before you begin Ensure you have an active held call on the phone. January 2020 Using Avaya J129 IP Phone SIP Comments on this document? infodev@avaya.com... -
Page 32: Managing Conference Calls
Adding a person on hold to a conference call About this task Use this task to add a person that you have put on hold to a conference call. January 2020 Using Avaya J129 IP Phone SIP Comments on this document? infodev@avaya.com... -
Page 33: Putting A Conference Call On Hold And Resuming A Call
1. To open Contacts list, do one of the following: • Press Contacts. • Press Main menu, and select Contacts. 2. Do one of the following: • If your Contacts list is empty, press New. January 2020 Using Avaya J129 IP Phone SIP Comments on this document? infodev@avaya.com... -
Page 34: Editing A Contact
6. Use the dial pad and soft keys to change the contact information. 7. Press Save. Viewing local contact details Procedure 1. Do one of the following: • Press Contacts. January 2020 Using Avaya J129 IP Phone SIP Comments on this document? infodev@avaya.com... -
Page 35: Searching For A Contact
To add the contact to the local contacts, press +Contact. Deleting a contact Procedure 1. Do one of the following: • Press Contacts. • Press Main menu > Contacts. 2. Select the contact to delete. January 2020 Using Avaya J129 IP Phone SIP Comments on this document? infodev@avaya.com... -
Page 36: Managing Call History
• Call time-stamp • Call duration Avaya J100 Series IP Phones software version 4.0.3 and later always encrypts the content of the call log file. When the offline call log feature is disabled in System Manager, if you downgrade the software of your phone to a version earlier than 4.0.3, you will lose the call log details. -
Page 37: Viewing The Recents Details
2. Select the number that you want to add or delete. 3. Select Details. 4. Select one of the following: • +Contact: To add a call record from the call history menu to the contacts list. January 2020 Using Avaya J129 IP Phone SIP Comments on this document? infodev@avaya.com... -
Page 38: Clearing The Recents List
3. Select one of the following when the phone prompts for confirmation: • Clear All: To delete all entries. • Cancel: To cancel and return to the previous menu. January 2020 Using Avaya J129 IP Phone SIP Comments on this document? infodev@avaya.com... -
Page 39: Chapter 8: Advanced Features
Before you begin Your system administrator must activate the feature for your extension. Procedure 1. Press Main menu > Features. January 2020 Using Avaya J129 IP Phone SIP Comments on this document? infodev@avaya.com... -
Page 40: Activating Ec500
About this task Use this procedure to answer calls on your cell phone. ® This feature is only available in the Avaya Aura environment. Before you begin The system administrator must program the phone so that you can receive incoming calls on your cell phone. -
Page 41: Blocking Your Extension From Displaying During Calls
Blocking your extension from displaying during calls Blocking your extension from displaying during calls About this task ® This feature is only available in an Avaya Aura environment. Before you begin Ensure that the system administrator activates the option for your extension. -
Page 42: Multiple Device Access
Session Manager. MDA limitations There are limitations for Multiple Device Access as Avaya J129 IP Phone supports only two call appearances, while the user might have more than two call appearances configured. The limitations for Multiple Device Access are the following: •... -
Page 43: Sending A Multicast Page
No Hold Conf button, the call is placed to the pre-configured number when the participant answers the call joins the no hold conference. If the participants do not answer the call within the configured time-out duration Avaya J100 Series IP Phones will display the appropriate message on the phone screen. -
Page 44: Adding A Participant To No Hold Conference
About this task Use this procedure to park the active call and answer the call from another extension. ® This feature is only available in the Avaya Aura environment. Your system administrator must activate the feature for your extension. In the IP Office environment, this feature is supported using short code dialing. Contact your system administrator for the list of short codes. -
Page 45: Retrieving A Voice Mail
Your system administrator must activate the feature for your extension. Procedure 1. During an active call, press Main menu > Features. 2. Use the Down Arrow key to go to the Auto Callback screen. January 2020 Using Avaya J129 IP Phone SIP Comments on this document? infodev@avaya.com... -
Page 46: Shared Control
™ With the Shared Control feature, you can operate phones from the Avaya IX Workplace Client client and use high quality audio of the phone. Shared control is supported on all the Avaya J100 Series IP Phones models. ® Phones must be registered with Avaya Aura to establish a shared control connection. - Page 47 Tracing a malicious call trace and track malicious calls and there is an attendant or controlling user to oversee the trace. ® This feature is only available in an Avaya Aura environment. Before you begin Your system administrator must activate the feature for your extension.
-
Page 48: Chapter 9: Avaya J129 Ip Phone Customization
Chapter 9: Avaya J129 IP Phone customization Phone Setting the Dial mode About this task Use this procedure to set the dialing method used to initiate dialing. Procedure 1. Press Main menu > Settings > Phone settings. 2. Use the Down Arrow key to go to the Dial mode screen. -
Page 49: Assigning Speed Dial
5. Press Replace or Clear when the phone prompts for confirmation. Activating Mute Alert About this task Use this procedure to configure your phone to alert if you speak while your phone is on mute. January 2020 Using Avaya J129 IP Phone SIP Comments on this document? infodev@avaya.com... -
Page 50: Setting Visual Alerting
4. Scroll to Alerting on calls, and press Select. 5. Scroll to Beacon LED. 6. Press Toggle to enable or disable visual alerting. 7. Press Save. Related links Visual alerting on page 51 January 2020 Using Avaya J129 IP Phone SIP Comments on this document? infodev@avaya.com... -
Page 51: Audio
1. Press Main menu > Settings > Audio Settings. 2. Use the Down Arrow key to go to the Button clicks screen. 3. Press Toggle to turn the audio on or off. 4. Press Save. January 2020 Using Avaya J129 IP Phone SIP Comments on this document? infodev@avaya.com... -
Page 52: Turning Error Tones On And Off
The task is relevant for people with hearing difficulties. Use this procedure to change the audio characteristic of the phone. Procedure 1. Press Main menu > Settings > Audio Settings. 2. Select Handset Profile. January 2020 Using Avaya J129 IP Phone SIP Comments on this document? infodev@avaya.com... -
Page 53: Display
1. Press Main menu > Settings > Display Settings. 2. Select Language. 3. Scroll to the language , and press one of the following: • Select • OK The phone prompts for the confirmation. January 2020 Using Avaya J129 IP Phone SIP Comments on this document? infodev@avaya.com... -
Page 54: Setting The Date Format
2. Use the Down Arrow key to go to the Time format screen. 3. Press Toggle to select one of the following options: • Time format 24 Hour • Time format 12 Hour 4. Press Save. January 2020 Using Avaya J129 IP Phone SIP Comments on this document? infodev@avaya.com... -
Page 55: Setting The Time Zone
• Ethernet: To connect to an Ethernet network. • Wi-Fi: To connect phone to a Wi-Fi network. 5. Press one of the following: • Toggle • Right arrow key • Left arrow key January 2020 Using Avaya J129 IP Phone SIP Comments on this document? infodev@avaya.com... -
Page 56: Setting The Network Configuration
4. Scroll to Network config. The Network configuration shows following two options: • Auto: To automatically connect a network. • Manual: To manually connect to a network. January 2020 Using Avaya J129 IP Phone SIP Comments on this document? infodev@avaya.com... -
Page 57: Connecting To A Wi-Fi Network
• Depending on the type of security in the Wi-Fi network, obtain the required credentials. Contact your system administrator for more details. Procedure 1. Press Main menu. 2. Scroll to Settings, and press Select. 3. Scroll to Network, and press Select. January 2020 Using Avaya J129 IP Phone SIP Comments on this document? infodev@avaya.com... -
Page 58: Backup And Restore
• Speed dial settings • Language • Time zone and time format • Date format Backup process is initiated only after retrieval of user-specific data is successful. January 2020 Using Avaya J129 IP Phone SIP Comments on this document? infodev@avaya.com... - Page 59 • When Manual Backup is not successful: Backup failed • When Manual Backup is successful: Backup successful • When Manual Restore is not successful: Retrieval failed • When Manual Restore is successful: Retrieval successful January 2020 Using Avaya J129 IP Phone SIP Comments on this document? infodev@avaya.com...
-
Page 60: Chapter 10: Troubleshooting
Viewing the Device type About this task View your device type when your system administrator asks you to provide your device type information. The device type can be either Avaya SIP or Open SIP. Procedure 1. Press Main menu. 2. Scroll to Network information, and press Select. -
Page 61: Viewing The Server Type
Viewing the Server type About this task View your server type when your system administrator asks you to provide your server type ® information. The server type can be of Avaya Aura or an open SIP. Procedure 1. Press Main menu. -
Page 62: Chapter 11: Resources
Chapter 11: Resources Documentation See the following related documents at http://support.avaya.com. Title Use this document to: Audience Overview ® Avaya Aura Session Manager See characteristics and capabilities, For people who want Overview and Specification including feature descriptions, to gain a high-level... - Page 63 Using Avaya IP Office Platform See information about the maintenance For people who System Status Application tasks for System Status Application. maintain System Status Application. Table continues… January 2020 Using Avaya J129 IP Phone SIP Comments on this document? infodev@avaya.com...
-
Page 64: Finding Documents On The Avaya Support Website
Customer documentation for some programs is now available on the Avaya Documentation Portal at https://documentation.avaya.com. Important: For documents that are not available on the Avaya Documentation Portal, click Support on the top menu to open https://support.avaya.com. Using the Avaya Documentation Portal, you can: •... -
Page 65: Viewing Avaya Mentor Videos
Avaya Mentor videos provide technical content on how to install, configure, and troubleshoot Avaya products. About this task Videos are available on the Avaya Support website, listed under the video document type, and on the Avaya-run channel on YouTube. • To find videos on the Avaya Support website, go to https://support.avaya.com/... -
Page 66: Support
Resources • To find the Avaya Mentor videos on YouTube, go to www.youtube.com/AvayaMentor and do one of the following: - Enter a key word or key words in the Search Channel to search for a specific product or topic. - Scroll down Playlists, and click a topic name to see the list of videos available for the topic. - Page 67 ......... corporate database list ..........deleting ................. dial pad ..............27, deleting a contact from call history ....... emergency calling ............29 editing ................local contacts list ............January 2020 Using Avaya J129 IP Phone SIP Comments on this document? infodev@avaya.com...
- Page 68 ...............53 features Main Menu ................accessing features ............39 making a call advanced ..............auto ................26 automatic callback ............dial mode ..............call forward ..............manual ................26 January 2020 Using Avaya J129 IP Phone SIP Comments on this document? infodev@avaya.com...
- Page 69 ............... contacts ................ Product ID removing contact ............phone ................60 replacing contact ............provisioning server ...............16 support .................66 supported features ...............14 recents January 2020 Using Avaya J129 IP Phone SIP Comments on this document? infodev@avaya.com...
- Page 70 ..............backup ................restore ................restoring ................59 videos .................. Viewing product ID ..............voice mail beacon LED ..............45 voice mail user ID ............watch list ................January 2020 Using Avaya J129 IP Phone SIP Comments on this document? infodev@avaya.com...
Need help?
Do you have a question about the J129 and is the answer not in the manual?
Questions and answers