Table of Contents
Advertisement
Available languages
Available languages
Please Read and Save this Use and Care Book
Por favor lea este instructivo antes de usar el producto
Veuillez lire et conserver ce guide d'entretien et d'utilisation
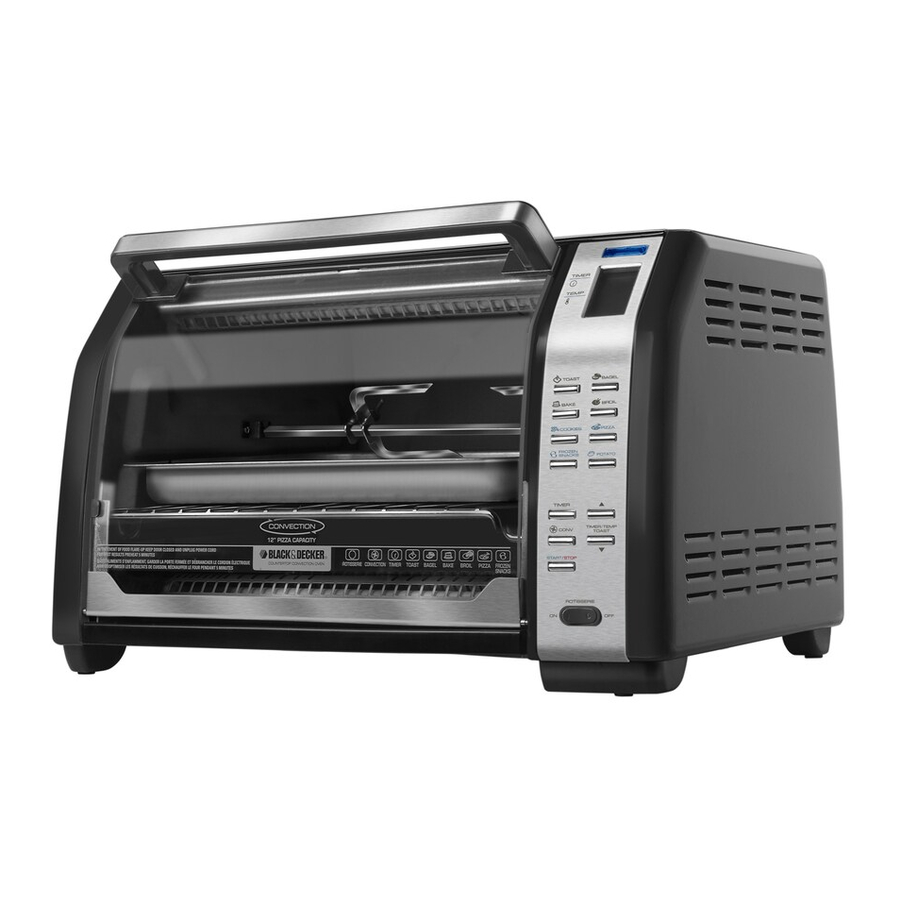
DIGIT L ROTISSERIE CONVECTION OVEN
HORNO S DOR DIGIT L DE CONVECCIÓN
FOUR À CONVECTION/RÔTISSOIRE
NUMÉRIQUE
Register your product online at www.prodprotect.com/applica,
Registre su producto por Internet en www.prodprotect.com/applica y tendrá la
Inscrivez votre produit en ligne à l'adresse www.prodprotect.com/applica
US /Canada
Mexico
http://www.prodprotect.com/applica
ccessories/Parts
(US /Canada)
ccesorios/Partes
(EE.UU/Canadá)
ccessoires/Pièces
1-800-738-0245
for a chance to WIN $100,000!
For US residents only
oportunidad de G N R $100,000!
Solamente para residentes de EE.UU
et courez la chance de G GNER 100 000 $!
ux résidents du É.-U seulement
1-800-231-9786
01-800-714-2503
(É.-U./Canada)
Model
Modelo
Modèle
❑ CTO7100B
Advertisement
Chapters
Table of Contents

Related Manuals for Black & Decker CTO7100B


Summary of Contents for Black & Decker CTO7100B
- Page 1 G GNER 100 000 $! US /Canada Mexico http://www.prodprotect.com/applica ccessories/Parts (US /Canada) ccesorios/Partes (EE.UU/Canadá) ccessoires/Pièces (É.-U./Canada) 1-800-738-0245 for a chance to WIN $100,000! For US residents only ux résidents du É.-U seulement 1-800-231-9786 01-800-714-2503 Model Modelo Modèle ❑ CTO7100B...
-
Page 2: Table Of Contents
GETTING F MILI R WITH YOUR UNIT ... 4 M IN FE TURES ..4 ELECTRONIC CONTROL P NEL FUNCTIONS ... 5 HOW TO USE ..6 GETTING ST RTED ... 6 HELPFUL INFORM TION BOUT YOUR OVEN ... 6 SLIDE R CK POSITIONS ..7 TO BEGIN COOKING ..7 ROTISSERIE COOKING ..8 ROTISSERIE COOKING GUIDE ..9 QUICK TIPS FOR ROTISSERIE COOKING . -
Page 3: Getting F Mili R With Your Unit
❑ Do not place any of the following materials in the oven: paper, cardboard, plastic wrap, and the like. ❑ Do not cover crumb tray or any parts of the oven with metal foil. This will cause overheating of the oven. ❑ To stop toasting, broiling or baking turn the controls to OFF. ❑ Use extreme caution when removing tray or disposing of hot grease. S VE THESE INSTRUCTIONS. GROUNDED PLUG s a safety feature, this product is equipped with a grounded plug, which will only fit into a three-prong outlet. Do not attempt to defeat this safety feature. Improper connection of the grounding conductor may result in the risk of electric shock. Consult a qualified electrician if you are in doubt as to whether the outlet is properly grounded. ELECTRIC L CORD a) short power-supply cord is to be provided to reduce the risk resulting from becoming entangled in or tripping over a longer cord. b) Longer extension cords are available and may be used if care is exercised in their use. c) If an extension cord is used, 1) The marked electrical rating of the cord set or extension cord should be at least as great as the electrical rating of the appliance, and 2) The cord should be arranged so that it will not drape over the countertop or tabletop where it can be pulled on by children or tripped over unintentionally. If the appliance is of the grounded type, the extension cord should be a grounding-type 3-wire cord. T MPER-RESIST NT SCREW Warning : This appliance is equipped with a tamper-resistant screw to prevent removal of the outer cover. -
Page 4: Electronic Control P Nel Functions
OR INNER SURFACE OF THE THE OVEN. OVEN • Plug unit into electrical outlet. The digital display shows 0:00 (C). 0:00 • This oven gets hot. When in use, always use oven mitts or potholders when touching any outer or inner surface of the oven (D). Note: Before first use, run this oven empty for 15 minutes to remove/burn off any possible residues from manufacturing. You may notice some slight smoke and odor escaping from the oven. This is normal and will disappear with use of oven. -
Page 5: Slide R Ck Positions
• You can change the temperature from ˚F to ˚C by pressing the Timer (▲) and (▼) button at the same time. • Once the selected temperature has been reached both the time and temperature can be changed at anytime during the cooking. • When using convection it is not necessary to change the temperature from that suggested by the package or the recipe. However, the baking time may be shorter; check foods frequently during baking to check for doneness. • When using the rotisserie it is suggested that foods be placed into a cold oven. • The oven is preset for temperature and time for medium toast (4 setting). Use this for your first cycle then adjust lighter or darker to suite your taste. • What is convection? Convection uses an internal fan that provides continuous circulation of hot air around the cooking food; the food is more evenly cooked and in some cases, is cooked faster. SLIDE R CK POSITIONS There are 4 possible positions for the slide racks. There is an upper and a lower slot; the rack can also be inverted for 2 additional positions (E). Position 1 Use lower slots along oven walls. Insert rack using a rack-down position. Position 3 Use upper slots along oven walls. Insert rack using a rack-down position. TO BEGIN COOKING To start cooking a series of buttons must be pressed (F). -
Page 6: Bake Function
9. t end of cooking cycle oven turns off and there are TEMP 3 beeps. BAKE TOAST BAGEL 10. The rotisserie must be turned off manually by pressing BAKE BROIL the Rotisserie switch to OFF. COOKIES PIZZA CONV FROZEN SNACKS POTATO 11. To remove food, using pot holders or oven mitts, lift left ROTISSERIE TIMER side of spit by lifting up and out. Pull spit out of drive TIMER/TEMP CONV TOAST socket and carefully remove food from oven and place on START/STOP ROTISSERIE heatproof platter. 12. Tent food with foil and let rest 10 minutes. Unscrew wing nuts and remove fork from pointed end of spit. Using long kitchen fork as guide, remove the food from the spit and remove second fork. ROTISSERIE COOKING GUIDE FOOD... -
Page 7: Convection Function
POTATO SNACKS To change temperature press (▲) or (▼). 4. Press Timer button, YOU H VE 5 SECONDS TIMER TO PROCEED. TIMER/TEMP CONV TOAST 5. Preset time flashes on digital display. To change time START/STOP press (▲) or (▼). ROTISSERIE 6. Press Start/Stop button to begin preheating of oven. 7. Oven beeps when set temperature is reached; insert food. 8. Close oven door. 9. t end of cooking cycle, unit beeps and oven turns off. COOKIES: (M) Preset temperature: 350˚ F Preset Time: 12 minutes TIMER Rack position: "2" lower slot, rack up or "3" upper slot, rack TEMP down (refer to illustration page 7) COOKIES BAGEL TOAST... -
Page 8: Toasting Bread And Bagels
4. P ress Timer button, YOU H VE 5 SECONDS TOAST BAGEL TO PROCEED. BROIL BAKE 5. P reset time flashes on digital display. To change time COOKIES PIZZA press (▲) or (▼). FROZEN POTATO SNACKS 6. P ress Start/Stop button to begin preheating of oven. TIMER 7. O ven beeps when set temperature is reached.` TIMER/TEMP CONV TOAST 8. P lace food on broil rack inserted into bake/broil pan. START/STOP Insert into oven. ROTISSERIE 9. llow at least 1,5" (3.81 cm) between top of food and top heating elements. 10. Close oven door. 11. -
Page 9: Recipes
SI N GL ZED ROTISSERIE CHICKEN 3½ lb. roasting chicken Olive oil Salt and pepper ¾ cup pineapple, apricot preserves ¼ cup finely chopped green onions 1 tbsp. gated fresh ginger 2 large cloves garlic, minced 2 tbsp. toasted sesame seeds 2 tbsp. low sodium soy sauce 1 tbsp. rice vinegar Position one set of rotisserie forks at end opposite point on the spit and secure by tightening the wing nut. Insert the spit through the chicken so that the forks are securely inserted into the meat. Place the second rotisserie forks onto the spit and secure it into the chicken. Make certain the chicken is centered on the spit and well balanced. Using kitchen twine, secure the chicken so that the wings and legs are securely tied to the body of the chicken. Rub the chicken with olive oil and season with salt and pepper. Insert the pointed end of the spit into the right side of the oven and place the left side into the spit support. Place the rack in the lower rack position with the rack down. Place the broiler/bake pan on the rack centering it below the chicken. Press the Bake button, the oven is preset to bake at 350° F. Set the time for 1½ hours. Turn on the Rotisserie and Convection. Meanwhile, combine the remaining ingredients in small saucepan and bring to a boil; reduce heat and simmer 5 minutes. Baste chicken several times during last 30 minutes of cooking. Test chicken for doneness by inserting a meat thermometer into the breast which should register 180° F, or pierce breast with fork and see that juices run clear. llow chicken to stand 10 minutes before serving. Serve with remaining sauce. Makes 4 to 6 servings. M C RONI ND CHEESE OLÈ 8 ounces elbow macaroni 1 ½ tsp. salt 1 can (14½ oz.) petite diced tomatoes with jalapeños ½ cup sliced green onions 1 large clove garlic, minced 2 tbsp. butter or margarine... - Page 10 ¼ tsp. black pepper M RM L DE: 2 tbsp. butter or margarine 2 large onions cut in strips (about 4 cups) 1 cup chopped dried apricots 1 tbsp. sugar 1 tbsp. grated ginger 1 tbsp. grated orange peel ½ tsp. salt Position one set of rotisserie forks at end opposite point on the spit and secure by tightening the wing nut. Insert the spit through the pork loin so that the forks are securely inserted into the meat. Place the second rotisserie forks onto the spit and secure it into the meat. Make certain the meat is centered on the spit and well balanced. Using kitchen cord, secure the pork. Combine ginger, salt, allspice, cloves and pepper in a small bowl. Rub evenly over pork. Insert the pointed end of the spit into the right side of the oven and place the left side into the spit support. Place the rack in the lower rack position with the rack down. Place the broiler/ bake pan on the rack centering it below the pork. Press the Bake button, the oven is preset to bake at 350° F. Set the time for 1½ hours. Turn the Rotisserie and Convection on. Meanwhile, cook onions in butter until softened. dd remaining marmalade ingredients and bring to a boil; reduce heat and simmer mixture 15 minutes or until mixture is thickened and almost all liquid evaporates. Keep warm. llow pork to stand 5 minutes before serving. Serve with marmalade. Makes 4 to 6 servings. SUND Y DINNER BEEF RO ST 4 lb. eye round roast 1 tsp. herbes de Provence 1 tsp. garlic pepper 1 tsp. salt 8 small red bliss potatoes 8 oz. small white onions, peeled...
-
Page 11: Care And Cleaning
3. To remove slide rack, open the door, pull the rack forward and out. Wash in warm, sudsy water or in a dishwasher. To remove stubborn spots, use a polyester or nylon pad. To replace the slide rack, open the door completely and slide into the rail and close the door. 4. Wash the bake pan, broil rack, rotisserie spit and forks in warm, sudsy water or in the dishwasher. To minimize scratching, use a polyester or nylon pad. 5. To remove the crumb tray, grasp the handle at the front of the oven and pull it out. Dispose of crumbs and wash the tray in warm, sudsy water. Remove stub born spots with a nylon mesh pad. Be sure to dry thoroughly before inserting the tray back into the oven. EXTERIOR SURF CES Important: The oven surface gets hot; be sure the oven has cooled completely before cleaning. Let the oven cool completely before cleaning any outer surface. Wipe with a damp cloth or sponge and dry with paper towel or soft cloth. COOKING CONT INERS • Metal, ovenproof glass or ceramic bake ware without glass lids can be used in your oven. Follow manufacturer’s instructions. • Be sure the top edge of the container is at least 1.5" (3.81 cm) away from the upper heating elements. TROUBLESHOOTING PROBLEM... -
Page 12: Instrucciones Import Ntes De Segurid D
ÍNDICE INSTRUCCIONES IMPORT NTES DE SEGURID D ..22 CONOCIMIENTO DEL PRODUCTO ..24 C R CTERÍSTIC S PRINCIP LES ...24 FUNCIONES DEL P NEL ELECTRÓNICO DE CONTROLES . ..25 COMO US R ..26 P SOS PRELIMIN RES ..26 CONSEJOS PRÁCTICOS SOBRE EL HORNO ...27 POSICIONES DE L S B NDEJ S CORREDIZ S ...27 P R COCIN R ...28 P R ROSTIZ R ..29 GUÍ... -
Page 13: Conocimiento Del Producto
❑ Tenga mucho cuidado al utilizar recipientes que no sean de metal ni de vidrio. ❑ Cuando este aparato no se encuentre en funcionamiento no se debe almacenar nada aparte de los accesorios recomendados por el fabricante. ❑ No introduzca los siguientes materiales en el aparato: papel, cartón, envolturas plásticas ni materiales semejantes. ❑ fin de evitar que el aparato se sobrecaliente, no cubra la bandeja para los residuos como ninguna otra superficie del aparato con papel de aluminio. ❑ Para interrumpir el tostado, asado o horneado de los alimentos, gire el control a la posición de apagado (OFF). ❑ Ejerza extrema precaución al mover la bandeja o al desechar la grasa caliente. CONSERVE EST S INSTRUCCIONES. ENCHUFE DE TIERR Como medida de seguridad, este producto cuenta con un enchufe de tierra que tiene tres contactos. No trate de alterar esta medida de seguridad. La conexión inapropiada del conductor de tierra puede resultar en un riesgo de choque eléctrico. Si tiene alguna duda, consulte con un eléctricista calificado para asegurarse de que la toma de corriente sea una de tierra. C BLE ELÉCTRICO a) El producto debe proporcionarse con un cable corto para reducir el riesgo de enredarse o de tropezar con un cable largo. b) Se encuentran disponibles cables de extensión más largos, que es posible utilizar si se emplea el cuidado debido. c) Si se utiliza un cable de extensión, 1) El voltaje eléctrico del cable o del cable de extensión debe ser, como minimo, igual al del voltaje del aparato, y 2) El cable debe acomodarse de modo que no cuelgue del mostrador o de la mesa, para evitar que un niño tire del mismo o que alguien se tropiece accidentalmente. Si el aparato es del tipo que es conectado a tierra, el cable de extensión deberá... -
Page 14: Funciones Del P Nel Electrónico De Controles
CONV TOAST START/STOP ROTISSERIE PREC UCIÓN THIS OVEN GETS HOT. WHEN ESTE HORNO SE C LIENT CU NDO IN USE, ALWAYS USE OVEN ESTÁ EN USO. SIEMPRE USE MITTS OR POT HOLDERS G RR DER S O GU NTES DE COCIN... -
Page 15: Consejos Prácticos Sobre El Horno
CONSEJOS PRÁCTICOS SOBRE EL HORNO • El aparato permite un retraso de 5 segundos para seleccionar las funciones y ajustar el reloj, de lo contrario, la pantalla exhibe 0:00 y uno debe seleccionar nuevamente. • Usted puede cambiar la temperatura de ˚F a ˚C al presionar las flechas (▲) y (▼) simultáneamente. • Cuando se alcanza la temperatura programada, tanto el tiempo como la temperatura pueden ser ajustados en cualquier momento durante el ciclo de cocción. • Cuando uno cocina por convección no es necesario alterar la temperatura recomendada en el paquete o la receta. Sin embargo, el ciclo de hornear puede ser más corto; supervise los alimentos frecuentemente. • Cuando utilice el asador se recomienda colocar los alimentos adentro de del horno frío. • El horno viene preajustado con tiempo y temperatura para tostadas de término medio (nivel 4). Utilice este nivel para el primer ciclo de tostado y después, ajuste el tostado al gusto. • ¿Qué es convección? El sistema por convección funciona un ventilador interno que proporciona aire caliente circulando continuamente en torno a los alimentos; los alimentos se cocinan más uniforme y en ciertos casos, más rápido. POSICIONES DE L S B NDEJ S CORREDIZ S Las parrillas corredizas pueden ser colocadas en 4 posiciones. El horno cuenta con carriles superiores e inferiores; la parrilla también puede ser invertida para 2 posiciones adicionales (E). -
Page 16: P R Rostiz R
P R ROSTIZ R (G): 1. Inserte el extremo puntiagudo del espetón a través de uno de los tenedores, con los extremos puntiagudos del tenedor orientados hacia el centro del espetón. Deslice el tenedor hacia el extremo cuadrado del espetón y apriete la tuerca. 2. Inserte el espetón en el centro del alimento a cocinar hasta quedar bien seguro. Consejo: Para mayor versatilidad, los tenedores para asar pueden ser doblados ligeramente para acomodar alimentos de diversa forma y tamaño. Procure no doblarlos demasiado para no dañarlos. 3. Deslice el segundo tenedor sobre el extremo puntiagudo del espetón, con los extremos puntiagudos orientados hacia el alimento. Continúe hasta que los tenedores queden bien seguros en el alimento. priete la tuerca alada. 4. Presione el botón del asador y permita que los alimentos giren una vuelta completa para asegurarse que los alimentos estén bien centrados y que no entren en contacto con los elementos de calentamiento superiores ni con la bandeja de hornear/asar (H). 5. Coloque la parrilla corrediza en la posición, “1”. Forre la bandeja de hornear/asar con papel de aluminio para facilitar la limpieza y recoger los jugos. 6. Siga las instrucciones de "Para Cocinar", pasos 1-4, página 25. Use el tiempo de asar sugerido en la guía provista, como también un termómetro de cocina. 7. Presione el interruptor del asador (Rotisserie) (J). 8. Para mejores resultados, bañe los alimentos durante los TIMER últimos 30 minutos de cocción. -
Page 17: P R Horne R
P R HORNE R Temperatura programada: 350˚F Tiempo programado: 30 minutos Posición de la parrilla: “2” carril inferior; parrilla hacia arriba Esta función es ideal para asar cacerolas, pasteles frescos o congelados, y para asar carnes o pollo. 1. Coloque la parrilla en el carril inferior orientada hacia arriba. 2. Presione el botón de hornear (Bake) (K). 3. La luz indicadora parpadea y uno tiene 5 SEGUNDOS TIMER P R PROCEDER. TEMP 4. La pantalla digital exhibe el tiempo programado. BAKE Para cambiar la temperatura, presione (▲) o (▼). TOAST BAGEL 5. Presione el botón del cronómetro; tiene 5 SEGUNDOS BAKE BROIL P R PROCEDER. -
Page 18: Boc Dillos Congel Dos
BOC DILLOS CONGEL DOS: (N) Temperatura programada: 400°F Tiempo programado: 6 minutos TIMER Posición de la parrilla: “2” carril inferior; parrilla hacia TEMP arriba o “3” carril superior, parrilla hacia abajo (consultar la FROZEN SNACKS ilustración página 25) BAGEL TOAST BAKE BROIL COOKIES PIZZA FROZEN POTATO SNACKS TIMER TIMER/TEMP CONV TOAST START/STOP ROTISSERIE PIZZ : (P) Temperatura programada: 400°F TIMER Tiempo programado: 20 minutos Posición de la parrilla: “2” carril inferior; parrilla hacia... -
Page 19: P R Tost R P N Y B Gels
• Después de cada uso, lave la bandeja de hornear y limpie el interior del horno con un limpiador no abrasivo y agua caliente. Demasiada acumulación de grasa produce humo. P R TOST R P N Y B GELS (T) Nivel programado: 4 (medio) Posición de la parrilla: “2” carril inferior; parrilla hacia arriba (consultar la ilustración página 25) La temperatura y el tiempo del horno vienen preajustados para un tostado de grado medio (ajuste 4). Use este para el primer ciclo de tostado y luego ajuste el control al gusto. Nota: La función B GEL tuesta el lado cortado y lo calienta ligeramente por fuera. 1. No es necesario precalentar el horno. 2. Coloque hasta 6 rebanadas de pan o 6 mitades de bagel (lado cortado hacia arriba) en la parrilla corrediza. TIMER TOAST 3. Cierre la puerta del horno. TEMP 4. Presione el botón Toast o Bagel. 5. La luz indicadora de funcionamiento parpadea y la TOAST BAGEL... - Page 20 T LL RINES CON J MÓN Y ESPIN C 8 oz (250ml) de tallarines anchos, cocidos y escurridos 1½ tazas (350ml) de jamón cocido 1 paquete (16 oz) (454g) espinaca congelada, descongelada y escurrida 1 lata (4,5 oz) (177ml) chiles verdes picados ¼ taza (50ml) de cebollinos rebanados 1 taza (250ml) requesón 1 taza (250ml) crema agria, ligera 1 cda (15ml) salsa inglesa ½ cdta (2ml) sal 4 rebanadas gruesas de tomate fresco 1 taza (250ml) queso, “Monterey Jack” Coloque la parrilla en la posición “2”. Precaliente el horno a 350˚F (175˚C). En un tazón grande, combine todos los ingredientes, exceptuando las rebanadas de tomate y el queso, “Monterey Jack”. Vierta la mezcla en un molde de hornear de 2 cuartos de galón (1,9 litros). Cubra y hornee por 45 minutos. Descubra; coloque las rebanadas de tomate por cima y rocíe el queso desmenuzado. Hornee otros 15 minutos hasta que la mezcla quede burbujeante y el queso empiece a dorar. Retire del horno y espere 5 minutos antes de servir. Rinde 6 a 8 porciones. C L B CINES ESTILO MEDITERRÁNEO 6 tazas (1,5 litros) de calabacines en rebanadas finas 1 taza (250ml) de cebolla picada 1 pimiento rojo, picado 3 dientes de ajo grande, picados 2 cdas (30ml) aceite de oliva 1 cda (15ml) orégano fresco o 1 cdta orégano seco 2 huevos, ligeramente batidos ½ cdta (2ml) sal ¼ cda (1ml) pimienta negra 1 taza (250ml) queso Monterey Jack, desmenuzado...
-
Page 21: Cuidado Y Limpieza
Ponga un juego de tenedores de asar en el extremo opuesto a la punta del espetón y asegúrelo con la tuerca alada. traviese el lomo de cerdo con el espetón de manera que los tenedores queden seguros en la carne. Coloque los otros dos tenedores en el espetón y asegúrelos en la carne. segúrese de centrar la carne en el espetón. te el lomo de cerdo con hilo de cocinar. En un tazón, combine el jengibre, la sal, pimiento de Jamaica, clavos y pimiento negra. Frote bien el cerdo. Inserte el extremo puntiagudo del espetón en el lado derecho del horno y coloque el lado izquierdo en el soporte del espetón. Coloque la parrilla orientada hacia abajo en los carriles inferiores. Coloque la bandeja de hornear/asar en la parrilla y debajo del lomo de cerdo. Presione el botón de hornear (Bake). El horno está preajustado a 350˚F (175˚C). Programe el cronómetro para 1½ horas. juste el control, “Rotisserie and Convection” a la posición de encendido (ON). Mientras tanto, cocine las cebollas en mantequilla hasta ablandar. gregue el resto de los ingredientes de la mermelada y lleve a un hervor. Cocine a fuego lento por 15 minutos o hasta espesar y dejar que se evapore casi todo el líquido. Mantenga caliente. Deje reposar el cerdo 5 minutos antes de servirlo. Sirva con la mermelada. Rinde 4 a 6 porciones. S DO DE C RNE DE RES 4 lb (1,8 kg) asado de res 1 cdta (5ml ) hierbas de Provincia 1 cdta (5ml) pimienta de ajo 1 cdta (5ml) de sal 8 patatas rojas pequeñas 8 oz (227ml) cebollas blancas pequeñas, peladas 8 oz (227ml) zanahorias pequeñas enteras 1 cdta (15ml) de aceite de oliva juste el horno a 325˚F (160˚C). Sazone el asado con hierbas, ajo y sal y colóquelo en la bandeja de hornear/asar. Coloque la parrilla en posición “1” y hornee por una hora. - Page 22 DETECCIÓN DE F LL S PROBLEM POSIBLE C US El aparato no calienta o deja de La toma de corriente no calentar. funciona o el horno está desconectado. La segunda tanda de tostado El control del grado de resulta muy oscura. tostado está a un nivel demasiado alto. Se forma humedad por dentro La cantidad de humedad en la puerta de vidrio durante varía entre un producto y el ciclo de tostado. otro según los productos; pan, bagels, pasteles etc. Los alimentos se sobre cocinan La temperatura y el tiempo o no se cocinan bien. de cocción pueden requerir reajuste. El aparato despide olor a Hay residuos de comida en comida quemada o humea la bandeja de recolección o cuando está en funcionamiento. en las paredes del horno. Los elementos calefactores Los elementos calefactores parecen no estar encendidos. funcionan intermitentemente durante el ciclo de cocción.
-
Page 23: Import Ntes Mises En G Rde
IMPORT NTES MISES EN G RDE Lorsqu’on utilise un appareil électrique, il faut toujours respecter certaines règles de sécurité fondamentales, notamment les suivantes. ❑ Lire toutes les directives. ❑ Ne pas toucher aux surfaces chaudes. Utiliser les poignées et les boutons. ❑ fin d’éviter les risques de secousses électriques, ne pas immerger le cordon, la fiche ni toute autre pièce non amovible de l’appareil. ❑ Exercer une étroite surveillance lorsqu’on utilise l’appareil près d’un enfant ou lorsque ce dernier s’en sert. ❑ Débrancher l’appareil lorsqu’on ne s’en sert pas et avant de le nettoyer. Le laisser refroidir avant d’y ajouter ou d’en retirer un accessoire. ❑ Ne pas utiliser un appareil dont la fiche ou le cordon est abîmé, qui présente un problème de fonctionnement, qui est tombé par terre ou qui est endommagé. Retourner le produit au centre de service de la région pour qu'il y soit examiné, réparé ou réglé électriquement ou mécaniquement. Ou composer le numéro sans frais approprié indiqué sur la page couverture du présent guide. ❑ L’utilisation d’accessoires non recommandés par le fabricant présente des risques de blessures. ❑ Ne pas utiliser l’appareil à l’extérieur. ❑ Ne pas laisser pendre le cordon d’une table ou d’un comptoir, ni le laisser entrer en contact avec une surface chaude. ❑ Ne pas placer près ou sur une cuisinière au gaz ou à l’électricité chaude, ni dans un four réchauffé. ❑ Déplacer avec une extrême prudence un appareil renfermant de l'huile chaude ou tout autre liquide chaud. -
Page 24: Comprendre Le Fonctionnement De L' Pp Reil
COMPRENDRE LE FONCTIONNEMENT DE L’ PP REIL C R CTÉRISTIQUES PRINCIP LES CONVECTION MINUTERIE RÔTISSOIRE RÔTISSAGE PIZZA CUISSON 1. Poignée de la porte 2. Témoin de fonctionnement ffichage numérique 4. Tableau de commande électronique (voir la figure B) 5. Interrupteur marche/arrêt (I/O) de la rôtissoire †6. -
Page 25: Utilis Tion
Utilisation L’appareil est conçu pour une utilisation domestique uniquement. TTENTION THIS OVEN GETS HOT. WHEN LE FOUR DEVIENT CH UD LORSQU’IL IN USE, ALWAYS USE OVEN EST EN M RCHE. TOUJOURS UTILISER DES MIT INES DE CUISINE OU MITTS OR POT HOLDERS DES POIGNÉES POUR TOUCHER WHEN TOUCHING ANY OUTER LES SURF CES EXTÉRIEURES OU... -
Page 26: Ét Pes De Cuisson
ÉT PES DE CUISSON Pour débuter la cuisson, il faut appuyer sur une série de boutons (figure F). 1. Sélectionner le type d’aliment à cuire : l’affichage numérique indiquera la température programmée. Dès que le voyant lumineux commence à clignoter, VOUS DISPOSEZ DE TIMER 5 SECONDES POUR F IRE VOTRE CHOIX. TEMP 2. Pour modifier la température, appuyer sur (▲) ou (▼). Note: • ppuyer brièvement sur le bouton pour changer la température, TOAST BAGEL 5 degrés à la fois. BAKE BROIL • Maintenir le bouton enfoncé pour changer la température par COOKIES PIZZA tranches de 25 degrés. -
Page 27: Guide De Cuisson À L Rôtissoire
GUIDE DE CUISSON À L RÔTISSOIRE QU NTITÉ TEMPÉR TURE LIMENT M XIM LE DE CUISSON À CUIRE 1,58 kg Poulet 350˚F (175˚C) (3½ lb) Rôti de 1,36 à 2,26 noix de 325˚F (160˚C) 1½ à 2 heures ronde (3 à 5 lb) Longe de 1,13 à 1,81 porc avec 325˚F (160˚C) 1½ à 2 heures ou sans (2½ à 4 lb) Petites 0,90 à 1,36 côtes 325˚F (160˚C) 1½ à 2 heures levées de (2 à 3 lb) -
Page 28: Cuisson P R Convection
CUISSON P R CONVECTION (figure L) Pour la cuisson par convection, le four utilise un ventilateur interne pour diffuser la chaleur de façon uniforme pendant la cuisson. Vous pouvez choisir la cuisson par convection à tout moment après avoir sélectionné le mode cuisson. Le symbole du ventilateur s’affichera à l’écran. Note: Certains aliments cuiront plus rapidement en mode convection; vérifier le temps de cuisson. FONCTIONS DE CUISSON D’ LIMENTS SPÉCI LISÉES Ces fonctions vous permettent de faire cuire des aliments à des températures et avec des temps de cuisson préprogrammés selon les aliments les plus populaires TIMER 0:30 de chaque catégorie. Vous pouvez également régler la température et le temps de cuisson de chaque catégorie TEMP à votre gré. Pour cuire ces aliments par convection, utiliser le mode cuisson et modifier la température et le temps de cuisson à votre gré. TOAST BAGEL 1. ppuyer sur le bouton correspondant à l’aliment à cuire BROIL BAKE (voir ci-dessous). COOKIES PIZZA 2. Dès que le voyant lumineux commence à clignoter, CONV FROZEN POTATO... -
Page 29: Fonction Pomme De Terre
Fonction POMME DE TERRE: (Figure Q) Température programmée: 400°F (205˚C) TIMER Temps de cuisson programmé: 45 minutes TEMP Position de la grille: no 2, dans la rainure inférieure et la POTATO grille en position vers le haut (voir l’illustration page 44) BAGEL TOAST BAKE BROIL COOKIES PIZZA FROZEN POTATO SNACKS TIMER TIMER/TEMP CONV TOAST START/STOP ROTISSERIE Fonction GRILL GE (Figure R) Température programmée: 450°F (230˚C) TIMER Temps de cuisson programmé: 20 minutes... -
Page 30: Recettes
7. ppuyer sur le bouton Start/Stop (marche/arrêt) pour commencer le grillage. 8. À la fin du cycle de grillage, le four émet un bip et s’éteint. Note: Par souci de commodité, l’appareil se souvient toujours du dernier réglage choisi, à moins qu’il n’ait été débranché. Conseil pour optimiser le grillage en cas de cycles consécutifs : Pour obtenir les meilleurs résultats lorsque vous procédez à des cycles d’utilisation consécutifs, permettez à l’appareil de refroidir brièvement entre chaque cycle de grillage. RECETTES POULET GRILLÉ À L’ SI TIQUE Poulet à rôtir de 1,58 kg (3½ lb) Huile d’olive Sel et poivre ¾ tasse (175 ml) de confiture d’ananas et d’abricots ¼ tasse (50 ml) d’oignon vert haché finement 1 c. à table (15 ml) de gingembre frais, râpé 2 grosses gousses d’ail, émincées 2 c. à table (30 ml) de graines de sésame grillées 2 c. à table (30 ml) de sauce soya faible en sodium 1 c. à table (15 ml) de vinaigre de riz Placer une fourchette à l’extrémité opposée à la pointe de la broche, et la maintenir solidement en place en resserrant l’écrou à oreilles. Insérer la broche à travers le poulet jusqu’à ce que la fourchette soit bien insérée dans la viande. Placer la deuxième fourchette sur la broche et la fixer solidement dans le poulet. S’assurer que le poulet est positionné au... - Page 31 C SSEROLE DE NOUILLES U J MBON ET UX ÉPIN RDS 8 onces (250 ml) de nouilles aux œufs larges, cuites et égouttées 1½ tasses (375 ml) de jambon cuit, en dés 1 paquet de 16 onces (454 g) d’épinards congelés, dégelés et essorés pour en retirer l’eau 1 boîte de 4½ oz (177 ml) de piments verts hachés ¼ tasse (50 ml) d’oignon vert tranché 1 tasse (250 ml) de fromage cottage 1 tasse (250 ml) de crème sûre légère 1 c. à table (15 ml) de sauce Worcestershire ½ c. à thé (2 ml) de sel 4 tranches épaisses de tomate fraîche 1 tasse (250 ml) de fromage Monterey Jack râpé Placer la grille en position no 2. Préchauffer le four en mode Cuisson et Convection à 350°F (175˚C). Dans un grand bol, mélanger tous les ingrédients, à l’exception des tranches de tomate et du fromage Monterey Jack. Verser dans un plat à cuire peu profond de 2 pintes (1,9 litres). Couvrir et cuire pendant 45 minutes. Découvrir, placer les tranches de tomates sur le dessus et parsemer du fromage râpé. Cuire 15 minutes de plus, jusqu’à ce que le mélange bouillonne et que le fromage commence à dorer. Retirer du four et laisser reposer 5 minutes avant de servir. Donne de 6 à 8 portions. C SSEROLE DE COURGETTES MÉDITÉR NÉENNE 6 tasses (1,5 litres) de courgettes coupées en tranches minces 1 tasse (250 ml) d’oignon haché 1 gros poivron rouge haché 3 grosses gousses d’ail émincées 2 c. à table (30 ml) d’huile d’olive 1 c. à table (15 ml) d’origan frais haché ou 1 c. à thé (5 ml) d’origan séché...
-
Page 32: Entretien Et Nettoyage
LONGE DE PORC RÔTIE VEC M RMEL DE D’ BRICOTS Longe de porc sans os de 2½ lb (1,13 kg) 1 c. à thé (5 ml) de gingembre râpé 1 c. à thé (5 ml) de sel ¼ c. à thé (1 ml) de piment de la Jamaïque moulu ¼ c. à thé (1 ml) de clou de girofle moulu ¼ c. à thé (1 ml) de poivre noir M RM L DE : 2 c. à table (30 ml) de beurre ou de margarine 2 gros oignons coupés en lanières (environ 4 tasses) 1 tasse (250 ml) d’abricots séchés tranchés 1 c. à table (15 ml) de sucre 1 c. à table (15 ml) de gingembre râpé 1 c. à table (15 ml) de zeste d’orange râpé ½ c. à thé (2 ml) de sel ¼ c. à thé (1 ml) de poivre noir 2 tasses (500 ml) de bouillon de poulet 1 tasse (250 ml) de jus d’orange frais ¼ tasse (50 ml) de vinaigre balsamique Placer une fourchette à l’extrémité opposée à la pointe de la broche, et la maintenir solidement en place en resserrant l’écrou à oreilles. Insérer la broche à travers la longe de porc jusqu’à ce que la fourchette soit bien insérée dans la viande. Placer la deuxième fourchette sur la broche et la fixer solidement dans la viande. S’assurer que la longe de port est placée au centre de la broche et bien équilibrée. À l’aide de ficelle, attacher la longe de porc pour qu’elle soit solidement retenue. Dans un petit bol, mélanger le gingembre, le sel, le piment de la Jamaïque, le clou de girofle et le poivre. Frotter ce mélange uniformément sur la longe de porc. Insérer la pointe de la broche dans la paroi droite du four et placer l’extrémité gauche de la broche dans le support. Placer la grille sur les rainures inférieures, la grille en position vers le bas. Placer la lèchefrite sur la grille, sous la longe de porc. ppuyer sur le bouton... -
Page 33: Dép Nn Ge
DÉP NN GE PROBLÈME C USE POSSIBLE L’appareil ne chauffe pas ou La prise de courant est cesse de chauffer. défectueuse ou le four n’est pas branché. Le deuxième grillage est trop Le four est réglé à un degré foncé. de grillage trop foncé. Une buée se forme à l’intérieur La quantité d’humidité de la porte en verre pendant le présente varie selon les grillage. produits, que ce soit du pain, des bagels ou des pâtisseries congelées. Les aliments sont trop ou pas La température et le temps de assez cuits. cuisson doivent possiblement être réglés. Il y a une odeur d’aliments Il peut y avoir des restes brûlés ou de la fumée lorsque d’aliments dans le plateau à le four fonctionne. miettes ou sur les parois du four. Les éléments chauffants ne Les éléments chauffants semblent pas fonctionner. s’allument et s’éteignent pendant la cuisson. -
Page 34: Need Help
NOTES/NOT S NEED HELP? For service, repair or any questions regarding your appliance, call the appropriate 800 num- ber on cover of this book. Please DO NOT return the product to the place of purchase. lso, please DO NOT mail product back to manufacturer, nor bring it to a service center. You may also want to consult the website listed on the cover of this manual. One-Year Limited Warranty ( pplies only in the United States and Canada) What does it cover? • ny defect in material or workmanship provided; however, pplica’s liability will not exceed the purchase price of product. For how long? • One year after date of purchase. What will we do to help you? • Provide you with a reasonably similar replacement product that is either new or factory refurbished. - Page 35 ¿NECESIT YUD ? Para servicio, reparaciones o preguntas relacionadas al producto, por favor llame al número del centro de servicio en el país donde usted compró su producto. NO devuelva el producto al fabricante. Llame o lleve el producto a un centro de servicio autorizado. DOS ÑOS DE G R NTÍ LIMIT D (No aplica en México, Estados Unidos o Canadá) ¿Qué cubre la garantía? • La garantía cubre cualquier defecto de materiales o de mano de obra. pplica no se responsabiliza por ningún costo que exceda el valor de compra del producto. ¿Por cuánto tiempo es válida la garantía? • Por dos años a partir de la fecha original de compra. ¿Cómo se puede obtener servicio? • Conserve el recibo original de compra.
- Page 36 Póliza de Garantía (Válida sólo para México) Duración pplica de México, S. de R. L. de C.V. garantiza este producto por 2 años a partir de la fecha original de compra. ¿Qué cubre esta garantía? Esta Garantía cubre cualquier defecto que presenten las piezas, componentes y la mano de obra contenidas en este producto. Requisitos para hacer válida la garantía Para reclamar su Garantía deberá presentar al Centro de Servicio utorizado la póliza sellada por el establecimiento en donde adquirió el producto. Si no la tiene, podrá presentar el comprobante de compra original. ¿Donde hago válida la garantía? Llame sin costo al teléfono 01 800 714 2503, para ubicar el Centro de Servicio utorizado más cercano a su domicilio en donde usted podrá encontrar partes, componentes, consumibles y accesorios. Procedimiento para hacer válida la garantía cuda al Centro de Servicio utorizado con el producto con la póliza de Garantía sellada o el comprobante de compra original, ahí se reemplazará cualquier pieza o componente defectuoso sin cargo alguno para el usuario final. Esta Garantía incluye los gastos de...
- Page 37 Sello del Distribuidor: Fecha de compra: Modelo: Date Code Marca registrada de The Black & Decker Corporation, Towson, Maryland, E.U. Marque de commerce déposée de la société The Black & Decker Corporation, Towson, Maryland, É.-U. R12007/1-24-79E/S/F Printed on recycled paper. Impreso en papel reciclado. Imprimé sur du papier recyclé. is a trademark of The Black & Decker Corporation, Towson, Maryland, US Copyright © 2007-2008 pplica Consumer Products, Inc. Fabricado en la República Popular de China Fabriqué en République populaire de Chine Imprimé en République populaire de Chine Comercializado por: pplica Manufacturing S. de R.L de C.V Presidente Mazaryk No111, 1er Piso Col. Chapultepec Morales, Mexico D.F Delegacion Miguel Hidalgo Servicio y Reparación Col. Centro, C.P. 06050 Deleg. Cuauhtemoc Servicio al Consumidor, Venta de Refacciones y ccesorios Made in People’s Republic of China...
Need help?
Do you have a question about the CTO7100B and is the answer not in the manual?
Questions and answers