Table of Contents
Advertisement
Quick Links
Advertisement
Table of Contents

Related Manuals for Insportline IN 2812


Summary of Contents for Insportline IN 2812
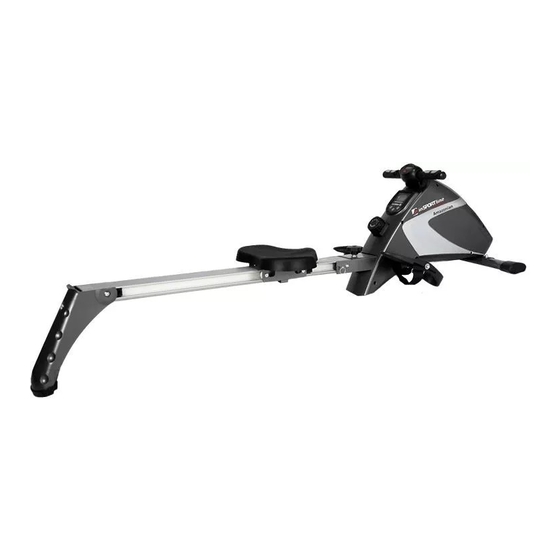
- Page 1 USER MANUAL – EN IN 2812 Rowing Machine inSPORTline Amazonian...
-
Page 2: Table Of Contents
CONTENTS SAFETY PRECAUTIONS........................EXPLODED DIAGRAM ........................... PARTS LIST ............................ASSEMBLY ............................. FOLDING ..............................RESISTANCE ADJUSTMENT ........................ EXERCISES ............................10 TROUBLE SHOOTING ......................... 13 MAINTENANCE ............................ 13 EXERCISE COMPUTER ........................13 FUNCTION BUTTON ......................... 13 FUNCTIONS ............................13 FUNCTION ............................14 ENVIRONMENT PROTECTION ...................... -
Page 3: Safety Precautions
SAFETY PRECAUTIONS • Keep this manual for future use. • Ask your physician before your training. You should ask about possible problems connected with training program. • Read all instructions. Instructions are written for safety of user and protection of the product. •... -
Page 4: Exploded Diagram
EXPLODED DIAGRAM... -
Page 5: Parts List
PARTS LIST DESCRIPTION DESCRIPTION Rower Frame Cushion Cover Cover for Rower Frame Nut(M10*1) Seat Nut(M10*1) Seat Bracket Fly wheel Front End Cap Fixing Bolt (φ9.5*115) Curved Washer(φ8) Rear Stabilizer Main Frame Screw (ST4.2*10F) Front Stabilizer Rear End Cap Carriage Bolt (M8*50) End Cap Axle for Pedal Roller1(φ28*48) -
Page 6: Assembly
Handlebar Wheel for Seat Adjustment Knob(M10*55) Fixing Bolt Tension Knob Clip Nut(M10) Computer for Handlebar Upper cover for handlebar's Washer (φ10) 70-1 computer Low cover for handlebar's Upper Wire 70-2 computer Rubber Pad 70-3 Hand pulse Lower Wire 70-4 Bolt Cross screw (ST2.9*10) Cross screw (ST3.5*30) Pivot... - Page 7 Step 2 Attach the seat bracket (4) to the underside of the seat (3) using the four Washer φ8 (22) and Screw M8*15 (23). Step 3 Connect upper wire (34) with Computer (12) then attach computer to the Main Frame (45). Step 4 Attach the front stabilizer (46) to the underside of the Main Frame (45) using the two Carriage Bolt M8*50 (47), Curved Washer φ8 (44) and S Nut (M8) (14).
- Page 8 Step 5 Insert the Axle for Pedal (48) to the Main Frame (45), cover the Plastic Bushing (18), pedal (17) and bigger Washer φ8 (15) in order. Then fix tightly by lock Nut M8 (14). Step 6 Attach rower frame (pt.48) to the main frame (45), connect upper wire (34) with lower wire (36). Fix them tightly by Pivot (20) and Bolt (24), then insert Pull Pin (21), at last tight tighten adjustment knob (30).
-
Page 9: Folding
FOLDING Unscrew the adjustment knob (30) from the mainframe (45) and remove the pull pin (21), then pull the rower frame (1) in towards the main housing unit and replace the pull pin to keep the rower in a folded position. -
Page 10: Exercises
EXERCISES Using your MAGNETIC ROWING MACHINE will provide you with several benefits. It will improve your physical fitness, tone your muscles and, in conjunction with a calorie-controlled diet, help you lose weight. The Warm-Up Phase This stage helps get the blood flowing around the body and the muscles working properly. It will also reduce the risk of cramp and muscle injury. - Page 11 Rowing is an extremely effective form of exercise. It strengthens the heart and improves circulation as well as exercising all the major muscle groups; the back, waist, arms, shoulders, hips and legs. The Exercise Phase This is the stage where you put the effort in. After regular use, the muscles in your legs will become more flexible.
- Page 12 Alternate Rowing Styles. Arms Only Rowing This exercise will tone muscles in your arms, shoulders, back and stomach. Sit as shown in Pic 4 with your legs straight, lean forward and grasp the handles. In a gradual and controlled manner lean back to just past the upright position continuing to pull the handles towards your chest.
-
Page 13: Trouble Shooting
TROUBLE SHOOTING Computer not working correctly. If your computer is not working correctly, please check whether the lower wire is connected to the upper wire, and make sure that the upper wire is connected to the computer. If you have checked for the above, and the computer still not working, then please make sure the batteries are still working and are installed correctly in the computer. -
Page 14: Function
FUNCTION BUTTON Press to have handgrip heart rate figures display on the monitor. FUNCTION PULSE The monitor will display the user's heart rate while exercising. you will see your current heart rate (bpm) display on the LCD during exercising. when you start to exercise, you must hold on grips with both hands, after 30 seconds to max. - Page 15 Warranty Conditions Warranty Period The Seller provides the Buyer a 24 months Warranty for Goods Quality, unless otherwise specified in the Certificate of Warranty, Invoice, Bill of Delivery or other documents related to the Goods. The legal warranty period provided to the Consumer is not affected. By the Warranty for Goods Quality, the Seller guarantees that the delivered Goods shall be, for a certain period of time, suitable for regular or contracted use, and that the Goods shall maintain its regular or contracted features.
- Page 16 Office: Ruse, "TEC Iztok" 20 Street Phone: 0894 566 060 E-mail: office@yako.bg Web: www.yakosport.eu www.insportline.bg...
Need help?
Do you have a question about the IN 2812 and is the answer not in the manual?
Questions and answers